
This post is sponsored by Minwax. I'll be showing you how to build a tabletop!
My dining room has changed over the years. Probably the only thing that has stayed is the dining table. It was given to us by some dear friends when we lived in Las Vegas and we love it. It has beautiful legs and has fit well in our small dining nook. A year and a half or so ago I built a larger top that fit over the original top. It has been nice having a larger top since my boys have gotten bigger, but I didn't like the edge coming down so far. I know this is going to sound like a silly reason, but trying to wipe crumbs into your hands when wiping the table is a lot harder with the edge that way. Plus it made it so you didn't see the legs as much and they are the biggest reason we love this table. This time when I built a new top, I removed the original top all together (it's safe in our garage) and built a new top for the legs. It is easier than you might think to build a tabletop!
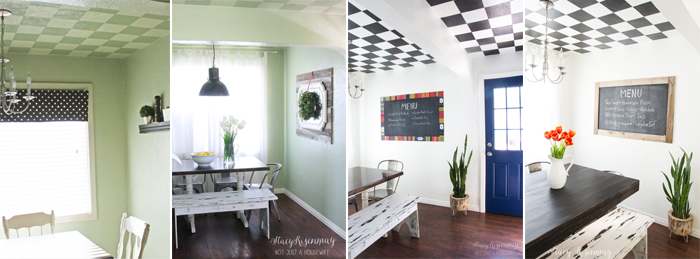
I think I finally found the right combination of color and size. This is the perfect table for our little dining nook!


Supplies:
1x4 Boards
2x2 Boards
Kreg Jig
Pocket Screws
Screwdriver or Drill
100 grit & 250 grit Sandpaper
Polyurethane
Foam Brush
Bristle Brush For Polyurethane
Build the Tabletop
Step 1: Cut the 1x4 boards to the length you want your tabletop to be, taking into account that the 2x2 border will add three inches to the length and width. Cut as many as you need to get the width you want. Our dining nook is small so our table ended up being 54 inches by 38 inches.
Step 2: I drilled pocket holes and used pocket screws to join the 1x4 boards together. They also connected the 2x2 that went around the border.

Step 3: I sanded the table with 100 grit sandpaper then finished off by hand sanding it with 220 grit. You need to make sure you finish with a fine grit sandpaper to eliminated and lines created but heavier grit sandpapers and sanders.
Stain the Tabletop
Step 4: Once it is sanded and the dust has been wiped off with a damp rag, apply a wood conditioner. If you are going to use an oil based stain, use and oil based conditioner. If you want to use a water based stain, there is a water based conditioner as well. Follow the directions on the can and wait the appropriate time before applying the stain.

Step 5: Stain the wood with your choice of color. I wanted the tabletop to go with the reclaimed wood surrounding the giant chalkboard so I chose Weathered Oak by Minwax. I have used it many times before and knew it would be perfect! The more coats you put on, the darker the color. I ended up applying two coats.

I like to use foam brushes to apply the stain.

Seal the Tabletop
Step 6: Once the stain has completely dried, it is time to brush on the polyurethane. Use a good quality brush that is meant for oil based polyurethane.

Once the polyurethane has dried completely, sand it using a fine grit sandpaper. When wood gets stained and sealed it can raise the grain and make it feel rough. Sanding it smooth it not feel rough and helps the second coat of sealer to adhere. Sand in between each coat. A tabletop needs at least two coats but three is best.


I also sanded down the top of my bench and stained it to match the table. The legs on the table and bench got a fresh coat of white paint. I love the whole look!

Springtime makes me think of gardening. I picked up some potted herbs to keep in my kitchen until I can plant some in my garden. They made the perfect addition to the spring tablescape.

White walls, lots of greenery, and warm wood tones together is my favorite combination. The Weather Oak color is perfect!

The large window lets in plenty of light. It is one of my most favorite sunny spots in the whole house.

I feel like I have finally have my dining room where I want it to be and it is bright and fresh! I am glad I kept trying and that I built a tabletop that will work for the space and my family.
Do you have a dining table that you love?
This post was sponsored by Minwax but all the ideas and opinions are all mine.


Great job, beautiful table!
Great job on this redo. The room looks so fresh. Please tell me about the dinnerware (brand, name, etc.). thanks
Thanks! The silverware and plates are both from the Better Homes and Gardens line at Walmart :)
Wow! I didn't realize how much of a difference this would make, but I really can see the legs of the table so more clearly! The color of the table is a nice contrast with the white! What a great job you did on this new table top! Everything looks lovely! I especially love the greens on the table!!! Everything here is still in slow mo! I even saw piles of snow when I went to town yesterday! Yuck! So bring on all the green!!! Yay!
That looks super good, we need a new table!
This is great, I was wondering how to switch up the table in my kitchen for a while now.
Great table top change and the finishing. Use the pre-stain condioner ---use this...great control of the tone. Love this site. PV