
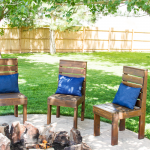
We have lived in this home almost 11 years without having a seating area. I feel kind of sheepish admitting this, but when we entertained outdoors we would bring out the collapsible camp chairs from the garage and the dining room chairs from inside. We finally have an outdoor seating area! We created a DIY paver patio.
Before we added the patio this, ladies and gents, was the view awaiting our guests.
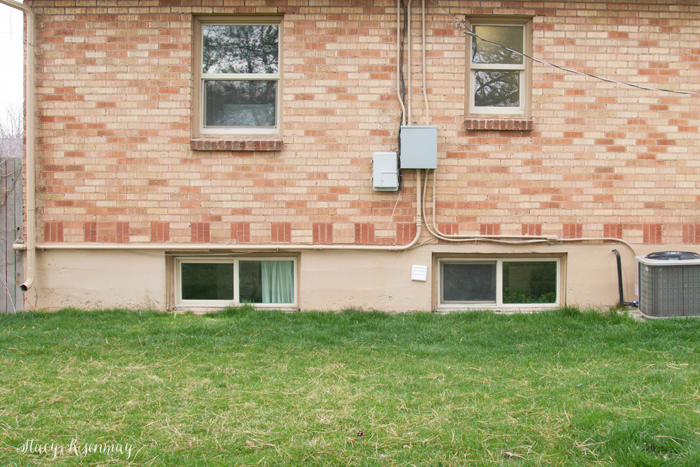
Shane and I have always planned on doing a patio. We have debated over the years whether to do pavers, concrete, pea gravel, or a wood deck. We ultimately went with pavers because I think they are the prettiest option and we wouldn't have to worry about weeds growing up through it like a deck or pea gravel.
Hello beautiful!

The whole family worked on this project and I love seeing how proud the boys are of their work. They dug, spread gravel and sand, and cheered me on as I laid the hundreds of pavers clear into the night.

I think my favorite view is it at night. The string lights give such a warm glow.


I have the full tutorial and details about the products used in my DIY paver patio over on the Home Depot blog. If you still have any questions about this project, feel free to comment below and I will get right back to you!
This is a project that I would do all over again. Some projects I get done with and think "I am am so glad I am done and I don't have to do that again!" But this was easier than I expected and quite fun. Have you ever laid pavers?
I'll have a post up this week with all the details of the planter wall that hides the electrical boxes. Stay tuned!
UPDATE:
Here is the post on how I made the sliding wall to hide the electrical!


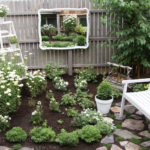


Is that vertical planter really hiding all the electrical/other wiring? I love it!! I also love what you did with your A/C, to hide that as well. Your before is how my east end of the house looks, sad! But you have given me inspiration!
Love this simple but BEAUTIFUL patio. We have been going over ideas for a space like yours since we moved to our "fixer-upper" four years ago. Thanks for sharing.
Great job! You should be proud. And the family also! I love it!
Beautiful Job! Looks so lovely at night especially.
Stacy...Looks wonderful!...Although my knees hurt, just looking at all the bricks, on the ground!...
I love this! But I can't find anything on the Home Depot blog. ?
Ack! I know. It was supposed to be on there yesterday so they said to go ahead and post on my blog but then it got pushed back. Hopefully tomorrow!
Here's the link! http://blog.homedepot.com/install-paver-patio/
This looks amazing! I can hardly believe it's the same space!!! I do have one question? How are your lights being held up??? I see how lovely they look at night and yet I keep wondering how you magically keep them aloft!!! :-) Silly, I know, but I really am curious! <3
They are clipped to the edge of the gutter and then they are tied to the pine tree across from the patio. It worked pretty well! I want to get more lights so it spreads out more instead of just in the center.
I'm so impressed. It looks fabulous--really professional. I'm guessing that there will be zero maintenance on this patio other than an occasional sweeping. A wood deck needs upkeep, and pea gravel would have been a whole other experience to walk across and put furniture on. This looks so solid and permanent. I'm always awed and inspired by what you accomplish, and your finishing touches as a decorator are fabulous.
Wow Stacy, it turned out simply gorgeous! Love the pavers you chose, love the flower boxes, love the lights. Love everything! Hope you have actually had time to relax and enjoy the space. :)
Amazing patio! We have a similar space right in front of our basement windows that I have been wanting to transform so I am pinning this post for inspiration to my porch and patio board.
The patio looks awesome and I love the vertical planter that hides all the house utilities. You all did a great job and it's perfect timing to enjoy for the spring/summer.
The seating area looks so nice! It is very inviting!
Looks amazing! How big is the patio? And how much of each of the materials did you use? Thank you!
Hello. I love the space you created! Can you share a link to the blog post detailing your project? When I click on the Home Depot link above, it just goes to the main blog, and a search for DIY paver patio isn't bringing up anything that looks like yours. Thanks!
I found it!https://www.homedepot.com/c/ap/how-to-install-a-paver-patio/9ba683603be9fa5395fab901c57fe7d8
I'll update the link in the post as well :)
Thank you! :)
Hi Stacey, I fell in love with this project! I found it on the Home Depot website. I have a similar space. But not sure how to take the measurements to know how many of the pavers do I need not to have to cut them. Can you please share with me how you did yours? It would be helpful to have real measures as a guidance. Thanks
Thank you! We have really enjoyed having an outdoor seating area. As far as the measurements go, I figured out how large I wanted the patio (16 feet wide by 12 feet deep) and times those two together to get 192 square feet. The product description for the pavers said that one pallet covered 98 square feet. so I ordered 2 pallets (196 square feet). I also chose a simple pattern that would make it possible to not have to make cuts. A herringbone pattern. would have been beautiful, but would have required a lot of cutting! I hope that helps!