Stacy Risenmay

Do-it-yourself projects and Home Decor

  • Home
  • About me
  • Our House
  • Project Gallery
  • PRESS
  • Contact Me
  • Videos
  • My Book

Old Door Privacy Screen

By Stacy 93 Comments

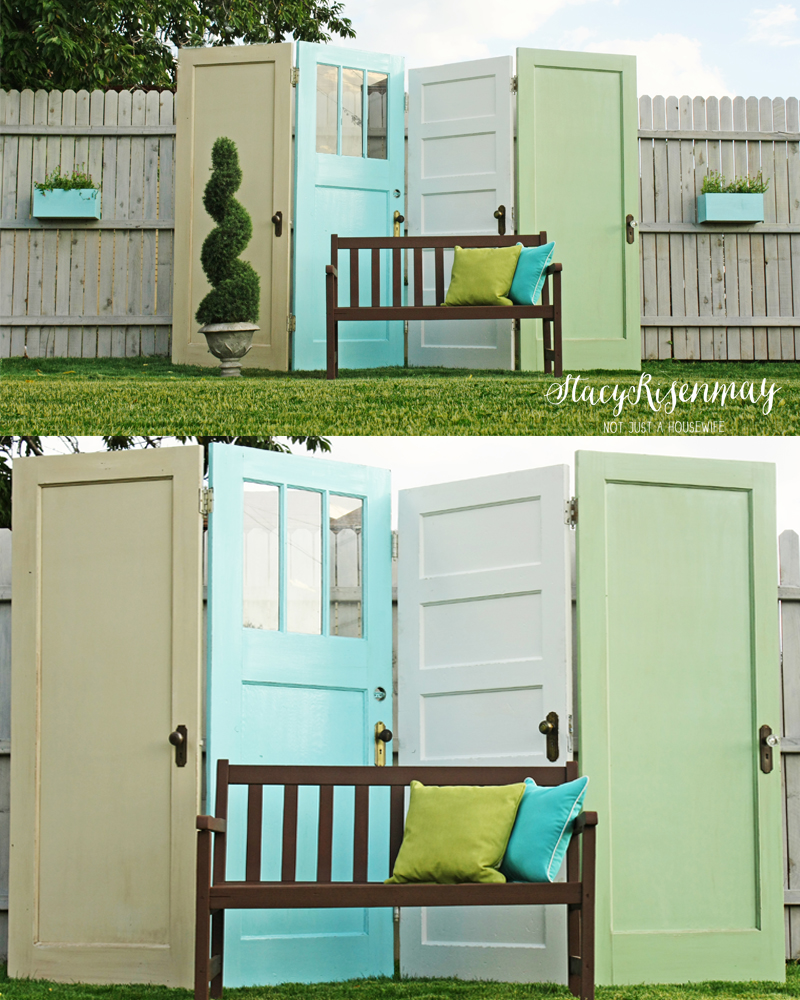
I am SUPER excited to show you my last project from the Outdoor Spaces Event!!! I think it is my favorite :) I used old doors that came from my 1938 home to build a screen.

I painted them the same colors as the flower pots and chairs. (Krylon’s Blue Ocean Breeze, Almond, Pichatio, and white) I have not sealed these yet but I will use Minwax’s Helmsman.

I have this screen set up on my grass because we don’t have our patio/pergola built off the back of our house  yet. I recommend that if you have painted items outside to first seal them, and then consider the placement of them carefully. You want them to last as long as possible. Keep things out of the direct spray of sprinklers. Under some sort of cover would be ideal. I also store all outdoor decor in my garage during the winter.

Also, when I put it in it final spot, I am going to find a way to anchor it to the back of my house. It is very sturdy, but I do have kids and you never know. I figure it is better to be safe than sorry.

Wouldn’t this be pretty as a backdrop for a wedding too? I just thought of that…

I am so excited to see what outdoor ideas you guys link up tomorrow! I am hanging out at Studio 5 today so I will post a clip later of my segment. Guess what I am talking about….

old door privacy screen

Pin It

You will also like:

  • Painted Placemats {Picnic Table Makeover}Painted Placemats {Picnic Table Makeover}
  • Pantry Makeover!!!Pantry Makeover!!!
  • Painting UpholsteryPainting Upholstery
  • Card Catalog Side TableCard Catalog Side Table
  • The final Secret Garden postThe final Secret Garden post
  • Gold Table {Makeover}Gold Table {Makeover}
  • Welcome to my secret garden….Welcome to my secret garden….
  • Outdoor Movie Theater SeatsOutdoor Movie Theater Seats

Subscribe to My Blog!

Filed Under: Favorites, Furniture, Home Decor, Outdoor Projects & Gardening, Painting 93 Comments

Comments

    Leave a Reply Cancel reply

    Your email address will not be published. Required fields are marked *

    This site uses Akismet to reduce spam. Learn how your comment data is processed.

  1. Inspire Me Heather says

    July 21, 2011 at 6:10 am

    How cool is that!!! Love it, you did a great job! The colours are fantastic and you “staged’ it very well!

    Reply
  2. Julie Buck says

    July 21, 2011 at 8:28 am

    Great idea. A bit late for me with keeping old doors, but I will try to talk someone else out of theirs.

    Reply
  3. Jennie Larsen says

    July 21, 2011 at 9:17 am

    LOVE LOVE LOVE. I love the planters on your fence and the hanging mason jars too. WELL DONE. winks-jen

    Reply
  4. Jenny@EvolutionofStyle says

    July 21, 2011 at 9:45 am

    I love this! Looks fantastic – great colors – great function.

    Reply
  5. Gloria says

    July 21, 2011 at 10:06 am

    I love the colors and that you left the door knobs on. So pretty and so many uses for them, indoor or outdoors.

    Reply
  6. Jo-Anna says

    July 21, 2011 at 10:25 am

    So fabulous! I love everything you’ve done in your yard! So pretty and fresh!
    Jo-Anna

    Reply
  7. Jamie says

    July 21, 2011 at 11:01 am

    OMG!! That looks amazing. I would love for you to stop by http://diyhshp.blogspot.com/ on Monday to link up your Privacy screen and any other projects you would like to share.

    Reply
  8. Colette says

    July 21, 2011 at 11:06 am

    Stacy, you never cease to amaze me! I wish I had one ounce of your creativity. I love this and hope I can find some doors to do this with. Thanks for sharing!

    Reply
  9. Catherine says

    July 21, 2011 at 11:12 am

    LOVE this idea! It looks great and the colors are awesome!

    Reply
  10. Laina says

    July 21, 2011 at 11:23 am

    Stacy, that is awesome! Want to fly over to Denmark and decorate for me?

    Reply
  11. Smallgood says

    July 21, 2011 at 11:28 am

    Yes, it would look perfect as wedding backdrop. It’s quite unique. The colors are sweet.

    Reply
  12. Kat Griffin says

    July 21, 2011 at 11:34 am

    very summery looking. the colors are fresh and crisp feeling I like it a lot
    KAT

    Reply
  13. Lauren@SimplyLKJ says

    July 21, 2011 at 12:05 pm

    That is so awesome! Love, love, love. And, the colors are gorgeous!! I could so see this as a backdrop for an out”door” wedding!

    Reply
  14. erica says

    July 21, 2011 at 12:35 pm

    ha! how clever and pastel!

    Reply
  15. danielle says

    July 21, 2011 at 12:48 pm

    amazing. i love it!!

    Reply
  16. beth says

    July 21, 2011 at 1:02 pm

    Love this, very cool and great color choices! Remind me of Miami Beach!
    Beth

    Reply
  17. Susan says

    July 21, 2011 at 1:36 pm

    A-DORABLE! Wow I love these doors… I can’t wait to see the rest!
    Susan

    Reply
  18. Ginger Snaps says

    July 21, 2011 at 3:16 pm

    So pretty. Love, love, love the colors. :)

    Ginger

    Reply
  19. Michelle at Faith, Trust, & Pixie Dust says

    July 21, 2011 at 3:17 pm

    I’m crazy about these beautiful doors! Love it!

    Warmly, Michelle

    Reply
  20. Rachel says

    July 21, 2011 at 3:28 pm

    That is wonderful. I think I may have to try this one.

    Reply
  21. Brittany says

    July 21, 2011 at 3:57 pm

    I love it!!! I just got an old door from a small town about 45 minutes away and I can’t wait to paint it. I have big plans for it. Love how yours turned out.

    Reply
  22. laxsupermom says

    July 21, 2011 at 4:12 pm

    Love this idea! I love how the doors are different, but cohesive, too. The colors you used are so fun! Thanks for sharing.

    Reply
  23. Christy says

    July 21, 2011 at 4:59 pm

    LOVE THIS! Fabulous idea!!

    Reply
  24. Amy @ Junkin' 4 Joy says

    July 21, 2011 at 9:59 pm

    Wonderful Idea. I love the colors. Blue Ocean Breeze is one of my favorite colors right now. I guess I will have to start looking for 2 more doors. I have 2 in the garage already!

    Reply
  25. Veronica says

    July 22, 2011 at 8:16 pm

    Love it Love it Love it!! I had to Pin it!!!!

    Reply
  26. Mary @ The Decorative Paintbrush says

    July 22, 2011 at 9:01 pm

    I’m so about recycling! This is just awesome! I love it! Cant wait to creep around the rest of your blog! Following you now over on FB!

    Reply
  27. Jen says

    July 22, 2011 at 10:12 pm

    Oh. My. Love. This is GORGEOUS! I love everything about it! Now I’m wishing I had enough garden space to make something like this for myself! :)

    Reply
  28. Ashley J @ mommybydaycrafterbynight.blogspot.com says

    July 23, 2011 at 7:25 am

    I adore this! I love that each door is a different style and different color! It looks so cute with the bench. I LOVE IT!!! Great job!!!

    xoxo, Ashley J

    Reply
  29. Kei @ Unfortunately Oh! says

    July 23, 2011 at 1:56 pm

    That is such a fantastic idea! It looks great, too!

    Reply
  30. TidyMom says

    July 24, 2011 at 8:16 am

    Stacy this is SOOO cute! and perfect timing, just yesterday I was in our basement looking at an old door we have down there and I told my husband I need to find another door and paint and hinge them together to make a screen for my laundry area!
    Now you’ve got me all excited to do it!!

    Reply
  31. Brittany says

    July 24, 2011 at 9:38 am

    Love it!

    Reply
  32. Holly says

    July 24, 2011 at 10:39 am

    I LOVE this! I have LOADS of old doors, and now I have a new idea for what to do with them!

    Reply
  33. Ellen says

    July 24, 2011 at 4:25 pm

    Love the privacy screen – the colors are so pretty! I wouldn’t be able to bring myself to take down the old doors in my house…. but I can definitely start watching around the neighborhood – there’s always a random house part or two put out at the street around here after a sunny weekend! :-) New follower to your blog – can’t wait to catch up on all of your projects!
    Ellen

    Reply
    • Stacy says

      July 24, 2011 at 4:31 pm

      Thank you! All the doors in my house are still the original ones. I just had extra because of tearing down a wall in the basement and from the garage. Our house, like most older homes, had a dorr for every room. A door to the kitchen a door to the hall. It was crazy how many doors our tiny house had! The previous owners took down a few too :) I hope you find some doors!!!

      Reply
  34. linda @ craftaholics anonymous says

    July 25, 2011 at 7:56 pm

    very fab! thumbs up!
    happy crafting,
    Linda

    Reply
  35. Heather {WhipperBerry} says

    July 25, 2011 at 8:27 pm

    Stacy my dear this is AMAZING!!

    kisses
    heather

    Reply
  36. amy gilman says

    July 26, 2011 at 10:43 pm

    I Just LOVE these. AWESOME choice of colors!! Looks fantastic! I would love for you to stop by and link them up at our link party going on now!!
    Thanks Amy
    http://www.SistersoftheWildWest.blogspot.com

    Reply
  37. LaDonna Loehrke says

    July 27, 2011 at 8:19 pm

    Love this idea! And will keep it in mind for when we get our porch finished. Thank you for sharing!

    Reply
  38. Rebecca Cooper says

    July 27, 2011 at 9:20 pm

    absolutely gorgeous! i adore the colors!! :)

    Reply
  39. Patty Apple says

    July 28, 2011 at 12:37 am

    I HAVE NO WORDS! THIS IS ABSOLUTELY FABULOUS! I had to share your blog on my facebook and I hope you do not mind! For years I have been trying to explain to my daughter the sort of screen that I wanted for my living room and here you are . . . WOW! Thank you for your talent and for sharing! No Words! Just incredible! Blessings!!!

    Reply
  40. Amy {The Idea Room} says

    July 28, 2011 at 11:26 am

    Oh. MY. Goodness! I love this!! It turned out so great! You are a true genius my friend!!

    Reply
  41. Esther says

    July 29, 2011 at 12:46 pm

    OMG what a wonderful idea! I’ve been thinking about a screen for my yard and this will be perfect! Thanks for sharing. Warm hugs, Esther

    Reply
  42. Thereasa Graagno says

    July 29, 2011 at 11:29 pm

    One word, ARTISTIC!!! I love it

    Reply
  43. abeachcottage says

    July 30, 2011 at 11:30 pm

    This is an adorable idea! Love how it looks.

    Reply
  44. Kitty says

    July 31, 2011 at 2:05 am

    Just featured you today!!!
    Check it out! http://threeyearsofdeath.blogspot.com/2011/07/feature-favs-4.html
    Love this project!!

    Reply
  45. Jenny @ DIY Newlyweds says

    August 3, 2011 at 8:45 pm

    This looks amazing! I love the bright colors you used!

    Reply
  46. MJ says

    August 19, 2011 at 10:37 pm

    So beautiful! I’d love to feature this on my “link love” post for tomorrow! :)

    Reply
  47. Kim@todayismysome-day says

    August 20, 2011 at 12:09 pm

    These are beautiful! eye-catching! original! All of the things we want our projects to be!

    Reply
  48. June Scott says

    August 22, 2011 at 5:52 pm

    What a fun screen idea, Stacy! Love the colors!

    Reply
  49. Kate says

    October 11, 2011 at 5:41 am

    What a great idea, that is SO cute!!

    Reply
  50. Lisa @ Creative Raisins says

    October 17, 2011 at 6:12 pm

    I came across your blog today and I love this idea, it is just so unique. The colors are perfect. Your newest follower.

    Lisa @ Creative Raisins

    Reply
  51. Danita Courtney says

    January 2, 2012 at 9:48 pm

    Thank you for sharing you wonderful creative ideas. I really appreaciate your tallent and enjoy looking at your finished products to see what I can do in my own home and environment to upcycle!

    Keep up the awesome work/fun you are having! The rest of will benifit in the long run and the Earth will defininatley be a better place. Thanks again!

    Sinserely,
    Danita Courtney from Midcoast Miscellany

    Reply
  52. Pam the Goatherd says

    January 10, 2012 at 7:23 am

    I’ve had this project in the back of my mind ever since I first saw it, but didn’t have any doors to work with. Saturday when I was at the dump recycling newspapers a guy drove in with a pick-up truck load of “junk” to dump that was topped off by a wood door with lots of character. He gladly loaded it into the back of my pickup for me. Now I just need to find three more…

    Reply
  53. Funky Junk Interiors says

    January 22, 2012 at 11:47 pm

    Gah… totally LOVE LOVE LOVE this! It’s so cheerful! I could see this being a fabulous windbreak as well.

    I’ve shared this on FJI Facebook and pinned for SNS 117. :)

    https://www.facebook.com/photo.php?fbid=10150588685826141&set=a.192514281140.164586.175378011140&type=1&theater

    Donna

    Reply
  54. Joy P says

    January 23, 2012 at 5:41 pm

    Great idea, privacy, colour, an area and old as well.

    Reply
  55. Kristi says

    March 31, 2012 at 7:43 pm

    I LOVE this!!! How is it holding up to the weather? Do you have to bring it inside during the winter or did you put something on it to protect it?

    Reply
  56. Laura@live-love-scrap says

    April 19, 2012 at 11:07 am

    this is so beautiful! love that you painted them all different colors! would be an awesome backdrop for family photos!

    Reply
  57. EmSue says

    April 22, 2012 at 5:09 pm

    I finally got four doors! Bought the hinges last weekend. Unfortunately, I have a “regular job” and won’t have time to put it together until next weekend. Then I’ll go scrounging for some cool doorknobs – the “jewelry” to put the finishing touch on it. I’m a little late getting to it, but when you love something, it’s never TOO late. And I do love this idea! Thank you!!

    Reply
  58. Cindy says

    February 4, 2013 at 8:42 am

    I have three french doors that I am wanting to make a screen to reduce the wind on our upper deck when we are BBQn or just hanging out. I want to keep a view, but stop the wind. My issue is keeping them from falling over because of the wind, and making them moveable without being an inconvenience. Any suggestions?

    Reply
  59. Jan says

    February 23, 2013 at 9:32 pm

    I just want to know how you secured the doors so they don’t fall over. I saw this photo and have bought some doors to do this. Did you secure them into the ground somehow. Please share. Thanks.

    Reply
  60. Jordan says

    March 21, 2013 at 1:55 pm

    What a cute idea! I have that same pot and twisted evergreen in my yard right now, and I love how alive and Spring-y yours looks. (I’m always afraid that evergreens will remind people of Christmas and only Christmas.) Thanks for the advice about sealing items after I paint them too. I plan on going on a painting spree very soon, and I’ll be glad that I found these tips!

    Reply
  61. Shannon@Hoybycrafts says

    April 9, 2013 at 5:20 pm

    I am in love with this ideas, and the color choices for the doors are awesome! Please consider following me and my blog at http://hoybycrafts.blogspot.com. Thanks for the fabulous idea!

    Reply
  62. Linda says

    September 18, 2014 at 1:22 pm

    I l like your doors. I was blessed last wk. my neighbor and friend came over; I was telling her about my butterfly bush. She came over and told me she would be back tomorrow to help !We help each other out but never to this extent. She has and “eye” and her yard is lovely. I have this huge butterfly bush I did not know what to do with. My hubby asked what to do, if it snows it is going to break. My answer was cut it down. So my friend I told her and she and I pruned and shaped and Wow! it is going to be fine for winter. Then we went bed to bed weeding, moving and removing plants. While I was weeding, she went around my garden beds and found my whimsical items and put them where she felt they gave an impact ! 8 hours later my garden was finished. Then we decorated my bristol table inside my pergola, and rearranged the patio furniture. It was fun , but I was tired by night time :0 Then I went out and finished the side yard a couple days ago.

    Reply
  63. Kristy says

    October 28, 2015 at 7:43 pm

    I was wondering how these have weathered over the years? I am wanting to build a fence from doors, but I wasn’t sure how do go about painting them. What should I do to seal them. I doubt they are 100% wood…

    Reply
  64. Carol says

    July 7, 2016 at 1:52 pm

    Obviously this is an older blog post, but maybe you’ll see this. I’m about to do the same thing with old wooden doors from my childhood home we tore down. They were all varnished at one point. I’m just wondering why type of paint you used….regular paint, spray paint etc. I have 6 regular wooden doors and about 3 smaller wooden doors that I am going to be playing with. Thanks.

    Reply
  65. LastHildegarde says

    January 14, 2018 at 10:06 pm

    I have noticed you don’t monetize your website, don’t waste
    your traffic, you can earn extra bucks every month
    because you’ve got hi quality content. If you want to know how to make extra
    money, search for: Mertiso’s tips best adsense alternative

    Reply
  66. Shelby L. says

    May 22, 2019 at 2:17 pm

    …I have a few old doors that i was thinking abut doing this, and happened across this site ….very nice. The one thing I dont ‘ get’ is why theres no description ( tutorial) on how you did this…I detest videos unless no other way to look at how its done, I was hoping you had a written post about how you did this. Ah well.

    Reply
  67. Paula says

    June 29, 2019 at 2:38 pm

    Did you use satin, matte or gloss paint? Thank you

    Reply
  68. maureen conner says

    January 13, 2020 at 11:38 am

    Did you hinge them together? how do you install them to keep them from blowing over?

    Reply
  69. ipl bhavishyavani says

    September 20, 2020 at 2:46 pm

    great

    Reply

Trackbacks

  1. Great Ideas — Summer Projects {2} says:
    September 1, 2011 at 12:19 am

    […]  Cool off with Italian Ice @ Tidy Mom Turn cast off doors into a Privacy Screen @ Not Just a Housewife Get the 411 on how to make Homemade Ice Cream Bowls @ Gluesticks Light and Bright Summer […]

    Reply
  2. Turn Old Closet Doors into an Outdoor Privacy Screen! says:
    June 28, 2012 at 8:05 am

    […] I was thinking about painting each door a different color. What do you think?? I can’t decide. And if you are looking for more planter box ideas, Kate @ Centsational Girl has made some beautiful ones on her blog. And another fun idea to do with old doors can be found from Stacy at Not Just a Housewife. […]

    Reply
  3. Feature Friday: Not Just a Housewife & The Shabby Nest - SNAP! Creativity says:
    July 13, 2012 at 12:52 am

    […] 1. Outdoor Privacy Screen 2. Scrap Wood Lamp 3. Mason Jar Wall Planter 4. Reclaimed Wood Shelves 5. Drive in Movie Cars […]

    Reply
  4. Creating the perfect backdrop for your wedding ceremony | Chair Flair says:
    September 5, 2012 at 11:24 am

    […] September 5, 2012 by Chair Flair  When planning a wedding, it quickly becomes obvious that a large amount of energy needs to be spent on the reception. It is the longer part of the celebration, it requires more decision-making and it’s where the most money goes. It is not uncommon for a bride to set up and realize that the ceremony could have used a few more decorations or details. Finding a just a few bold, unique elements to add to your ceremony can make a world of difference, without adding loads of extra work or money. A great thing to focus on is choosing the right backdrop for your vows. Here are some simple, lovely ideas! Floral decor doesn’t have to be stuck to arches or pillars, this soft, modern backdrop is breathtaking! We found it at BHLDN, but you could put one together yourself at a lower cost, or make it from paper (see below!). This cotton and paper flower garland can be crafted at home, or ordered from Etsy. This canvas backdrop is so sweet, and can be made to order with any quote (or if you are crafty, do it yourself!). The Etsy shop behind these banners is based in Calgary! Another banner style, we love the look of this one! This chalkboard is not backdrop size, but we think it would be awesome if it was! How cute to be standing in front of your own story as you begin your life together. Large chalkboards can be easily crafted with plywood and paint.Source: Delightfully Engaged And if you’re really handy with chalk, you can get as fancy as you’d like! So awesome!Source: Oh Lovely Day One chandelier can set the whole stage! You can rent one or track one down at a thrift store, depending on your budget. From vintage to blingy, chandeliers can fit any theme. If you really have some extra room in your budget, why not take it Hollywood? (See below) WOW. This is obviously gorgeous, and could certainly be done on a simpler scale with similar linens and colours.Source: Lavendar & Ash So simple. So cheap. Bohemian chic! Streamers can make a beautiful, flowing backdrop.Source: Ruffled How sweet, extra-long streamers as a runner.Source: Posh Bridal Finally, we have the aged window backdrop. These ones are hanging, but there are so many options here!Source: Style Me Pretty A similar look can be achieved with old doors, we’ve seen backdrops of aged, vintage doors, or doors coated in chalkboard paint, but we love this modern twist.Source: Not Just a Housewife […]

    Reply
  5. Great Ideas -- Summer Projects {2} says:
    November 7, 2012 at 3:41 am

    […]  Cool off with Italian Ice @ Tidy Mom Turn cast off doors into a Privacy Screen @ Not Just a Housewife Get the 411 on how to make Homemade Ice Cream Bowls @ Gluesticks Light and Bright […]

    Reply
  6. Bucket of a List. | Stars and Rainbows says:
    April 12, 2013 at 8:47 am

    […] & Pea Risotto 56. Visit Cinque Terre, Italy 57. Visit the Krka Waterfalls, Croatia 58. Make a room divider out of doors 59. Pitch a makeshift tent on the beach 60. Make some rainbow pasta 61. Do an engagement shoot with […]

    Reply
  7. Decorar com Portas Velhas | Recicla Design Brasil says:
    November 9, 2013 at 5:05 pm

    […] Pinterest, Girls Meet Homes; DIY Cozy Home; Roadkill Rescue; Not Just a Housewife; Furnish Burnish; Love this Pic; Vila do […]

    Reply
  8. Como decorar com Portas Velhas – Inspiração | Recicla Home Design says:
    April 20, 2014 at 4:32 pm

    […] Pinterest, Girls Meet Homes; DIY Cozy Home; Roadkill Rescue; Not Just a Housewife; Furnish Burnish; Love this Pic; Vila do […]

    Reply
  9. 10 Idea Old Wood Doors Design In Garden | My Door Hardware Lock says:
    August 28, 2014 at 8:40 pm

    […] {source} Four Old wood doors Wall back ground or Partition. […]

    Reply
  10. Creating Privacy Outdoors | Honeysuckle Life says:
    September 18, 2014 at 9:24 pm

    […] {image: Not Just a Housewife} […]

    Reply
  11. 18 Ways To Give Old Doors New Life says:
    February 29, 2016 at 6:02 am

    […] 12. Connect some old doors to make your own privacy screen. […]

    Reply
  12. Repurposing Old Doors: Finding Function Anew | Decozilla says:
    March 22, 2016 at 1:46 pm

    […] Source: notjustahousewife […]

    Reply
  13. 11 Ways to Repurpose Old Doors - Dukes and Duchesses says:
    April 17, 2016 at 11:02 am

    […] This privacy screen is such a clever idea.  I love that it mixes different styles, heights and colors.  They all look fabulous together, don’t they?A shelf is a clever way to repurpose an old door.  I really like that the original hardware was kept for this project. […]

    Reply
  14. Create Eclectic Outdoor Style - Living Outdoors says:
    June 1, 2016 at 9:23 am

    […] Sources: Seashells  |  Vintage Candlesticks  |  Herbs  |  Mason Jar Lights  |  Copper/Gold Foil Branches  |  Driftwood  |  Privacy Screen […]

    Reply
  15. 10 DIY para reciclar puertas antiguas de madera - La cartera rota says:
    October 12, 2016 at 11:01 am

    […] 5: fuente desconocida / 6: shades of blue interiors / 7: infarrantly creative / 8: lestoc / 9: not just a housewife / 10: little vintage […]

    Reply
  16. Talk of the Town #52 - Knick of Time says:
    December 27, 2016 at 5:56 pm

    […] Repurposed Old Doors Privacy Screen […]

    Reply
  17. Talk of the Town #52 - Sadie Seasongoods says:
    December 27, 2016 at 6:00 pm

    […] Organized Pantry | Repurposed Old Doors Privacy Screen […]

    Reply
  18. Talk of the Town #53 - My Repurposed Life™ says:
    December 28, 2016 at 6:15 am

    […] Repurposed Old Doors Privacy Screen […]

    Reply
  19. Doorway to DIY Heaven – Think Restore before Big Box store says:
    February 9, 2017 at 12:31 pm

    […] with your screen by selecting mismatched doors and painting them complimenting colors. Check out Stacey Risenmay’s privacy screen she made and her advice of how to prep the doors for outdoor […]

    Reply
  20. 10+ Kreative Tür umfunktionieren Ideen 2017 – Viele Kreative Ideen says:
    September 18, 2017 at 9:32 am

    […] Quelle […]

    Reply
  21. 17 DIY Privacy Screen Projects For Your Patio Or Backyard | The Self-Sufficient Living says:
    January 13, 2018 at 7:20 pm

    […] a fun and practical way to recycle old doors! Transform them into a garden privacy screen with this simple idea. Great backdrop for a wedding or birthday […]

    Reply
  22. DIY Outdoor Privacy Screen Ideas - Liquid Image says:
    December 6, 2019 at 1:55 am

    […] via […]

    Reply
  23. DIY Outdoor Privacy Screen Ideas - Remodel Or Move says:
    February 26, 2020 at 11:40 pm

    […] via […]

    Reply
stacyWelcome! I'm sharing our adventures as we fix up our 1938 cottage. Whether it is big or small, I think everyone should love their home and I don't think it takes a lot of money to make a space your own.
 

Search this site

categories


Subscribe

Privacy Policy

Copyright Not JUST A Housewife © 2021 | Web Hosting By RFE Hosting

To the Top

Welcome! Thanks for visiting.
I blog about fixing up our 1938 cottage. I post tons of budget friendly projects and by subscribing, you'll never miss a single one!
Your information will *never* be shared or sold to a 3rd party. Pinky promise :)
Welcome!
Hi! I'm Stacy and I blog about fixing up our 1938 cottage. Join the thousand of others who get my posts sent to their inbox for FREE!
Your information will *never* be shared or sold to a 3rd party.