• Skip to primary navigation
  • Skip to main content
  • Skip to primary sidebar
  • Skip to footer
Stacy Risenmay
  • Home
  • About me
  • PRESS
  • Contact Me
  • My Book
    • Facebook
    • Instagram
    • Pinterest
    • Twitter
menu icon
go to homepage
subscribe
search icon
Homepage link
  • Home
  • About me
  • Project Gallery
  • Our House
  • PRESS
  • Contact Me
  • Privacy Policy
    • Facebook
    • Instagram
    • Pinterest
    • Twitter
  • ×

    Modern Tree Stump Planter

    By Stacy 75 Comments

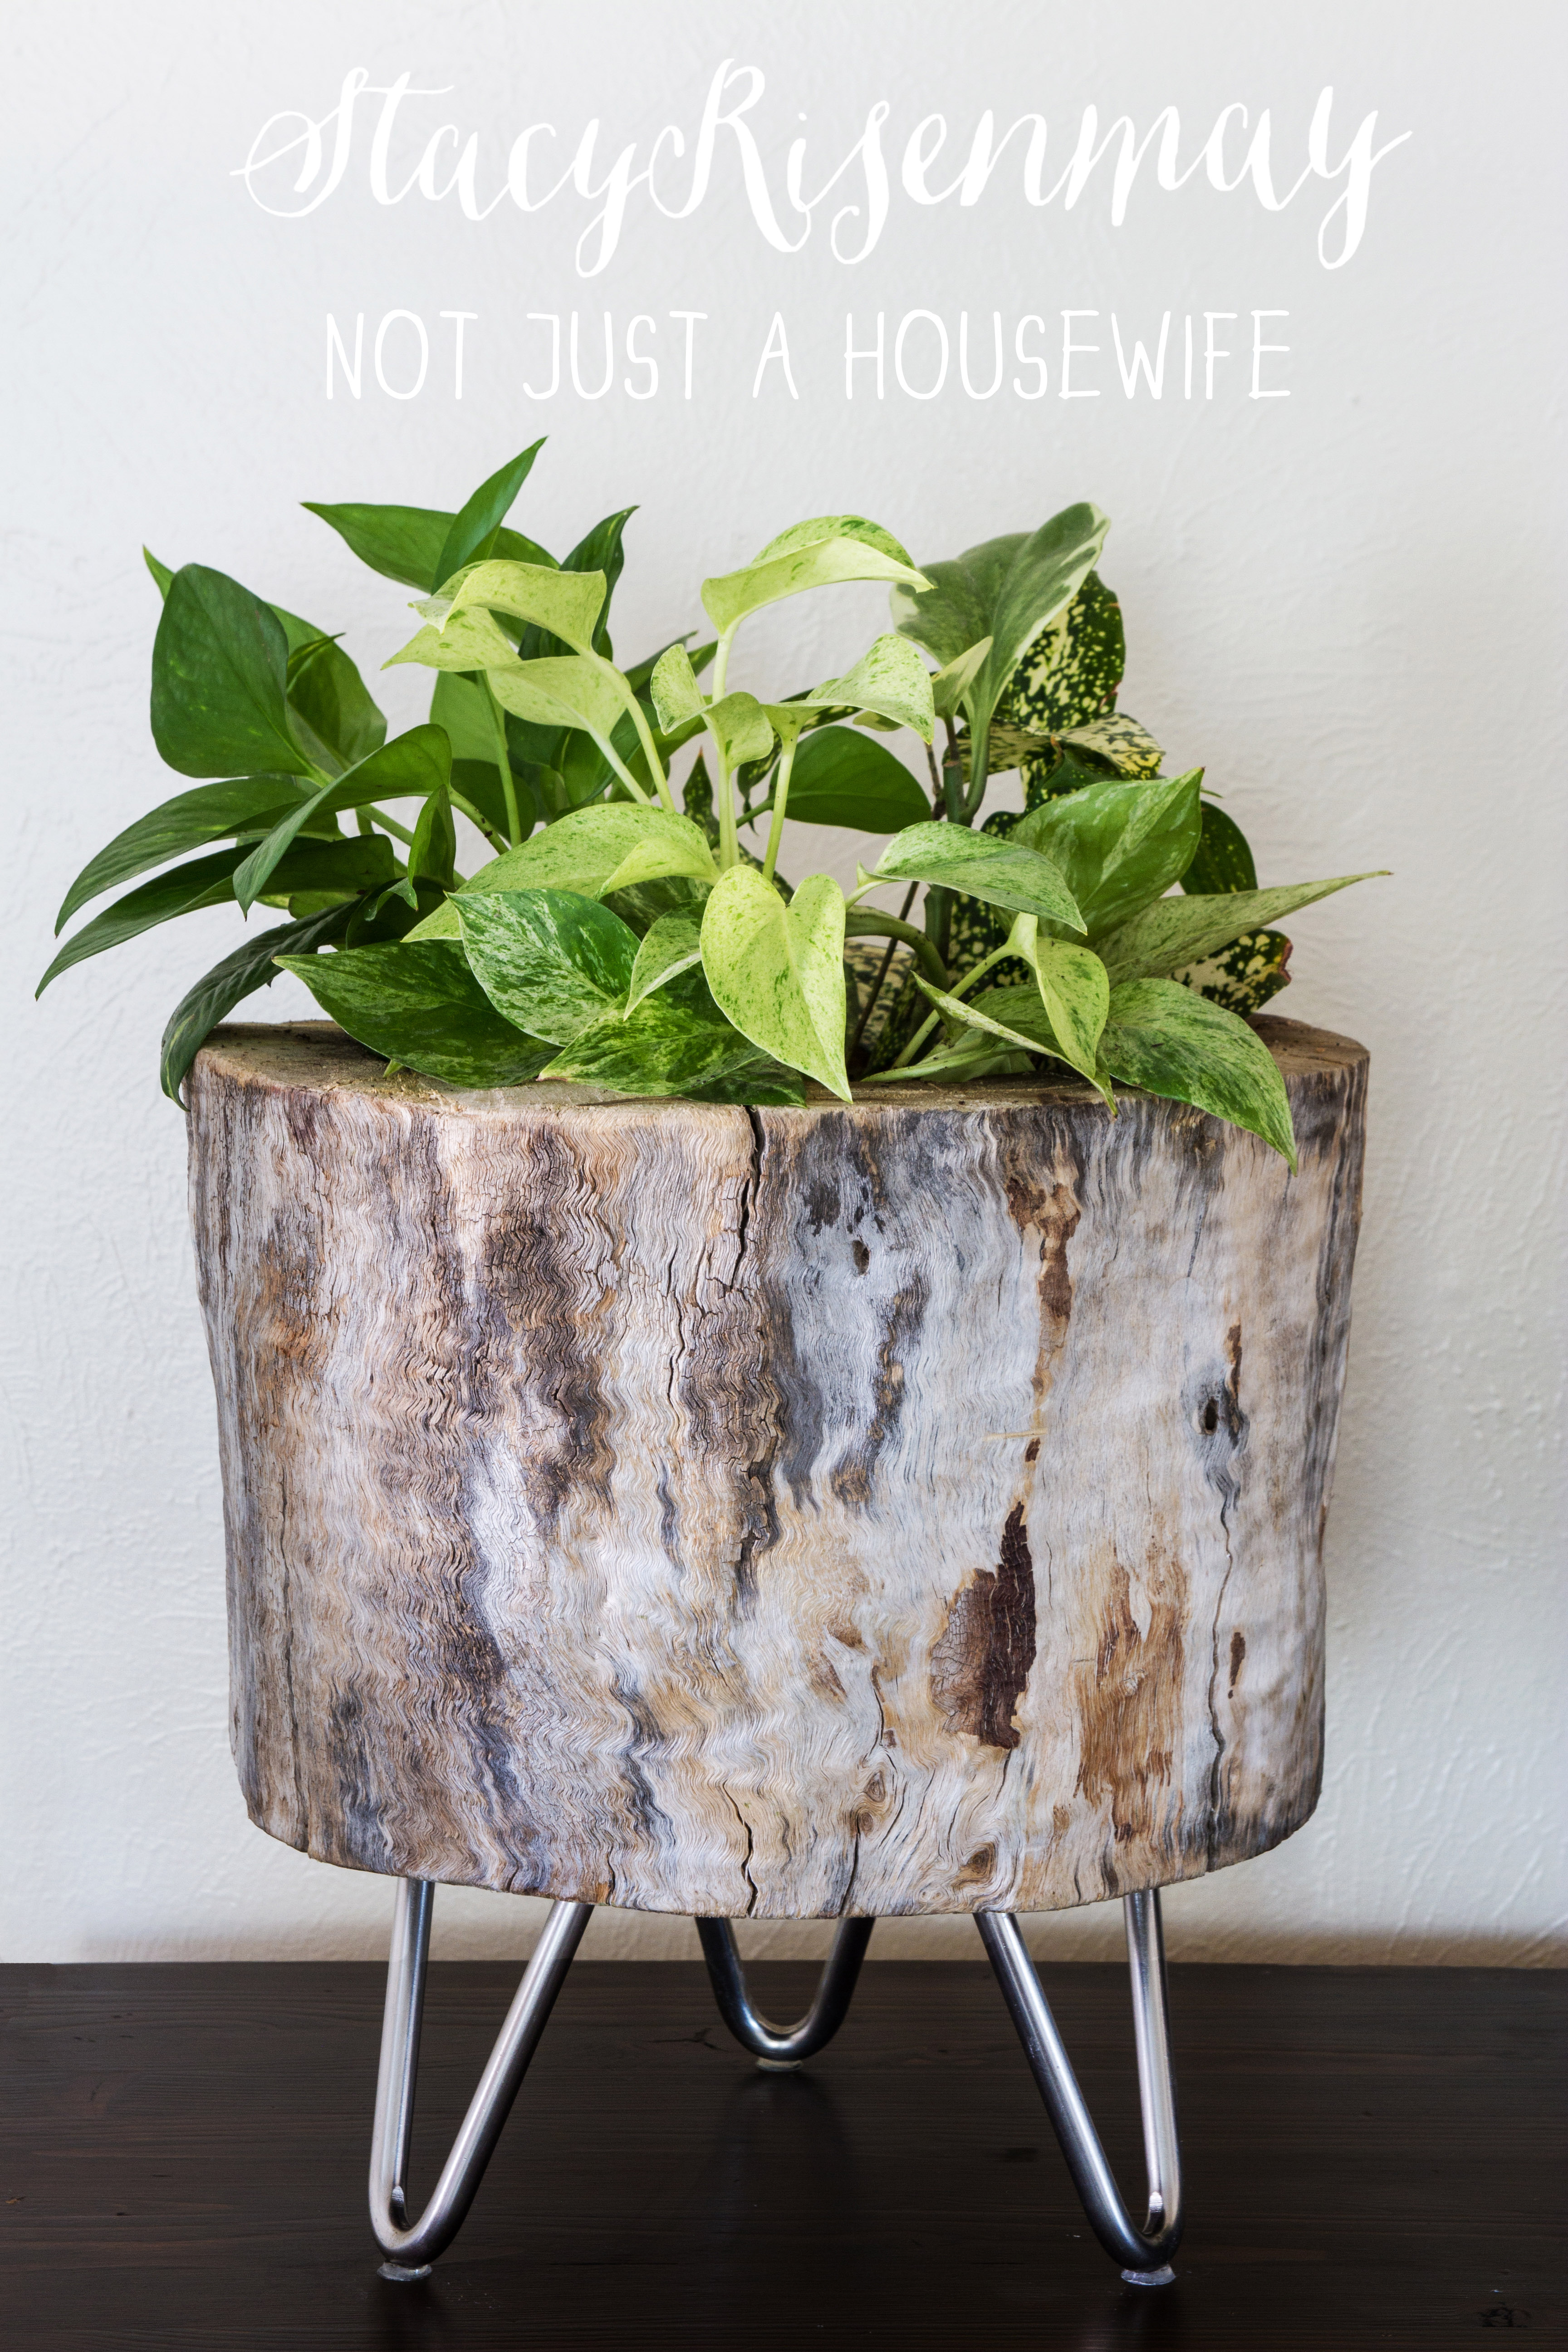
    I planned on doing this project back in March. I started making this project about a month ago. I kept getting interrupted. So to say that I am excited it is finally done is an understatement. It was worth the wait because I am completely smitten with my new planter!

    modern tree stump planter


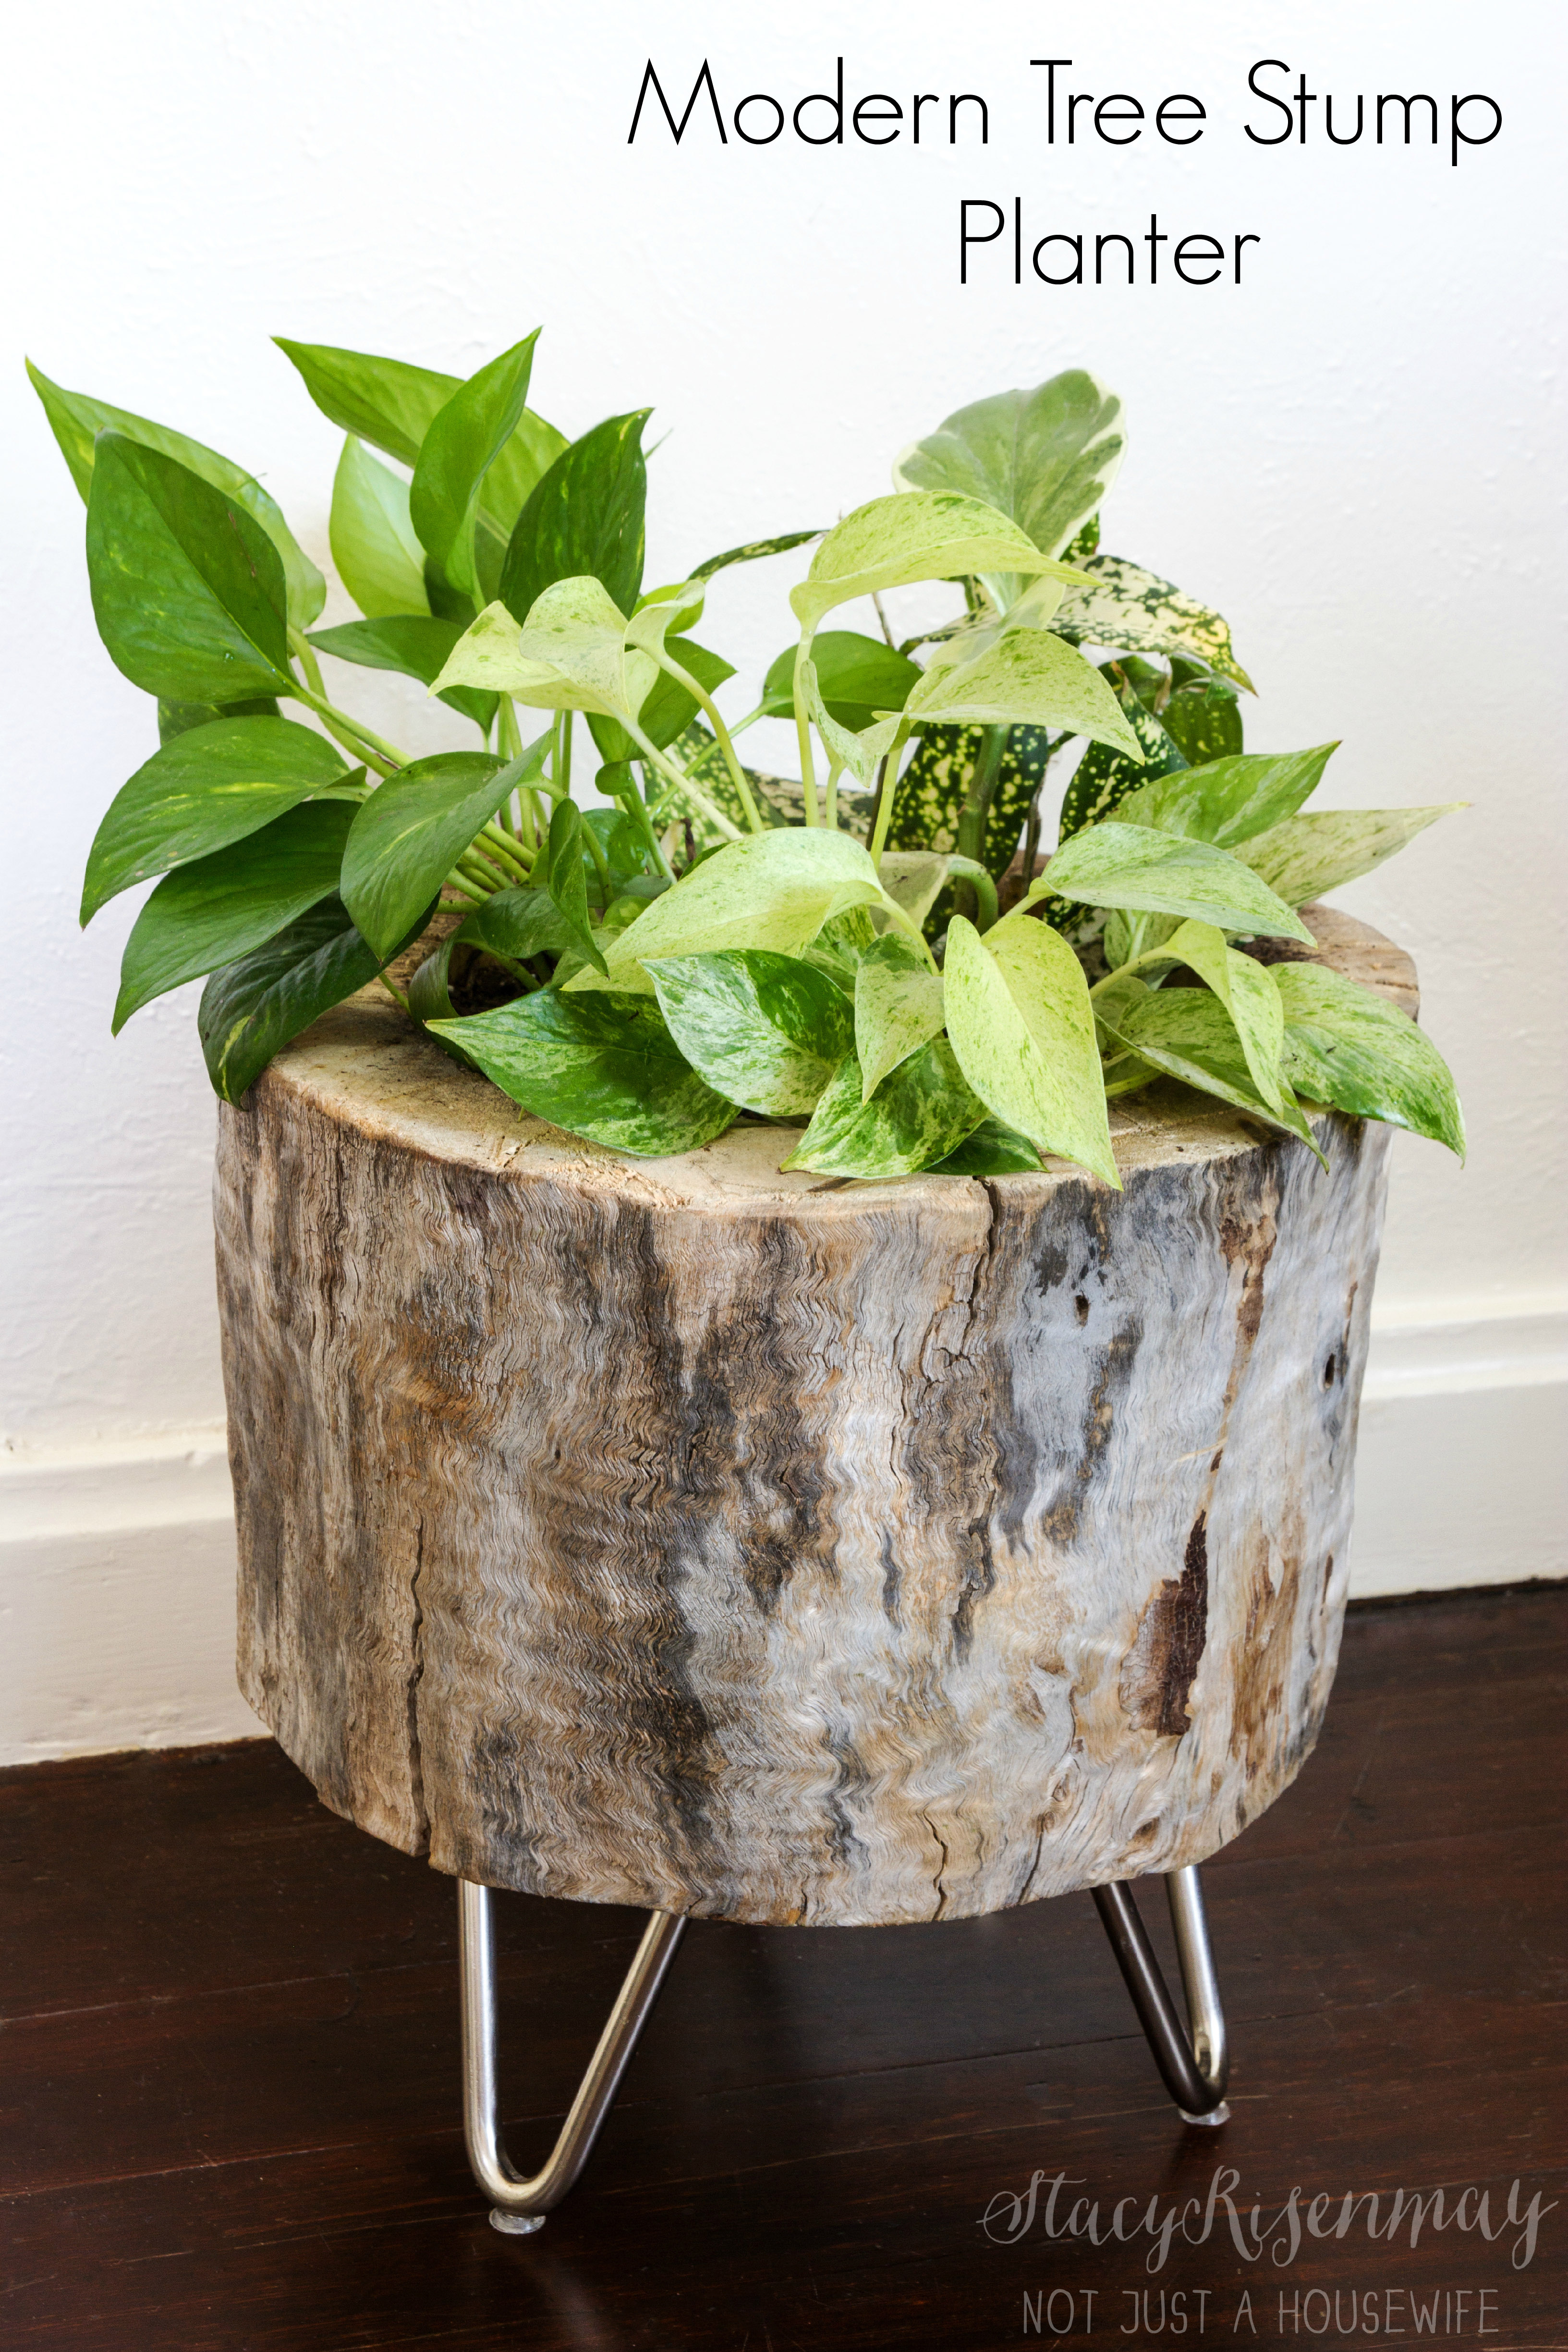
    A couple of years ago one of our big trees in our backyard got blown down in a huge storm. I was devastated. Ever since then, I have tried to use the pieces of the tree in projects so that it didn't get wasted. We didn't have a chainsaw at the time so a kind neighbor came over and cut it into manageable pieces so we could move it to the very back of the yard to our wood pile. It sat there for a long time. It lost its bark and dried out. But to me it was beautiful and needed a new life.

    tree stump planter


    I added some mid-century modern legs. I think they are my favorite part.

    modern log planter


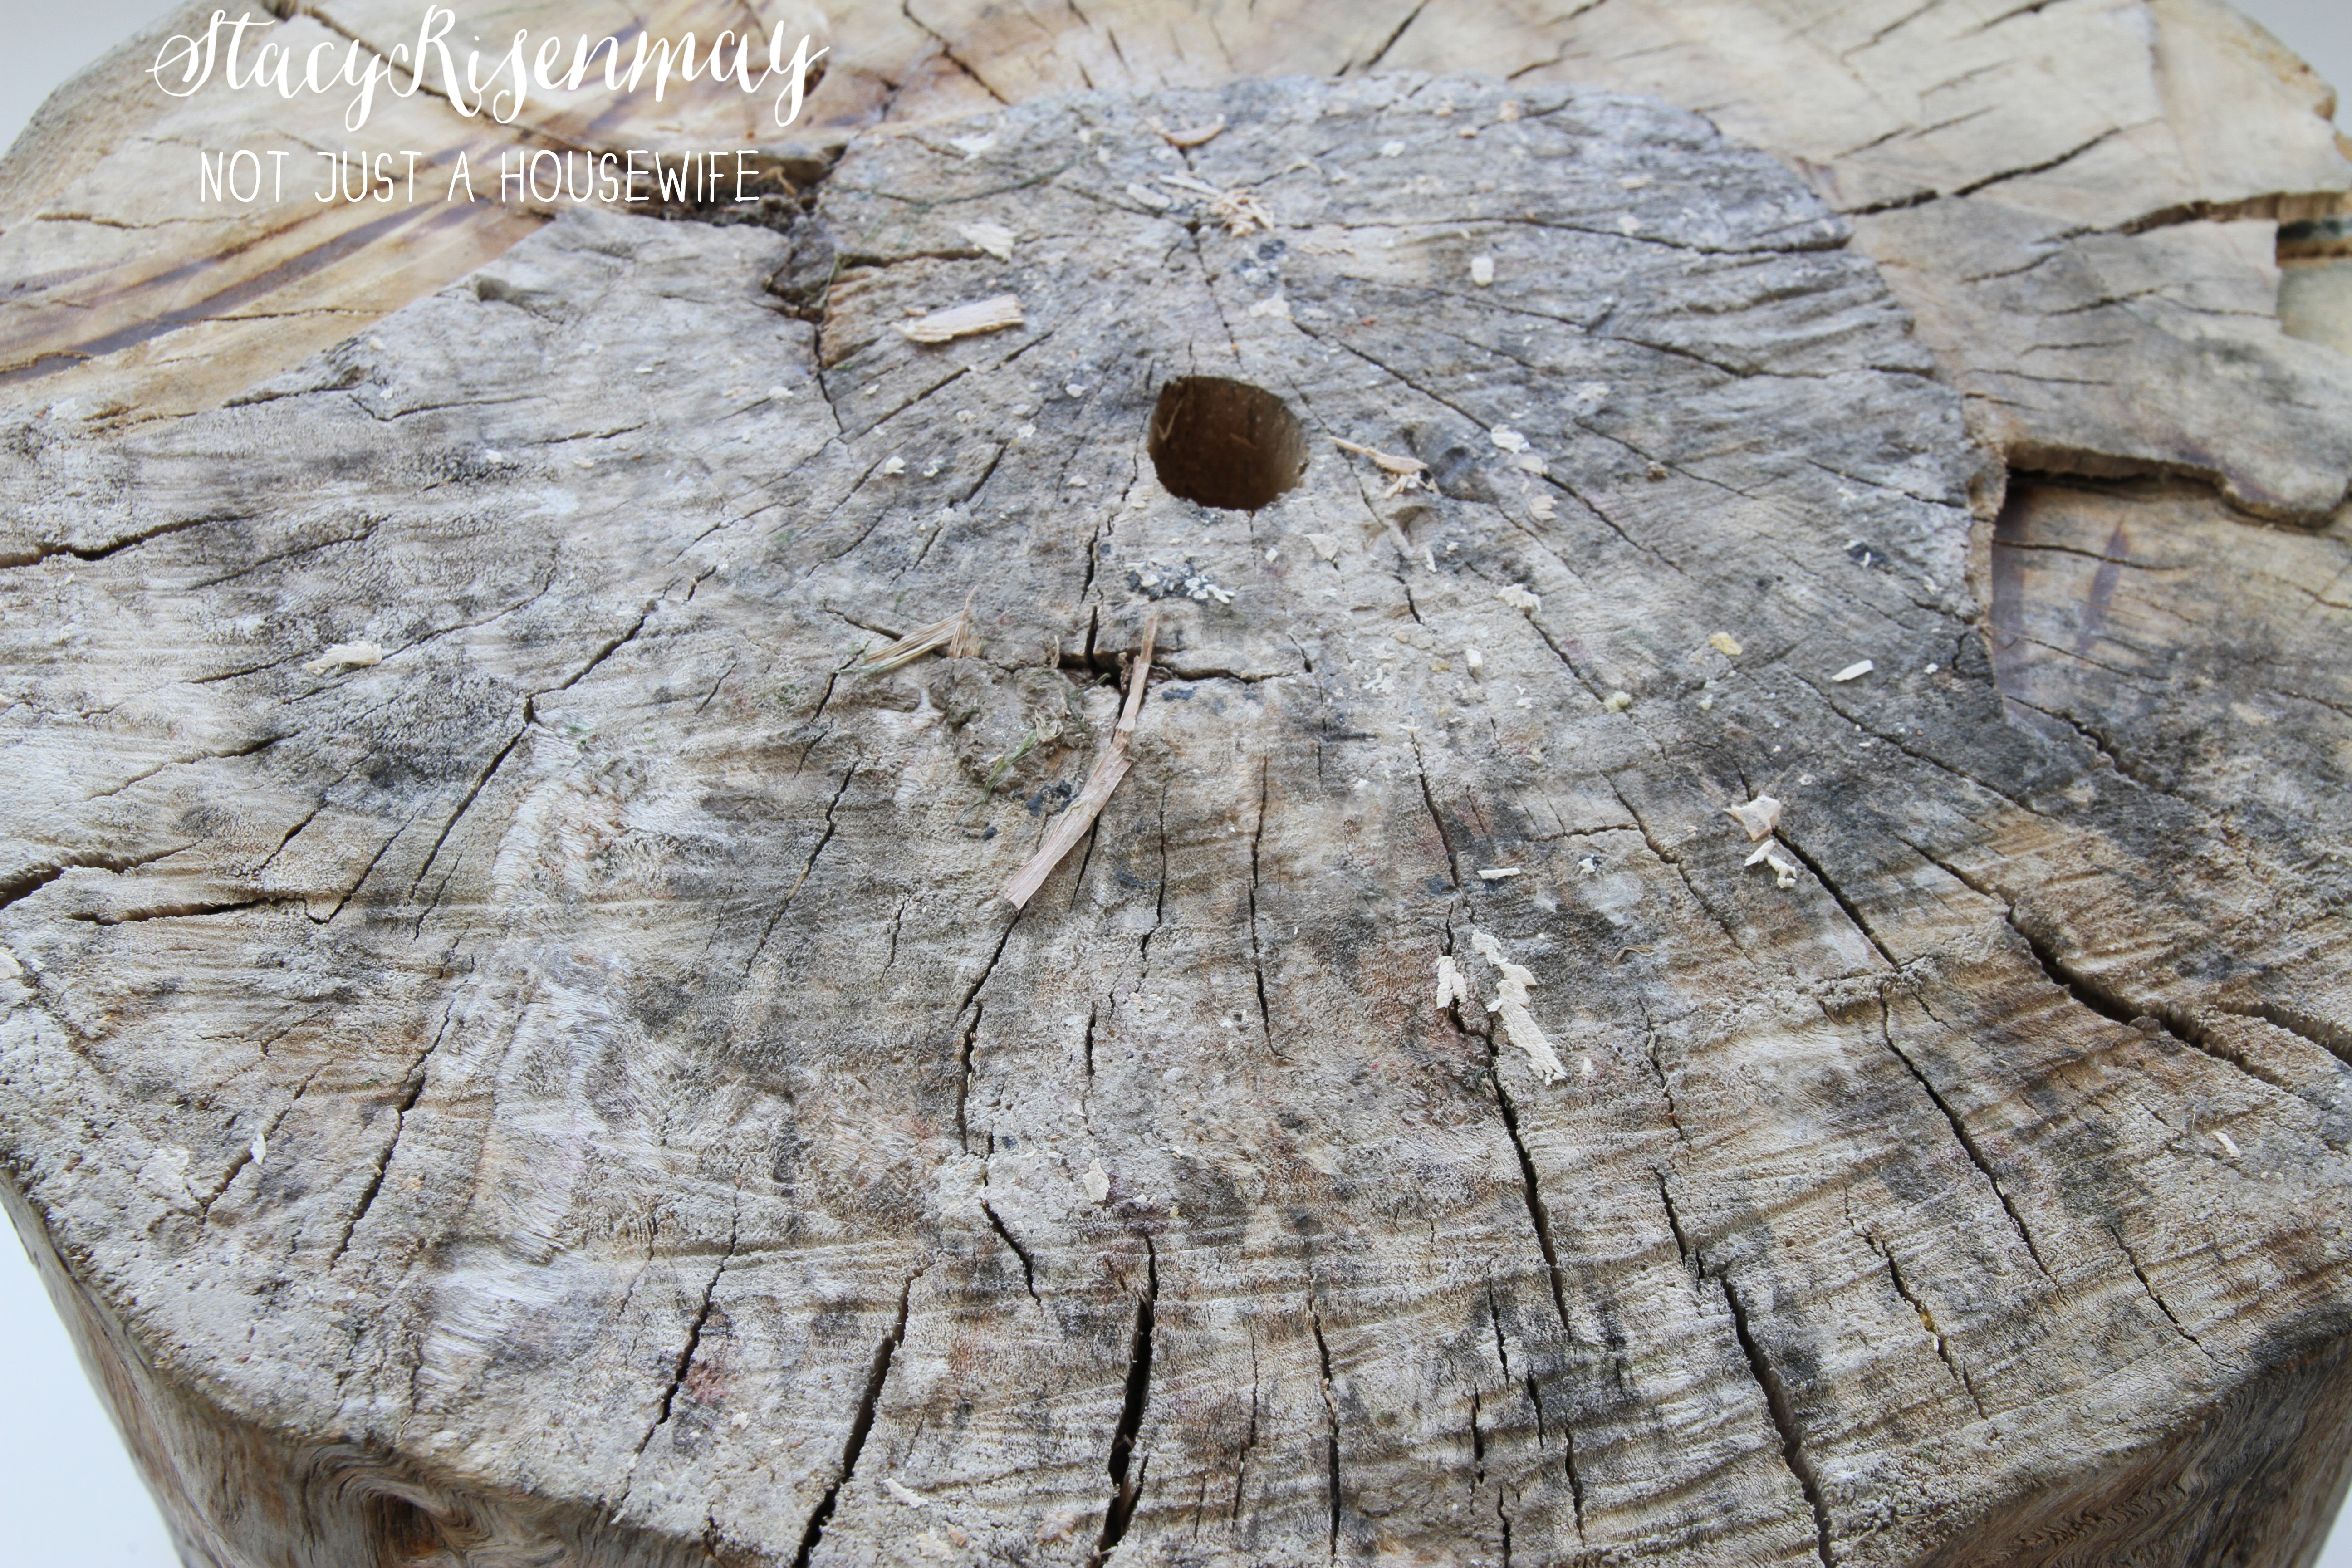
    To start out, I had to trim up the stump. Our neighbor was not concerned with making straight cuts when he cut up the tree for us so I had to level the top off. I didn't have a chainsaw back then, but thanks to Ryobi, I do now!

    cut tree stump


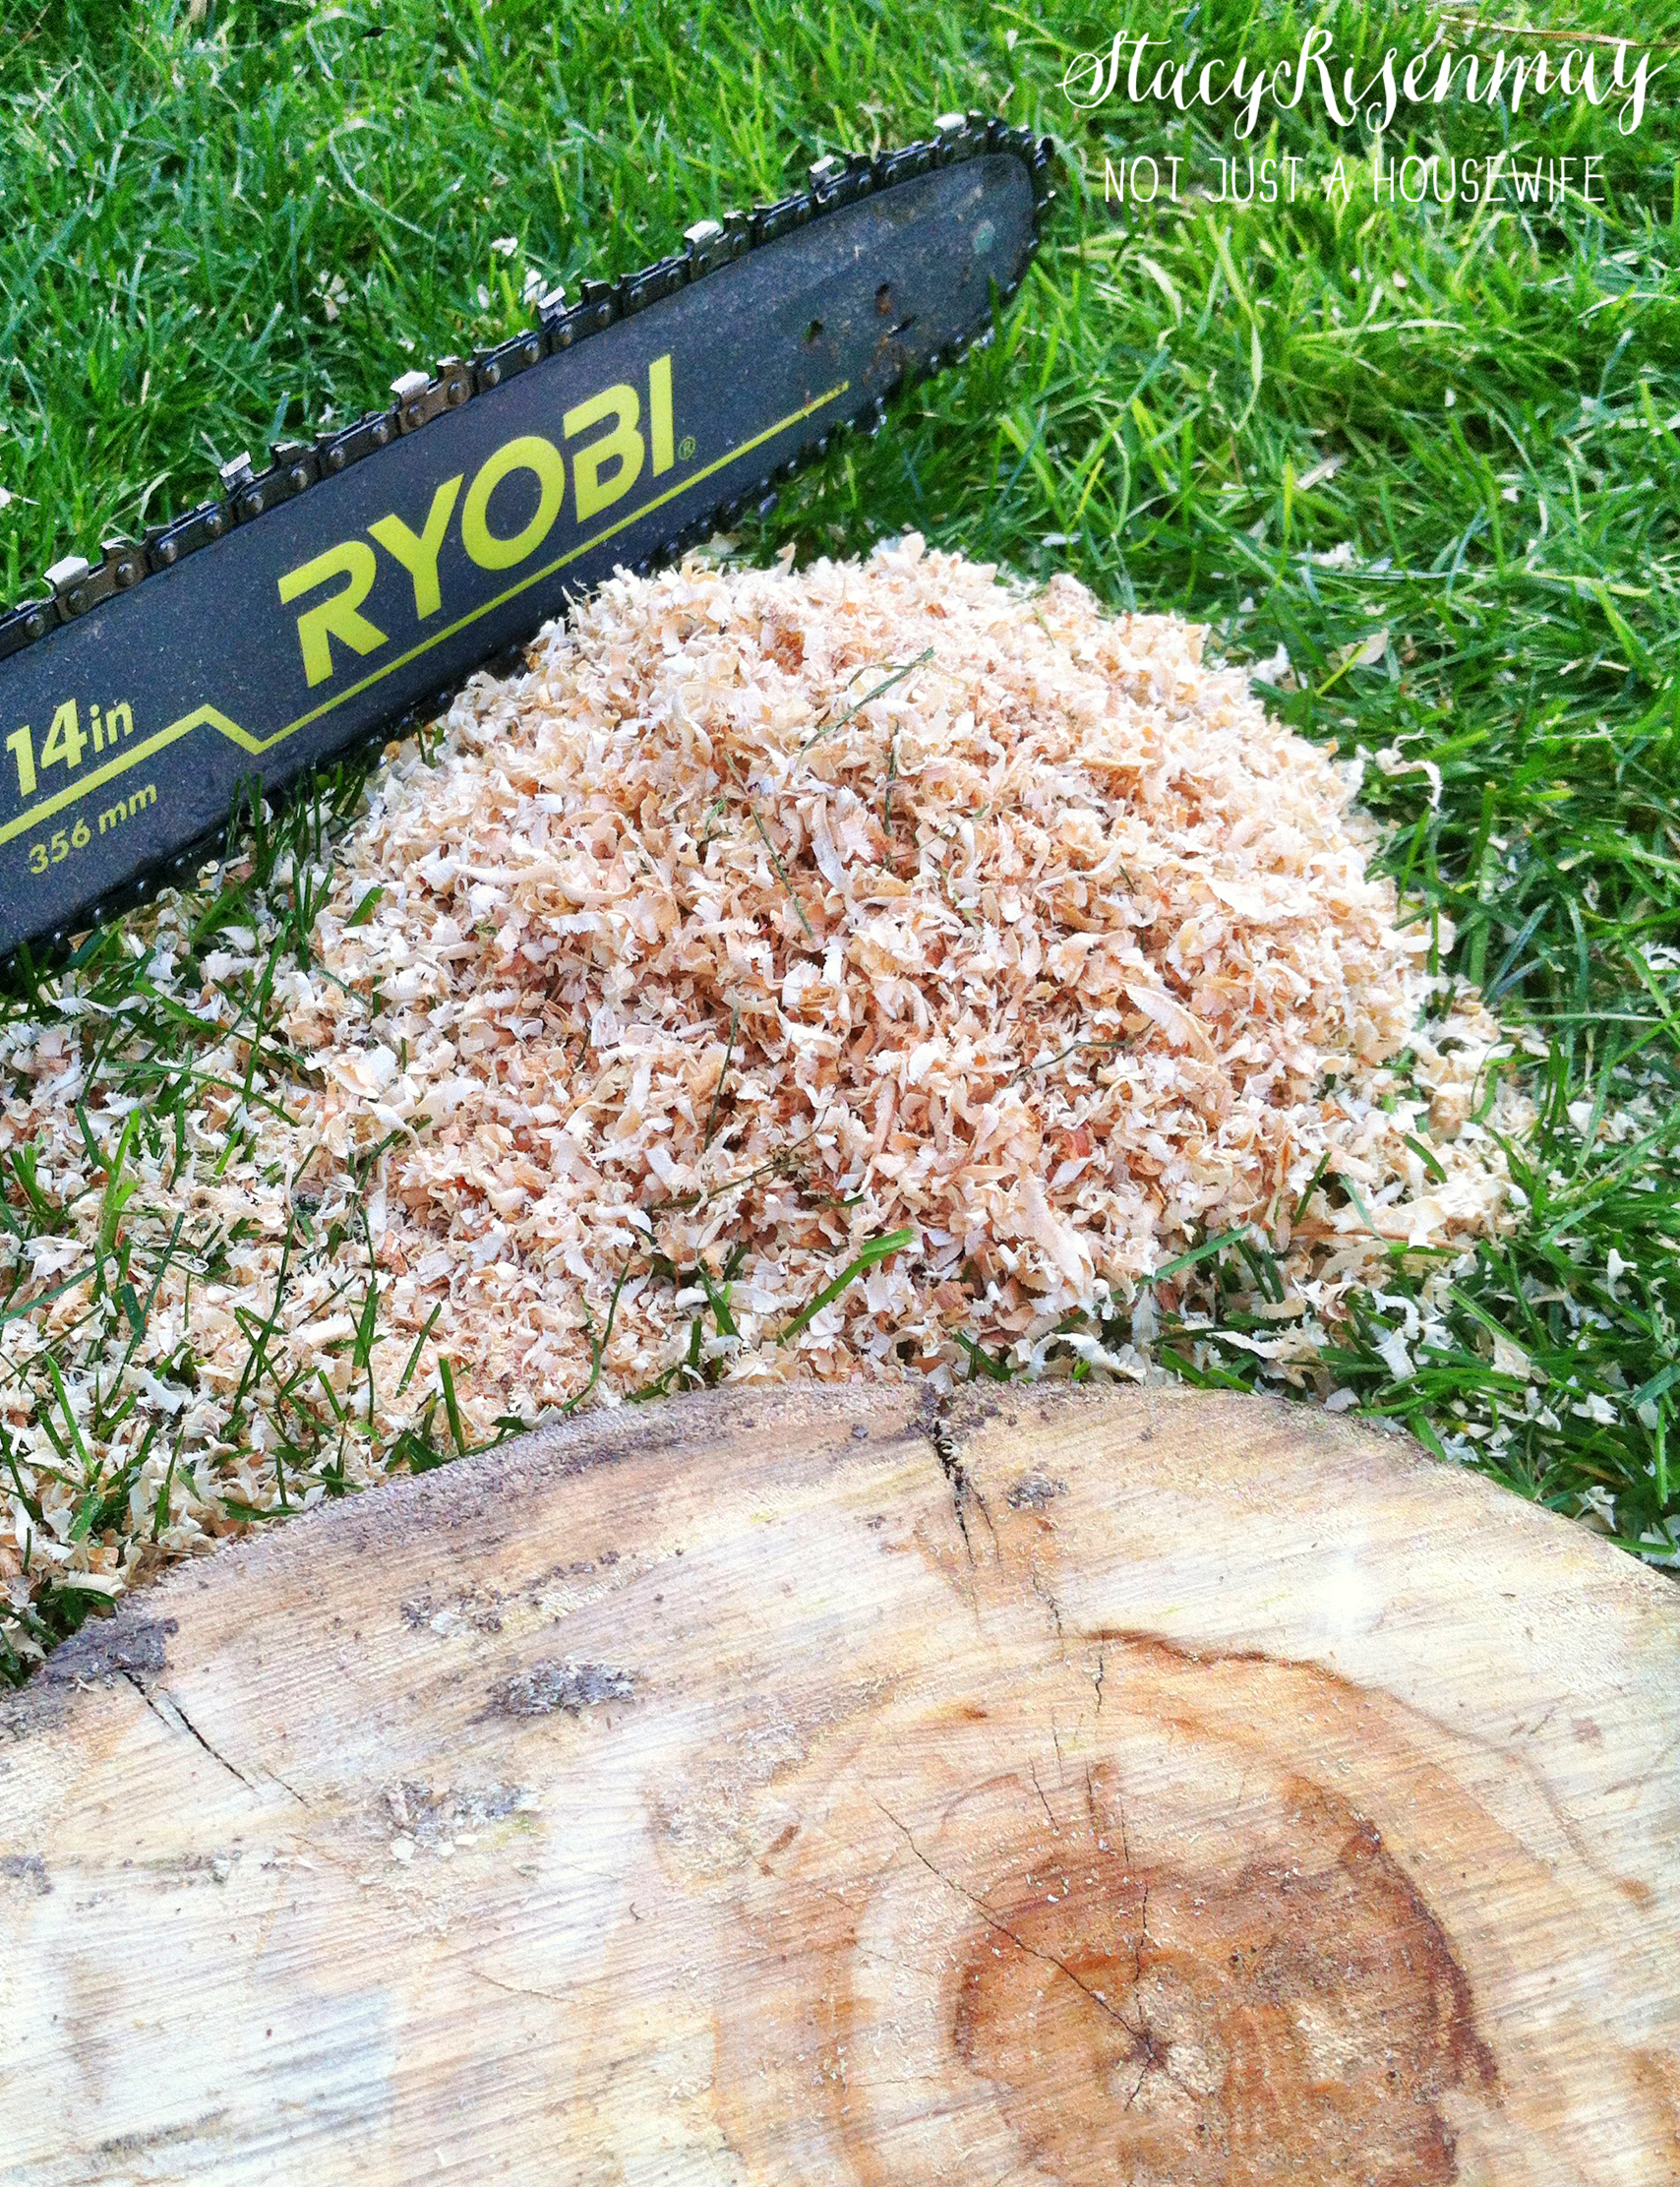
    Back in March I was able to go to the Ryobi headquarters and try out all their outdoor tools. I was the most impressed by the mower and the chainsaw. It cut fast and smooth.
    ryobi brushless chainsaw

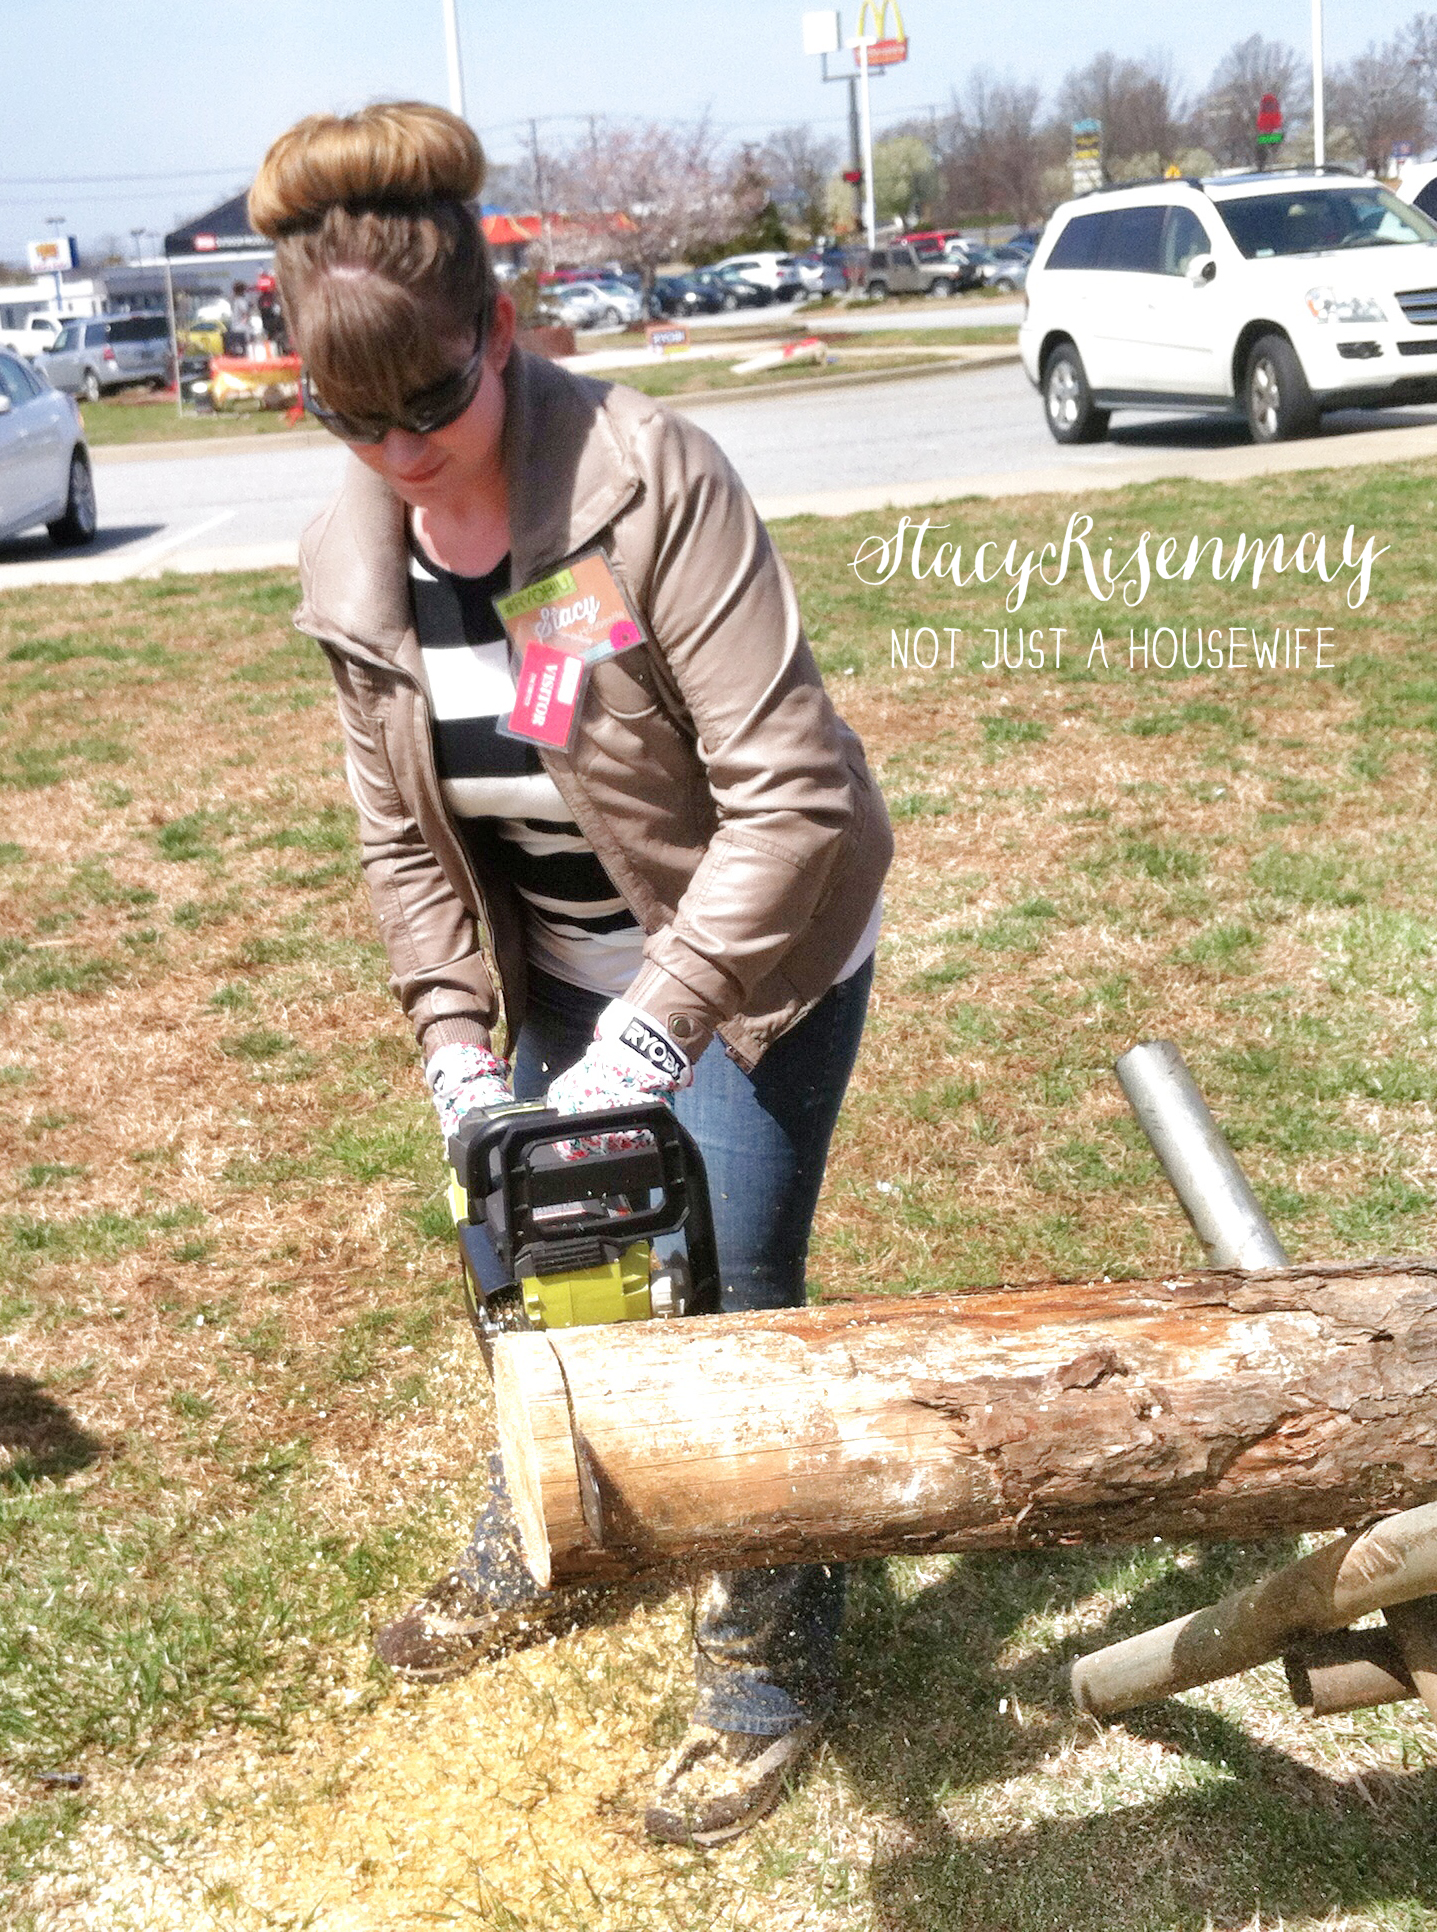
     Ryobi 14" 40V Brushless Motor Chainsaw


    (affiliate link)
    After I had the stump pretty flat, it was time to hollow it out. I started out by drilling a hole with a ½ inch drill bit. The I inserted my jig saw into the hole and cut a circle around the stump where I wanted the opening to be. I wanted the perimeter to have a nice clean line. Then I used a bore bit to drill down.

    boring through tree stump


    I learned that I should have tried to drill closer together. I ended up using the chisel more than I needed to I think during the first two inches.


    bore bit to hollow out stump

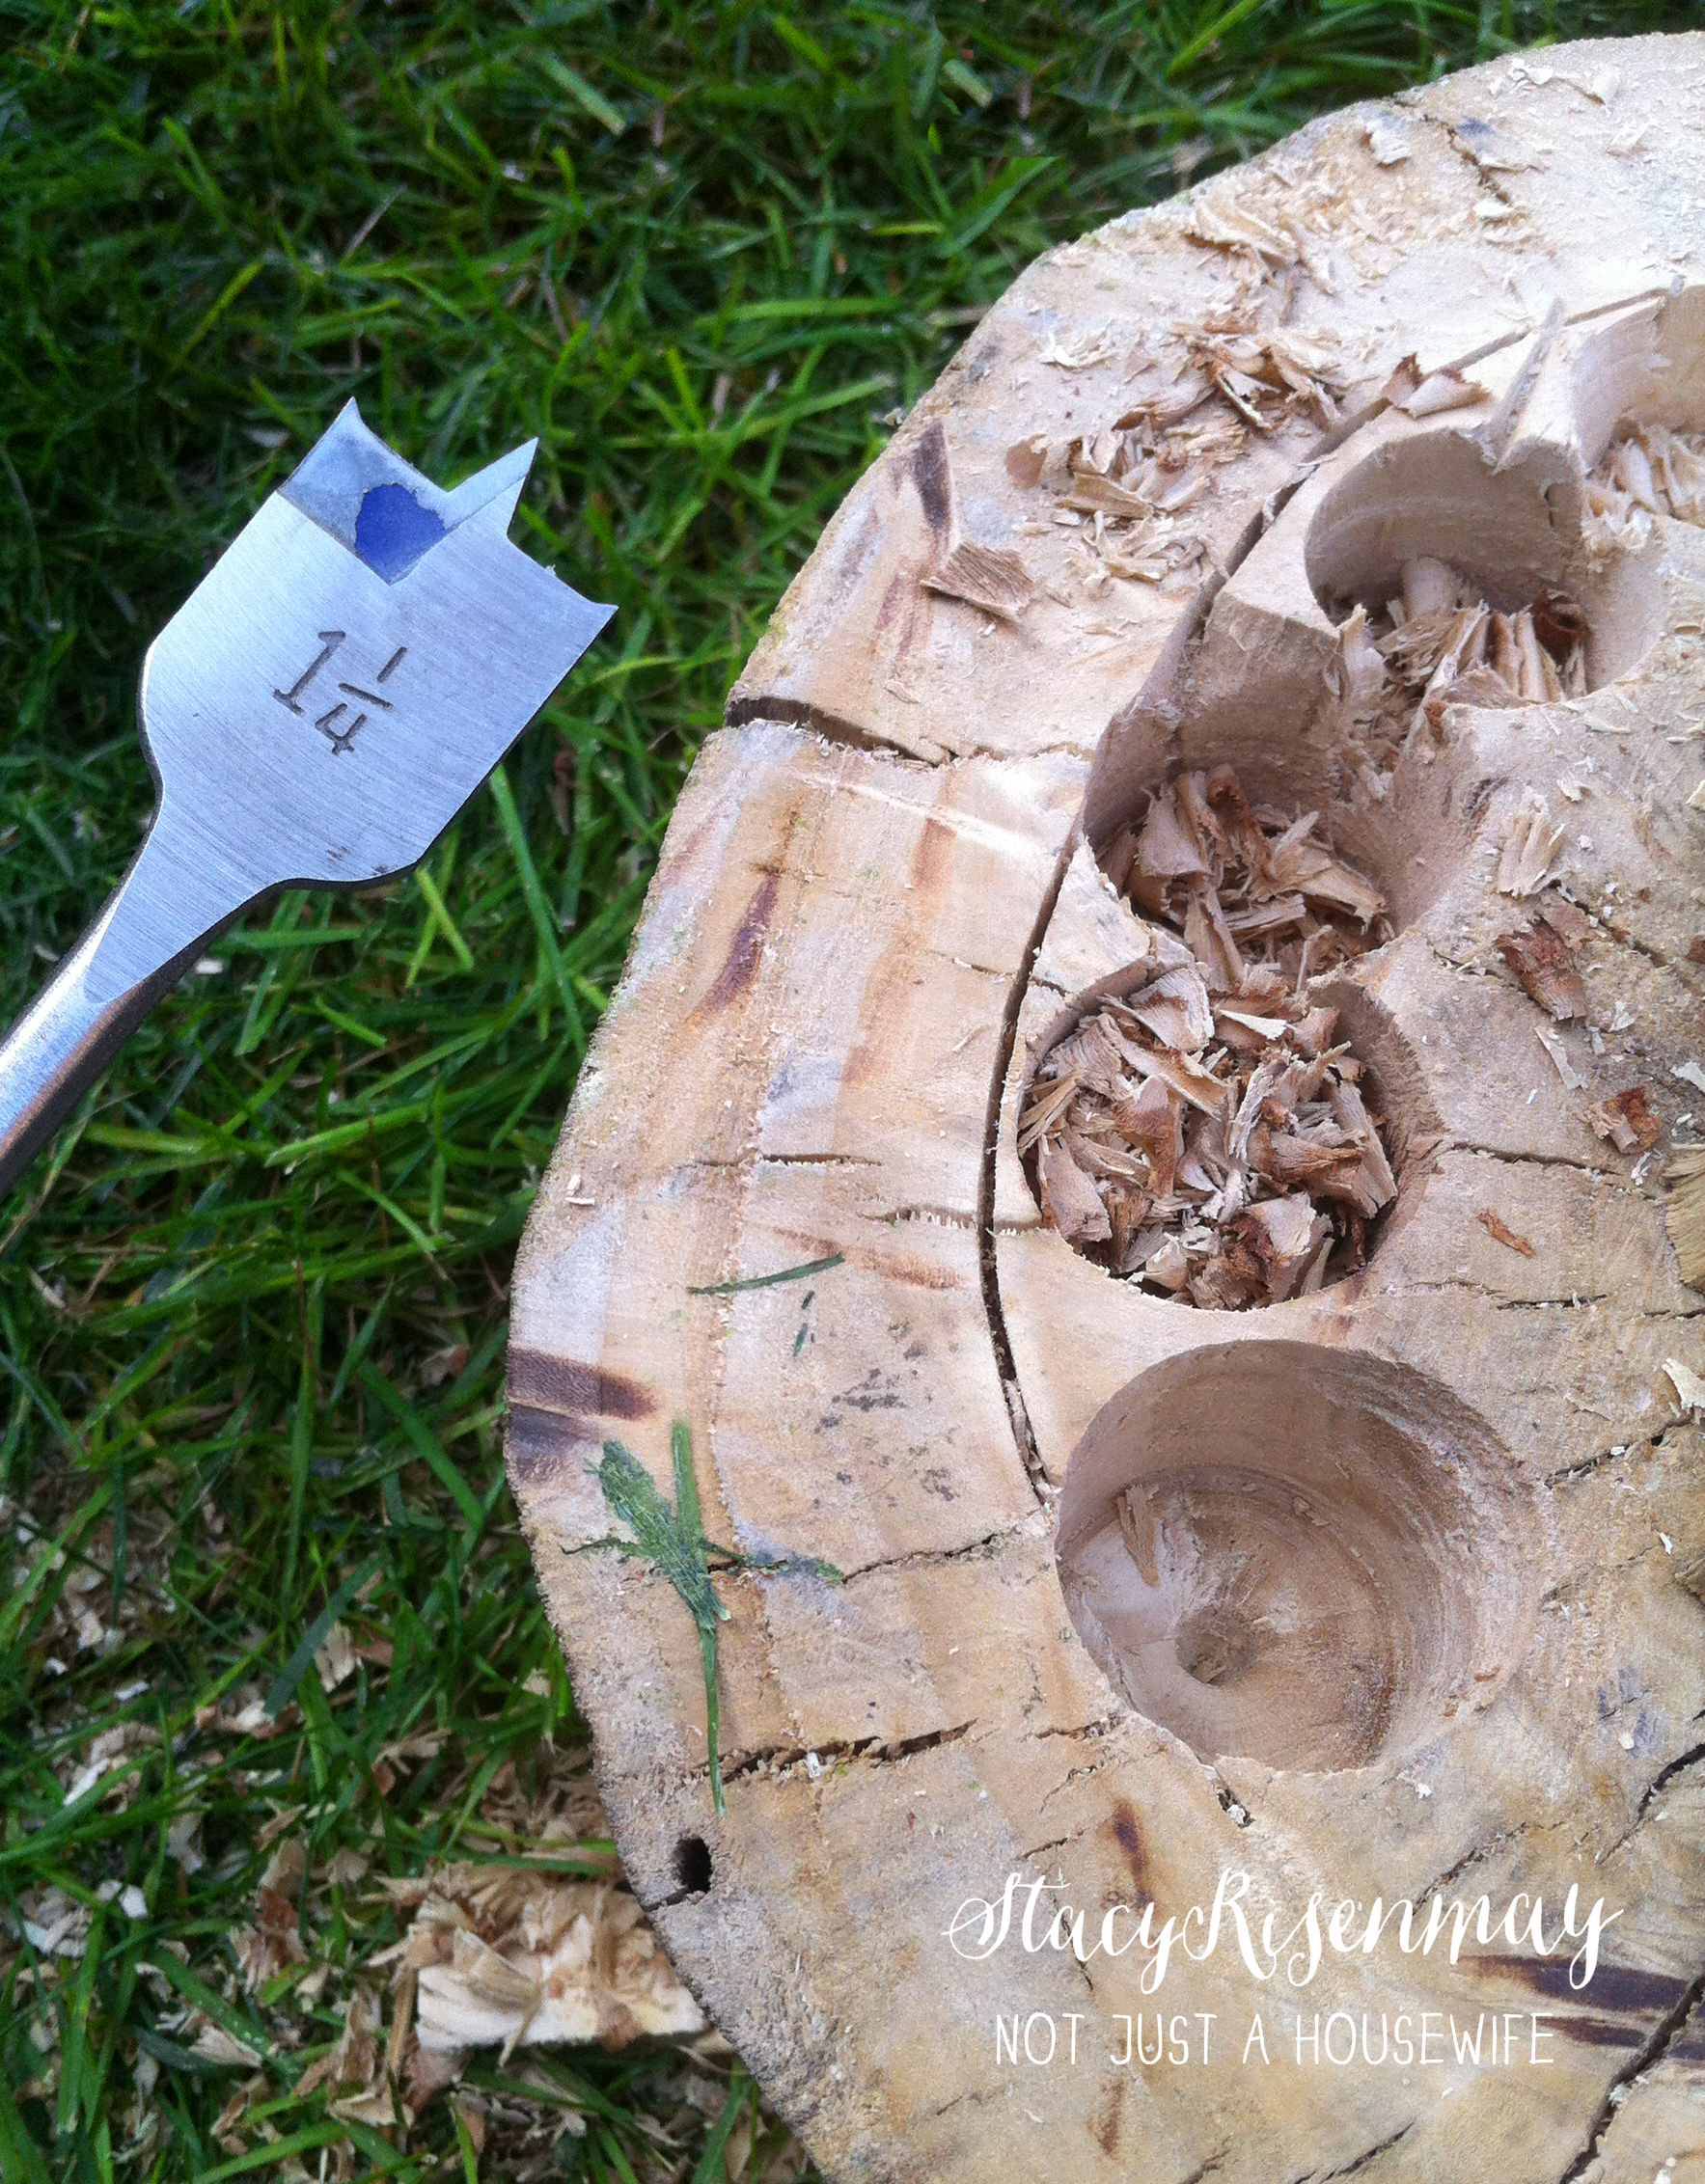
    A chisel or crowbar works to get out any chunks.

    chisel


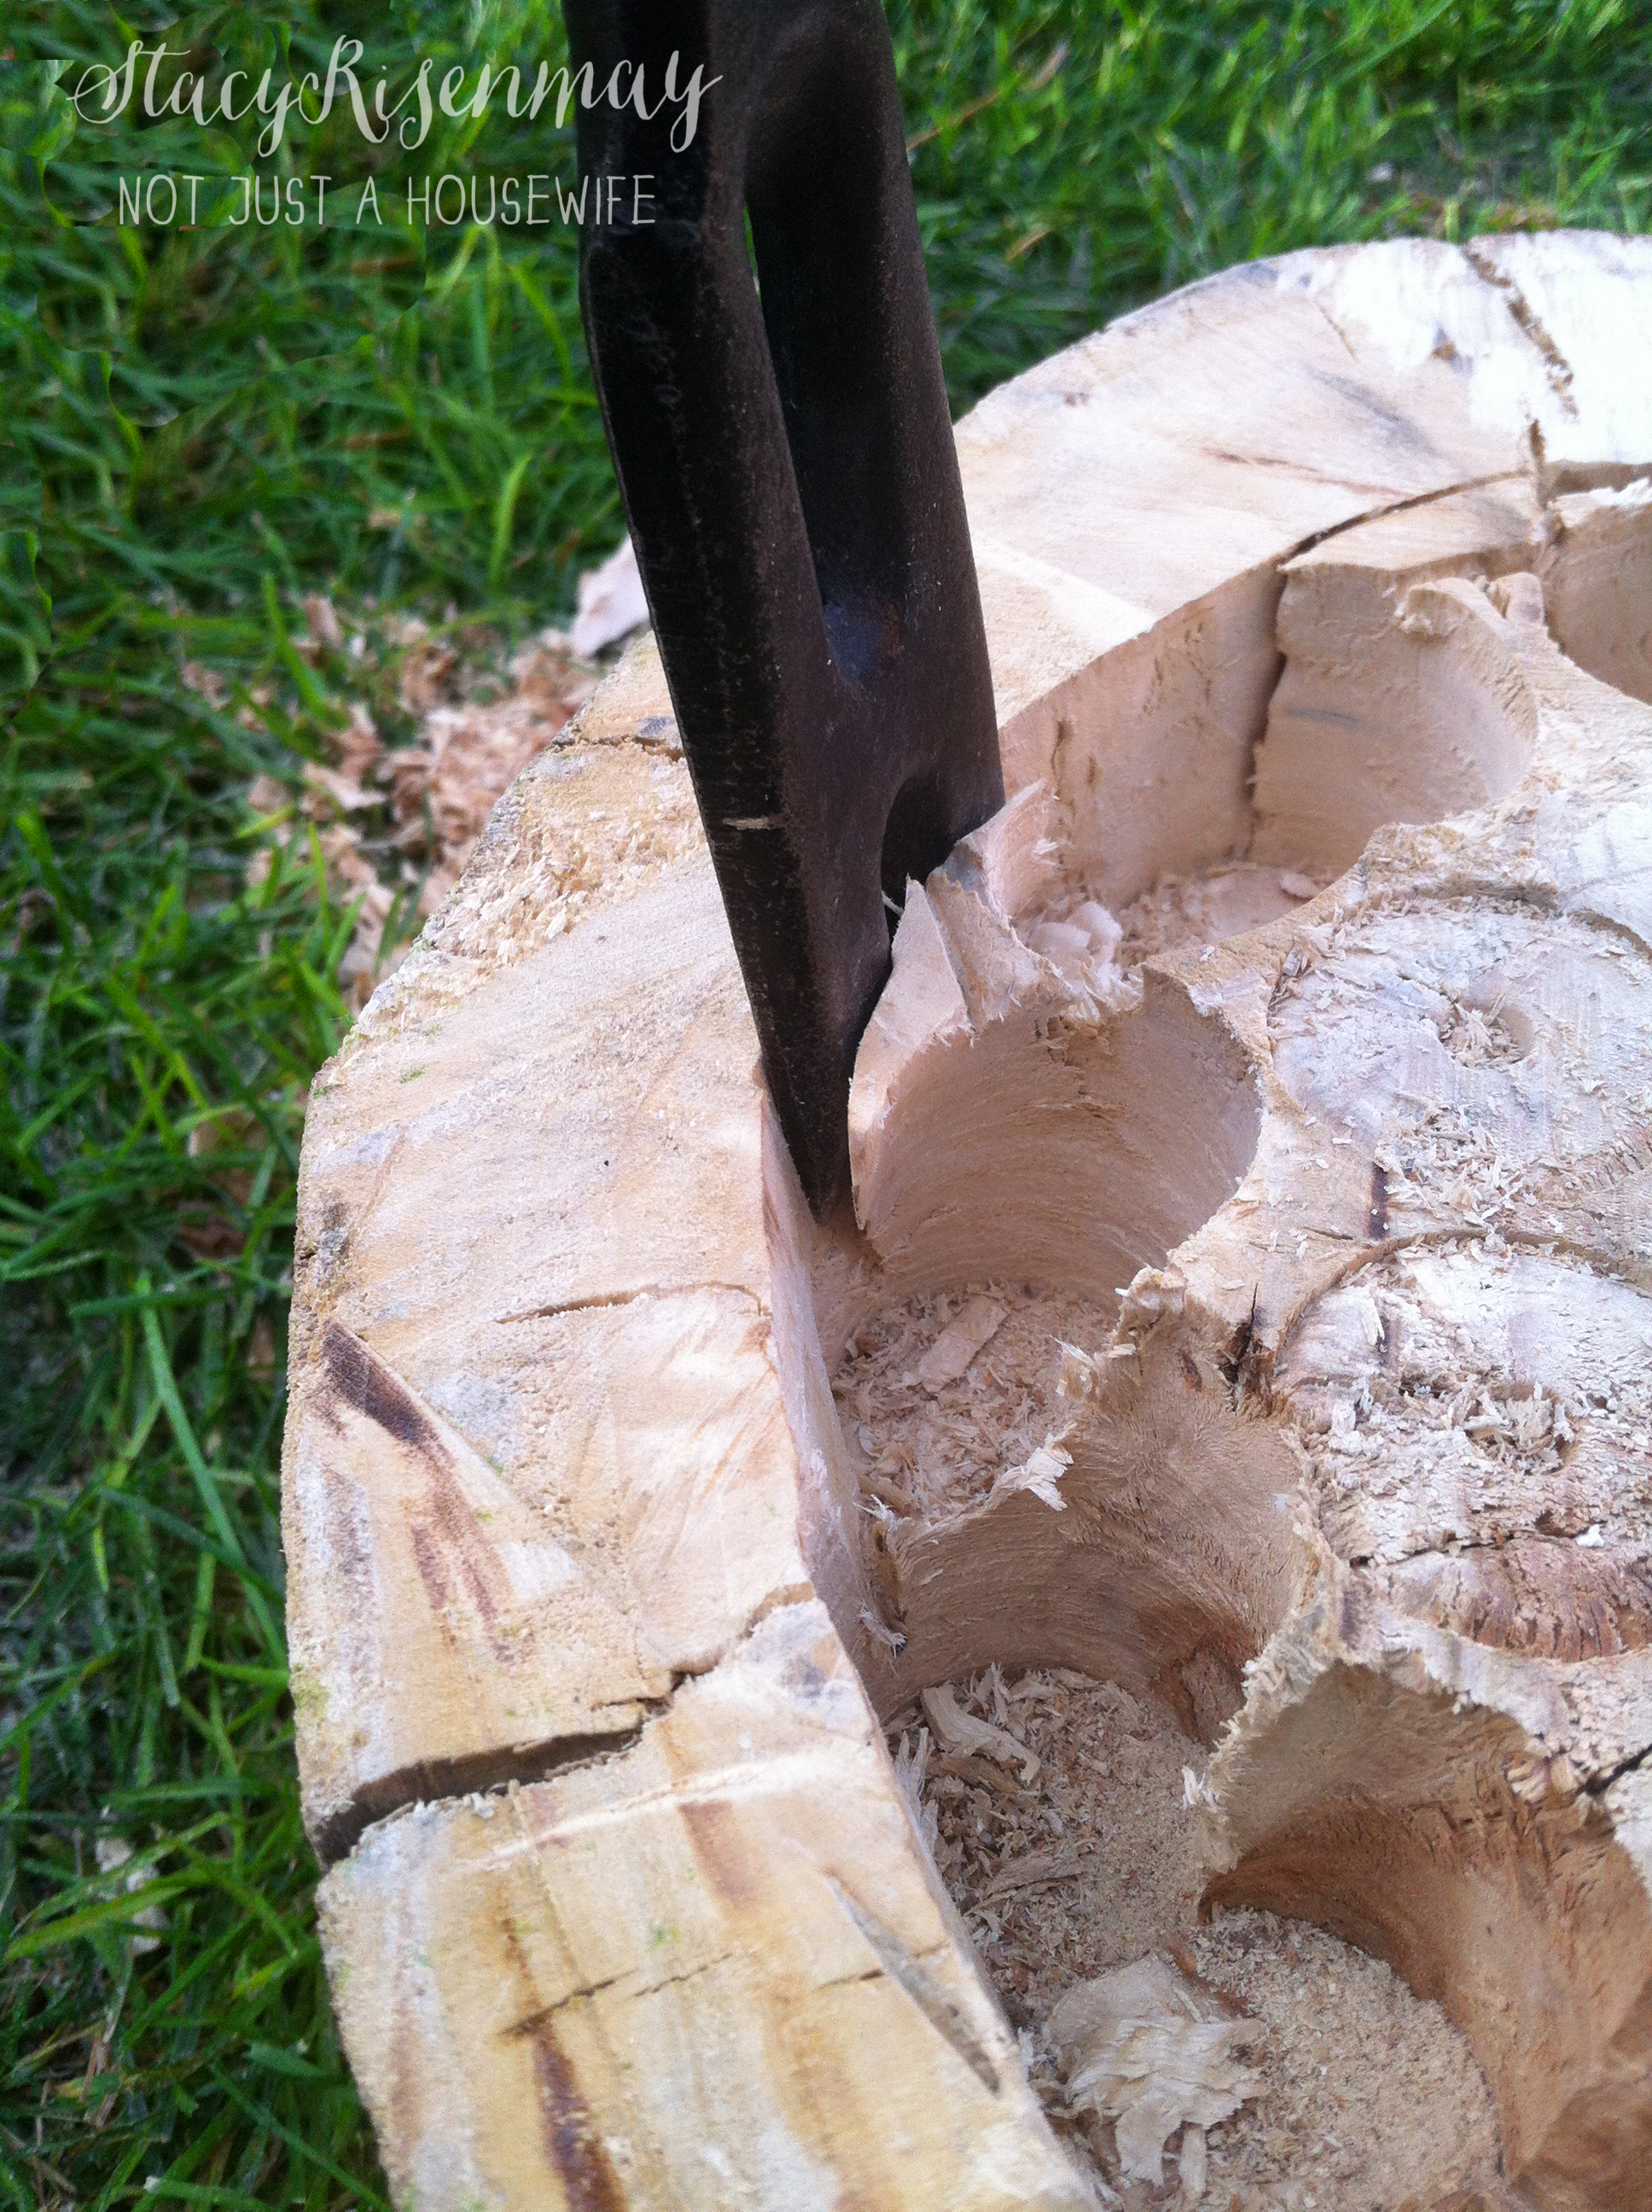
    The first couple of inches were hard and time consuming. And lets just say you could skip the arms at the gym and just focus on legs for a few days. After that it seemed to go faster. It ended up being 6 inches deep.

    hollow stump


    I drilled a drainage hole in the bottom with the ½ inch drill bit.

    drainage hole

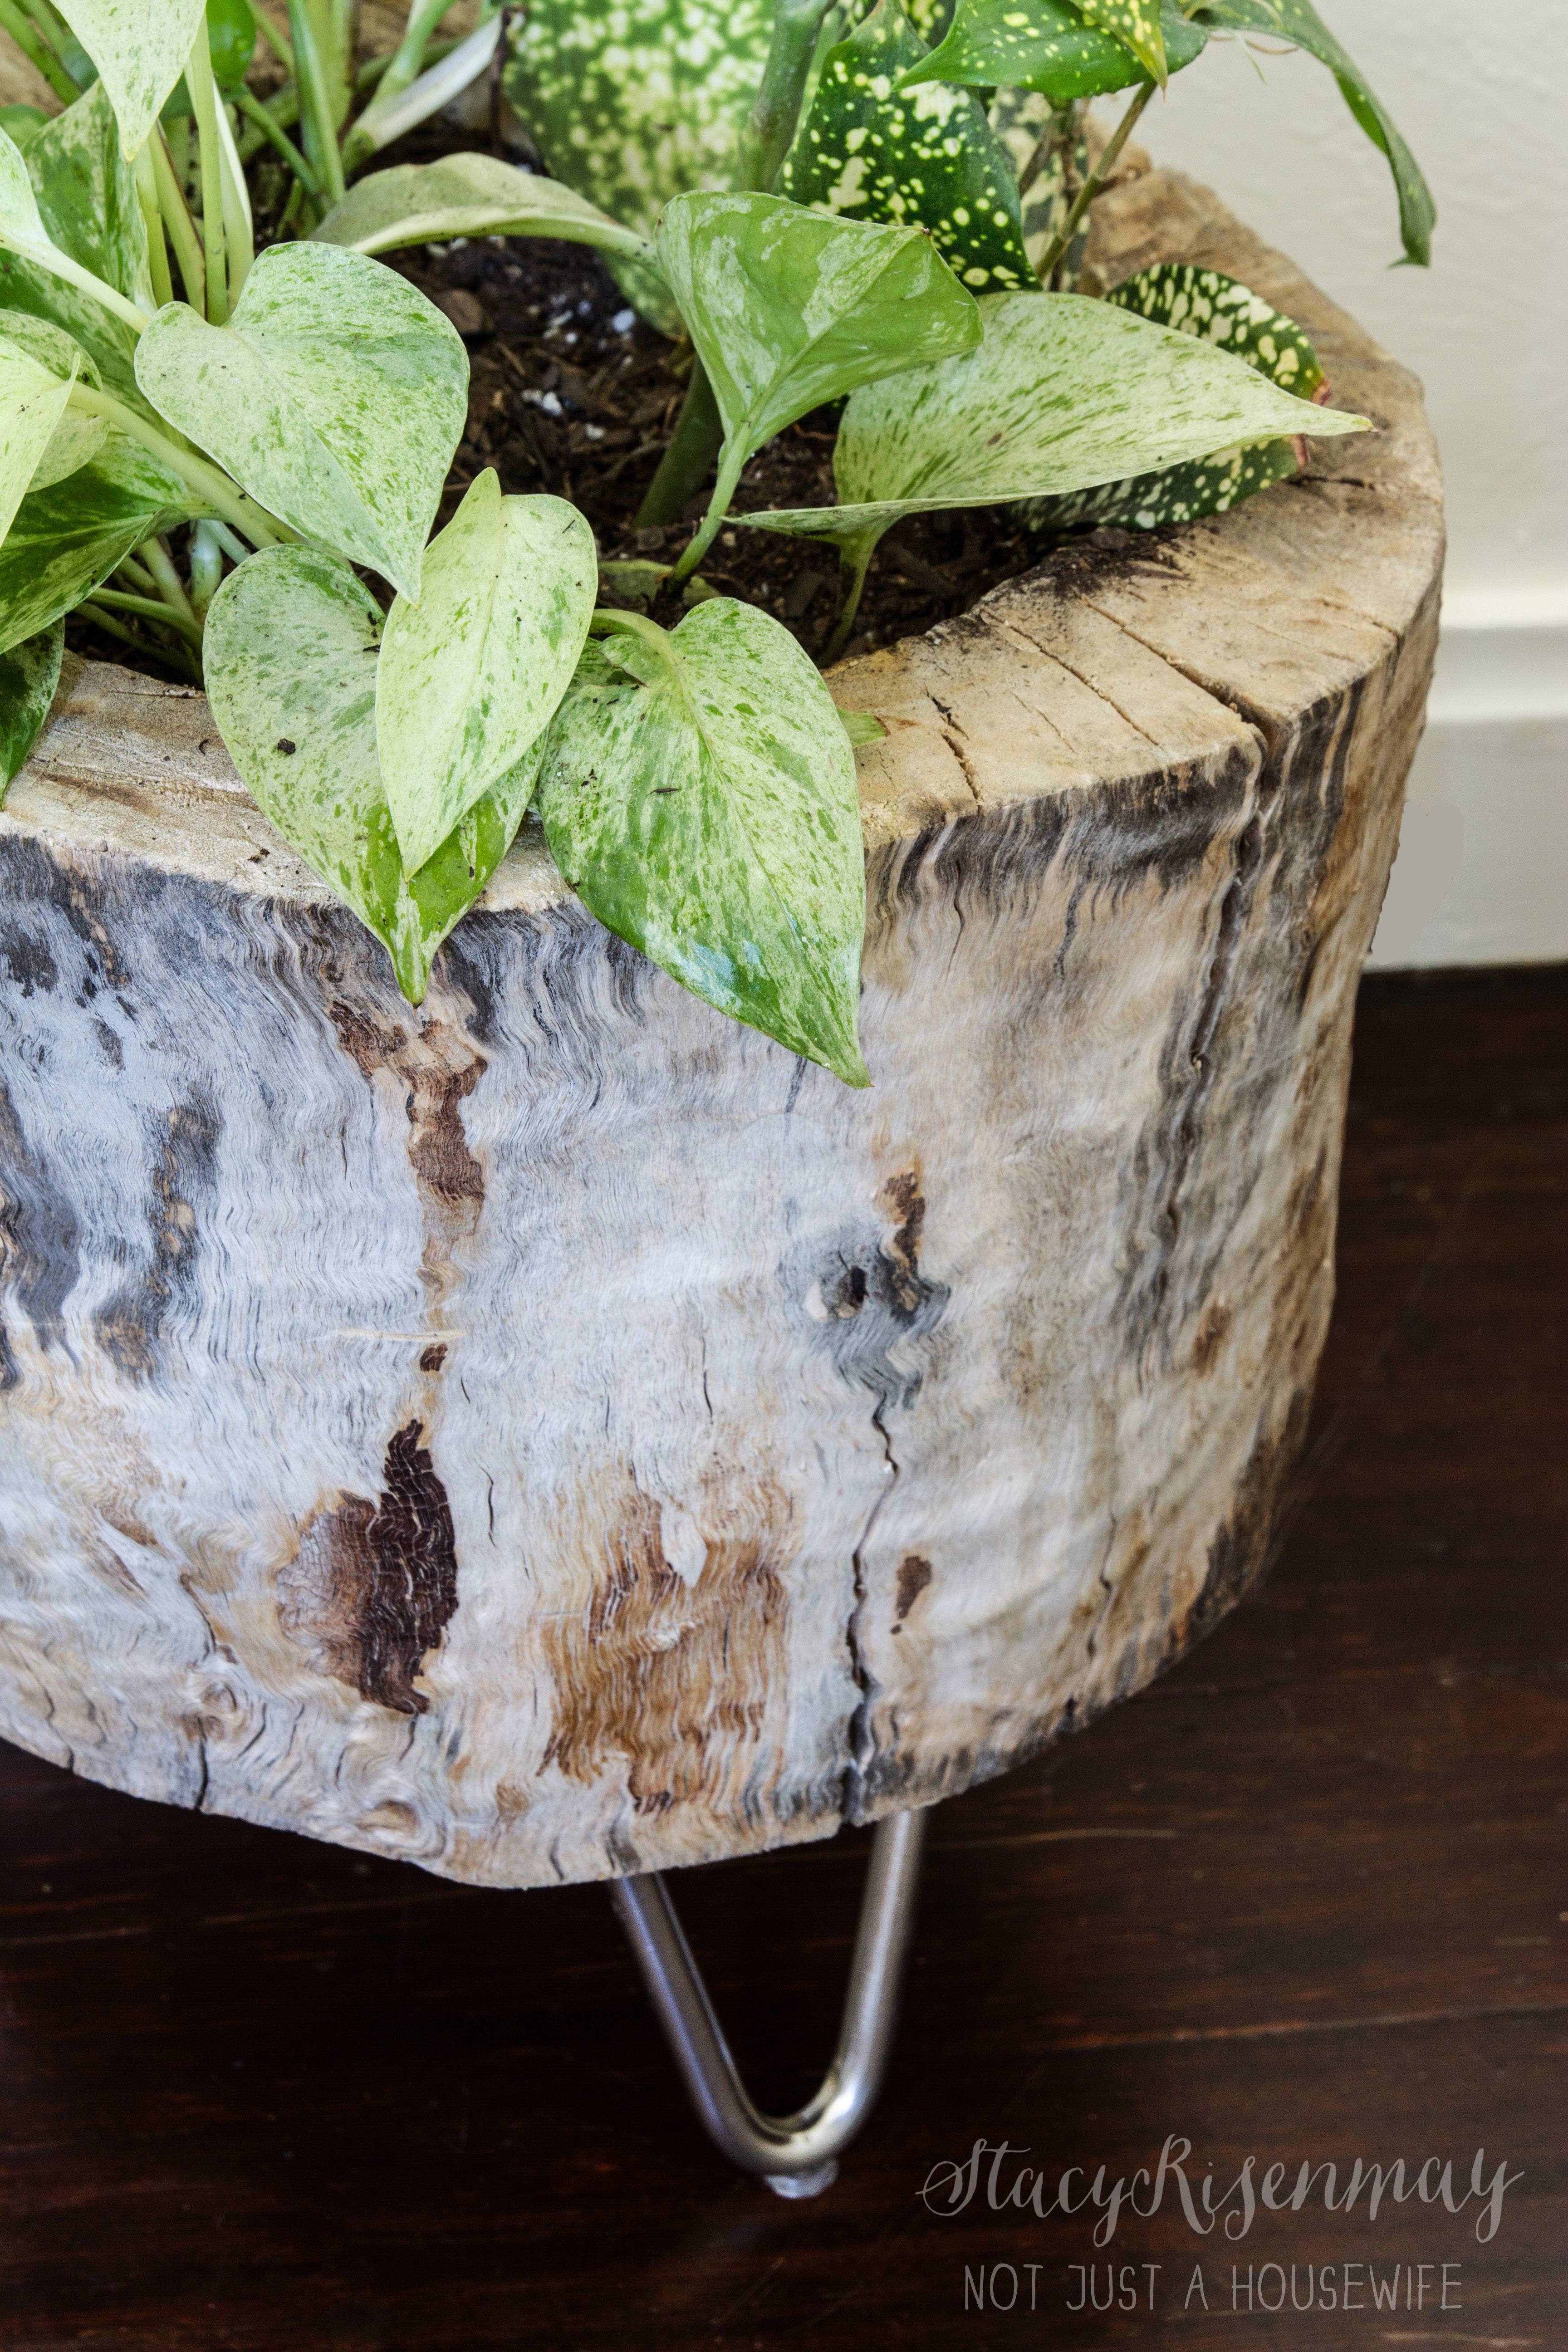
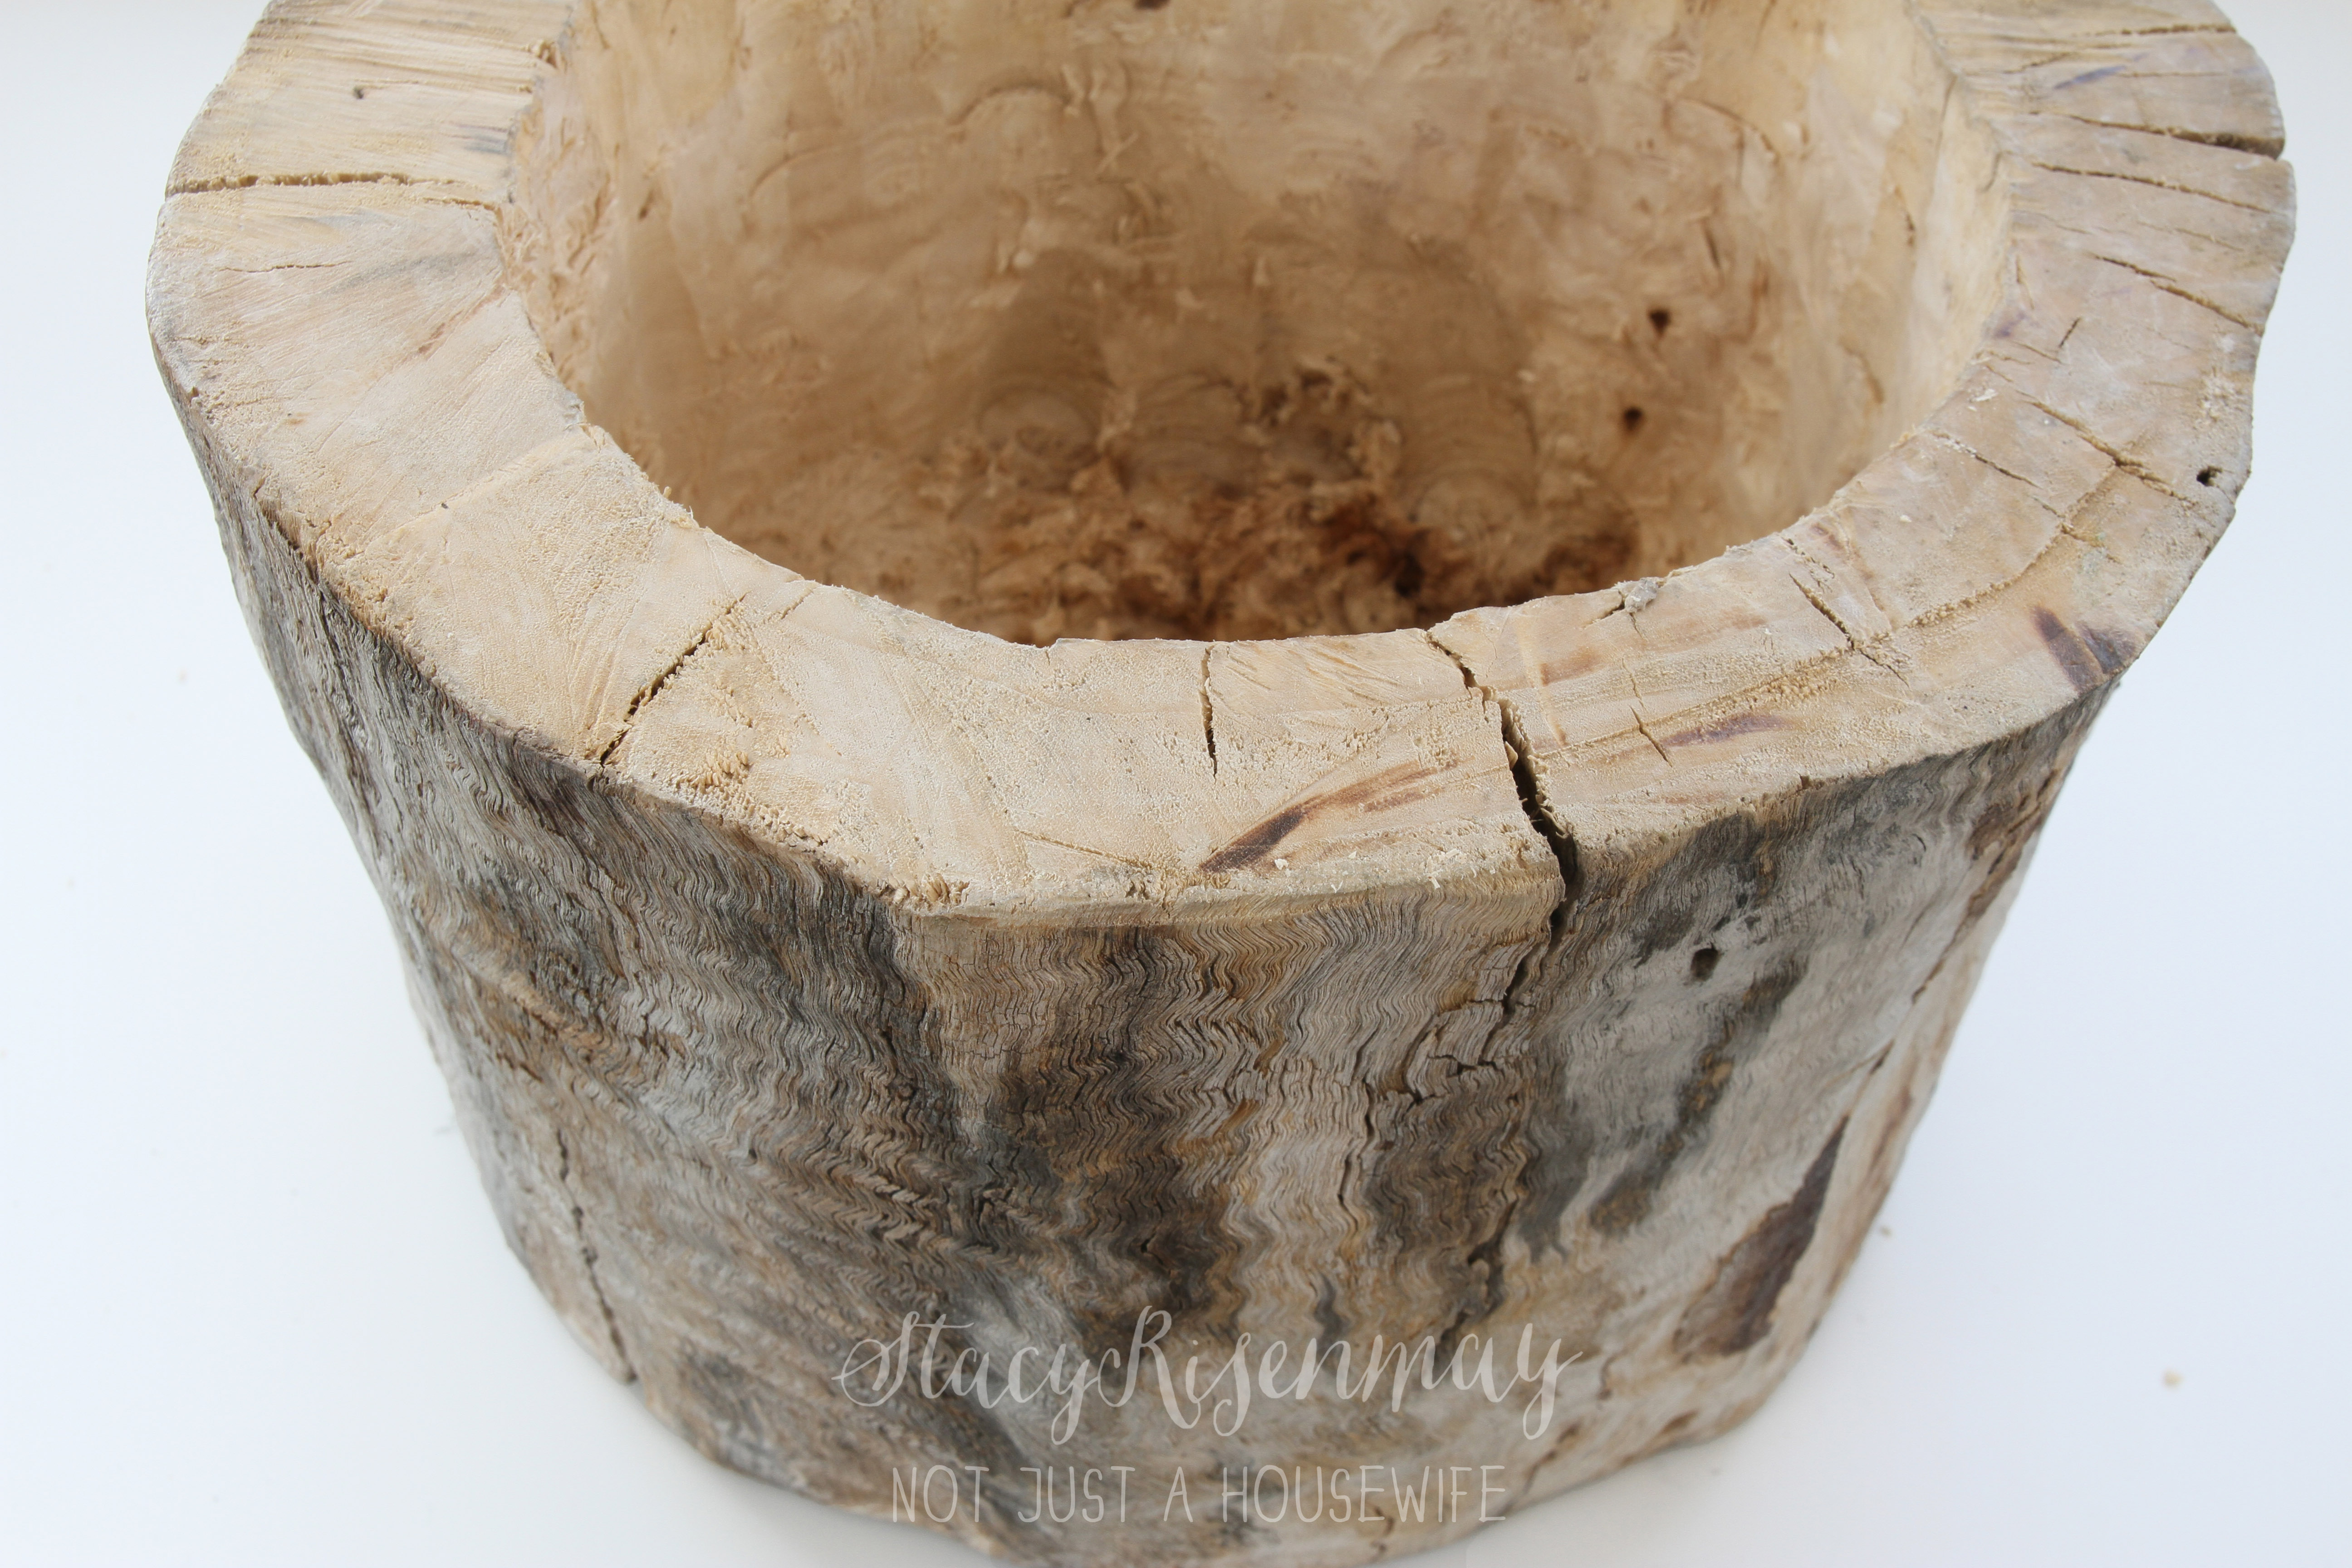
     You can see the bottom is all gray from being weathered. It is not as smooth as the top was since it was cut with a different chainsaw.


    Then I sealed the inside of it with Helmsman.

    seal inside_edited-1


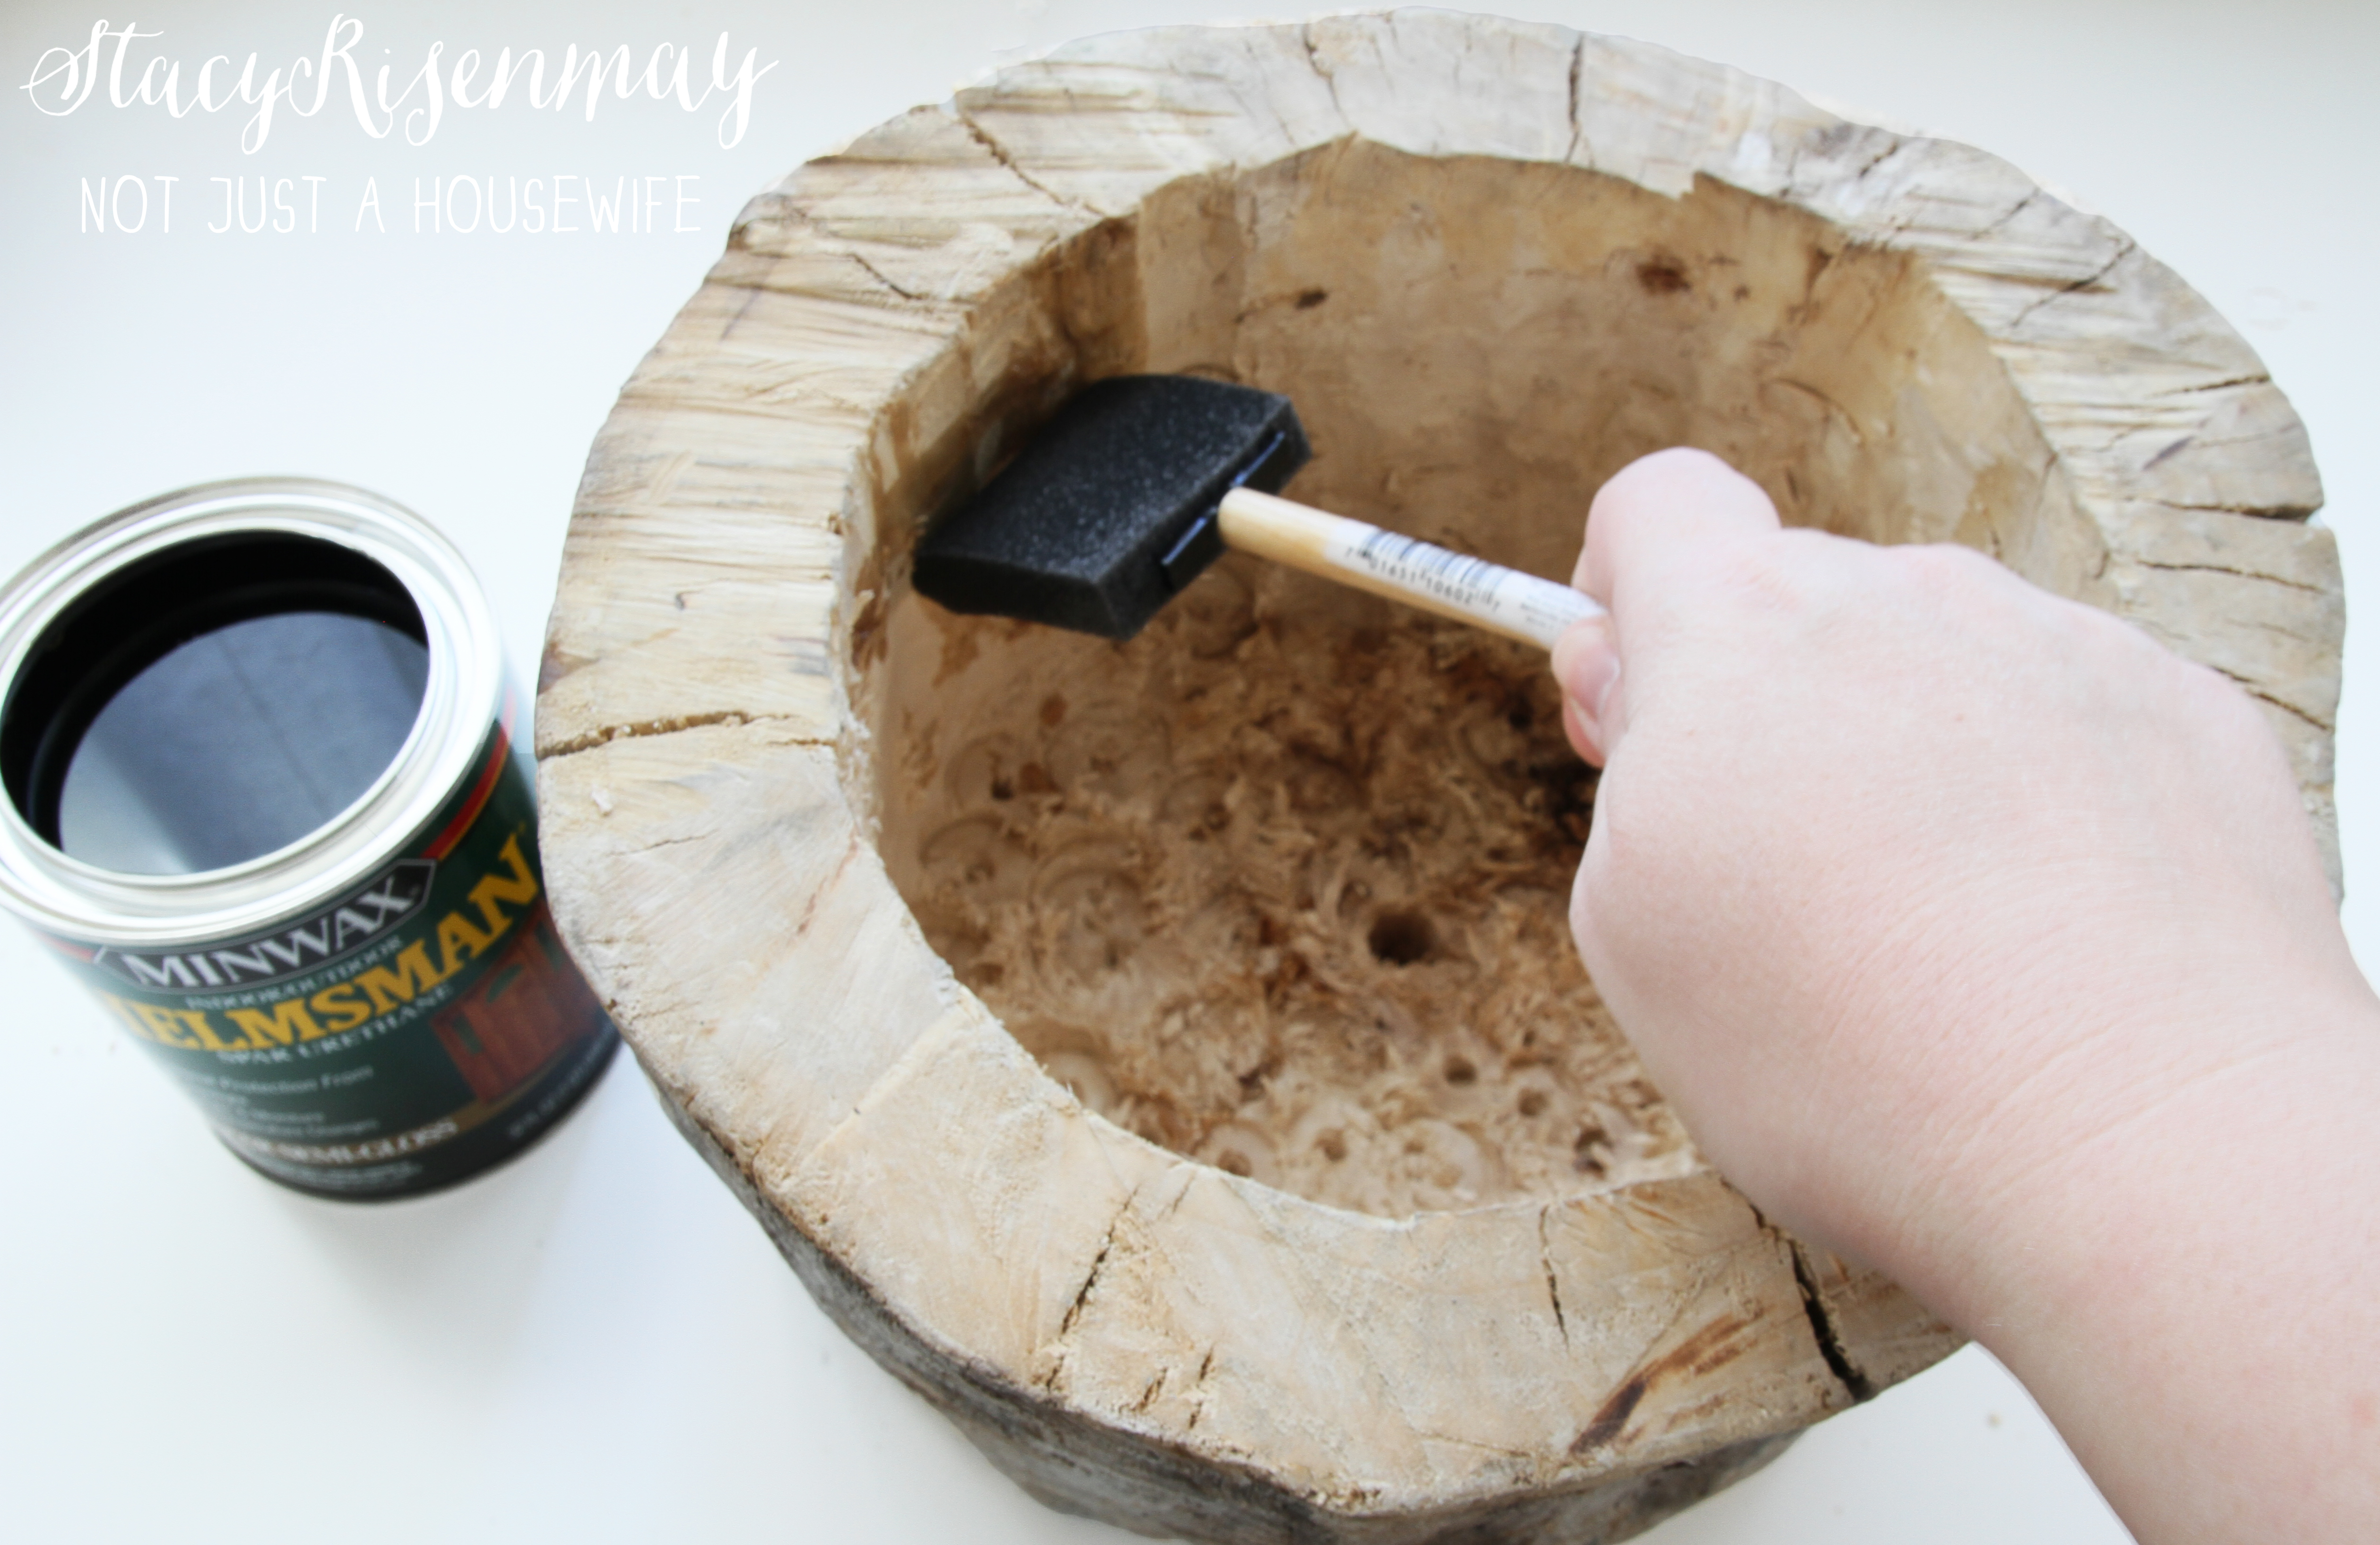
    I also sealed the bottom since it would get wet as water drains out. Once it was dry I added the legs.

    add legs


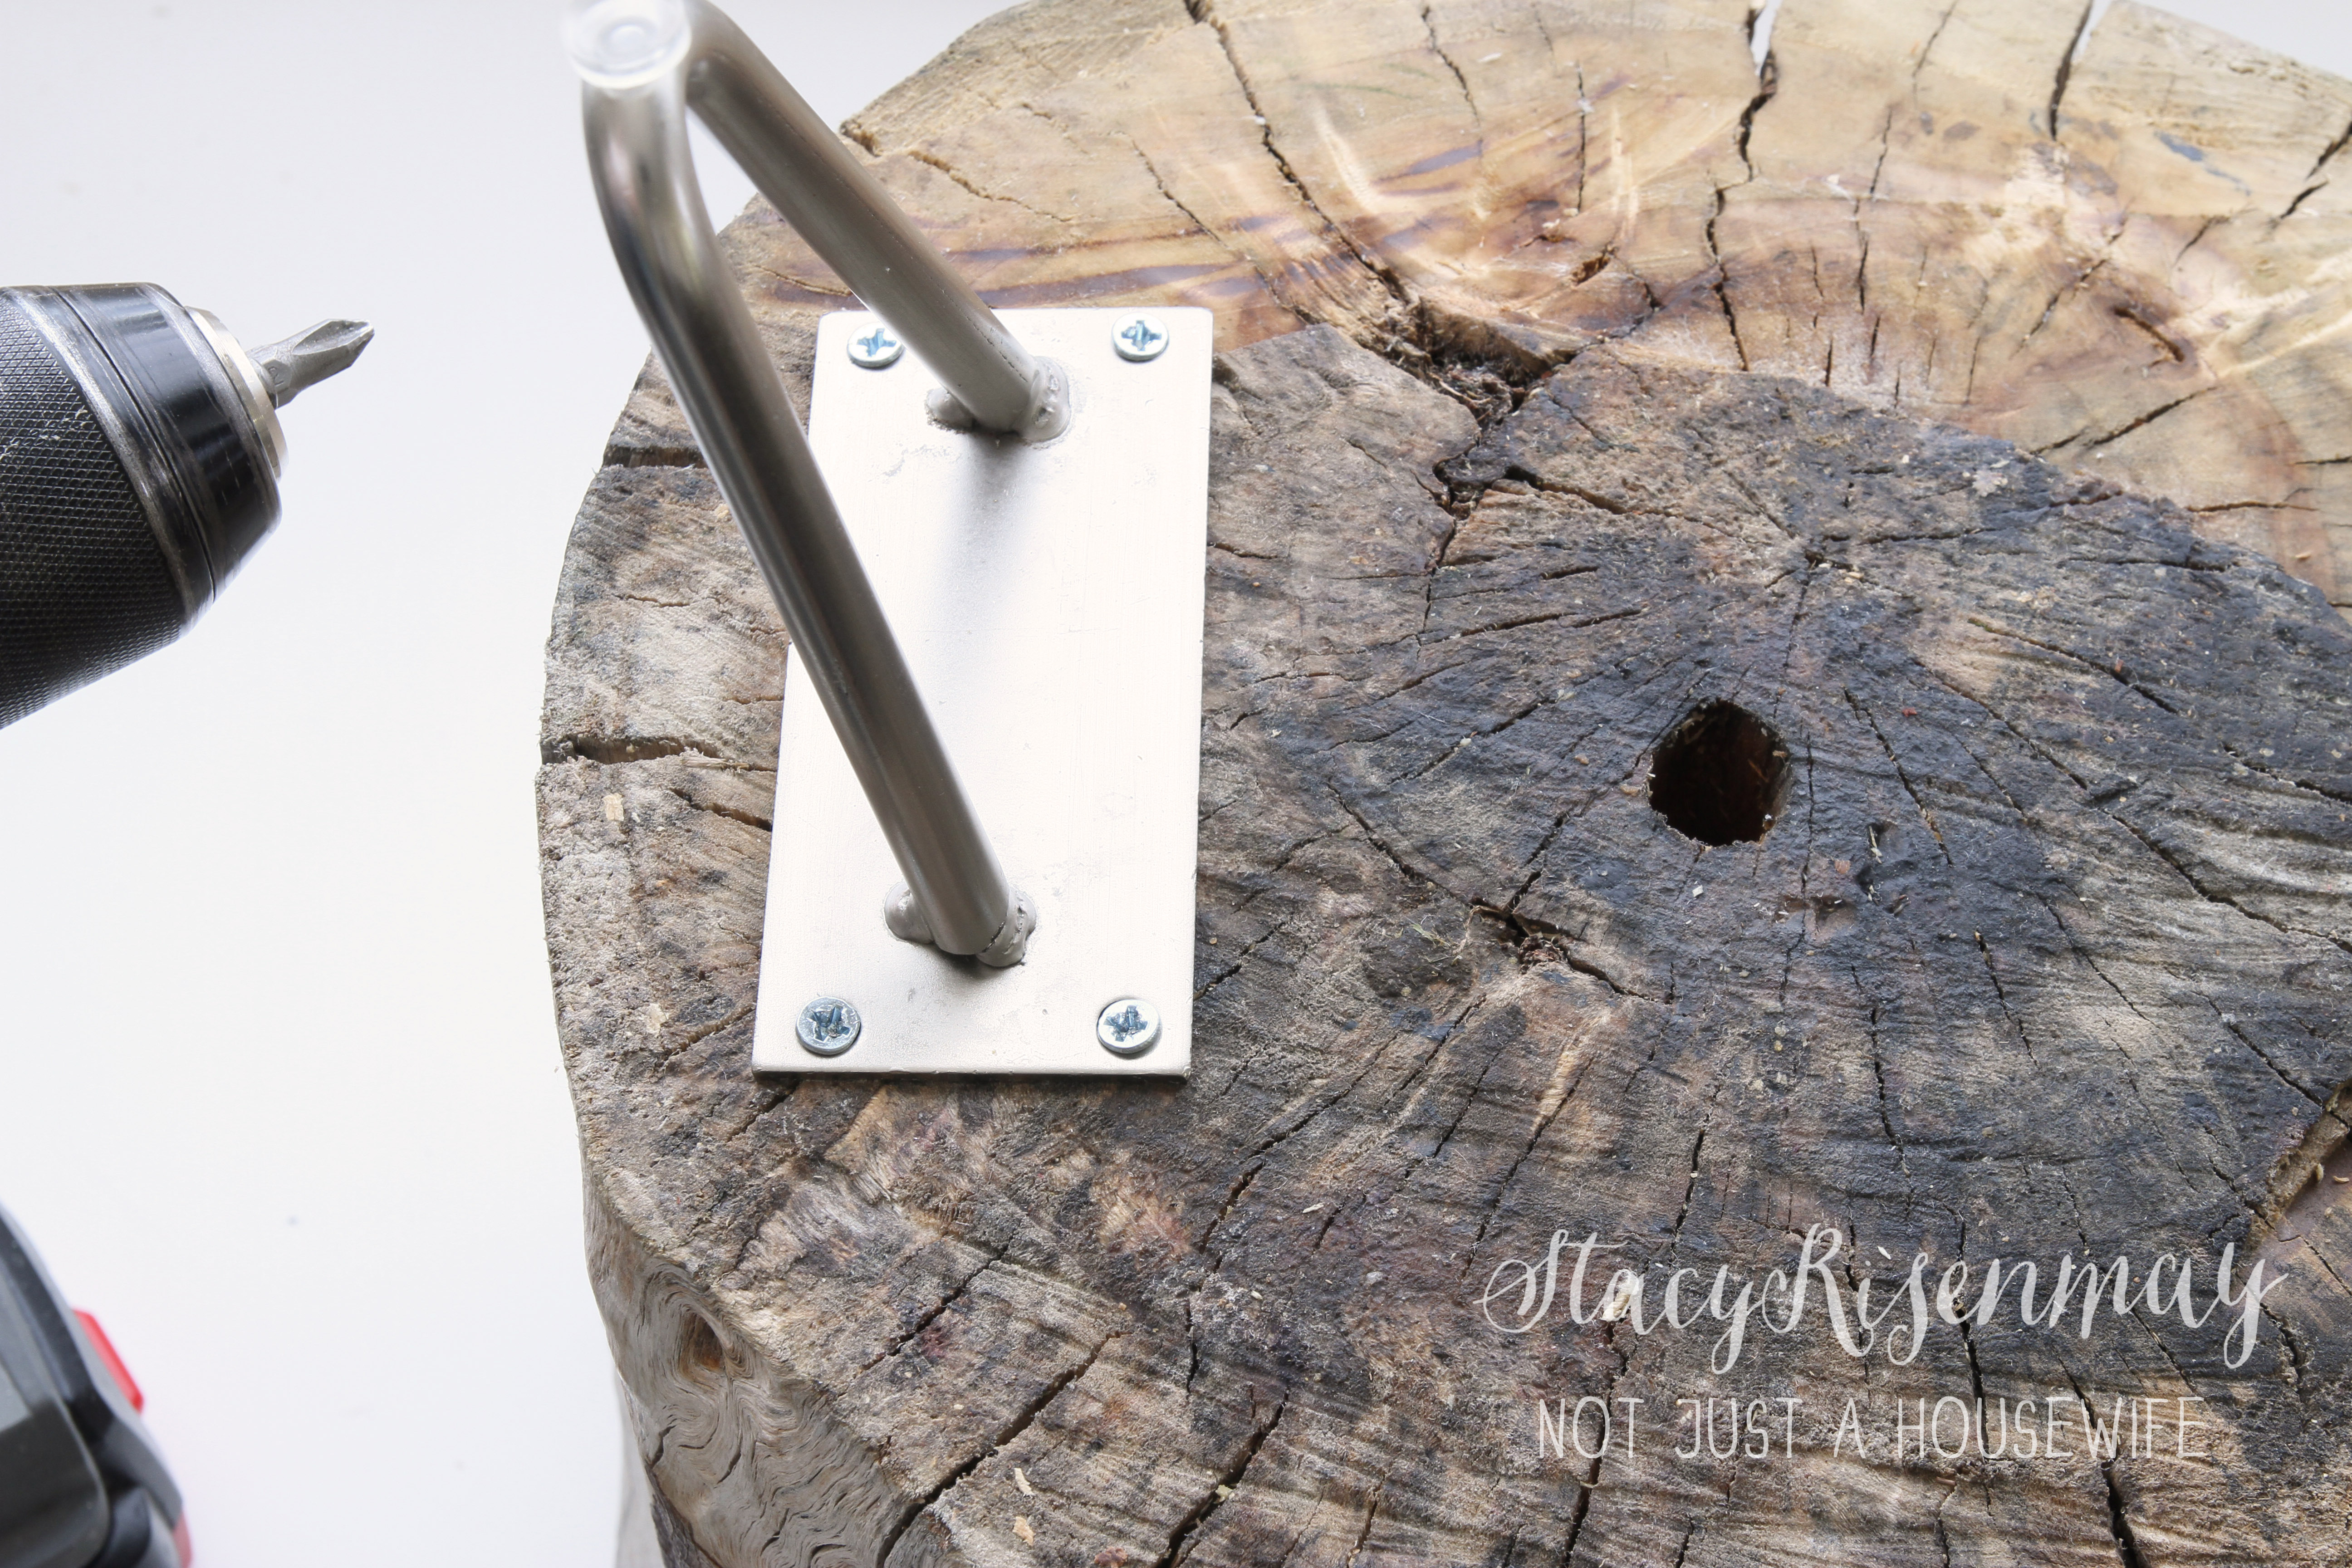
    Three legs worked perfectly! I transplanted the plants that were in my mason jar wall planter into this planter. One of them was an original plant. A couple had been in the jars for a year and a half or more and were ready for a new home.

    modern log planter


    I have been making even more tree stump projects for my book and it is killing me not to share. But I love organic and rusticness of stumps and logs. What kind of fun things have you seen made out of tree stumps?


    ryobi badge_edited-1


    *I was given a Ryobi 40 volt Brushless chainsaw to use and review but the thoughts and project idea are all my own.

    You will also like:

    • Office Closet Makeover {The Big Reveal!}Office Closet Makeover {The Big Reveal!}
    • Announcing: The Second Annual DIY Contest!!!Announcing: The Second Annual DIY Contest!!!
    • Cheerful Yellow Family Room {The BIG Reveal!!!!}Cheerful Yellow Family Room {The BIG Reveal!!!!}
    • Office Sneak Peek, Fingerprint Art, & The Early DaysOffice Sneak Peek, Fingerprint Art, & The Early Days
    • Removing Labels From Crates + Giveaway!Removing Labels From Crates + Giveaway!
    • My Driveway got a MAKEOVER!My Driveway got a MAKEOVER!
    • My *NEW* Closet!My *NEW* Closet!
    • Mason Jar Planter: UPDATEMason Jar Planter: UPDATE

    « Tips For A Simple Fall Tablescape
    What a Difference Shutters Can Make! »

    Filed Under: DIY & Tutorials, Favorites, Home Decor, Houseplants, Outdoor Projects & Gardening, Power Tools 75 Comments

    Subscribe

    for your weekly DIY fix.

    Reader Interactions

    Comments

    1. jessica rose

      November 18, 2014 at 4:37 am

      I love the idea of this although sadly I don't think my DIY skills are quite up to this.firstly I don't own a chain saw!! ;)

      Reply
    2. Mary Beth|Cupcakes and Crinoline

      November 18, 2014 at 7:29 am

      This is absolutely awesome, Stacy! I love the step-by-step instructions. I always wondered how to hollow out a stump and now I know and the end result is something I would definitely use in my home.

      Reply
    3. Laura

      November 18, 2014 at 7:40 am

      I love this! Now, I just need to find a beautiful tree stump. Ryobi tools are the best. They are pretty much all we use over here. I didn't know they had a chainsaw! We will have to look into that if our other one ever gives out.

      Reply
    4. Katie

      November 18, 2014 at 7:56 am

      Ahhh I love this! I've always wanted to do a planter or even a table like this! So cool!

      Reply
    5. Johnnie Lanier

      November 18, 2014 at 8:05 am

      Stacy, I LOVE this!! Great idea. I wanna use a chainsaw now ;)

      Reply
    6. Vidya @ Whats Ur Home Story

      November 18, 2014 at 8:16 am

      This is seriously awesome. Totally planning to make it. Pinning.

      Reply
    7. sarah krouse

      November 18, 2014 at 8:19 am

      What a great project to add to my list! Love what you were able to accomplish - thanks for sharing your resources.

      Reply
    8. Gina

      November 18, 2014 at 8:29 am

      This turned out great! I really like the contrast between the modern, metal legs and the earthy stump. What a great project :)

      Reply
    9. Bonnie P

      November 18, 2014 at 8:49 am

      Where did you purchase the legs from? Really nice project!

      Reply
      • Stacy Risenmay

        November 18, 2014 at 9:17 am

        I can't remember because it was so long ago but it was either etsy or eBay. You can find people who make and sell them for a decent price. Otherwise they can be pretty pricy.

        Reply
        • Stacy

          November 18, 2014 at 11:57 am

          Okay I dug around a bit and looked at my order histories on both sites. It was on eBay and here is the guy I bought them from: http://www.ebay.com/usr/omjsupply?_trksid=p2059210.m2749.l2754

          When I bought them they were $19 and now they are selling for $24. You may be able to find a better deal.

          Reply
    10. Jen Goode

      November 18, 2014 at 9:46 am

      Love Love Love - what a beautiful accent for your home and I adore that it's a natural up-cycle too. Thank you for sharing - Gorgeous!

      Reply
    11. Katie {Sweet Rose Studio}

      November 18, 2014 at 9:52 am

      What a genius idea Stacy! I would have never thought to put this together!

      Reply
    12. Natalie @ A Turtle's Life for Me

      November 18, 2014 at 10:14 am

      Love it! We have tree stumps from last winter's storms and I've had an idea in my head for something similar, but nowhere near as cool as yours turned out! Great job!

      Reply
    13. Mindi

      November 18, 2014 at 11:18 am

      This is awesome Stacy!! I love it!

      Reply
    14. Kim @ Sand & Sisal

      November 18, 2014 at 11:21 am

      Seriously Stacy, this is one of the coolest projects I have seen in a long time! I LOVE it..... and will be making one! Can you share where you found the feet?
      PS: Ryobi Rocks!!!!

      ~ KIM ;)

      Reply
    15. Amy C

      November 18, 2014 at 11:41 am

      Stacy, this planter is FANTASTIC!!! I may have been a little too giddy when I saw it but wow! Great job!

      Reply
    16. Julie

      November 18, 2014 at 12:15 pm

      Woah, that is so cool. And check you out with the power tools!

      Reply
    17. Chelsea

      November 18, 2014 at 12:38 pm

      This is gorgeous!!

      Reply
    18. Amy Anderson

      November 18, 2014 at 3:57 pm

      I love this so much! It's awesome!

      Reply
    19. Jenna

      November 19, 2014 at 4:22 am

      You always have the coolest planters!! I love this idea- especially the hairpin leg addition!

      Reply
    20. Leanne

      November 19, 2014 at 11:13 am

      Oh my goodness, I just love this! I have 2 stumps sitting at the side of my house. I need to do this! Pinned!

      Reply
    21. Nikki @ Tikkido

      November 19, 2014 at 11:36 am

      Wow, that's absolutely gorgeous! The color of the wood, the hairpin legs... perfection!

      Reply
    22. Chelsea

      November 19, 2014 at 6:32 pm

      You are so clever, Stacey!! This is so cool. Thanks for the detailed tutorial I totally want to do this!

      Reply
    23. Michele McDonald

      November 19, 2014 at 7:17 pm

      That is gorgeous, Stacy!! It looks like a high end piece from a fancy store. LOVE the rustic-ness of it!

      Reply
    24. KC Coake

      November 19, 2014 at 7:20 pm

      Love this! It is so pretty!

      Reply
    25. Sandy

      November 20, 2014 at 5:05 pm

      i love this! Did you do any thing to the out side of the stump?

      Reply
    26. Toni

      April 06, 2015 at 3:10 am

      Hello there. I'm an art and design student from the Philippines. Your innovative and super creative DIY stuff has inspired me to make something great out of my free weekends and summer vacation. I accidentally stumbled on your website and lucky me, I've found a treasure trove of wonderful DIY ideas. Your site has now been saved as a favorite. Please keep on doing what you do best. God bless and good luck.

      Reply
    27. Jennifer

      April 09, 2015 at 3:11 am

      I love log planters. For those who do not have access to equipment, I sell small planters on Etsy. https://www.etsy.com/listing/217700676/a-true-conversation-piece-rustic-log?ref=shop_home_active_7

      Reply
    28. Angie

      May 05, 2015 at 8:18 pm

      This is gorgeous. I love your taste in pairing rustic with modern. Quick question- did you line the inside with anything after sealing or put anything on the bottom? I see you drilled a drainage hole but don't have a drip pan underneath. How do you avoid water dripping on your floor? Thanks for any info you can provide! LOVE IT!!!!

      Reply
      • Jamie

        October 21, 2015 at 11:32 am

        I second this question!

        Reply
        • Stacy

          October 21, 2015 at 11:35 am

          I only watered once a week with about 1 cup of water. So it doesn't leak. But if I water any plant more than that (if it needs a good soak) then I carry it to the sink to water it and let it drip there before putting it back in it's place.

          Reply
    29. Vera

      June 20, 2015 at 7:35 am

      i love this. I would buy it if you had them for sale! Great job!

      Reply
    30. Katy

      June 24, 2015 at 8:22 am

      Ah! I love you took it mid century instead of the normal rustic route. I feel like I see mid century everywhere lately, in a few pieces mixed into fairly traditional homes.

      http://www.alittledailyhappiness.com/mid-century-modern-combinations/

      Reply
    31. Roslyn

      February 01, 2016 at 5:28 pm

      Hi, really like your planter. It looks great. Can you tell me where you purchased the metal legs for your tree stump planter?

      Thanks,

      Reply
    32. marissa | rae gun ramblings

      February 25, 2016 at 12:15 am

      I am in awe. That thing is fantastic. I want one but I kill plants so it wouldn't look that awesome for long ha

      Reply
    33. may

      March 26, 2016 at 7:47 pm

      Hello!
      I love your modern wood planter! How much do you charge?

      Reply
    34. Cheryl Williams

      July 02, 2016 at 2:22 pm

      I've been holding on to a tree stump for ages but didn't know how to fix it into a planter. Now I do thanks to you. I'm sure it won't be as great as yours but if it looks near the same I'll be happy. I'm so thrilled. Thank you.

      Reply
    35. Mike Seymour

      November 22, 2016 at 7:37 am

      that is a real good idea i have some Boxelder stumps in my back yeard now I know what to do with them thank you.

      Reply
    36. Jennifer

      March 15, 2017 at 5:41 pm

      Did you have a powerful drill to start the first hole? I have a pretty decent drill working with a pine tree and I can not get it started.

      Reply
    37. Cinda

      May 18, 2017 at 2:23 pm

      Love the planter!
      But I really want to know where you got the legs for it. I need table height ones, maybe you can send me in the right direction?
      Thanks

      Reply
    38. Amy

      September 28, 2017 at 11:23 am

      Thank you so much for all the explanation and photos. I can't wait to make mine.

      Reply
    39. Ivory

      January 07, 2018 at 5:24 pm

      I love, love, love this project. This planter turned out fabulous. Happy 2018

      Reply
    40. Ivory

      May 04, 2018 at 6:27 pm

      I love this idea, I will be looking for large cutup firewood on side of road. Then do this. Thanks for sharing.

      Reply
    41. Cyndi Oliver

      September 03, 2018 at 9:57 am

      Thank you so much what an amazing project and I also love the contrast of metal on wood! I was looking for an easier way to hollow out a log without just using a chisel and you have achieved that for me. I used to do metal smithing. In order to make a bowl out of copper you need a dome shape to form the copper. That was what I was looking to do but now when I'm done, I'm gonna make me a planter. Well done.

      Reply
    42. Alexis

      September 21, 2018 at 2:19 pm

      OMG! I have found a beautiful tree stump at work that I really wanted to do somethng with. This is perfect! Its quite large so i am going to hollow out one side and make the other side into a coffee table! Thanks for the inspo and tips. xx

      Reply
    43. Barbara

      March 31, 2019 at 10:57 pm

      Love this planter.

      Reply
    44. Sean Collins

      November 07, 2019 at 4:57 pm

      Very cool thanks!

      Reply
    45. Marie Wyatt

      April 19, 2020 at 10:52 pm

      I love your ideas,and inexpensive, I'm a amateur gardener, like trying things, I'm using some of yourideas.

      Reply
    46. Jerry Delan

      June 30, 2020 at 12:32 pm

      Your did a terrific job. You left out, As how you removed the wood from the center core. Did you grill more 1 1/4” holes and use a
      Chisel? To go to the 6” depths did you tier down with the 1 1/4” bit and chisel.
      Hope you respond back to me. Jerry

      Reply
    47. Anne Schneider

      October 10, 2020 at 2:04 pm

      Did I miss the part when you finished sealing, did you add potting soil?

      Reply
    48. lisa

      February 11, 2021 at 4:50 pm

      where diid you purchase the legs?

      Reply

    Trackbacks

    1. Fresh Ideas for your Home | I'm Lovin' It | TidyMom says:
      January 8, 2015 at 6:01 pm

      […] Modern Tree Stump Planter tutorial at Not Just a Housewife […]

      Reply
    2. How to Recycle Tree Stumps for Garden Art and Yard Decorations says:
      February 7, 2016 at 3:51 pm

      […] Modern Tree Stump Planter: I added a modern touch to a tree stump planter that I made. Come see how you can make one yourself! (via Not Just a Housewife) […]

      Reply
    3. DIY Hollowed Tree Wood Planters says:
      February 15, 2016 at 3:04 pm

      […] Tree Stump Planter Tutorial via Not Just a Housewife […]

      Reply
    4. Aprovechar el tocón de un árbol para decorar y construir says:
      February 23, 2016 at 1:03 pm

      […] Fuente: notjustahousewife […]

      Reply
    5. Indoor Gardening Gets A Makeover With These 15 Unique Planter Ideas – Earth911.com | Organic Garden Mart says:
      February 24, 2016 at 6:12 am

      […] This Modern Tree Stump Planter is a beautiful and unique way to display your favorite plants in your home. Image Credit – Stacy Risenmay, Not Just A Housewife […]

      Reply
    6. Indoor Gardening Gets A Makeover With These 15 Unique Planter Ideas – Earth911.com | Patio easy says:
      February 24, 2016 at 7:25 am

      […] This Modern Tree Stump Planter is a beautiful and unique way to display your favorite plants in your home. Image Credit – Stacy Risenmay, Not Just A Housewife […]

      Reply
    7. Indoor Gardening Gets A Makeover With These 15 Unique Planter Ideas – Earth911.com | Garden Solutions Mart says:
      February 24, 2016 at 8:34 am

      […] This Modern Tree Stump Planter is a beautiful and unique way to display your favorite plants in your home. Image Credit – Stacy Risenmay, Not Just A Housewife […]

      Reply
    8. Indoor Gardening Gets A Makeover With These 15 Unique Planter Ideas - Earth911.com says:
      February 25, 2016 at 9:43 am

      […] This Modern Tree Stump Planter is a beautiful and unique way to display your favorite plants in your home. Image Credit - Stacy Risenmay, Not Just A Housewife […]

      Reply
    9. Como aprovechar el tocón de un árbol para sumarlo a la decoración - Decoracion.red says:
      March 4, 2016 at 3:19 am

      […] Fuente: notjustahousewife […]

      Reply
    10. How to DIY Hollowed Tree Planters • How to says:
      April 2, 2016 at 1:27 am

      […] Tree Stump Planter Tutorial via Not Just a Housewife […]

      Reply
    11. Ela faz vários buracos no tronco de uma árvore. O resultado é simplesmente magnífico! - Histórias Com Valor says:
      May 31, 2016 at 9:04 am

      […] Not Just a Housewife […]

      Reply
    12. Ela faz vários buracos no tronco de uma árvore. O resultado é simplesmente magnífico! - Partilha.me says:
      May 31, 2016 at 9:41 am

      […] Not Just a Housewife […]

      Reply
    13. How to turn tree stumps and logs into planters - Trending Buzzer says:
      June 1, 2016 at 12:38 am

      […] NOT JUST A HOUSEWIFE This chic alternative is a way to turn that log into a permanent indoor pot. Armed with a can of sealant and a few inexpensive legs, Stacy Risenmay turned a short log into a planter that could easily pass for an expensive home decor item. You can see her full walkthrough on her blog, Not Just a Housewife. Inspired yet? Whether looking for a polished finish or a more rustic look, stumps, logs and branches make great planters. Try making smaller planters as outdoor centerpieces or as give-aways at your next gathering. […]

      Reply
    14. Tree Stump Interior Projects That Will Leave You Speechless - feelitcool.com says:
      August 22, 2016 at 4:23 pm

      […] Image via: notjustahousewife.net […]

      Reply
    15. 16 Amazingly Creative DIY Planter Ideas You Could Make In An Hour | homedesignfind says:
      November 30, 2016 at 12:50 pm

      […] Source […]

      Reply
    16. 16 DIY Ideas for How to Recycle Tree Stumps for Garden Decor - Style Motivation says:
      March 13, 2017 at 2:15 pm

      […] Modern Tree Stump Planter- Not Just a Housewife […]

      Reply
    17. Voici ce que vous pouvez faire en perçant une simple souche de bois. À en rendre jaloux votre voisinage! says:
      May 6, 2017 at 7:04 am

      […] un vrai, beaucoup plus coûteux. Pour plus d’informations sur la façon de procéder, visitez le blogue de Stacy Risenmays pour y découvrir les […]

      Reply
    18. Bohre ein paar Löcher in den Baumstumpf – deine Kreation lässt deine Nachbarn grün vor Neid werden! – LEBEN365.NET says:
      May 8, 2017 at 4:59 pm

      […] schönen Pflanzentopf, der sehr dekorativ ist. Wie du dies anstellst, kannst du auf Stacy Risenmays Blog […]

      Reply
    19. 17 Small Indoor Plant Ideas + Planters To Liven Up Your Apartment - The Gorgeous List says:
      November 7, 2018 at 9:03 pm

      […] Via Not Just A House Wife […]

      Reply
    20. Meet Stacy! - Sawdust 2 Stitches says:
      November 28, 2018 at 11:11 am

      […] As a self proclaimed plant lady, I love collecting plants and building planters for them. This slatted one has a modern feel and was super easy to make! I have made a hanging beaded planter, a set of three hexagon planters, and even one that was made from a tree trunk. […]

      Reply
    21. 17 Small Indoor Plants And Planter Ideas To Liven Up Your Apartment | The Gorgeous List says:
      December 10, 2018 at 4:43 pm

      […] Via Not Just A House Wife […]

      Reply
    22. 16 Creative & Luxurious DIY Plant Pot Ideas – Parison & Brush says:
      February 13, 2021 at 2:41 am

      […] Source: Not just a Housewife […]

      Reply
    23. Backyard planting ideas - SurroundYou Design LLC says:
      December 14, 2022 at 9:38 am

      […] adding some color with plants can convert them to beautiful planters for indoor or outdoor. Stacy Risenmay has a detailed Blog about how to hollow the Stumps and shows you what you need to do to make […]

      Reply

    Comment Below! Cancel reply

    Your email address will not be published. Required fields are marked *

    This site uses Akismet to reduce spam. Learn how your comment data is processed.

    Primary Sidebar

    stacyHey! I'm Stacy and am a DIY addict. I love to get my hands dirty, whether it's sawdust, paint, or dirt. My goal is to help YOU learn to fix up your home and yard. No matter the style or size, I think everyone should love their home. And it doesn't takes a big budget to get there. Let's DIY together!

    Subscribe to My Blog!

    Search this site

    categories


    Subscribe

    Footer

    Welcome! I'm sharing our adventures as we fix up our 1938 cottage. Whether it is big or small, I think everyone should love their home and I don't think it takes a lot of money to make a space your own

    About Stacy

    • Facebook
    • Instagram
    • Pinterest
    • Twitter

    My Favorites

    copyright

    All images and content are copyrighted via Stacy Risenmay unless otherwise stated. If you'd like to share my work, please link back to this blog.
    Thank you for visiting!


    Footer

    ↑ back to top

    About

    • Meet Stacy
    • Privacy Policy
    • Contact

    Categories 

    • Home Decor
    • Outdoor Projects & Gardening
    • DIY & Tutorials
    • Kid Activities
    • Recipes
    • Travel
    • Cleaning
    • Houseplants
    • Staining
    • Painting
    • Power Tools
    • Holiday Ideas

    Newsletter

    • Sign Up! for emails and updates

    As an Amazon Associate I earn from qualifying purchases.

    Copyright © 2020 Brunch Pro on the Brunch Pro Theme


    Privacy Policy
    Welcome! Thanks for visiting.
    Hi! I'm Stacy and I want to help YOU become a DIY rockstar! Sign up for my email list so each project, tip, and trick will go directly to your inbox :)
    Your information will *never* be shared or sold to a 3rd party. Pinky promise :)
    Welcome!
    Hi! I'm Stacy and I blog about fixing up our 1938 cottage. Join the thousand of others who get my posts sent to their inbox for FREE!
    Your information will *never* be shared or sold to a 3rd party.