• Skip to primary navigation
  • Skip to main content
  • Skip to primary sidebar
  • Skip to footer
Stacy Risenmay
  • Home
  • About me
  • PRESS
  • Contact Me
  • My Book
    • Facebook
    • Instagram
    • Pinterest
    • Twitter
menu icon
go to homepage
subscribe
search icon
Homepage link
  • Home
  • About me
  • Project Gallery
  • Our House
  • PRESS
  • Contact Me
  • Privacy Policy
    • Facebook
    • Instagram
    • Pinterest
    • Twitter
  • ×

    What a Difference Shutters Can Make!

    By Stacy 7 Comments

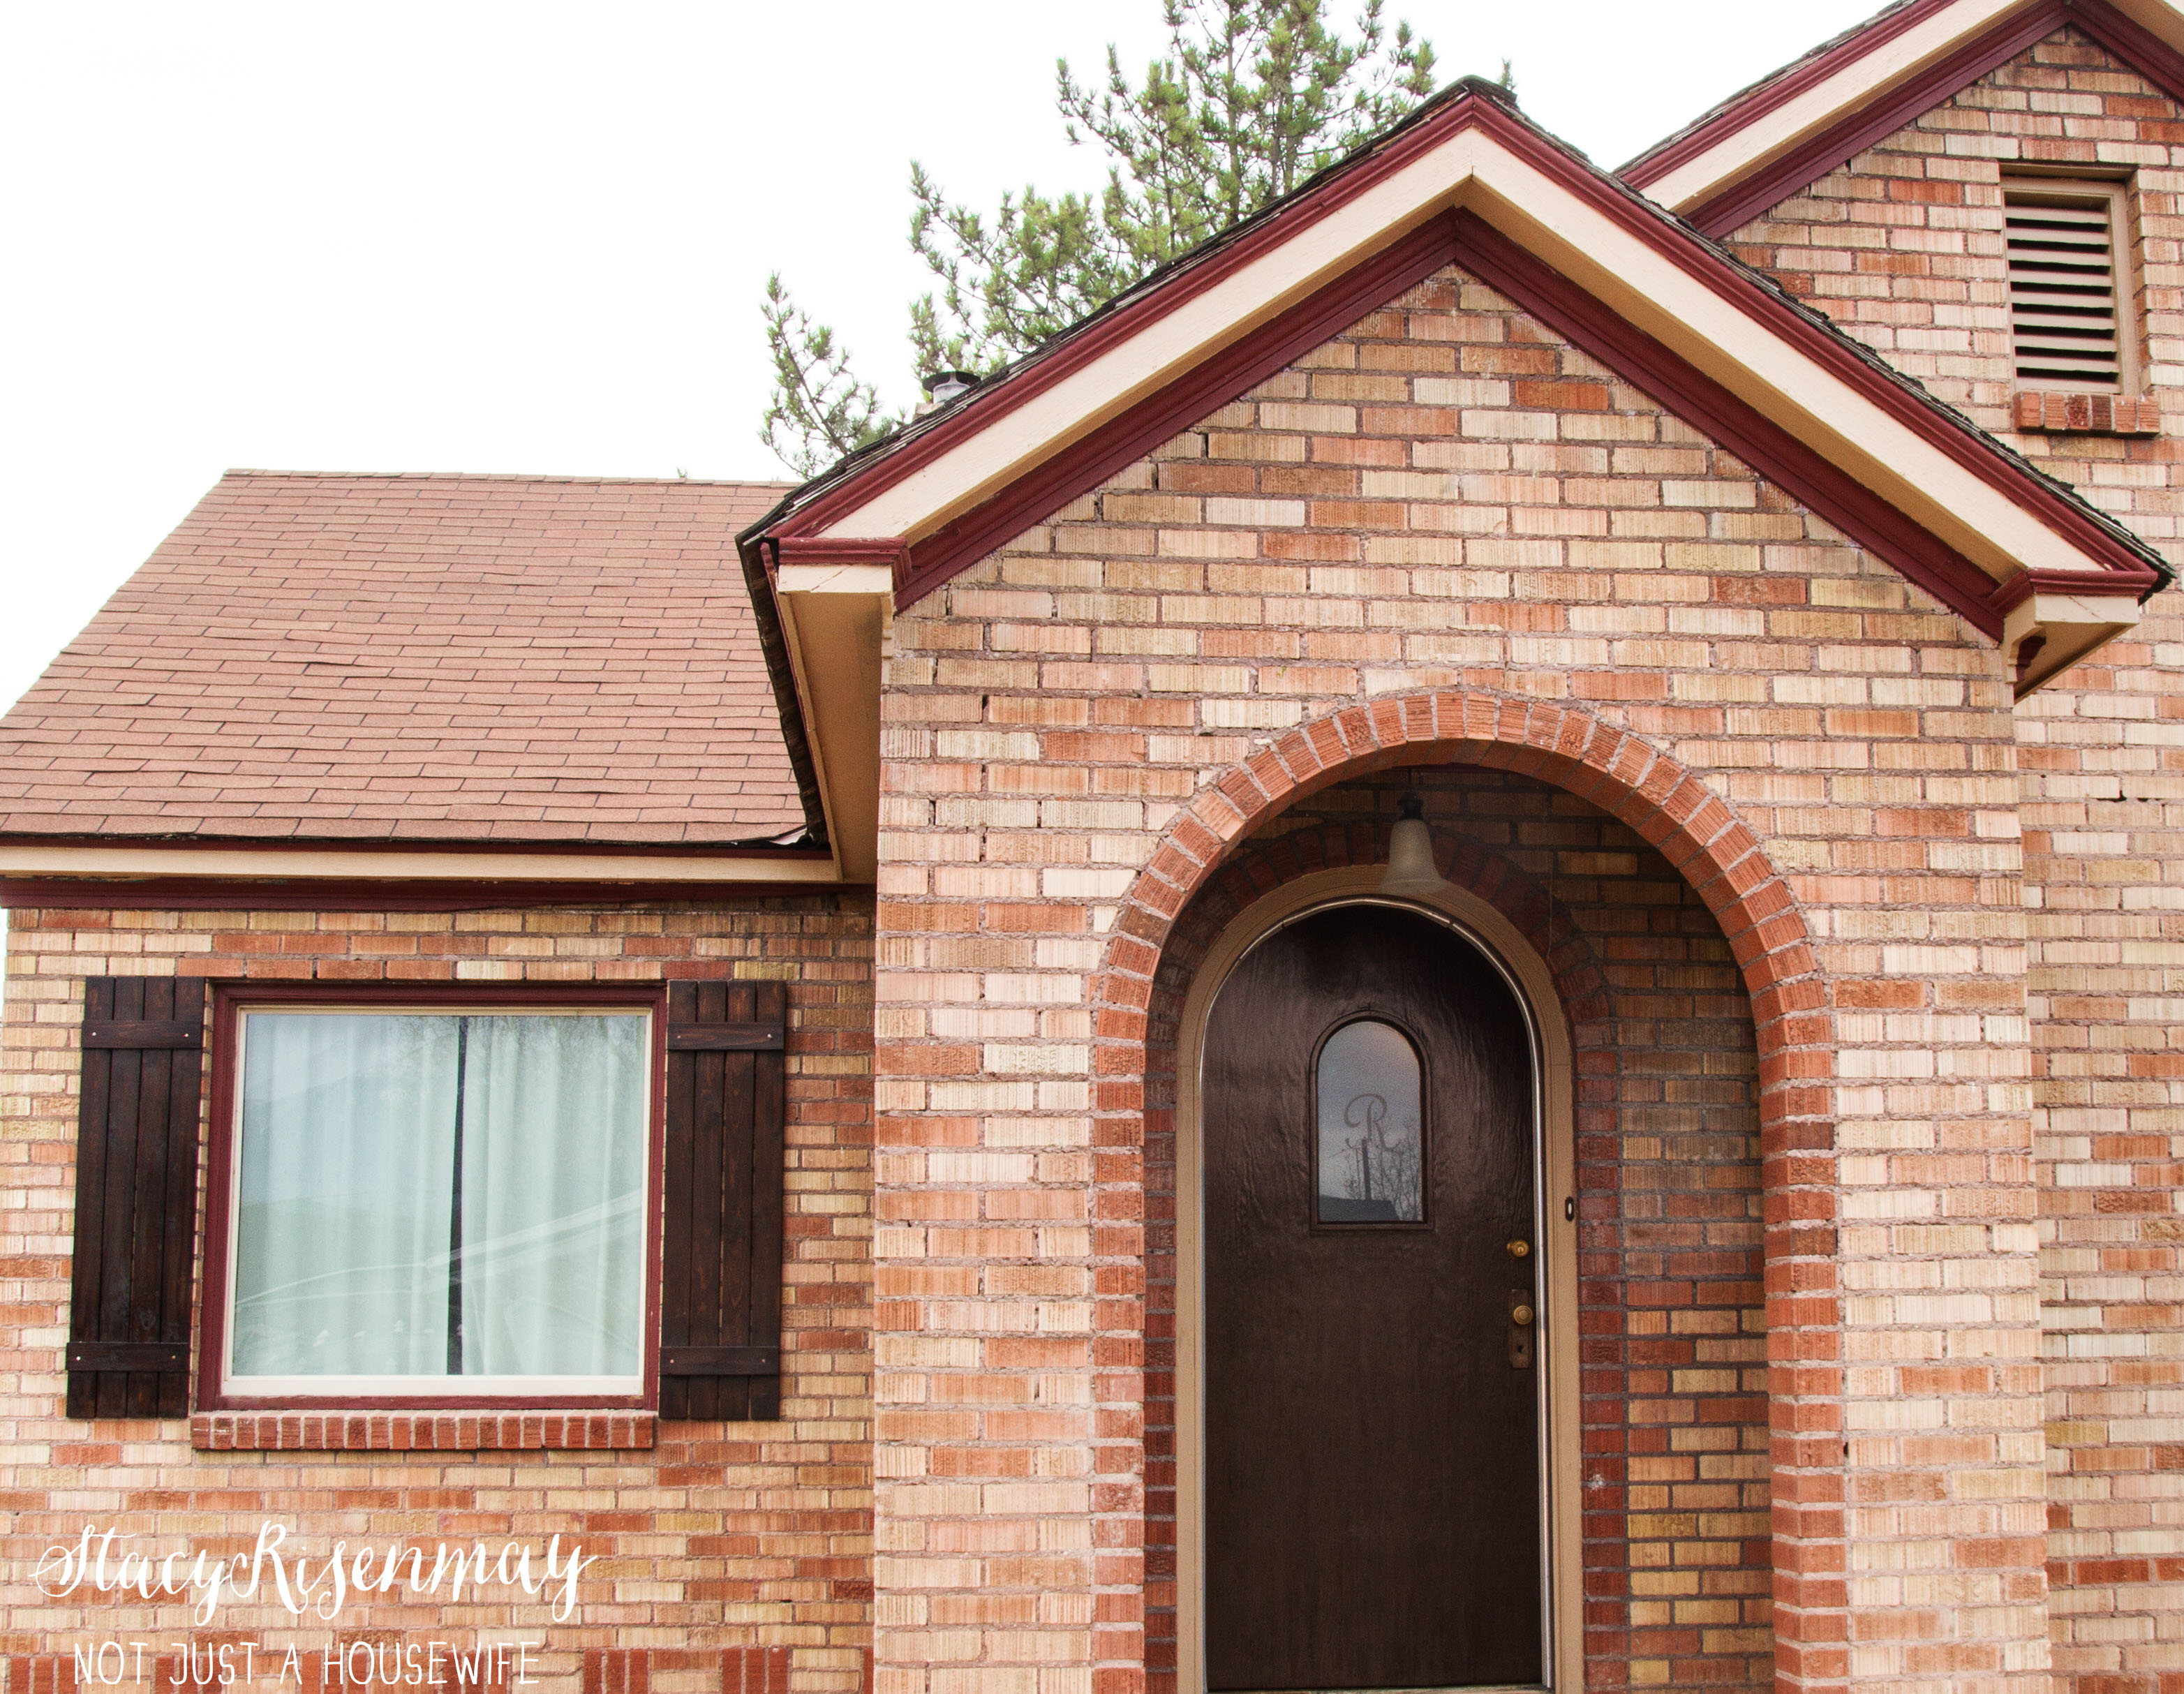
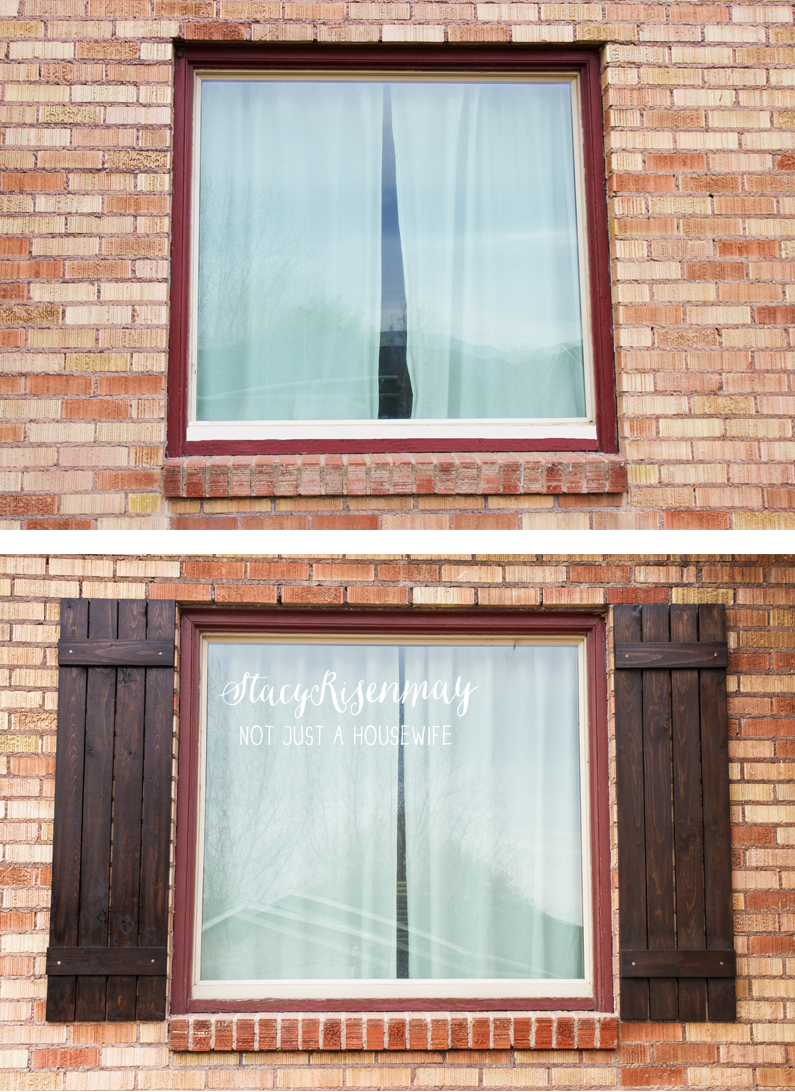
    Shutters have been on my list for ages and ages. I built these shutters this summer. I stained them in early fall. And I am just now getting around to hanging them. The second we had them up and I stood back to have a good look I said to Shane "Why did we wait so long to do this?" It was such a simple project and yet it has such a big impact.
    shutters on house


    Because I waited so long to hang them, my flower beds are full of dead and half dead flowers. It snowed but then melted. Nobody wants to see that mess! So I promise to do a full on reveal when it snows and covers my flower beds.

    shutters on brick cottage


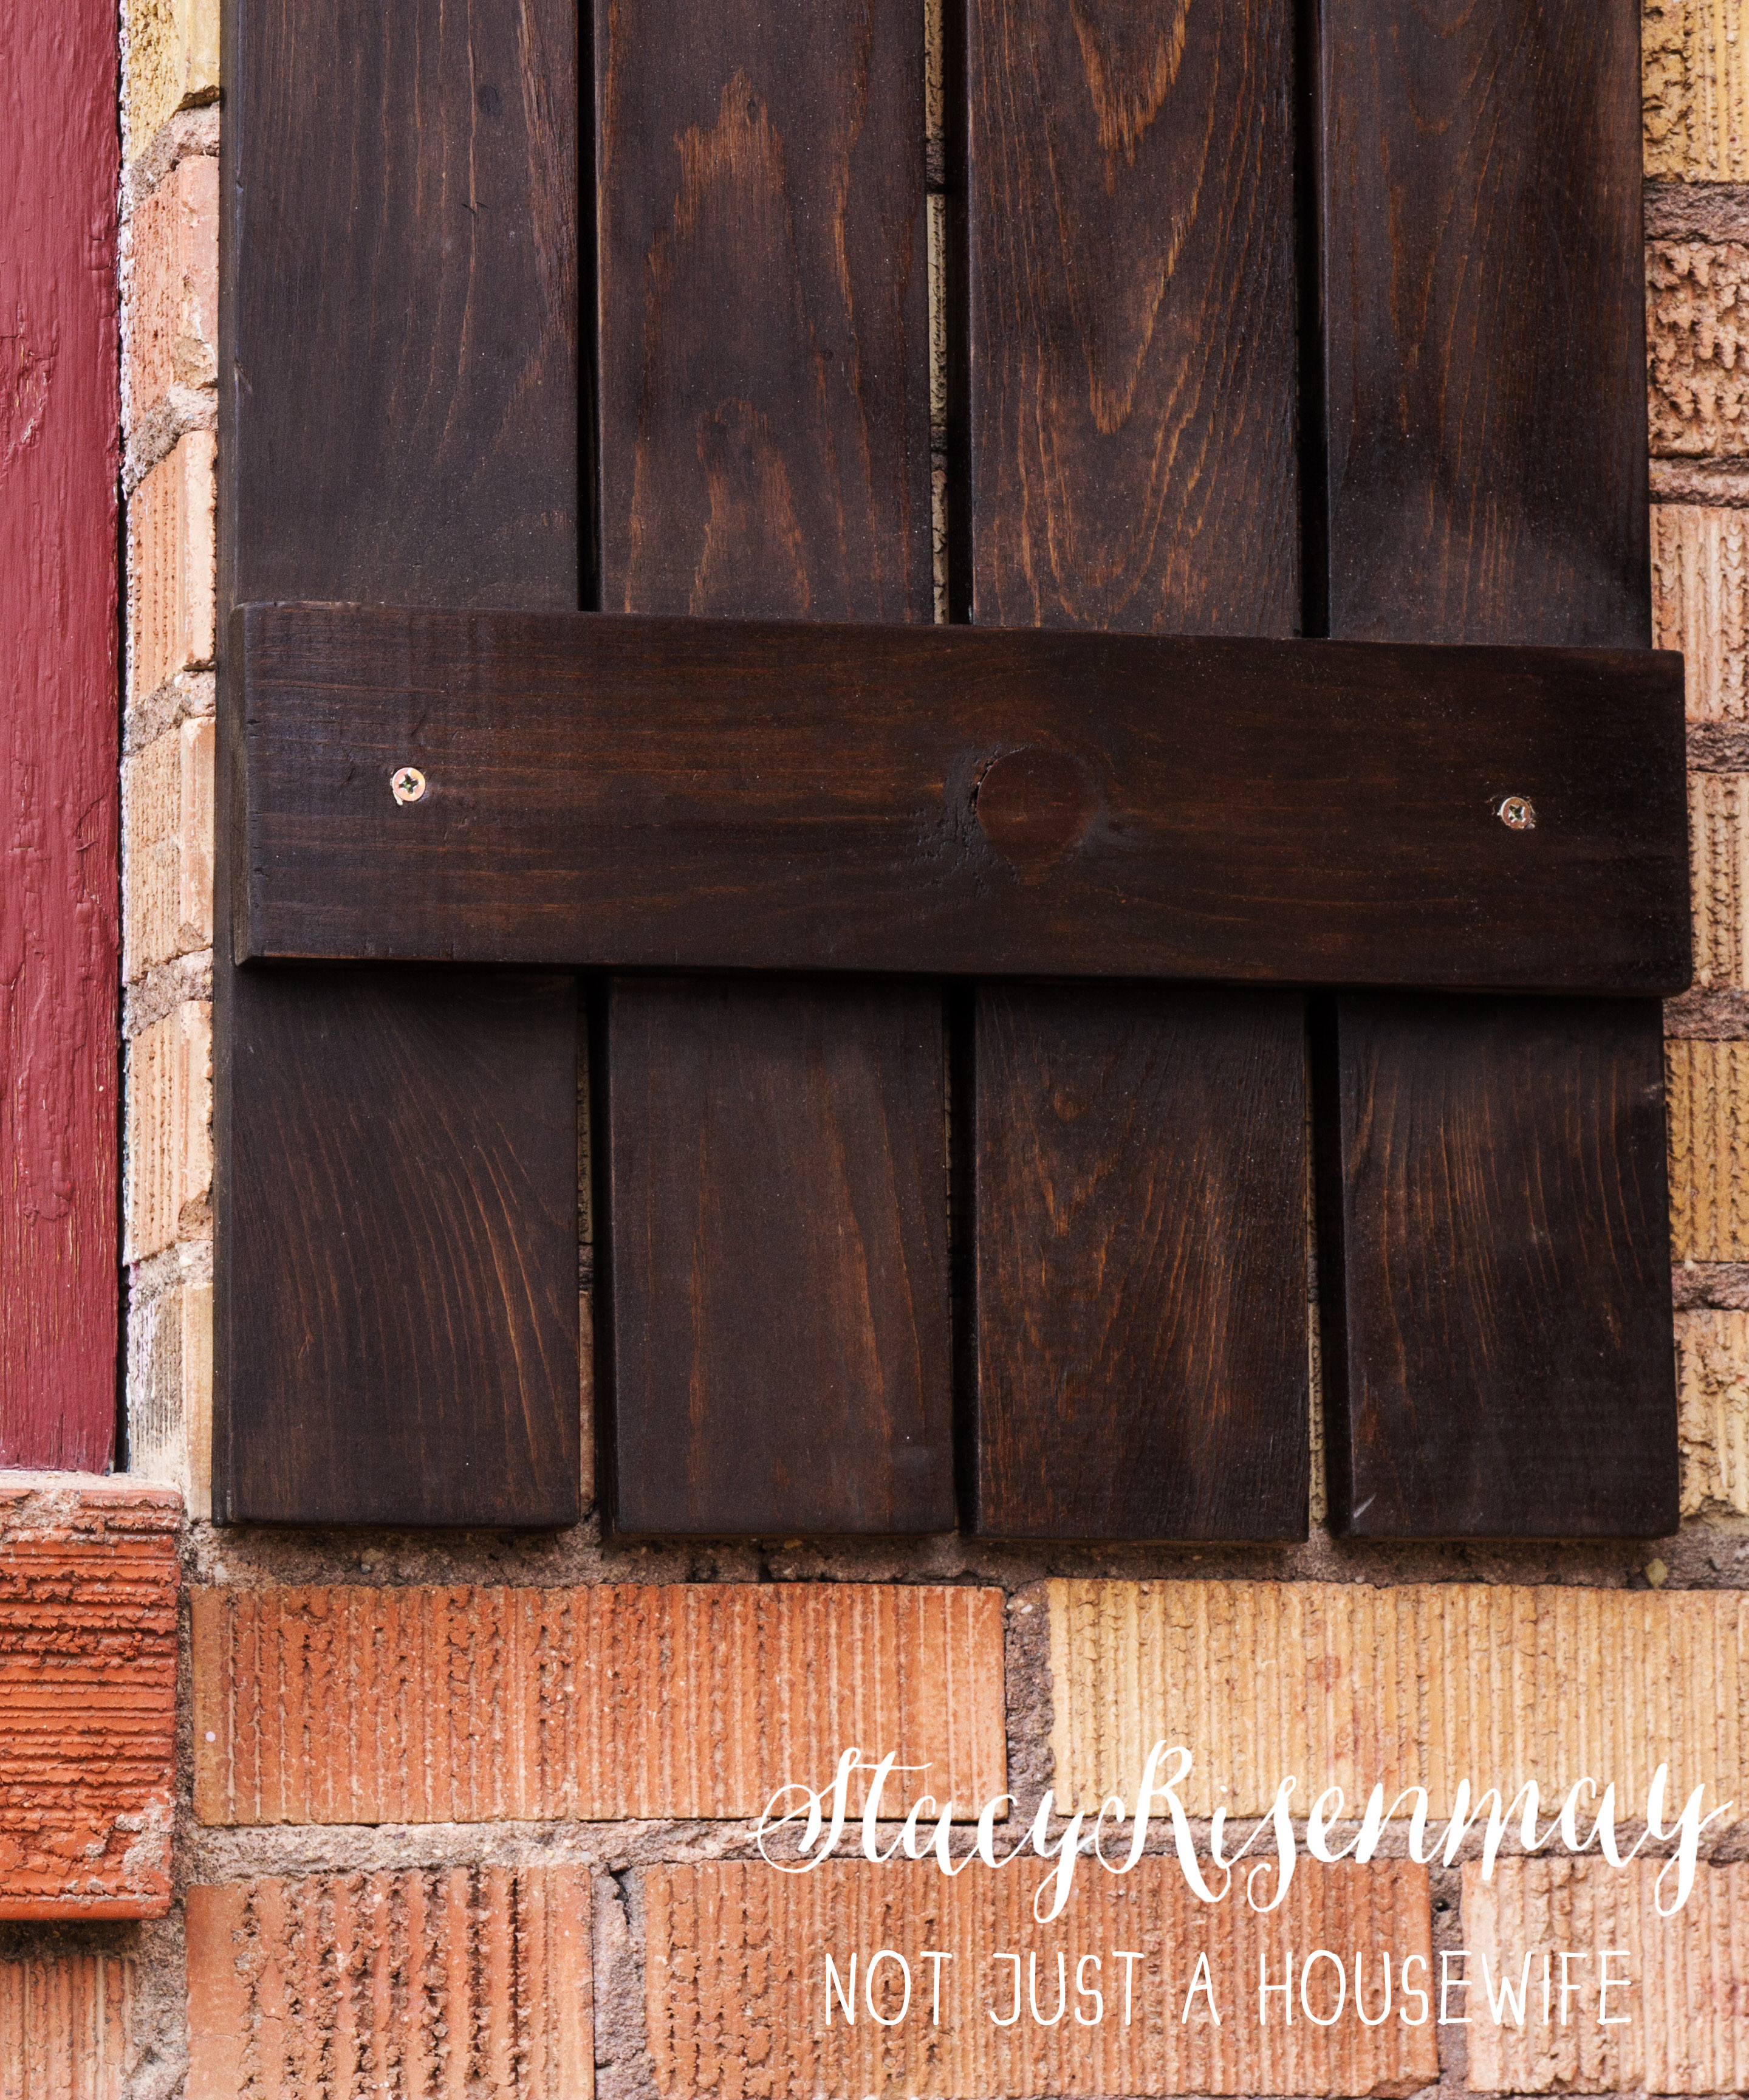
    They really are simple to build and easily customizable. I just measured my windows and decided how wide I wanted them to be. I bought some 1x4 boards and cut four (per shutter) the the same length as the height of the window. Then I cut a couple of cross pieces the width that I wanted. I decided to have the slits in between each board be thin but I have seen them much wider.

    building simple shutters

    I screwed them together with deck screws (nails won't hold up in the weather over time in pine) from the back so you don't see all the screws.

    Here is a little tip....

    I attached the outside boards first to make sure they were right along the edge of the cross board and secured them with a screw. Then I eyeballed where the two in the middle should be and screwed them into place. I eyeballed it for two reasons. First, I was lazy. Second, because I knew some of the boards were a little warped and therefore slightly imperfect. If I had measured, it still would not have lined up perfectly so why add more stress. But I get it, you may have an inner need to measure. Go for it :) Each board ended up with two screws on either end.

    start by screwing on the end pieces


    I stained them the same color as the front door which is Dark Walnut from Minwax.

    shutter dark walnut stain


    And just because a reveal is not quite complete without a before and after....

    before shutters and after shutters


    Tomorrow is the monthly linky party and I should have another post up later this week if all goes well. I can't wait to see what you have been up to!

    You will also like:

    • My 5 minute $1 Christmas WreathMy 5 minute $1 Christmas Wreath
    • Heat Embossed Gift Tags & CardsHeat Embossed Gift Tags & Cards
    • Crushing On: ChromeCrushing On: Chrome
    • Swedish Raspberry Kiss CookiesSwedish Raspberry Kiss Cookies
    • Favorite FindsFavorite Finds
    • Getting Your Patio Summer Ready!Getting Your Patio Summer Ready!
    • Blogging Q&ABlogging Q&A
    • 15 Perennial Flowers That Are Easy To Grow15 Perennial Flowers That Are Easy To Grow

    « Modern Tree Stump Planter
    Pineapple Cheese Ball & A Simple DIY Serving Tray »

    Filed Under: DIY & Tutorials, Outdoor Projects & Gardening, Power Tools 7 Comments

    Subscribe

    for your weekly DIY fix.

    Reader Interactions

    Comments

    1. Lucy

      December 01, 2014 at 8:24 am

      Wow, those look GREAT!

      Reply
    2. Haley

      December 01, 2014 at 5:05 pm

      How did you attach them to your house? I really want to add shutters to my brick house!

      Reply
      • Stacy

        December 01, 2014 at 10:19 pm

        Last year we added shutters to the garage window to test this way out and it has worked great for a year and a half. So we tried it on the front. We pre-drilled a pilot hole using a masonry bit that was smaller around than the screw. Then we just screwed it directly into the brick. I had wanted to use the brick hooks I saw on Pinterest but our house is so old the brick size is different than the standard brick.

        Here is the link to the brick clips. Maybe they could work for you!

        http://www.leevalley.com/us/garden/page.aspx?c=&p=10437&cat=2,51520

        Reply
    3. Amy

      December 01, 2014 at 8:41 pm

      They look great! I've had them on my list too...for a while :-)

      Reply
    4. shonee

      December 02, 2014 at 7:59 am

      Your shutters turned out great! It is amazing how a little accent can make a big change. I am hoping to start working on getting the outside of our house looking better next year. Maybe i will have to add some shutters!
      -Shonee

      Reply
    5. Kara Cook

      December 02, 2014 at 9:05 am

      Wow! I didn't think your house could get any cuter, but of course you found a way. You are amazing my friend!

      Reply
    6. Danita

      December 05, 2014 at 6:35 pm

      Wow! You did a great job on these Stacy! I love how the shutters make the dark door pop AND the other way around! What a beautiful project to do and one in which you are so handy at accomplishing! Hang in there with balancing all your other projects! I am sure you will meet your goals!
      A reader from Maine!
      Danita

      Reply

    Comment Below! Cancel reply

    Your email address will not be published. Required fields are marked *

    This site uses Akismet to reduce spam. Learn how your comment data is processed.

    Primary Sidebar

    stacyHey! I'm Stacy and am a DIY addict. I love to get my hands dirty, whether it's sawdust, paint, or dirt. My goal is to help YOU learn to fix up your home and yard. No matter the style or size, I think everyone should love their home. And it doesn't takes a big budget to get there. Let's DIY together!

    Subscribe to My Blog!

    Search this site

    categories


    Subscribe

    Footer

    Welcome! I'm sharing our adventures as we fix up our 1938 cottage. Whether it is big or small, I think everyone should love their home and I don't think it takes a lot of money to make a space your own

    About Stacy

    • Facebook
    • Instagram
    • Pinterest
    • Twitter

    My Favorites

    copyright

    All images and content are copyrighted via Stacy Risenmay unless otherwise stated. If you'd like to share my work, please link back to this blog.
    Thank you for visiting!


    Footer

    ↑ back to top

    About

    • Meet Stacy
    • Privacy Policy
    • Contact

    Categories 

    • Home Decor
    • Outdoor Projects & Gardening
    • DIY & Tutorials
    • Kid Activities
    • Recipes
    • Travel
    • Cleaning
    • Houseplants
    • Staining
    • Painting
    • Power Tools
    • Holiday Ideas

    Newsletter

    • Sign Up! for emails and updates

    As an Amazon Associate I earn from qualifying purchases.

    Copyright © 2020 Brunch Pro on the Brunch Pro Theme


    Privacy Policy
    Welcome! Thanks for visiting.
    Hi! I'm Stacy and I want to help YOU become a DIY rockstar! Sign up for my email list so each project, tip, and trick will go directly to your inbox :)
    Your information will *never* be shared or sold to a 3rd party. Pinky promise :)
    Welcome!
    Hi! I'm Stacy and I blog about fixing up our 1938 cottage. Join the thousand of others who get my posts sent to their inbox for FREE!
    Your information will *never* be shared or sold to a 3rd party.