• Skip to primary navigation
  • Skip to main content
  • Skip to primary sidebar
  • Skip to footer
Stacy Risenmay
  • Home
  • About me
  • PRESS
  • Contact Me
  • My Book
    • Facebook
    • Instagram
    • Pinterest
    • Twitter
menu icon
go to homepage
subscribe
search icon
Homepage link
  • Home
  • About me
  • Project Gallery
  • Our House
  • PRESS
  • Contact Me
  • Privacy Policy
    • Facebook
    • Instagram
    • Pinterest
    • Twitter
  • ×

    I Tackled A Project I Neglected for 13 years... {Exterior Painting}

    By Stacy 7 Comments

    We all have them. Projects that we put off for YEARS. And then when we finally do them, we are like "Why did I wait so long?" In my defense, this project is one I couldn't do because of my fear of tall ladders. I am comfortable until about the third or fourth step. Falling and hurting my ankle really badly didn't help my fear of climbing high things either. Shane came to the rescue and completed this exterior painting project for me. He painted the back of the garage and it finally matches the front!

    This exterior painting project is sponsored by HomeRight but all ideas and opinions are 100 % my own! This post also contains affiliate links.


    Unlike the front of the garage, we have never painted the back eave or foundation in the 13 years we have lived here. We painted the front red soon after moving here and then updated it with tan paint recently (see that exterior painting project HERE). The back has been completely forgotten. I think because it is rarely seen by others and because we became use to seeing it like it was, it just wasn't a top priority.

    But we have done a lot of work in the backyard over the past couple of years and it stood out more and more because everything else looked nice.


    Tips for Exterior Painting

    Step 1:

    Shane used a scraper and a metal brush to get as much of the old paint off as possible. It also a good way to get dirt and grime off.
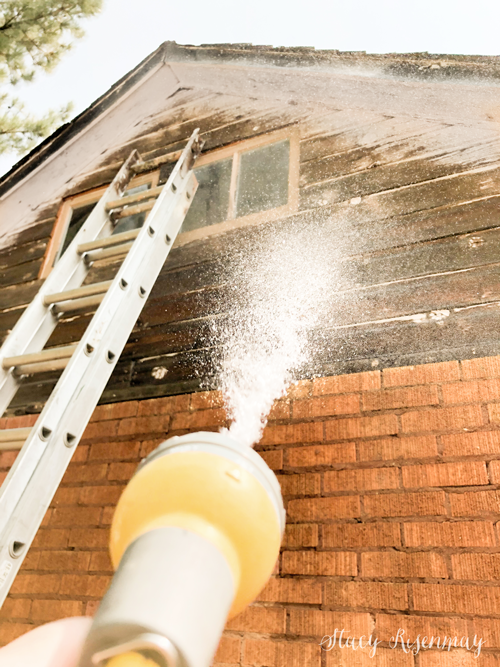


    Step 2:

    I hosed it off when he was done to get all the dust and paint chips off. You need the surface you are going to paint to be as clean as possible.


    Step 3:

    The wood paneling is over 80 years old so there are plenty of gaps and cracks. Once it was completely dry, it was time to caulk. Shane went through several tubes of caulk filling everything in.


    Step 5:

    Cover anything you don't want to get painted with painters tape and tarps.

    Step 6:

    Use a high quality exterior paint. We used one with added primer. Shane used the HomeRight Super Finish Max. We chose the same tan color as the fountain and eaves of the house. I filmed the whole process and it took him 11 minutes to paint the whole thing. That is including getting down from the ladder, moving it, and climbing back up several times. It is so much faster with the sprayer than any other way!

    The wood was so dry that it soaked up paint like crazy. It took four coats!

    Shane used the Super Finish Max


    Noe that we have the patio, a fountain, new landscaping and the chicken coop makeover done in the backyard, it is nice to have this unfinished project done as well.


    So I am curious... What is an unfinished project that you have put off for a long time? What is keeping you from doing it?


    As a reminder, this is what the front looked like before painting it tan.


    And what it looks like now! The planters are a new addition too!


    You will also like:

    • Garage Door MakeoverGarage Door Makeover
    • Painted CementPainted Cement
    • Painting Window BoxesPainting Window Boxes
    • Tips For Painting MetalTips For Painting Metal
    • Easiest Way To Paint WallsEasiest Way To Paint Walls
    • DIY Outdoor PlantersDIY Outdoor Planters
    • Metal Card Catalog MakeoverMetal Card Catalog Makeover
    • Tips for Painting Kitchen CabinetsTips for Painting Kitchen Cabinets

    « New Adventures
    Garage Attic Makeover REVEAL!!! »

    Filed Under: DIY & Tutorials 7 Comments

    Subscribe

    for your weekly DIY fix.

    Reader Interactions

    Comments

    1. Danita

      August 25, 2020 at 4:38 pm

      Shane is such a great guy! So glad he gave you a helping hand on this one!!! My sweetie HATES painting. I usually have to gently encourage him it's time to redo the trim on our porches! I am patient and it eventually gets gone.

      So happy the garage is DONE! Everything looks amazing!!! Now I am excited to see the attic revel!
      It's all looking good!

      Reply
      • Stacy

        August 26, 2020 at 6:34 pm

        Exterior painting (especially in the summer heat) isn't always the most fun project. I am glad he was willing to help too!

        Reply
    2. Dana Herbert

      August 26, 2020 at 5:03 pm

      It looks wonderful! So believable about all the coats of paint. Was that still the hot pink paint on the foundation at the back? I believe one of my cousins did that for grandpa (of course, several years ago) around the house and garage. As a side note: I love the picket fence around your chicken run.

      Reply
      • Stacy Risenmay

        August 26, 2020 at 5:19 pm

        Yes! It was the original hot pink :) How fun to hear the story about it! The south side still has it as well. It just has been way too hot to tackle that since it has been in the 100s. I'll paint that strip this Fall. I love the picket fence too.

        Reply
    3. James the Designer

      September 03, 2020 at 2:47 am

      Reminded me of all the projects I had put on hold for so long. Ill be busy this weekend!

      Reply
    4. Shauna

      September 22, 2020 at 11:32 am

      It looks so crisp and fresh now! Don't you love a good paint makeover?!

      Reply
    5. HOMEiA

      November 17, 2020 at 9:34 am

      wow..wow! You did very good job. The house look much difference after home DIY process get done.

      Reply

    Comment Below! Cancel reply

    Your email address will not be published. Required fields are marked *

    This site uses Akismet to reduce spam. Learn how your comment data is processed.

    Primary Sidebar

    stacyHey! I'm Stacy and am a DIY addict. I love to get my hands dirty, whether it's sawdust, paint, or dirt. My goal is to help YOU learn to fix up your home and yard. No matter the style or size, I think everyone should love their home. And it doesn't takes a big budget to get there. Let's DIY together!

    Subscribe to My Blog!

    Search this site

    categories


    Subscribe

    Footer

    Welcome! I'm sharing our adventures as we fix up our 1938 cottage. Whether it is big or small, I think everyone should love their home and I don't think it takes a lot of money to make a space your own

    About Stacy

    • Facebook
    • Instagram
    • Pinterest
    • Twitter

    My Favorites

    copyright

    All images and content are copyrighted via Stacy Risenmay unless otherwise stated. If you'd like to share my work, please link back to this blog.
    Thank you for visiting!


    Footer

    ↑ back to top

    About

    • Meet Stacy
    • Privacy Policy
    • Contact

    Categories 

    • Home Decor
    • Outdoor Projects & Gardening
    • DIY & Tutorials
    • Kid Activities
    • Recipes
    • Travel
    • Cleaning
    • Houseplants
    • Staining
    • Painting
    • Power Tools
    • Holiday Ideas

    Newsletter

    • Sign Up! for emails and updates

    As an Amazon Associate I earn from qualifying purchases.

    Copyright © 2020 Brunch Pro on the Brunch Pro Theme


    Privacy Policy
    Welcome! Thanks for visiting.
    Hi! I'm Stacy and I want to help YOU become a DIY rockstar! Sign up for my email list so each project, tip, and trick will go directly to your inbox :)
    Your information will *never* be shared or sold to a 3rd party. Pinky promise :)
    Welcome!
    Hi! I'm Stacy and I blog about fixing up our 1938 cottage. Join the thousand of others who get my posts sent to their inbox for FREE!
    Your information will *never* be shared or sold to a 3rd party.