• Skip to primary navigation
  • Skip to main content
  • Skip to primary sidebar
  • Skip to footer
Stacy Risenmay
  • Home
  • About me
  • PRESS
  • Contact Me
  • My Book
    • Facebook
    • Instagram
    • Pinterest
    • Twitter
menu icon
go to homepage
subscribe
search icon
Homepage link
  • Home
  • About me
  • Project Gallery
  • Our House
  • PRESS
  • Contact Me
  • Privacy Policy
    • Facebook
    • Instagram
    • Pinterest
    • Twitter
  • ×

    Reusable Wood Gift Tags

    By Stacy 1 Comment

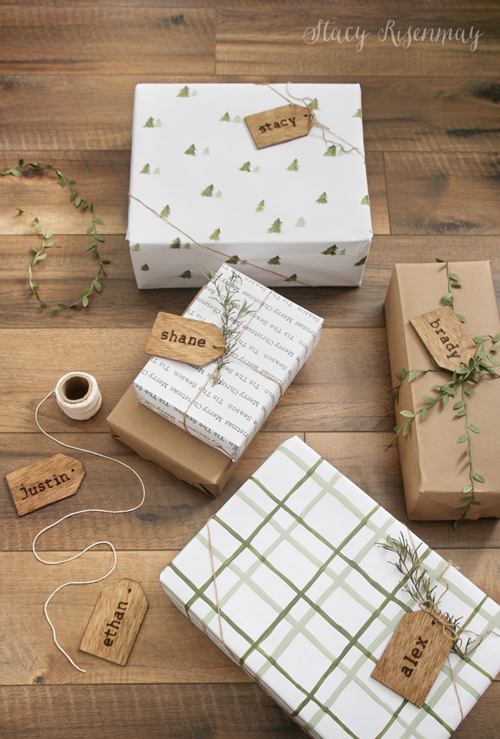
    Shane is better at wrapping gifts than I am. He can get those real crisp lines. But I love to add the finishing touches! Gift tags, bows, bells, greenery, or anything else to make it festive! I decided to make some wood gift tags this year. Not only are they adorable, but they are reusable! These wood gift tags are a simple DIY that your kids could help with. You can easily knock this project out in an afternoon and it will take your presents up a notch!

    I also hand painted the wrapping paper.

    Supplies For Wood Gift Tags

    (links are affiliate)

    Needle nose pliers

    Metal wood burning letters

    Wood burner

    Wood Tags (or ⅛" plywood if you want to DIY them)

    Metal work surface or small piece of sheet metal

    The wood gift tags you can buy usually come in packs of 50 or 100. They are very inexpensive. I decided since I needed less than that amount, and I wanted them to be a bit larger, that I would make my own. I cut them out of ⅛" plywood and simply drilled a hole. Mine are approximately 2 inches by 3 inches.

    TIP: Whenever using a wood burner, have some needle nose pliers handy. The wood burner and tips get VERY hot and you will need to use something to screw them in and out with.

    Step 1:

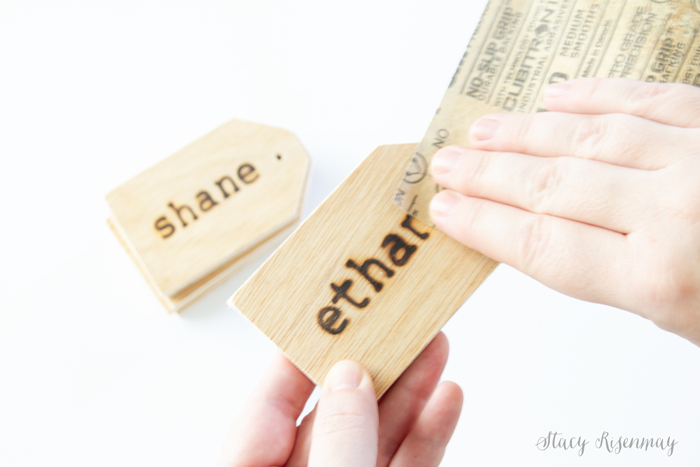
    After you add a new letter or tip, wait a full minute before pressing it down on the wood to allow it time to heat up. Gently rock it side to side and back and forth to ensure it gets evenly burned.

    Step 2:

    Sometimes, especially on light wood, you will have orange around the letters. If this bothers you, simply sand it lightly and it will remove the orange haze around the letters.

    Step 3:

    To make sure you get an even color when staining, add a wood conditioner first.

    A medium wood stain works best to stain the wood gift tags. Brush it on, wait about 10 minutes, and then wipe off any excess.

    Wait for them to completely dry before adding them to your gifts.

    Did you miss my home tour? See my house all decorated for Christmas HERE!

    Do you enjoy wrapping gifts? What are some fun things you have added to dress up your packages?

    Pin For Later:

    You will also like:

    • 30 Gift Ideas for Teen Boys {That Won't Break the Bank}30 Gift Ideas for Teen Boys {That Won't Break the Bank}
    • Cute Packaging For GiftsCute Packaging For Gifts
    • Gingerbread Houses and a Family UpdateGingerbread Houses and a Family Update
    • Mini Letter Board OrnamentsMini Letter Board Ornaments
    • Easy Clay Snowflake OrnamentsEasy Clay Snowflake Ornaments
    • Chalkboard WreathChalkboard Wreath
    • Christmas Countdown Chalkboard SignChristmas Countdown Chalkboard Sign
    • Cottage Christmas Home TourCottage Christmas Home Tour

    « Cottage Christmas Home Tour
    Easiest Way To Paint Walls »

    Filed Under: DIY & Tutorials, Holiday 1 Comment

    Subscribe

    for your weekly DIY fix.

    Reader Interactions

    Comments

    1. Cath

      December 07, 2019 at 10:29 am

      Adorable. All of it. Last year I decided that I'm going to start using reusable tags and either boxes or bags for Christmas gifts. I rather like wrapping gifts, but it takes soooooo long in a busy time of year. And all the waste at the end of the day bothers me. Love your paper, though.

      Reply

    Comment Below! Cancel reply

    Your email address will not be published. Required fields are marked *

    This site uses Akismet to reduce spam. Learn how your comment data is processed.

    Primary Sidebar

    stacyHey! I'm Stacy and am a DIY addict. I love to get my hands dirty, whether it's sawdust, paint, or dirt. My goal is to help YOU learn to fix up your home and yard. No matter the style or size, I think everyone should love their home. And it doesn't takes a big budget to get there. Let's DIY together!

    Subscribe to My Blog!

    Search this site

    categories


    Subscribe

    Footer

    Welcome! I'm sharing our adventures as we fix up our 1938 cottage. Whether it is big or small, I think everyone should love their home and I don't think it takes a lot of money to make a space your own

    About Stacy

    • Facebook
    • Instagram
    • Pinterest
    • Twitter

    My Favorites

    copyright

    All images and content are copyrighted via Stacy Risenmay unless otherwise stated. If you'd like to share my work, please link back to this blog.
    Thank you for visiting!


    Footer

    ↑ back to top

    About

    • Meet Stacy
    • Privacy Policy
    • Contact

    Categories 

    • Home Decor
    • Outdoor Projects & Gardening
    • DIY & Tutorials
    • Kid Activities
    • Recipes
    • Travel
    • Cleaning
    • Houseplants
    • Staining
    • Painting
    • Power Tools
    • Holiday Ideas

    Newsletter

    • Sign Up! for emails and updates

    As an Amazon Associate I earn from qualifying purchases.

    Copyright © 2020 Brunch Pro on the Brunch Pro Theme


    Privacy Policy
    Welcome! Thanks for visiting.
    Hi! I'm Stacy and I want to help YOU become a DIY rockstar! Sign up for my email list so each project, tip, and trick will go directly to your inbox :)
    Your information will *never* be shared or sold to a 3rd party. Pinky promise :)
    Welcome!
    Hi! I'm Stacy and I blog about fixing up our 1938 cottage. Join the thousand of others who get my posts sent to their inbox for FREE!
    Your information will *never* be shared or sold to a 3rd party.