
We have another awesome sewing tutorial from the fabulous Tammy!

I know there are tutorials everywhere for hooded towels, but I have yet to see this way to make them which was taught to me by a non-blogging friend. With swimming weather around the corner--cross your fingers--it is time to beef up the towel supply!
There are so many ways to embellish towels so let your imagination lead on this one. I will share with you some of my favorite ways—all simple. A hooded towel is my go to baby gift (especially for boys) and everyone seems to like them a lot. My own children have a closet full of them and will only use a towel that has a hood. You can sew one up quickly so it is easy to whip up a new one when an idea hits.
Materials
½ hand towel -- *see note
1 bath towel
embellishments (ribbon, fabric, ric rac, ruffles, etc.)
pins – long ones (quilting pins) preferred
heavy duty sewing needle for your machine (Not required, but works much better!)
*note* I always buy 2 bath towels and a matching hand towel at the same time to make sure I have a matching piece for the other half of the hand towel. You can also use the extra halves for appliqueing shapes onto your towels.
Instructions
Make the Hood
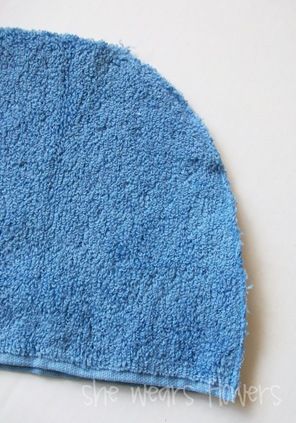
Cut the hand towel in half widthwise (hamburger cut).
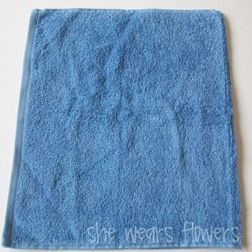
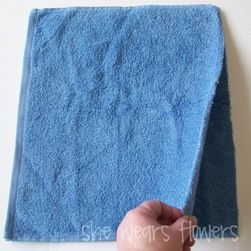
Fold hand towel in half with finished edges to the side and bottom and the fold at the top.
Cut an arc shape for the head. There is no exact science to this,
but I tend to cut off almost 2 inches and then curve in from there.
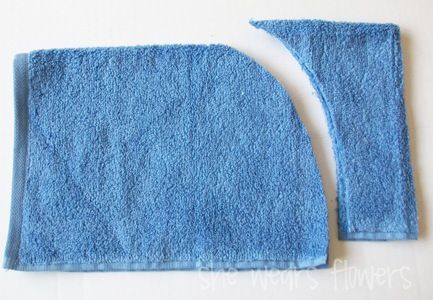
Sew the towel together along the arc with ⅛ inch seam allowance.
Use a stitch that is a little bit longer than your regular stitch length.
(I sew most fabrics around a 2 so I changed it to 2.5 for this.)
Turn towel inside out and sew again along the arc with ¼ inch seam allowance.
This will make {most of} a French seam. It hides all of the raw edges and reinforces the seam.
(HERE is an excellent tutorial for using French seams with clothing construction.)

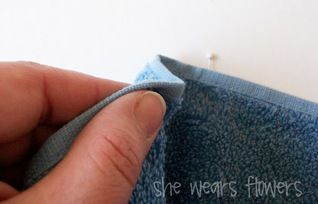
Turn the hood right side out.
Fold the factory finished edge of the towel towards the back (the wrong side or inside of the towel
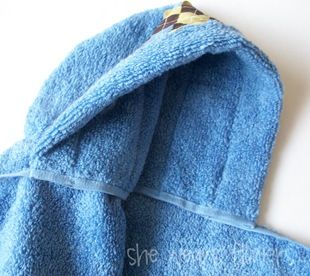
will be flipped out). Sew in place. You will be sewing it to the right side of the hood. This will make the inside more comfortable and the top edges will be covered with your embellishments. I have also used towels with textured borders and no other embellishments.

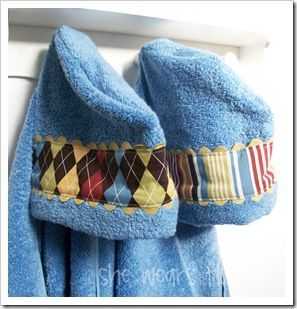
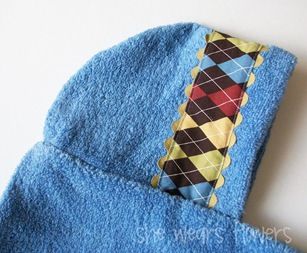
Sew embellishments in place along the top of the hood. Be sure that the raw edges of the embellishments line up with, or are slightly shorter than, the finished edges of the hand towel.You do not need to finish the ends of the embellishments because the ends will get sewn into the seams when you join the hood and the towel together. Just sew in place along the sides or down the center depending on your embellishment. I use the finished edge of the towel that was flipped up as a guide to keep things straight.
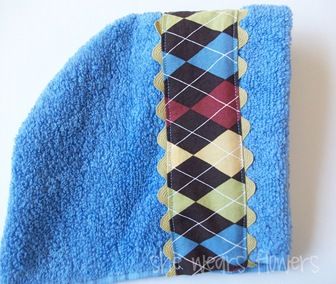
Mine looks crooked in every single picture, but it isn’t—just the way the pictures look!
There are so many ways you can do the embellishments that I won’t attempt to name them all. This picture shows a few that I really like. (The ric rac edged fabric one is a new idea I learned from The Cottage Mama which I saw HERE.)
Make Center Pleat on the Bath Towel
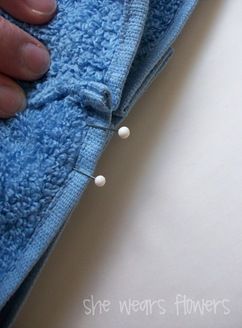
To make a pleat, first mark the center of the length of the bath towel with a pin.
Bring a small section of towel from the left side towards the center so that it makes a fold at the back.
Pin in place. This will be very thick. Repeat with the right side.
Sew along the pleat to hold everything in place.
It is easier to put the hood on without the pins in the way.
Sew Hood to Towel
Place the center seam of the hood on the center of the pleat in the bath towel with the hood on top and right sides together. Pin in place.
Starting from the center point, sew the hood to the towel along the edge of the towel. Since one edge is finished (bath towel), I try to sew along the part where the pile of the towel starts so my stitches are hidden a little better. Backstitch several times at the ends to secure the hood to the towel.
Turn everything around and sew other side of hood to towel again from the center point to the edge.
Voila! You are done!
All of the edges are clean and smooth so they won’t fray or feel annoying. And, they look good!
You can also add appliques or ruffles or whatever makes you happy to the rest of the bath towel, but I like to decorate the hood and keep the rest plain and simple. It is really up to you, though!


These are soooo wonderful. They would make great beach towels.
AH. I wish I knew how to sew!! I would LOVE to make these for my boys. They too wont wear towels without hoods. I may have to take a sewing lesson or two.
thank you sooo much for this tutorial!!! I just finished mine and they are adorable!!! :)
OK, silly question... do you sew the pleat so there is something to hang up? Or is there another reason for this?
What is 'hamburger cut???
Super easy! Thanks so much for the clearly written directions!!!
Well, maybe my mouth does, but it has learned to deal.
The images no longer display :(
Would love to see how your towel looks in progression of making the hooded towel.