
After surviving spring break with the kids home, two bouts of the stomach flu, and what seemed like endless days of dark gloomy skies, I FINALLY had a day where I could do a photo shoot for my office closet makeover. We had a sunny day and my husband was home to wrangle the kids :)
I think I need to give you a little reminder of what it looked like before. It was bad. Brace yourselves....
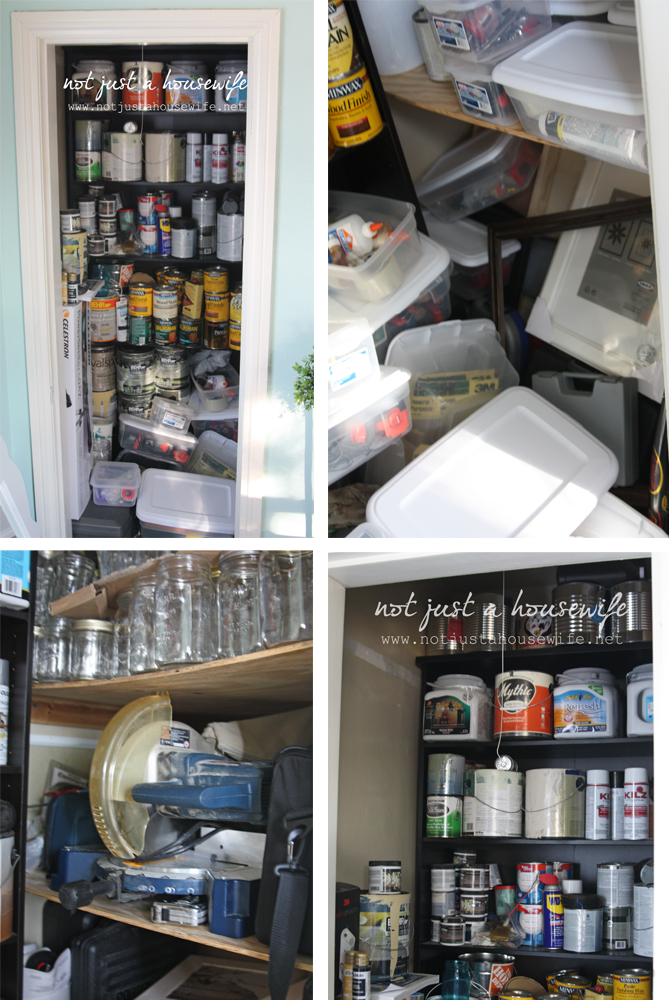
So you can see why I needed to overhaul the whole thing, right? And sad but true, this "before" was actually after I had bought totes and sort of organized it. The problem was that the totes were piled so deep in the shelves that I had to unload them all to get to the totes that were in the back. It was not very functional I needed to somehow get everything out front and center.
I took everything out and repainted it a fun color. I used a paintstick and it made it go by fast!
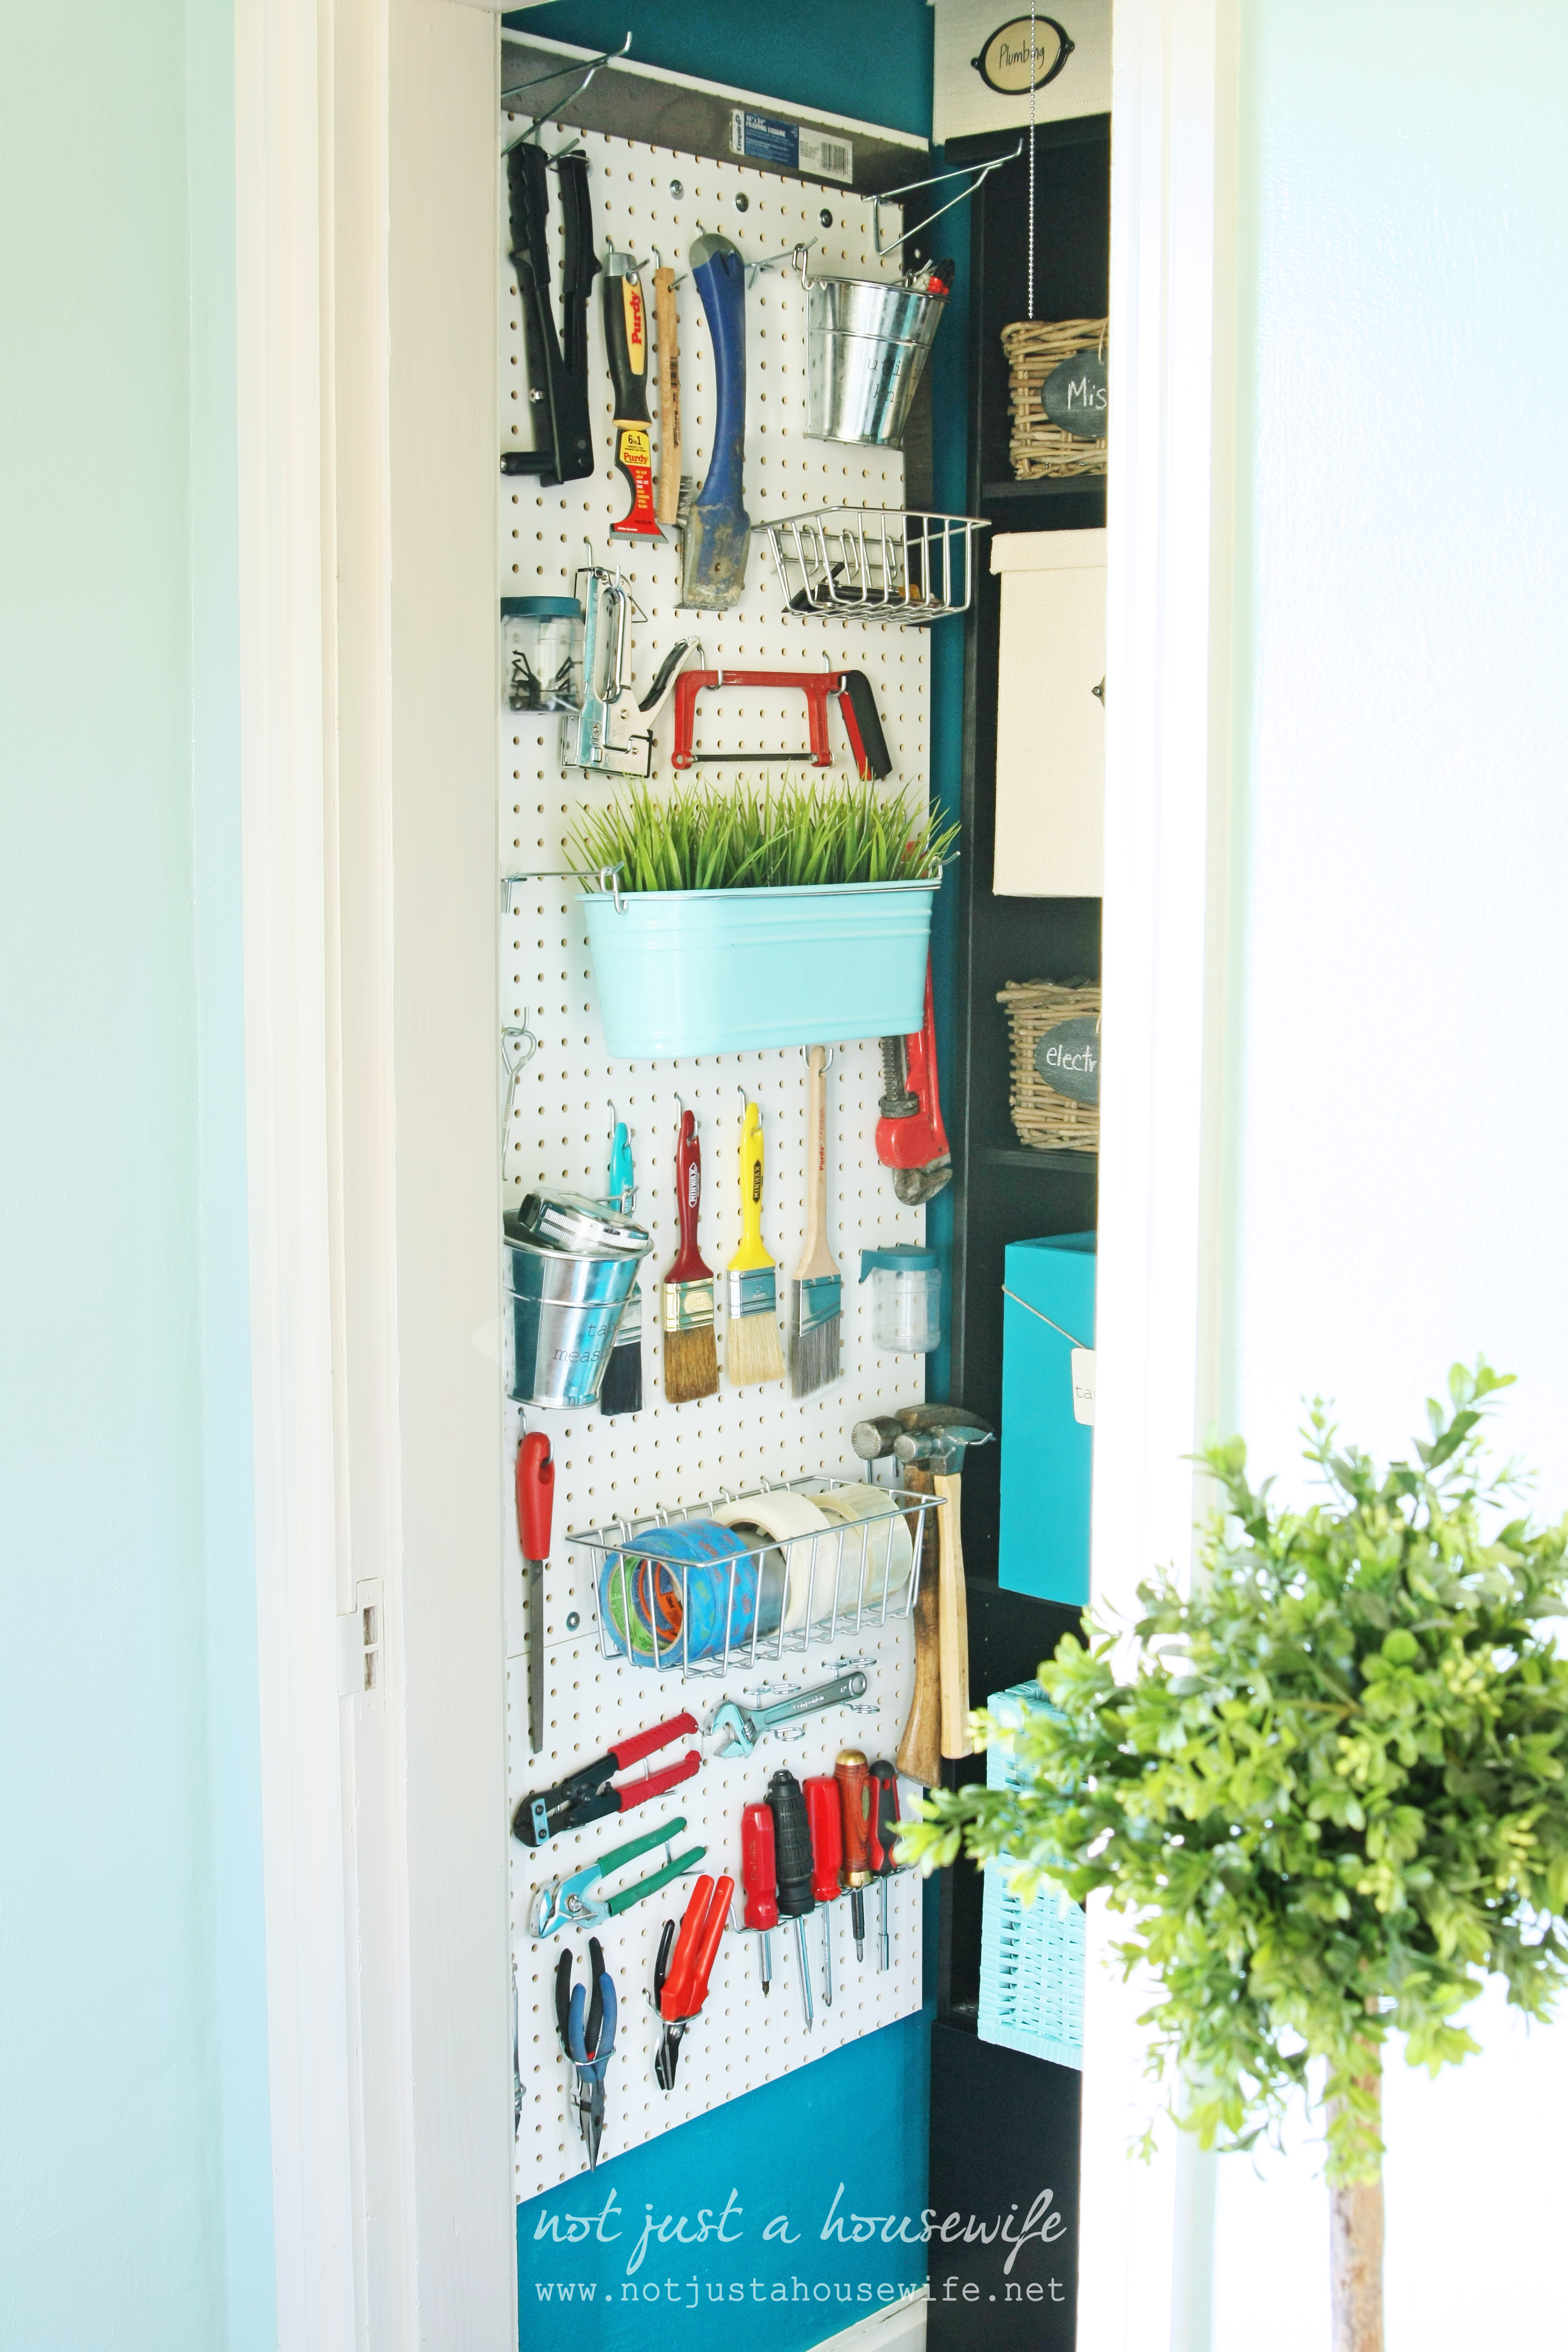
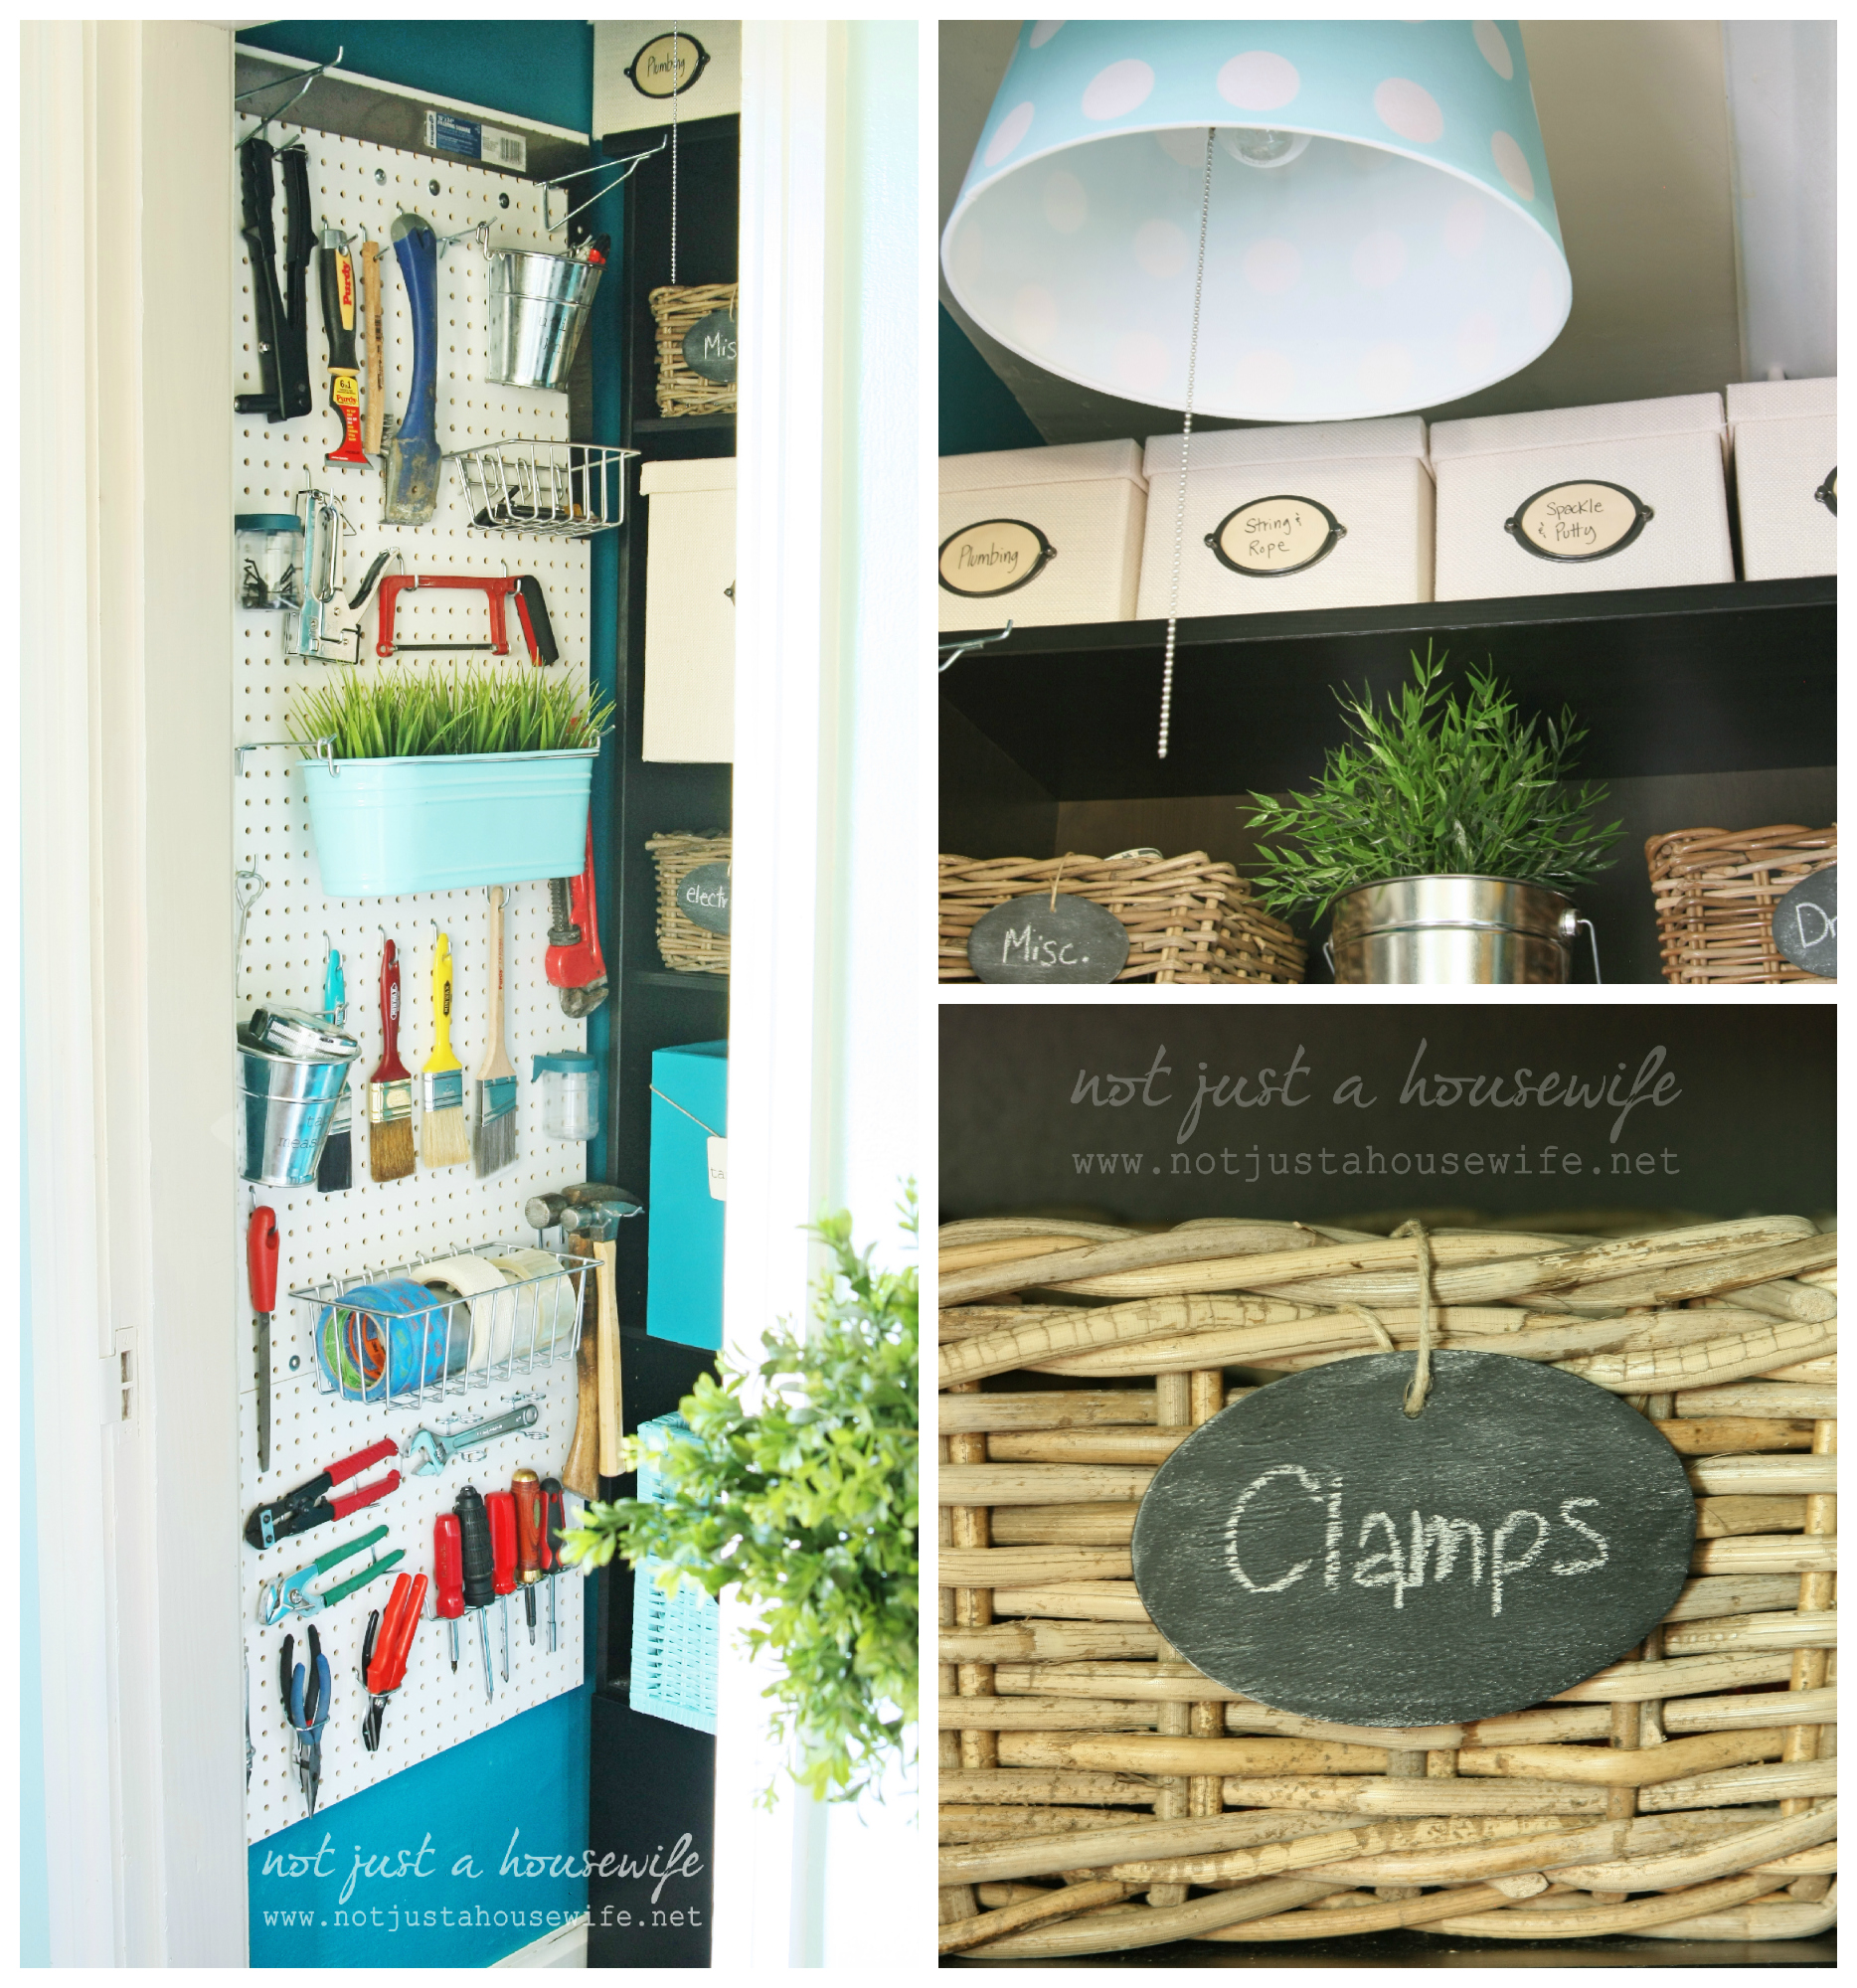
One of the ways I did that was by adding pegboard. I was not utilizing the wall space across from the shelves before. So by adding the pegboard, I instantly added a TON of storage. And the best part is that everything is right there and easy to grab. No more unloading a million totes to find something.

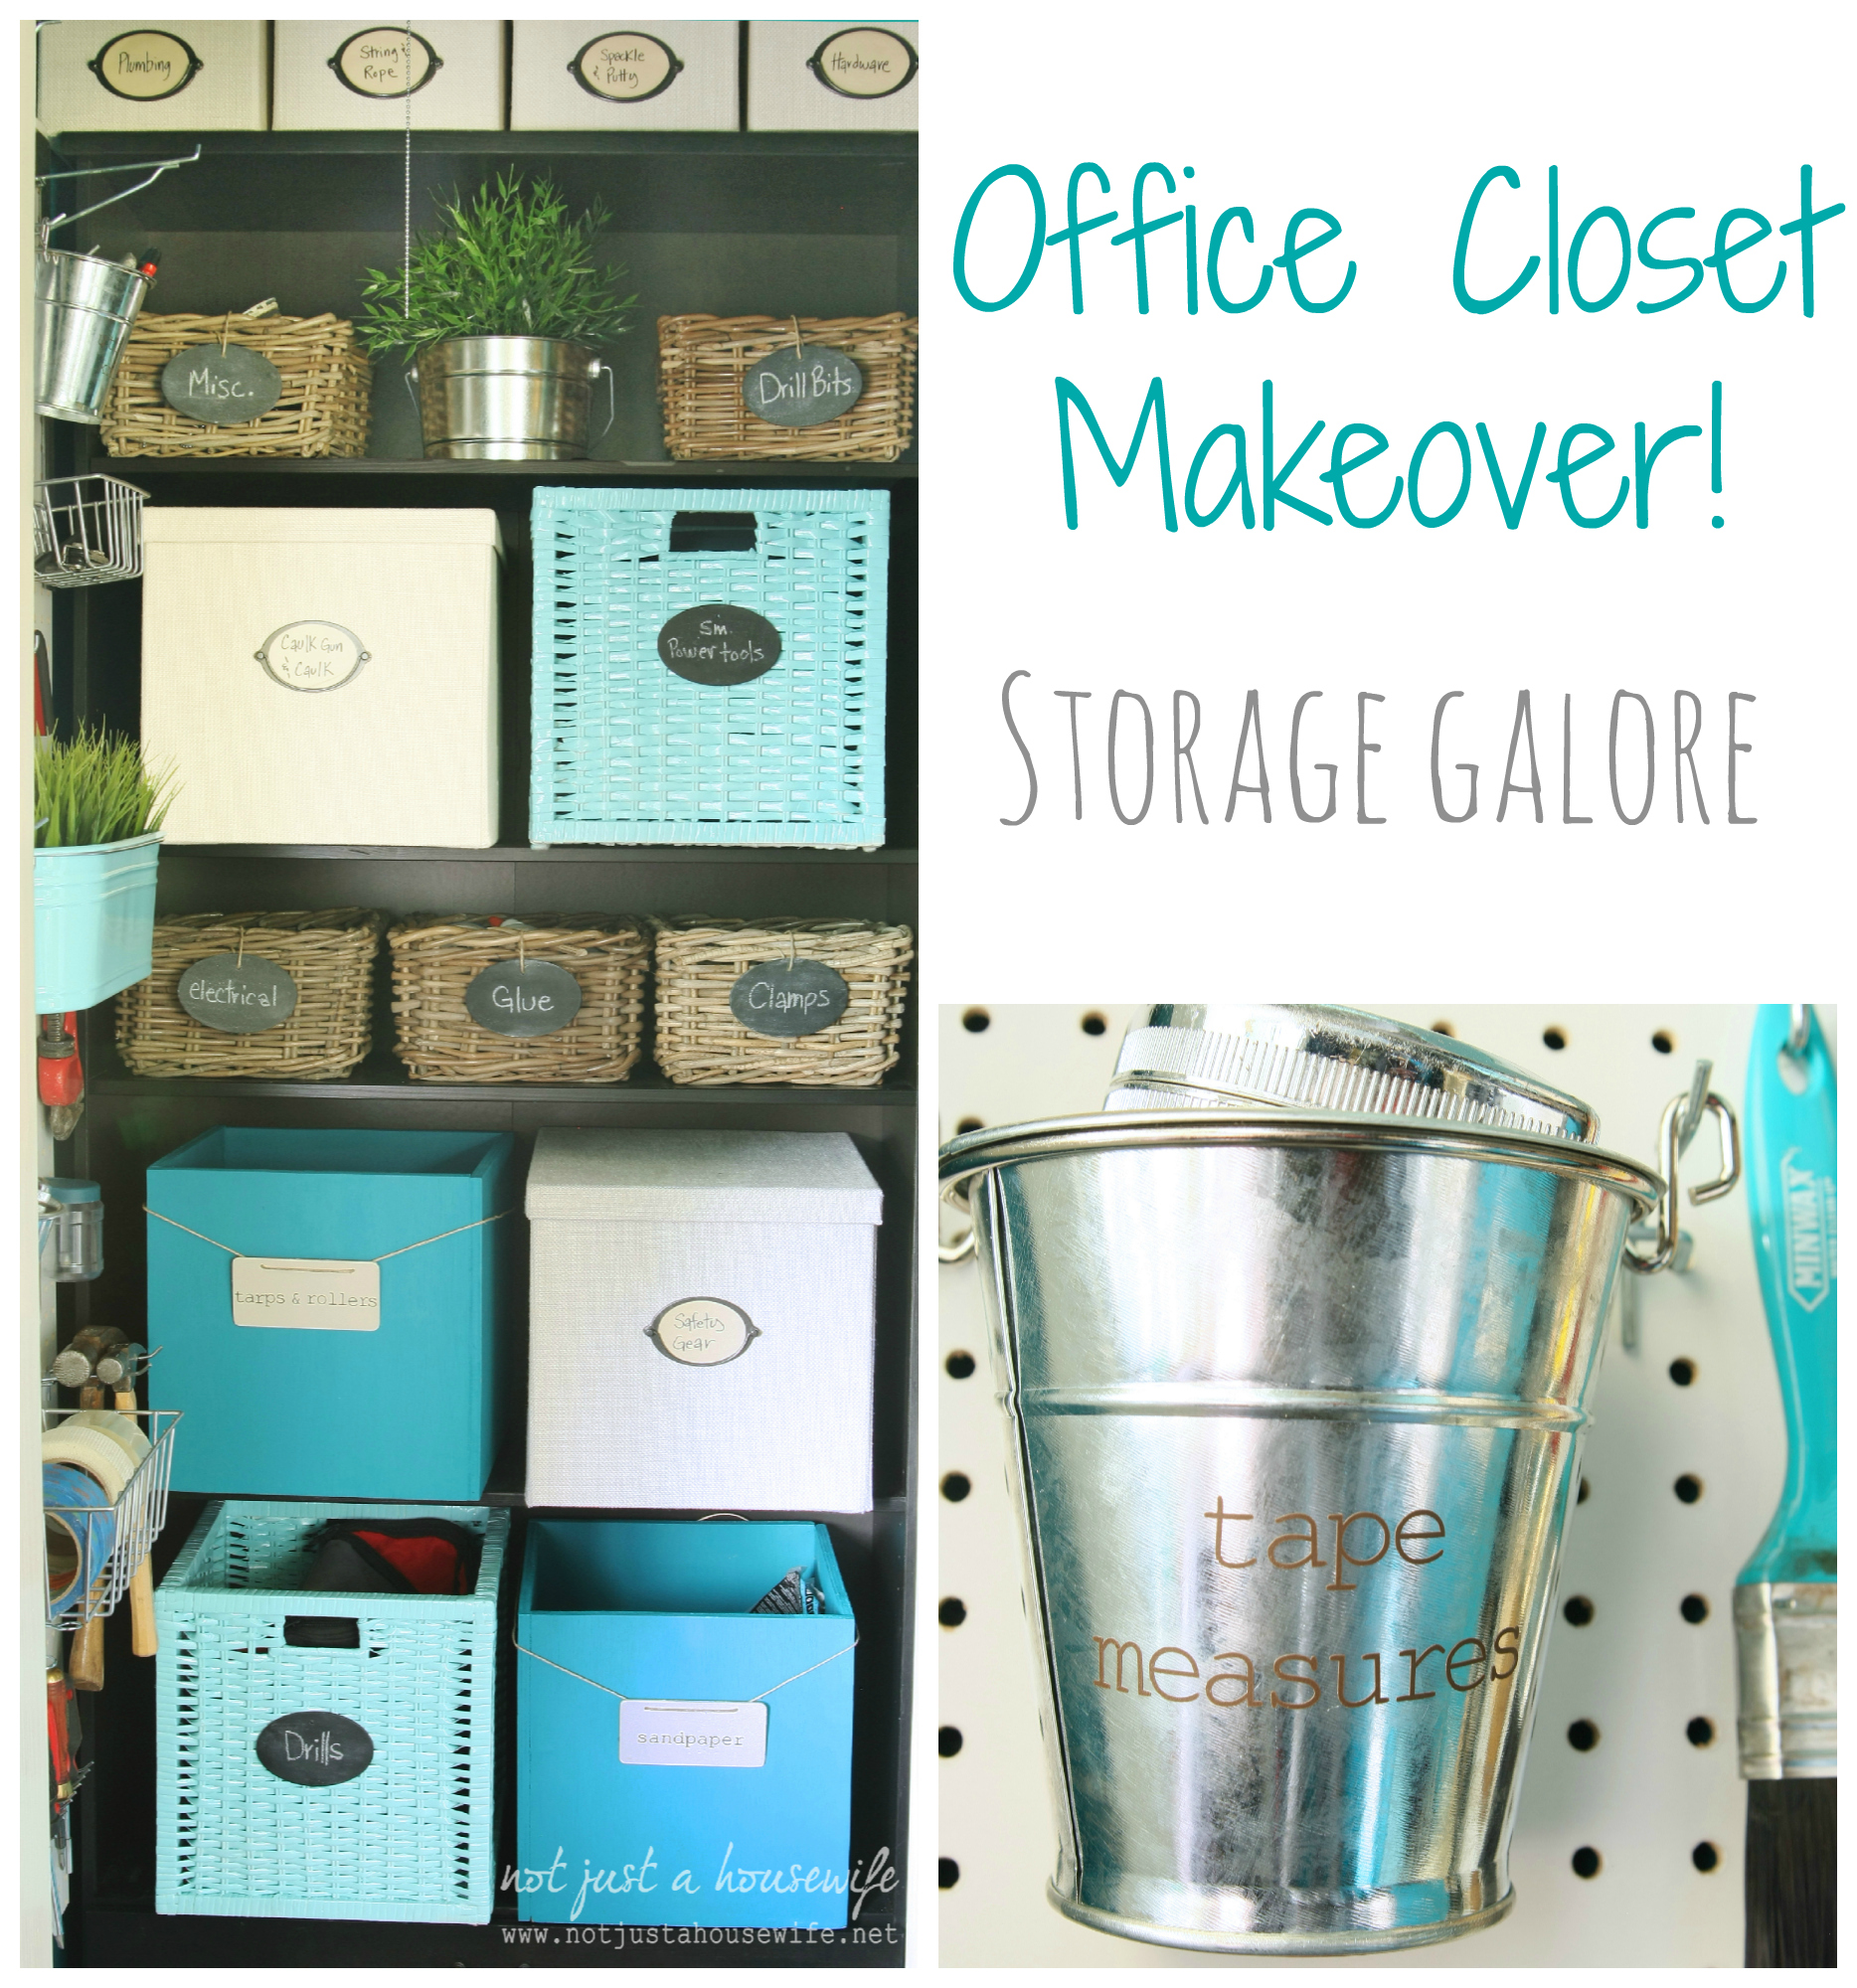
I bought the pegboard from Home Depot and decided to keep it white since the wall were a darker color (Peacock Blue by Glidden mixed in Behr Ultra). The pegs, hooks, and baskets came in a "starter kit" box that was a really good deal (also from HD). The baskets were black so I spray painted them silver to match everything else.
The turquoise long metal container started out white. It came from IKEA and I spray painted it. The smaller silver buckets also came from IKEA.
I love that the colors of the tools add to the fun :)
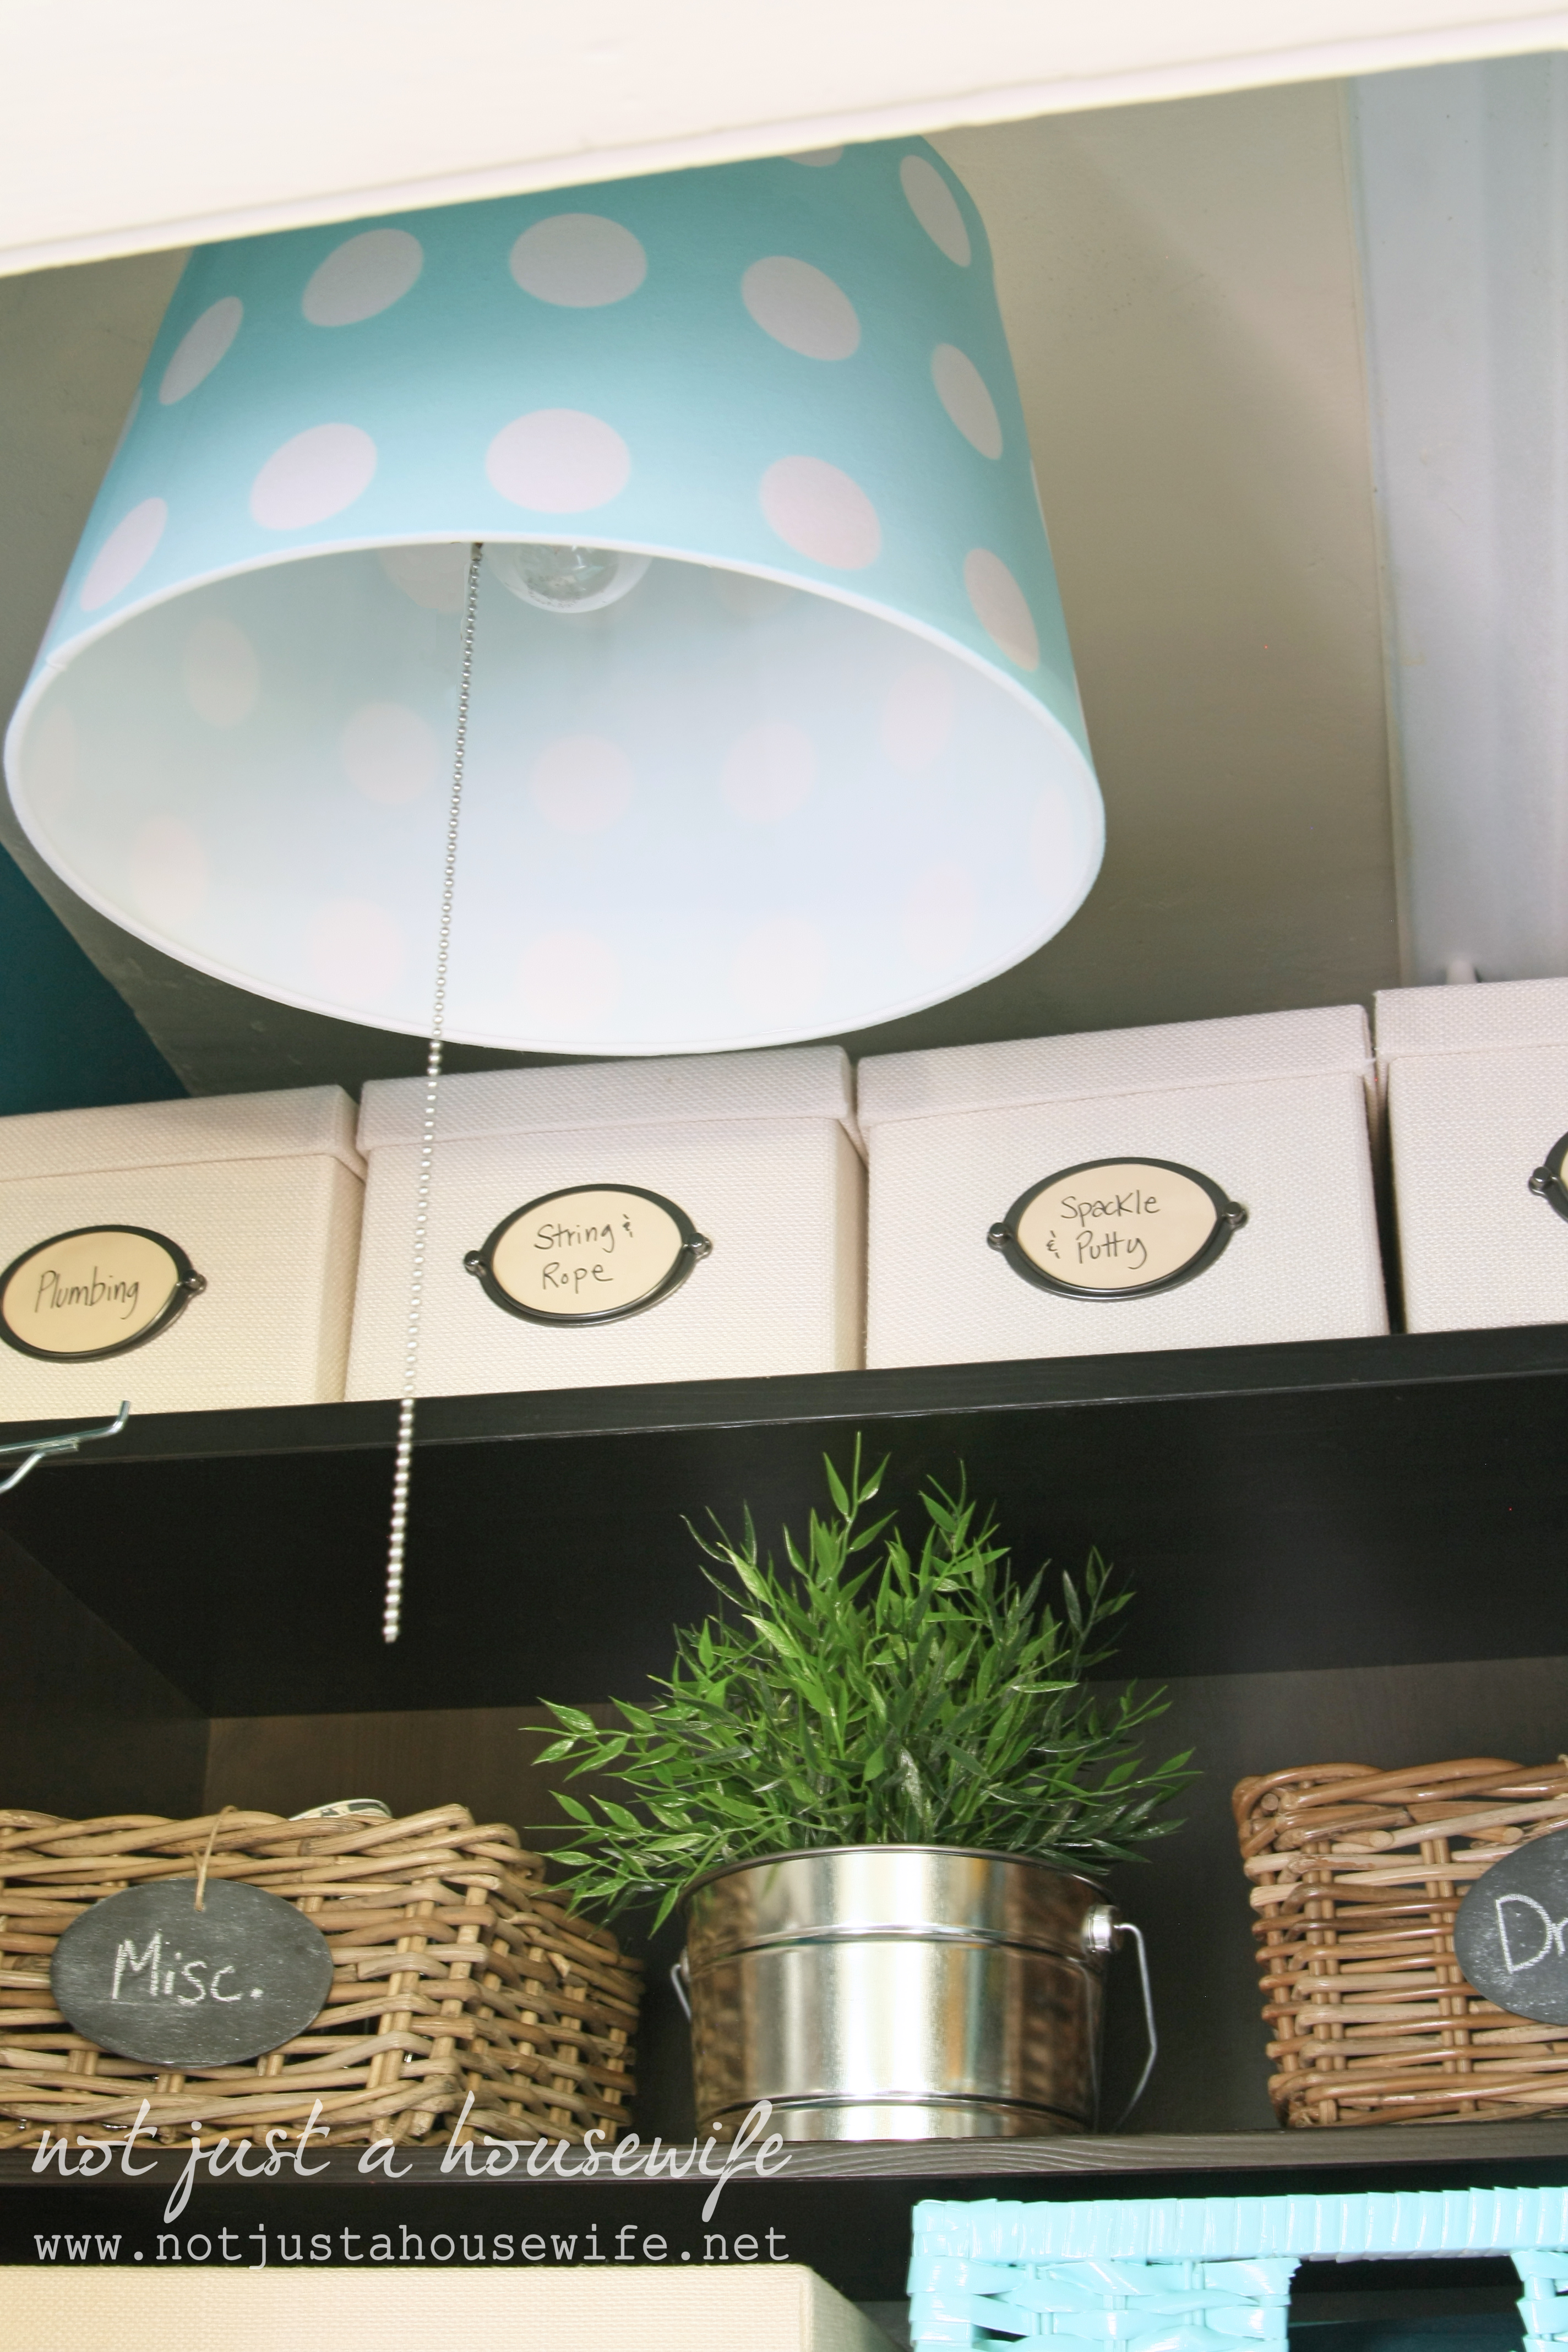
I love my polka dot lamp shade :) I bought a basic white shade from IKEA. Then I cut out circles from vinyl and stuck them on the shade like stickers. I then spray painted it lightly. If you spray too much and it gets saturated, when you turn the light on the shade will look uneven.
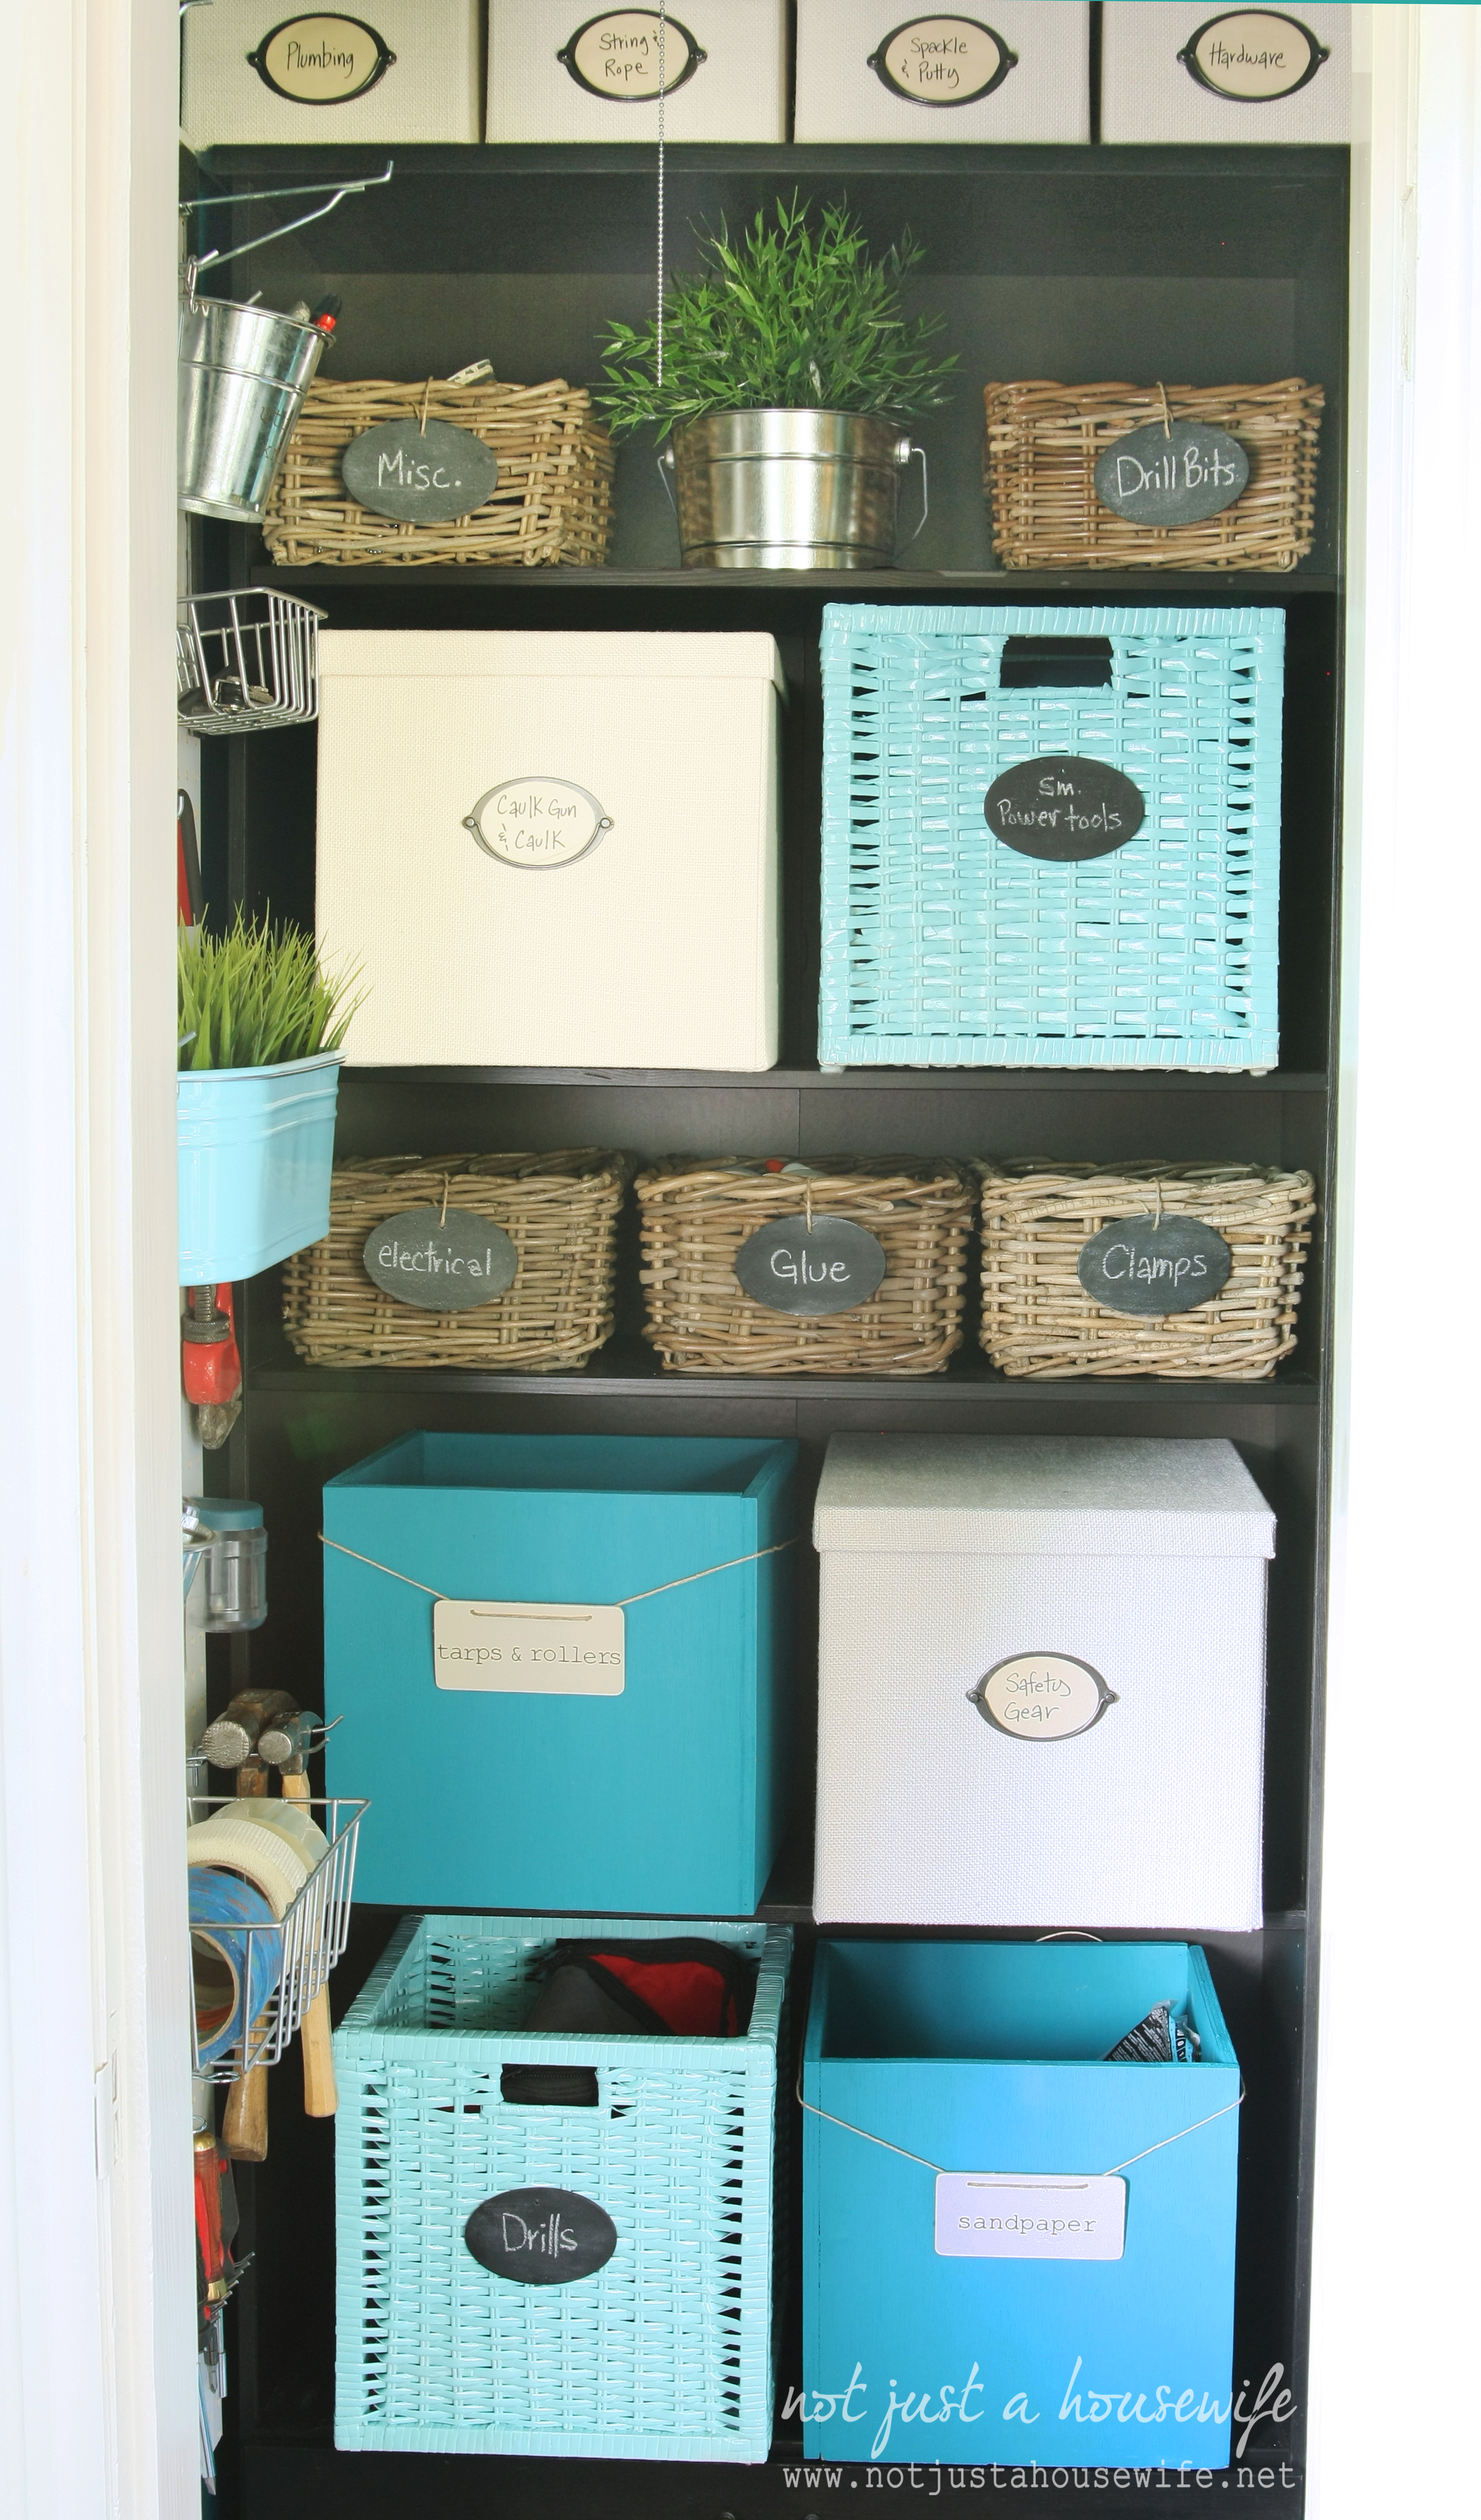
I love the bookshelf!!! I wanted the closet to look like the rest of the office as much as possible. So I bought the same baskets and canvas boxes. I built the peacock blue boxes out of scrap plywood and painted them. The light turquoise baskets are also from IKEA but they started out white. I spray painted them.
 (Do you see the same baskets and storage boxes?)
(I had to hang out the office window to get these shots! The closet in in the corner of the room and it was so hard to get his angle)
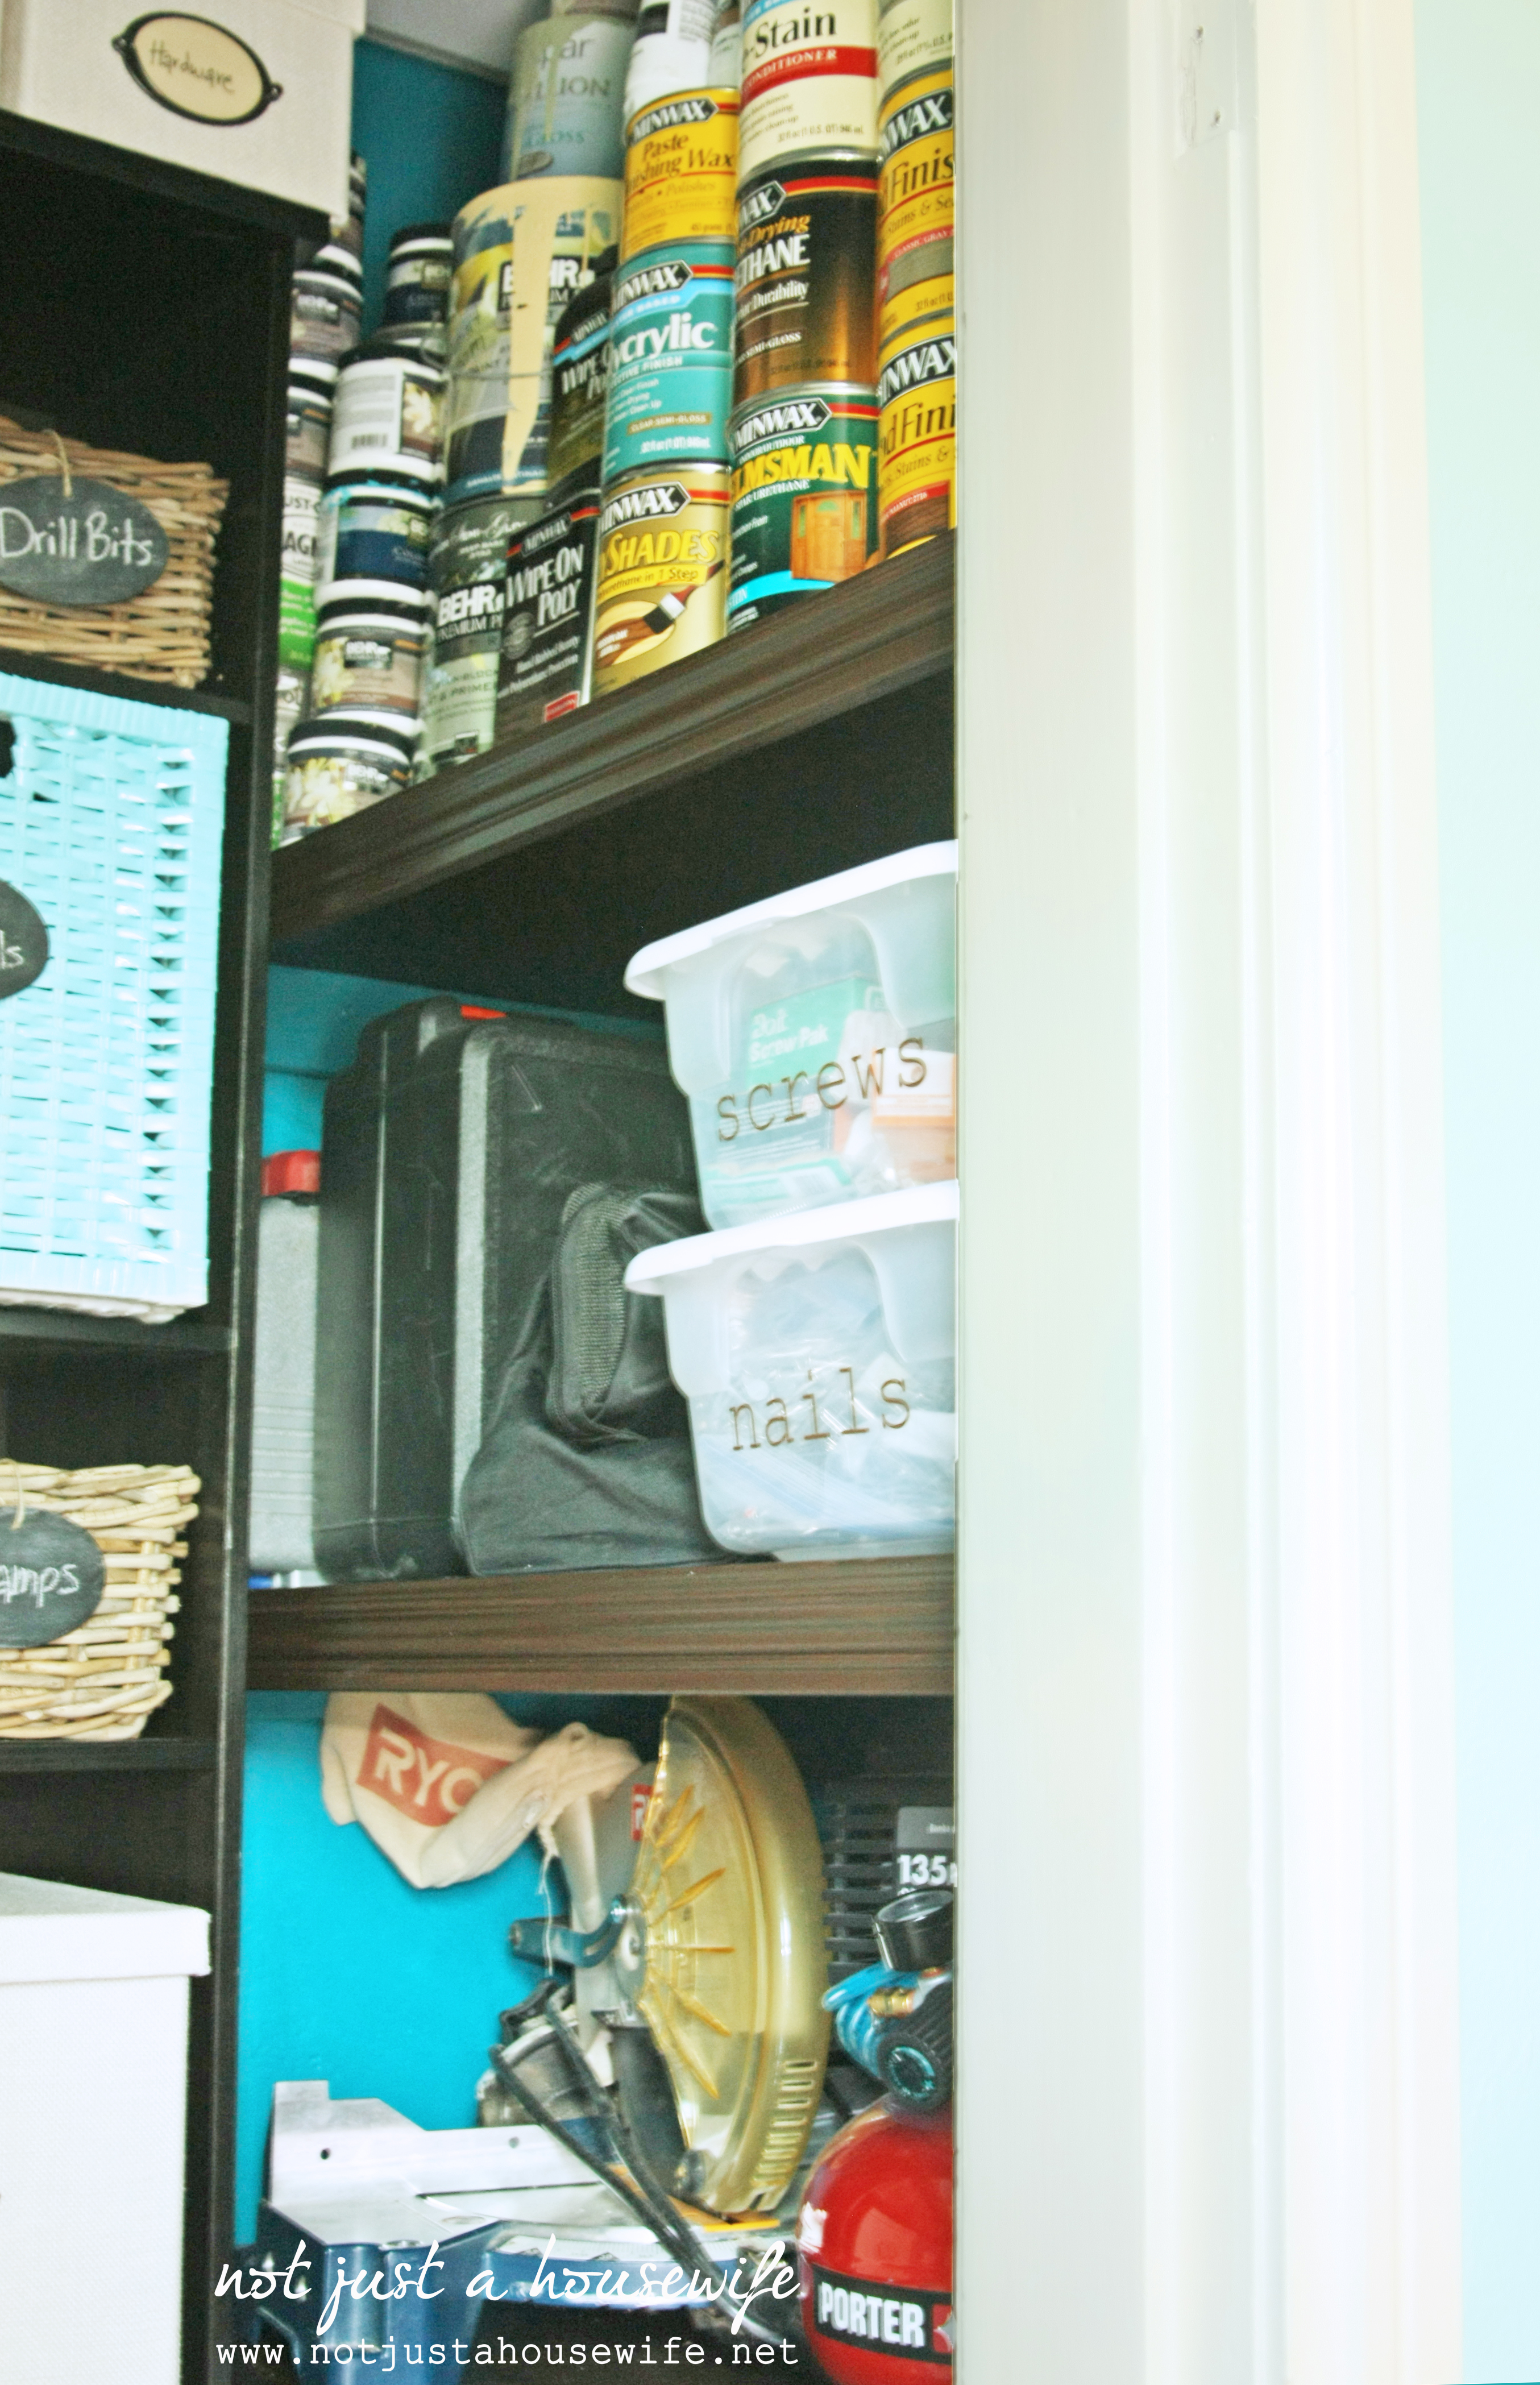
The shelves got a makeover too. The were just simple plywood shelves we put up soon after moving here. Functional but not pretty. Added some molding and stained them with Walnut Gel Stain from Minwax. I put everything that didn't fit in a cute bin on these shelves. Because this is above the stairs that go to our basement it is on an angle. SO the top shelf is 41 inches deep, the middle shelf is 31 inches deep and the bottom shelf is 21 inches deep.
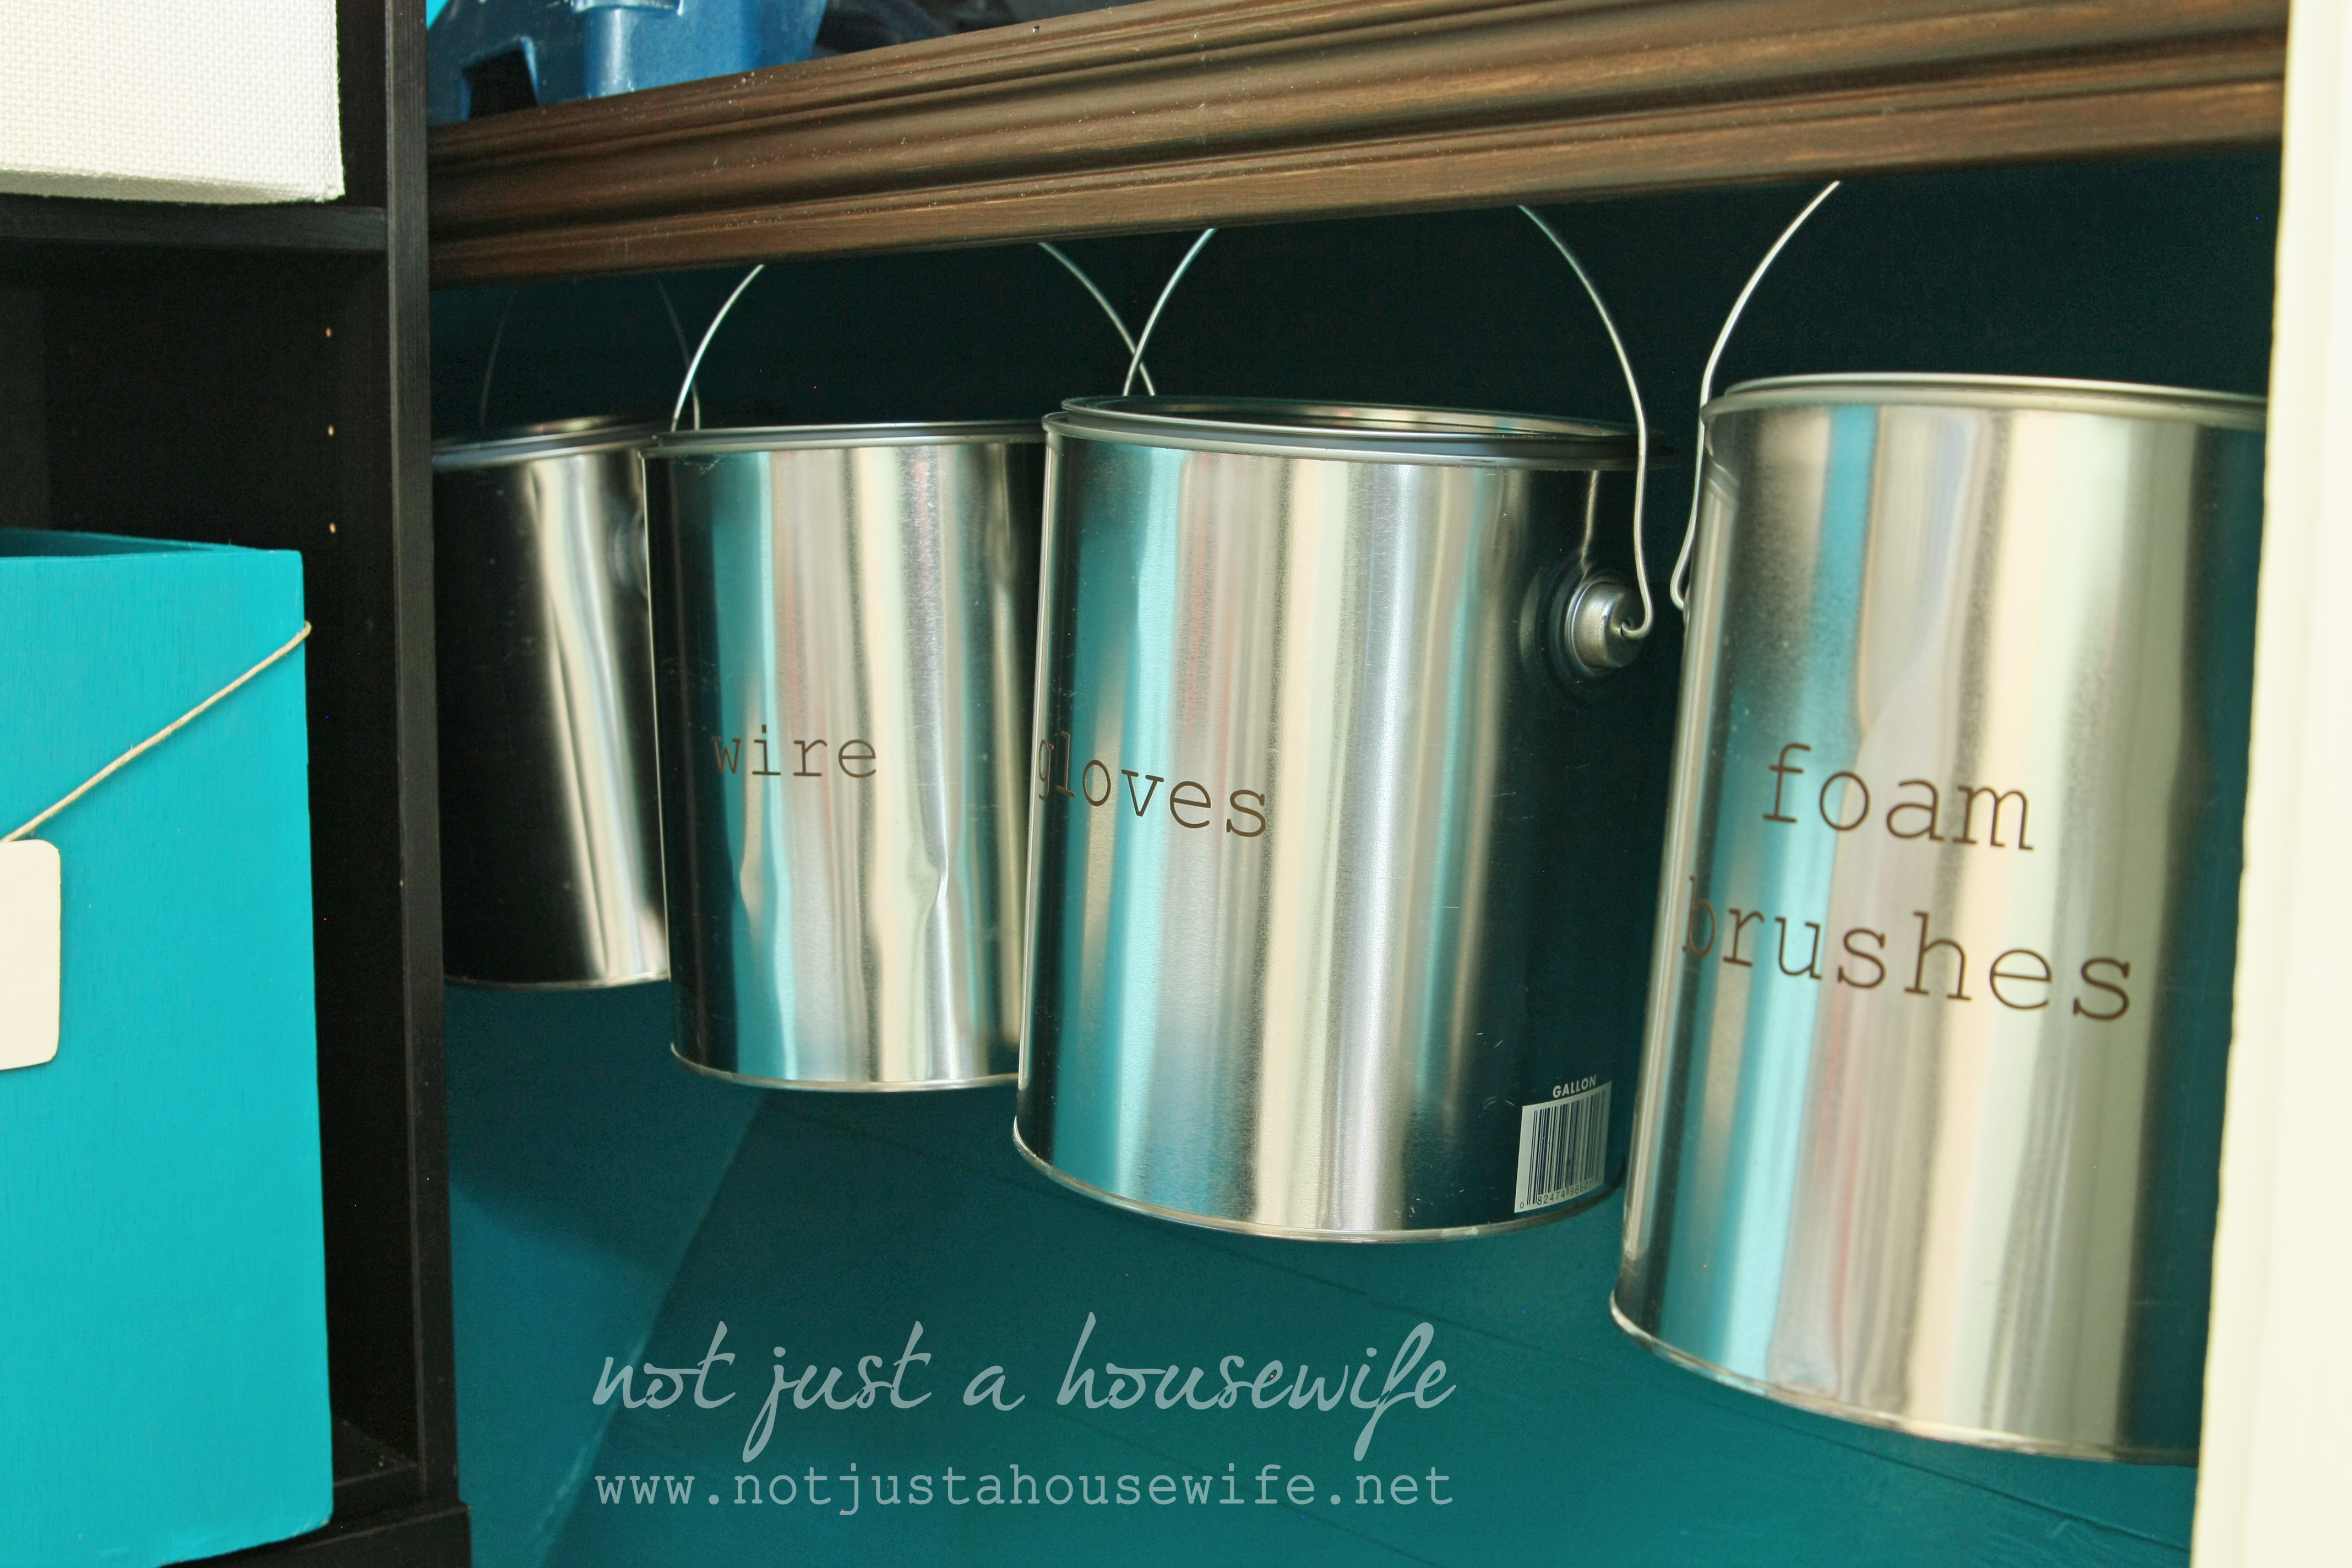
Underneath the bottom shelf was shallow enough that I didn't think it was worth adding a fourth shelf. But I wanted to take advantage of the space. I hung hooks under and put some empty paint cans filled with more DIY goodies in them. Did you know you can buy paint cans like this with out any paint? They were less than $5 each at Home Depot. And since my closet is all about DIY I thought they were fitting :) I cut out vinyl lettering to label them.

Here are some of the during shots :) Even the floors got a makeover!
I know there is a ton of stuff crammed into this 3 foot by 3 foot closet, but it has made my DIY life so much easier! And I am even going to keep the door off because I like seeing it all organized and pretty.
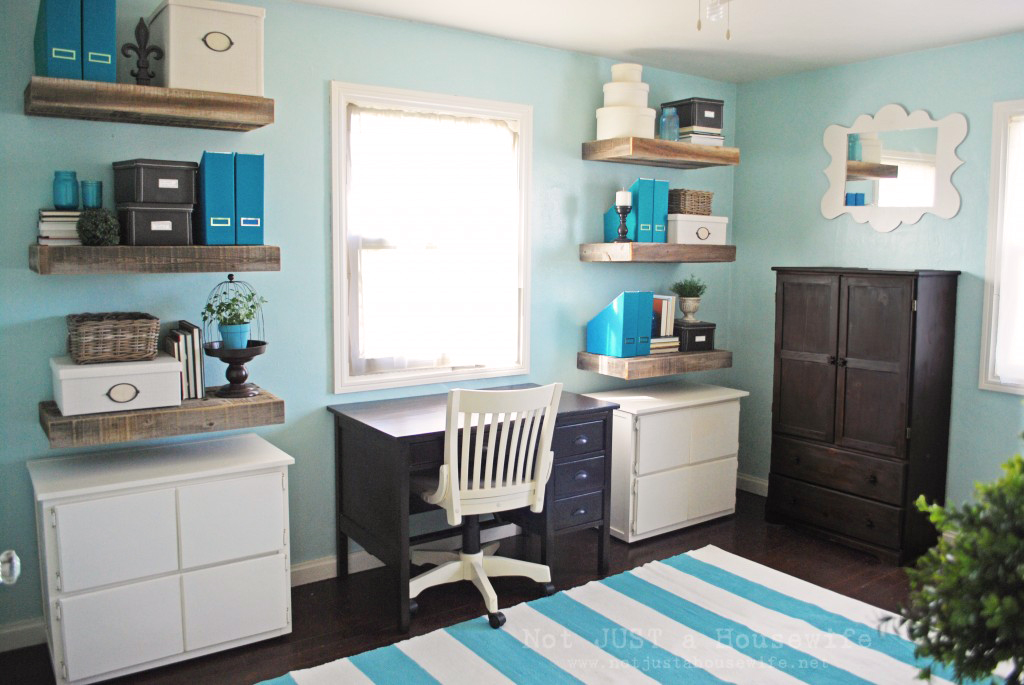
To see my full office read this post. And to see my computer hutch I recently finished for my office read this post.


This is a very nice space! What color paint did you use on the walls in the closet? And the baskets? I just love the color combo!
The paint color is called Peacock Blue by Glidden but I mixed it in Behr Ultra. The baskets ( and many other things) came from IKEA.
It looks fantastic! I love the colors and the way everything is so organized! :)
-Bonnie @ Revolutionaries
http://www.revolutionariesblog.com
That is PURE AWESOME. Every single detail is perfect; I can't even imagine how much work that was but oh my goodness it paid off. Love the colors and organization. KUDOS on a job well done!!! jules
It looks awesome! I love that your "office" is filled with tools, stain and paint, not paper and the norm office supplies. Can't wait to see you this week!
It really is beautiful. I love the paint you chose for the inside:0)
It looks fantastic!
This is spectacular! I love the paint cans for storing stuff. How did you put the names of the stuff inside onto the metal cans?
I cut out the words from vinyl.
Fabulous job Stacy!! I love all the colors you used. And especially that pegboard! Everything has a spot and it's also super adorable. :)
Wonderful makeover! The whole room looks amazing! :)
Awesome Stacy! Wowww loved it! I just can't help it, I love baskets and boxes to keep everything organized!!! It looks amazing!
Hope you can join my Hop and Link Party This week, I'm so excited about it!!!
Hope you are having a wonderful day thanks for sharing this
Hugs
Cami @ TitiCrafty blogspot
So great when a space becomes more functional/useable. And when it's so pretty to provide even more great inspiration...bonus! Can't wait to see even more great projects from you now that you have such a pretty storage space to work from.
Looks great and far too beautiful to just be storage. Must be a dream to work on projects in that room.
Love it! Especially the lamp shade. :) Oh the power of spray paint. Thanks for the inspiration!--Susan
What a fun and functional closet!!!
Ashley
OK, now that's the kind of closet I need! I was expecting some actual "office" supplies like paper and pens and stuff, but instead it's all your DIY equipment! I've been going crazy trying to figure out how to organize all the tools that I keep bringing into the house (because the garage is a disaster area and I can't find anything in there). I'm so inspired right now! :)
I am so impressed by the great job you did. And you must be thrilled to have that project done and everything so organized. I tend to have things in so many places.. garage, cupboards, closets. How nice to have this all together.
Cindy
This looks beautiful, Stacy! That pegboard is AWESOME! I love how the closet really compliments the rest of the room! So inspiring! Hope you're having a great week!
~Abby =)
Wow! Looks great. That should put a spring in your step when it's time to tackle another project. Wow. Sigh. Ummm. I need to do something about my "workbench" (haha--completely covered with stuff. No work could ever be done on it.) Very inspiring.
I LOVE it! It looks so amazing, I need to do this! Thanks for great inspiration!
Wow! What a lot of work you put into this gorgeous makeover. You are so inspiring. Blessings to you, Patti@OldThingsNew
i wouldn't have thought to incorporate peg board inside...what a great idea and makeover.
Love it! I'm just starting to organize all my stuff, and it's intimidating because I've let it pile up. Good ideas you have! I'm thinking I may have to borrow a few to get my stuff organized
LOVE the pegboard idea. I think I'll do this in my garage because I don't have any good storage for all of my litlle tools. They always end up all over the house or in the laundry room on top of the washing machine. Not a good system at all!
Oh I love it! The peg board is so smart. I need to remember to do that on a spot I have like that in my pantry.
I thought it was hilarious that you said you had to hang out the window to get that one shot. Funny lady! Your office is awesome. It must be great to work in there.
Wow!! I love that peacock blue color, and what a refreshing storage space this is now! I bet you feel like you can breathe when you go in there. Ahhhh. I love that organized feeling! :) I think the paint cans are my favorite detail. Beautiful!
This gives me great inspiration for my office closet!
-Morgan
Okay seriously amazing!! So awesome! Love how everything matches so beautifully.
Wow Stacy, This isn't just a closet - it's a work of art! Congrats on such a neat accomplishment. You rock!
Warmly, Michelle
Where did all the paint cans go? It looks nicer but there is a whole lot less in there
The paint cans are on the top shelf. The shelf is almost 4 feet deep so it holds all the cans with tons or room behind to spare.
I am in the middle of making a pegboard for my craft room. I bought those enamel buckets from Ikea and I would love to paint them. Do you have any tips? Did you sand it or prime it? Also do you know what size pegs you used to hang them from? Love yours! Thanks so much!
What a great do over. This gets me motivated for my next project, thanks.
This is so inspirational! It looks beautiful. Can I ask how you hang pegboard? Such a great idea!
Thanks!
Julia
Excellent job!
Just stumbled upon your blog. I love it! This is a great closet redo. The peg board was a great idea. I recognize the IKEA storage cause I have used some of those items in my own space.