
I somehow forget how hard it is to blog in the summertime. Every year the struggle to balance my time on projects, yard work, and the computer takes me by surprise. This tutorial for the L shaped kid beds with storage is long overdue. I appreciate all of the kind words about this set of beds when I shared my boys' bedroom reveal on the blog and social media. These beds were a lot easier to build than you might think!

Cut List for Beds
(4) 1x4s cut to 32"
(4) 1x4s cut to 69"
(8) 4x4s cut to 36" - legs
(4) 2x2s cut to 69"
(26) 1x3s or 1x4s cut to 37.5" - mattress slats
*This makes it so the bed is 39X76. A mattress is 38x75. If you want more wiggle room for bedding, add a couple of inches to the end and side 1x4 boards. I had space restraints I was working with (as you can see in the photo it is a tight fit!) It works with our bedding just fine but some may want more room.
Cut List for Railings
(2) 1x4s cut to 18"
(2) 1x4s cut to 36"
(2) 1x4s cut to 56"
(6) 1x4s cut to 9.5"
(1) 1x10 cut to 11"
(1) 1x10 cut to 29"
(1) 1x10 cut to 49"
Cut list for ladders
(4) 1x4s cut to 36"
(4) 1x4s cut to 13.5"
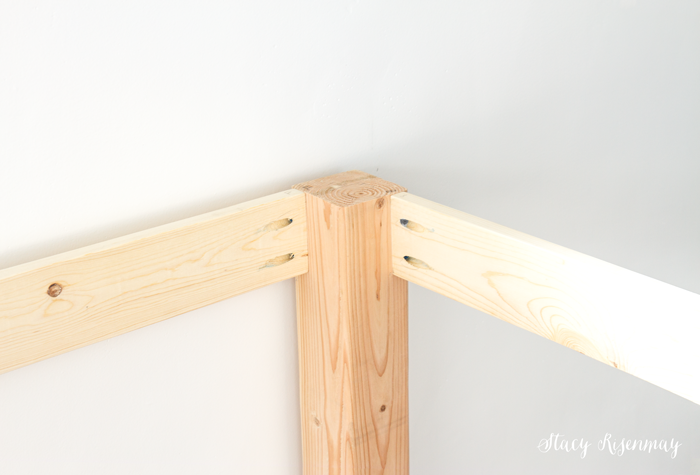
It really is a very simple construction. I first attached the 32" boards and the 69" boards to the legs using pocket holes and screws.
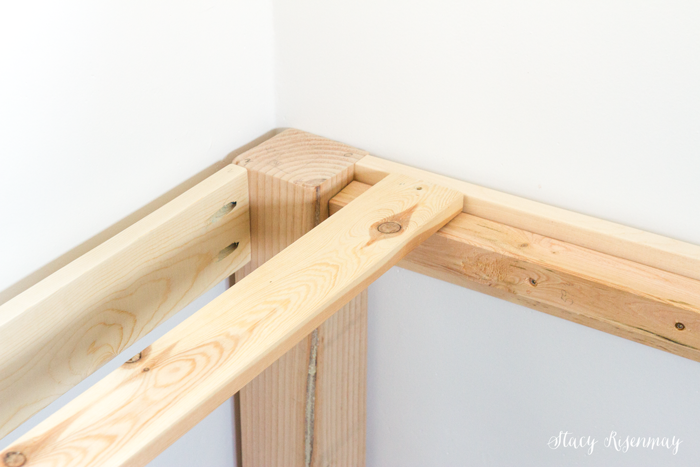
Then I attached the 2x2s to each of the the long sides. This will be what the mattress slats sit on.

Add the slats using 2" wood screws. When I added the 2x2s to the sides of the bed, I placed it so that when the slats were added, they would be the same height with the sides and legs. This way the mattress cam sit on top of everything.
I chose to not connect the beds using screws because it is such a tight fit for this room. If your room is wider you may want to connect the two beds somehow.

For the railings, I used 1x10 boards. I used a ruler as a straight edge and drew lines to represent mountains. I cut them out using a jigsaw.
Once they were cut out and sanded, I taped them off and stained them using a water based stain. I had a white stain and a black stain so I mixed them together to create to shades of gray.
You can also buy already mixed gray stain. I like Slate and Charcoal from Minwax.
Once it was dry, I taped it off again for the other sections of mountains.

I used pocket holes and screws to attach the 1x4 boards around the mountain cutouts. The bottom part of the rainling also had pocket holes so I could attach it to the bed.

I built two very simple ladders by screwing the smaller boards to the longer boards with wood screws that I sunk and then puttied over. I notched out a bit at the top so it would not stick out from the bed too far. It also made it easier to screw onto the bed. It is screwed on at the top and in the side (into the leg).

The plan was to stain it to match the floors. I used Weathered oak. Because the 4x4 legs are a bit more orange than the 1x4 boards, after the first coat of Weathered Oak, I applied a coat of Provincial. I wiped it off almost immediately. This gave the 1x4s enough of a warmer hue that they matched the legs. The legs were only stained using Weather Oak.

The whole bed received two coats of polyurethane even the mountains.
The railings were attached as soon as the poly was dry. I used pocket screws. They overlap like this:
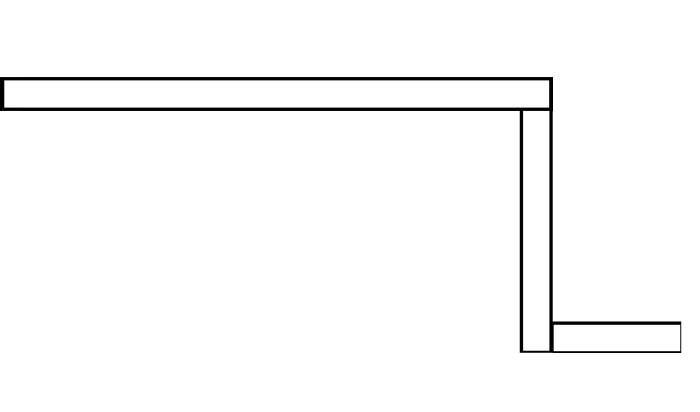
It ends up leaving roughly a 20" opening for the boys to get on and off the beds. The overall dimensions of the beds are 39x76 and it's 36" tall. A standard twin mattress is 38x75. You can adjust the height if you want. You could also make the railing with a different design. An X design would be cute or cut out something fun to fit the theme of your space.
I added curtains using regular curtain rods and hardware. I cut a set of curtains from IKEA in half and then I only had to sew a little. I love having the beds off the ground! Kid beds with storage are perfect for small spaces but are great for any room. We have bookshelves and cubbies under there as well as a little table and chairs. What a fun little fort!

The boys have LOVED sleeping and playing on (and under) their beds :) If you missed the full bedroom reveal, you can see it HERE.

I'll have the post up later this week with the sources and tutorials for all the other items in the room. It was such a fun space to create and put together!


So, does it end up fitting two twin sized mattresses? I absolutely love these! I need to do some measurements to see if they would fit in my boys room.
Yes! My 14 year old sleeps on one and my 8 year old sleeps on the other. The older one makes up adventure stories at night and puts my youngest to sleep. After a healthy dose of giggles of course :)
I even slept up there one night when my oldest was at scout camp and my youngest was sick.
What a great idea! High but not too high. Boy how l hated bunk Beds! And that corner... what a great place to relax .
another wow. and the instructions and photos are just great.
There’s no photos of underneath the bed?
I haven't had much luck since it is darker under there. I need to try it without the kids under there I guess. Any little movement makes the photo blurry since the shutter has to stay open longer. I'll work on it :)
Could you put a work light or lamp down there just to give the area extra light for the photo? I'm curious, too. Would love to see it all kitted out with kid stuff. (Really just want to imagine having such a cool bed when I was little.)
There is a lamp on their little table. I'll try again and get the photos added to the next post about all the details of the room :)
I love that even you can sleep in these beds! That shows the quality of craftsmanship or in this case womanship! ( If that's not a word it should be! ) ;-)
This makeover look is just amazing!
How wonderful.
Love this bedroom and the clever bed design that meets multiple needs. I'm about to retrofit an old headboard/footboard to fit a new mattress. It was an old hand-made rope bed, so the pegs are still existent on the two parts, but a previous adaptation was made to accommodate a traditional mattress and box spring. Whatever the sides of the rope bed were are long gone.
I bought a modern style foam mattress and am foregoing the box spring. I'm also going with a twin XL rather than a twin size mattress. Therefore, I have to replace the boards on the sides that held the head- and footboards together and provided a base for the slates. (Sorry this is such a long story.) What I'm wondering about is I notice your beds are just an inch longer and wider than the mattresses. I'm guessing you were working within the constraints of the room size. How's that working out? Would you have made the beds a little bigger if you had the room? Is it hard to change the sheets? I don't have size constraints, but I'm wondering how much wiggle room to leave at the ends of the mattress. Long story for a simple question. I'm haunted by the idea, "Measure twice and cut once."
I probably would make them an inch or so wider. It works fine with the bedding how it is now but it doesn’t hurt to have more wiggle room! I was able to pull the beds away from the one wall an inch or so which gave me more room too since there isn't a railing on that side..
Very cool build. Nice job!
This is a great idea and design. It may well be the bed that finally encourages my 3-year-old son to sleep in his own room! I just need to make sure it fits...Thanks for sharing.
When it comes to furnishing kids’ rooms, you can’t have too much storage. This bed is a clever solution because it has more than one purpose. It gives your kids a place to sleep and a place to store extra items.
Hi I wanted to make this but only for one bed. Do I just halve everything? Thanks!
Hi there! Im a beginner, i understand the length measurements, but i dont understand the 1x4s etc. Are these measurements for thickness?
With a 1x4 board, the 1 represents the thickness and the 4 represents the width. But because that is the size before the lumber being planed, it is actually 3/4" by 3 1/2".
Love this!! Did you use a standard mattress? It looks more like a futon type mattress...not quite as bulky as a traditional one..which is what I'd prefer!
They are regular sized but are from IKEA so they aren’t as tall (thick).
Thank you!! My husband is building these next week so I'm trying to figure out the size of curtains that I need. Do you remember what you used?
I used some curtains from IKEA and just cut them shorter.
What size screws did you use besides the 2in wood screws?
Stacy, Do you have the measurements or any info on the optional slide?
Thanks
While this is a cute design, the walk through and measurements are actually very off and difficult to work with. If anyone decides to do a loft bed I suggest finding and actual plan not this blog post. - A VERY frustrated mama with a wonky bed and hundreds of dollars wasted.
I'm so very sorry you had difficulty with this build. I have had lots of people send me pictures of the beds they built using this tutorial. I do wish I had had the skills at the time of writing this to do actual building plans. They tend to be easier for people to follow.
What about the slide pictured??