
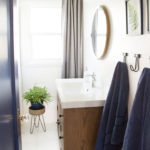
I shared my bathroom reveal this week. Thank you for all the kind comments on the post and on social media. I have been enjoying leaving the door open instead of feeling like I had to keep the door close to hide its ugliness.
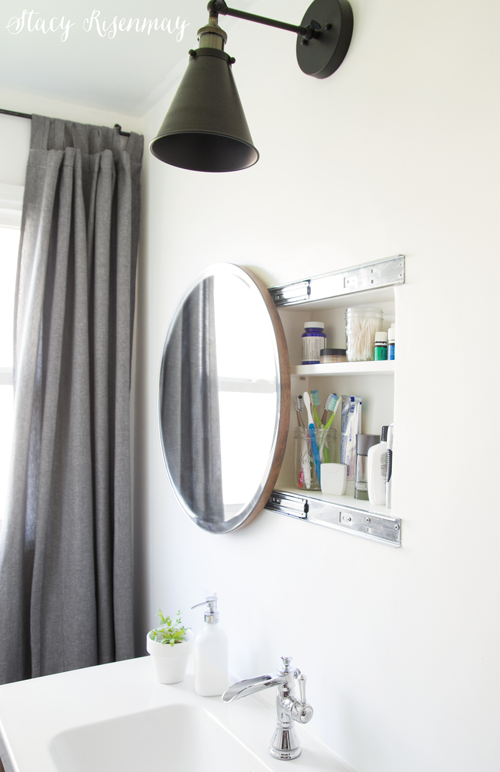
There is one more thing I have yet to share about my bathroom. My mirror has a secret.
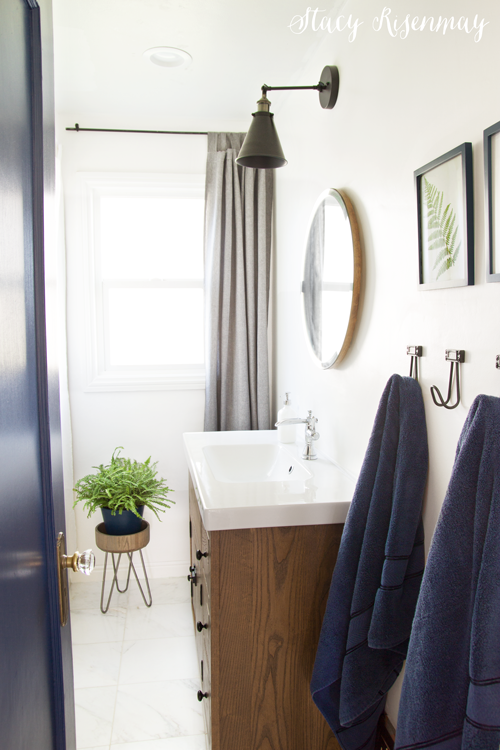
I knew I wanted a round mirror offset all the corners (the square tiles, the rectangle shape of the room, the window, and the vanity) but I was torn because when we took down the old bulky medicine cabinet, it revealed the little nook for the original cabinet. I wanted to use the little inset area as a medicine cabinet. I love that our house has so many fun little built ins and nooks :) Round mirrors don't open with hinges like a square or rectangle mirror would so I had to come up with a solution.
My idea? Drawer slides! I now have a round sliding bathroom mirror!
I measured the mirror and figured out the right size of drawer slides and how big the nook could be. The nook was quite long so we ended up adding 2x4s and made it about 8 inches shorter so the mirror would cover the whole thing. You can see in the picture that I traced the mirror with pencil so I knew for sure where it would be and what it would cover.

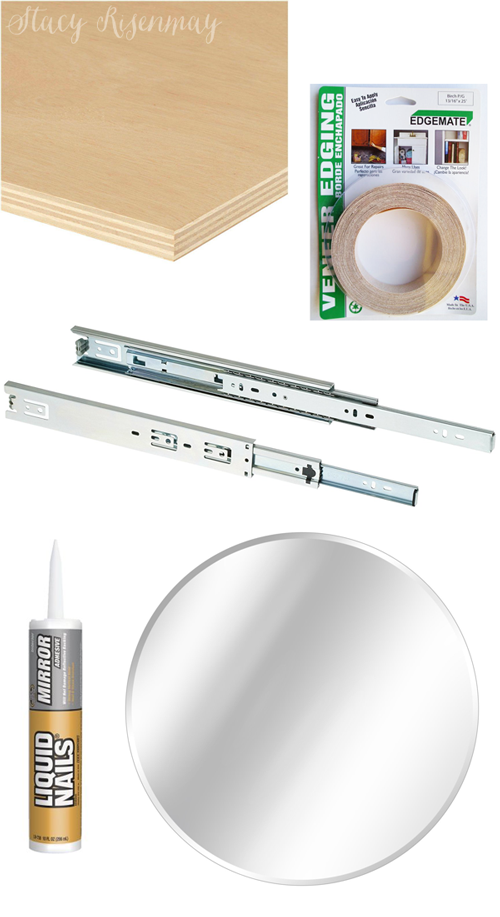
Supplies:
(links are affiliate)
¾" Plywood
Jigsaw
Drill
Wood stain
Small foam brush
1. Figure out what size hinges to use based on your mirror size and nook size. The mirror is 24 inches and I used 16 inch drawer slides that are fully extendable. Because the mirror is round and is narrower at the top and bottom, you can't use drawer slides that are 24 inches. I held it up to the nook and marked where the top and the bottom lined up to the mirror and that is how I came up with 16 inches.
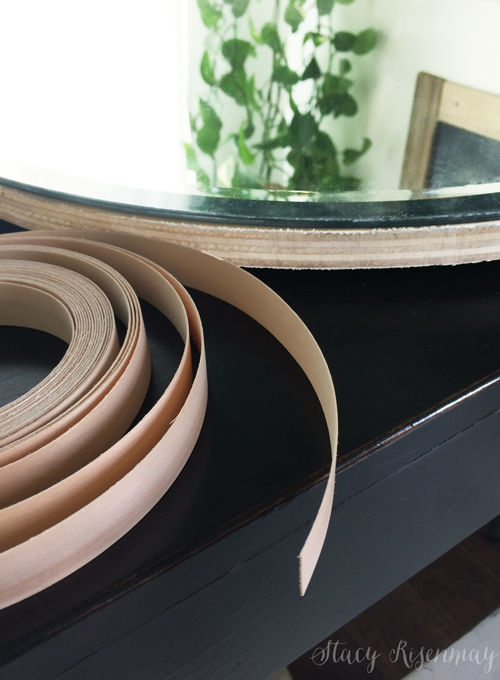
2. Attach wood to back of mirror. In order to attach the drawer slides to the mirror, I had to add wood to the back of the mirror. I traced the mirror onto some ¾ inch plywood and then cut out the circle using a jigsaw. The mirror came with metal hanging plates on the back that stick out about ½ inch, so after I cut out the circle, I cut out two holes that lined up with the metal plates so the mirror would be flush against the wood. Use a type of adhesive that is meant for mirrors. Allow it to fully cure before moving on the the next step.
3. Cover rough edges. I didn't want the plywood edge to be what you saw. I wanted a more polished look so I bought edging tape. It is a thin wood veneer with a heat activated backing. I cut it to the length I needed to go all the way around the mirror and then used an iron (according to the instructions) to adhere the ending to the plywood. It also serves to hide the slight gap between the mirror and plywood.
4. Stain and seal. Once it has cooled, I stained it with Minwax's Provincial stain and when the stain had dried I then sealed it. I used a small brush and was careful not to get any on the mirror. You could tape it off if your wanted to.
5. Attach the drawer slides to the back of the mirror and the wall. I attached half of the drawer slides to the back of the mirror, using a level to make sure they were perfectly straight. The after double checking the measurements, I attached the other half of the drawer slides to the wall. I waited until Shane got home to help me slide the mirror's half of the drawer slides into the wall's half. The mirror with the added plywood is quite heavy and I didn't want to risk dropping it while carefully trying to connect the drawer slides.
*It is important to note that the drawer slides are attached to 2x4s in the wall and we used extra long screws (not the short ones the drawer slides came with).
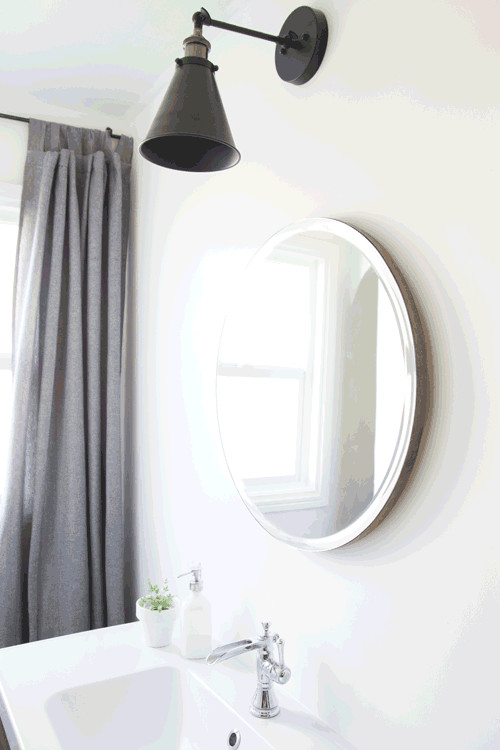
I am so happy I was able to utilize the little nook, gain extra storage space, and have the round mirror I wanted.
Do you have anything you have made for your house that solved a problem? I would love to hear about your projects!
.


Wow!!! This is genius AND gorgeous!!! I love everything about it!!
love! we are about 3 weeks behind you stacey! We just finished flooring, shower. Can't decide on vanity. pushing to be done by Thanksgiving. #goals
Good luck to you! Especially if you have guests coming :) I am sure it will be great.
Of ALL the DIY and blogs I read......THIS IS BY FAR THE MOST CLEAVER DIY I HAVE EVER SEEN!!!!!! ABSOLUTELY PERFECT!!!!
Wow! That is quite a compliment! Thank you :)
Love the long curtains in the bathroom. We just remodeled ours but with limited wall space my towel rod is under the window. The curtains make it so elegant looking...
Love the mirror idea too!
I actually considered adding a towel rod or hooks under the window since it is closer to the shower. I bet it looks great!
Brilliant!!!! What an amazing idea.
Extraordinary idea! And well done. Thanks for sharing this.
This is beyond brilliant! It looks fantastic, too. Now I wish I had a place that I could do this. Thanks for sharing this awesome idea.
I'm a little late to the party, but the whole bathroom looks fabulous. You have such a great eye for interior design. But this sliding mirror idea blew me away. Brilliant idea!!! And the round mirror is a wonderfully elegant note.
Thank you so much! I smile every time I slide it open and close :)
great idea, thanks for sharing
wow you are so clever ! any challenges better watch out when you are around !!
Thank you! They do say that necessity is the mother of all invention, or in my case, being stubborn ;)
Wonderful idea with the sliding mirror!
OMG, I love, love, love, &love this idea. Fabulous job.
Gotta say, the sliding round mirror is my favorite. Very ingenious!
GENIUS!!!
Excellent idea!
WHOA! this is awesome, and like, super secret. i want to store valuables here, lol. i LOVE this, truly original!
b
What a cool idea! Your bathroom is gorgeous! Sharing on Twitter.Thank you for sharing on Merry Monday! Hope to see ya next week!
Kim
Now, this is a very clever idea. I am sorry I had the hole left by the medicine cabinet filled in.
That idea is so awesome! Great way to have it all and it looks great - nice job.
This is a FABULOUS idea! I would never have thought of it!
Great idea ! I am interested in the wall lamp for my kitchen. Where did you purchase it ? Thanks !
I have the same light in my kitchen too! At the bottom of this post, there's a list with links where I got all the items in my bathroom, including the light.
https://www.notjustahousewife.net/2017/10/blue-and-white-bathroom-makeover.html
Your sliding bath mirror is such a unique idea and could certainly be used with any shape mirror. What a creative replacement for an outdated medicine cabinet (using the existing recess)) and one that is almost flat to the wall as well. I could also see this idea being used to make doors for the "niche between the studs" cabinets that are often used in baths , laundry rooms and kitchens. Wood doors (to match existing cabinetry), bulletin boards or chalkboards would work for this. Great for spaces where a swing out door is awkward - tons of possibilities. Thanks for sharing this genius idea!
I so love this idea. Is the mirror and wood very heavy? I would love to buy this mirror from Serena and Lily and do the exact same thing.
Thanks
I did reinforce the opening with 2x4s to ensure that it would be strong enough. If you do that you should be fine!
For the first impression, I thought that the mirror was fixed, but not it's flexible and unique. I must say that this is one of the best bathroom remodeling ideas for small bathroom.
What a great idea!! Do you suggest using anything besides the heavy plywood? Could you use eucaboard or a thinner plywood
Hi! This looks perfect for a powder room I'm renovating. Can I ask the reasoning for the wood on the back of the mirror? I gather it's so that you can screw the drawer slides to the mirror? In your opinion, would using a strong adhesive work so that I don't have to thicken the mirror? Thanks! Great work!
This is the kind of thinking I was looking for! Moving into a rental that has a terrible dinky medicine cabinet and im dying to take the mirror off it and make a creative solution. Do you think if I put wood on the back of a round mirror it could still work with a hinge mechanism?