
 I combined 2 of my favorite tools with 2 of my favorite things. The jigsaw and nail gun plus flowers and fun colors!
It is a pretty straight forward and easy process. I first decided the size I wanted and cut the boards to size. I used a 1"x8" board. The ends are 8" long and the front and back pieces are 16" long.

Then I came up with a design. I just drew it on the wood but in the past I have made a template of the design out of paper and traced it. Either way make sure to measure all the points so it comes out even. When I use paper I fold it in half to make sure it is symmetrical.

Next I used the jigsaw to cut it out. Sorry I don't have a picture of me cutting it out. It was nap time and my hubby/assistant was at work. But if you really need to see an action shot, go HERE.

Then I assembled the box. I used my brad nailer but if you don't have one you could easily use screws to hold it together. I would sink them (drill them below the surface) and then putty over them. Use a sandable nail filler and sand it smooth when it dries.

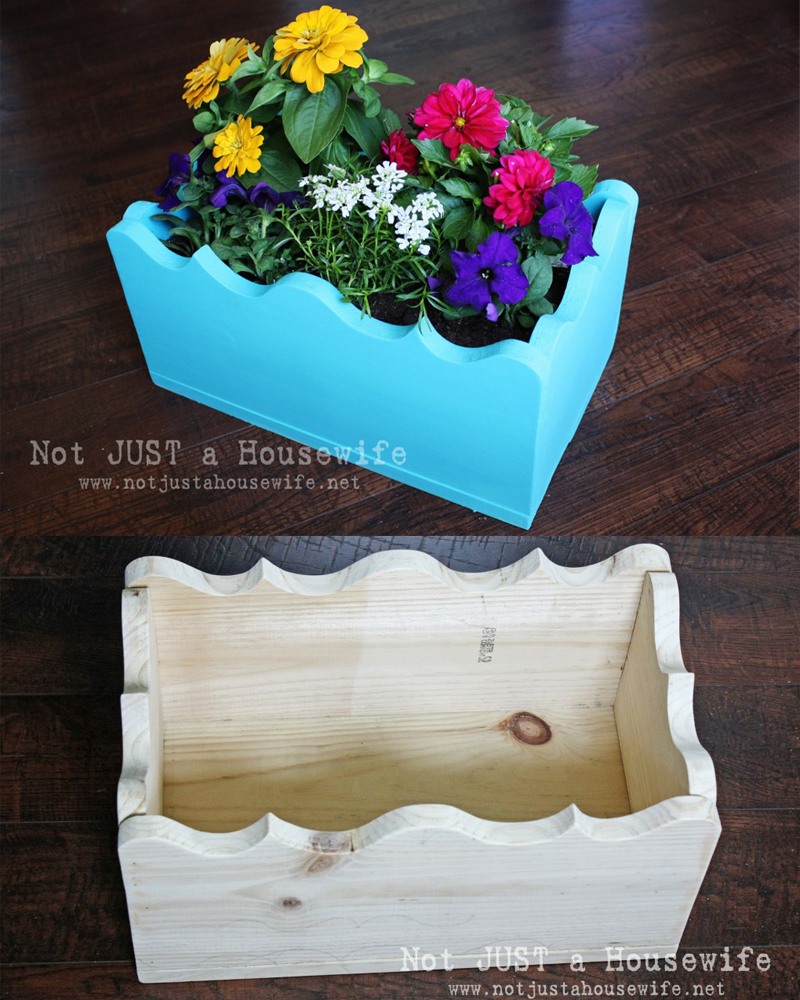
Here she is all put together! For the bottom I used to slats. That way there is a slit that runs along the whole bottom for drainage.

I chose a fun bright color. It is called Mermaids Treasure by BEHR. I also bought rounded feet for it but I was so excited to plant the flowers that I forgot to attach them. Since I was going to screw then in from the inside they won't be going on. But that is okay.
You can seal it if you want to. It would probably be a good idea. I would use Helmsman Spar Urethane by Minwax. It is like polyurethane but for the outdoors.
I am not sure where I am going to put her, but I am sure she will look great no matter where it is :)


I love how the color is Mermaid's Treasure, and the scallops you cut kindof look like waves. So pretty! Great tutorial! Thanks for sharing.
I REALLY love this! May I ask how much it cost to make? I would love to be able to offer to make these for centerpieces for a friends wedding.
The board was a 1"x8"x6' and cost 4.98. I had some left over. Enough to do another side. You could always use that piece as the bottom. And they can be made smaller or with a smaller board. But it was definitely cheap to make. Good luck!
So cute, and my favorite color of all time!!
Love this! I would totally put it on my to-do list if I didn't have a bad rep of killing plants.
Love it Stacy! Such a fun color!
Really cute, really amazing! I want one!
i love your new header!!!
I love the color and the detail on the top! So cute! I need something like that for my back patio!
Question, did you cute the boards on an angle to make it wider at the top? If so, which edges were at which angle? i've been trying to make some window boxes... yours looks much easier and cuter.
I didn't cut it at an angle. If you end up making some please send a picture! I would love to see!!!
love everything about this. the color. the choice of flowers.
now, i just need to learn to use said power tools...
thanks for sharing!
Too cute! Love that color. Your blog makeover looks awesome too!
Love the color!! Also love your new blog design, very pretty!
Hi Stacy, your blog is new to me. I followed I link to you from sawdustandembryos.com I am interested in the outdoor planter you constructed. How did it hold up? I've been looking for a long, narrow rectangular planter (maybe 6' x 1') but everything I find is too wide and way to expensive. I intend to sent it on cement near a retaining wall with a metal headboard at the back of the planter for morning glories to climb. Any advice or words of wisdom?