• Skip to primary navigation
  • Skip to main content
  • Skip to primary sidebar
  • Skip to footer
Stacy Risenmay
  • Home
  • About me
  • PRESS
  • Contact Me
  • My Book
    • Facebook
    • Instagram
    • Pinterest
    • Twitter
menu icon
go to homepage
subscribe
search icon
Homepage link
  • Home
  • About me
  • Project Gallery
  • Our House
  • PRESS
  • Contact Me
  • Privacy Policy
    • Facebook
    • Instagram
    • Pinterest
    • Twitter
  • ×

    Reclaimed Wood Floating Shelves

    By Stacy 120 Comments

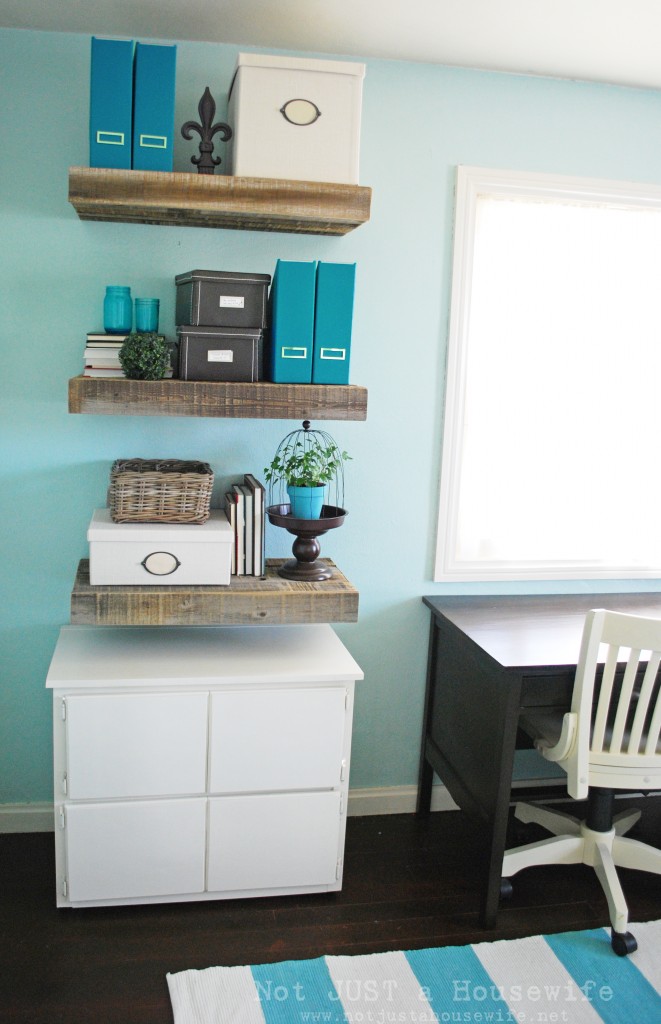
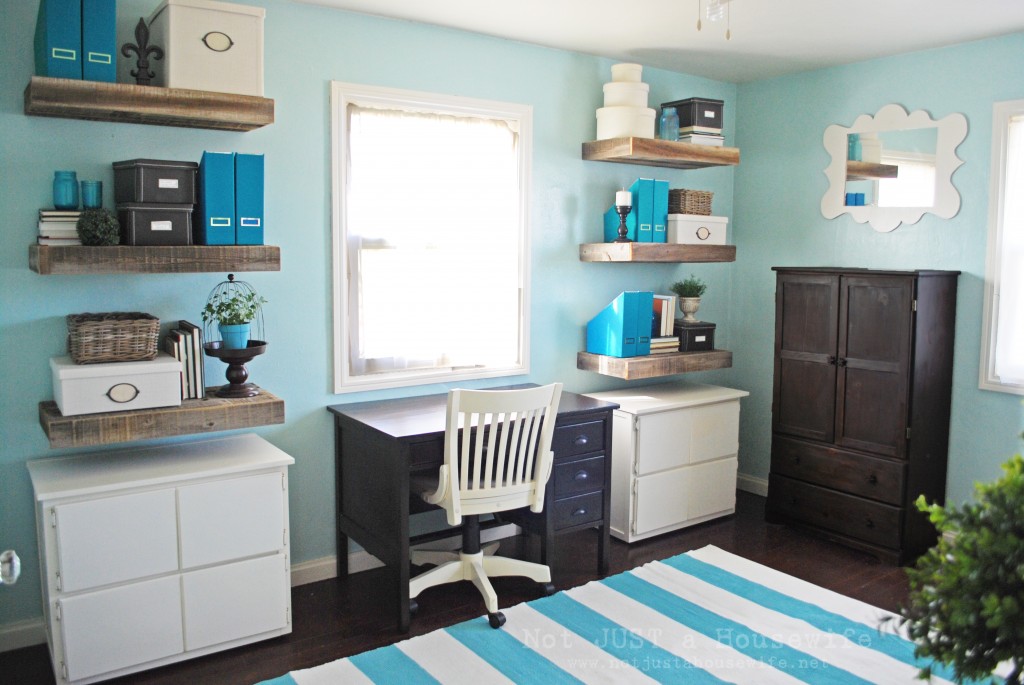
    I have been so excited to share this tutorial with you. Out of all the elements in my new office I have received the most emails about these shelves.

    When you have a small space the smartest thing you can do is go vertical. I was NOT taking advantage of the wall space in the way my office was done before.  I knew I wanted shelving but I did not want a giant wall of built in shelves because I thought it would feel too heavy and would make the space seem smaller. I love the openness of these floating shelves!

    I have mentioned in the past that I think that a small budget forces you to be creative. That was definitely the case with these shelves. My original design called for new wood that would have been painted cream to match the cabinets below.  But when all was said and done the budget didn't allow for that. I have a large pile of old fence pickets in the backyard I got for another project so I used some of those. Free was definitely in my budget. I am happier with these shelves than I would have been if I had bought new wood :)


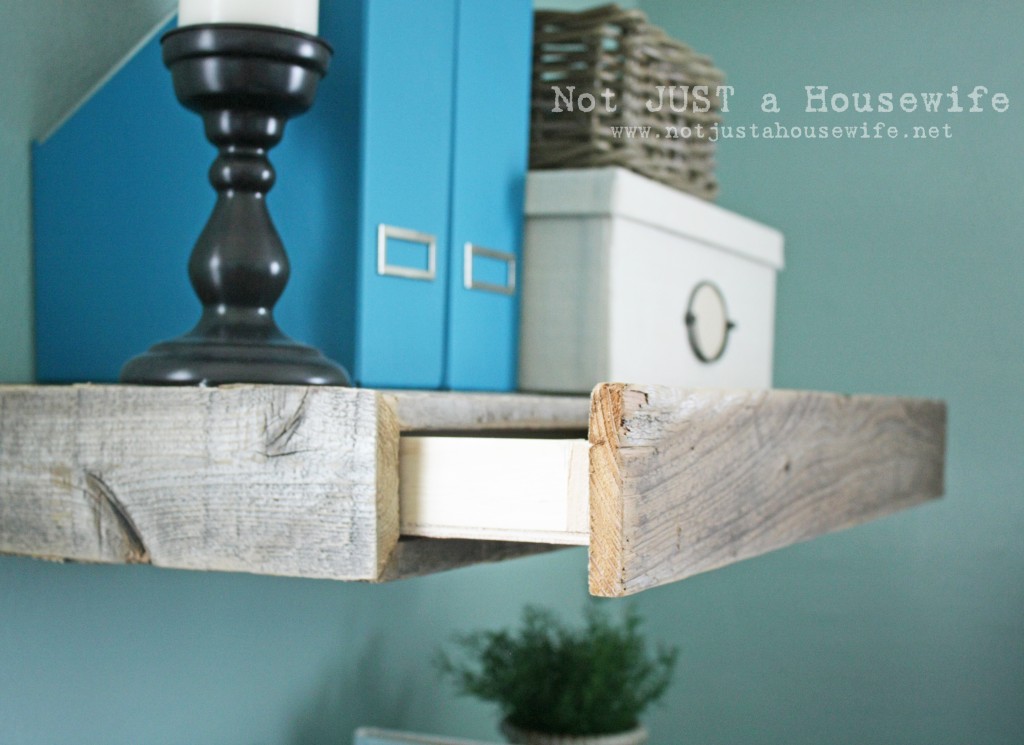
    Remember when I revealed my office and I said that my shelves had a secret????


    Eeeeek! They are also drawers!!!!!! I love it :) When I was brainstorming for ways to add much needed storage to this space I thought, why not this? Granted the drawers are only 2 inches deep, but they are perfect for paper! Anything else would probably be too heavy anyway. Right now they are filling up fast with my kids artwork and school work that I will one day put into scrapbooks, and with things I am too lazy to file away.


    Alright, on to the tutorial!!!

    Supplies needed:

    (affiliate links)

    *Reclaimed wood (I used old fence slats)

    *Miter Saw

    *Wood Glue

    * Brad Nailer

    *Level

    *1x2 and 2x3 boards

    *Plywood

    *Wood Screws


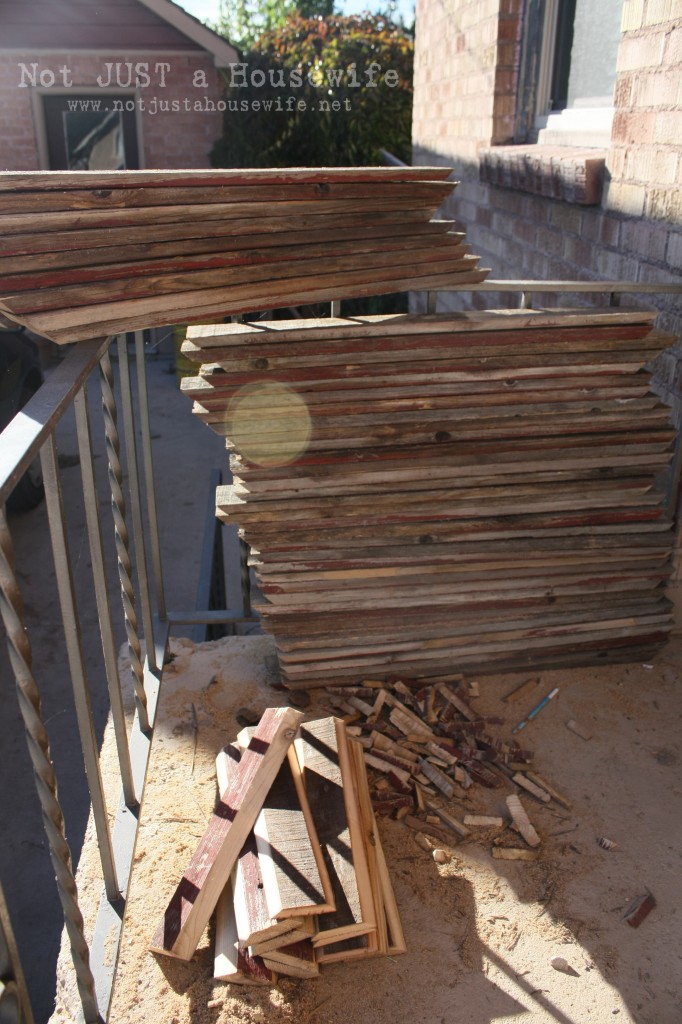
    I decided how long I wanted the shelves to be and then measured and cut the wood pickets to that length. There would be 6 shelves total and it took 4 boards for the top and 4 boards for the bottom so I cut (48) 30 inch boards. Then I cut 12 boards for the sides. After I did that I needed to cut the enda at an angle (mitered cut). I used the miter saw and cut at a 45 degree angle. I swear I had my husband take a picture of me cutting at an angle but I couldn't find it in my computer file. Sorry about that. If you look closely to the picture you can see the angled ends.

    For the side pieces, the long side needed to be cut at an angle, not the end. I sent my hubby to the neighbors to use their table saw while I was doing the other cuts. (Dear Santa, I need a table saw.....) You can see the smaller side pieces in the picture too.


    When I talked about building the bench that is on my office, I mentioned that picking out smooth, straight wood was critical to building  furniture. Well, new fence pickets are not straight and smooth let alone OLD ones. So I broke that rule. And it made it a little more challenging when it came time to construct. But the end result was totally worth it!

    It was kind of like putting a puzzle together. I placed different pieces together and saw what worked the best. Sometimes I had to flip one over or switch it out.
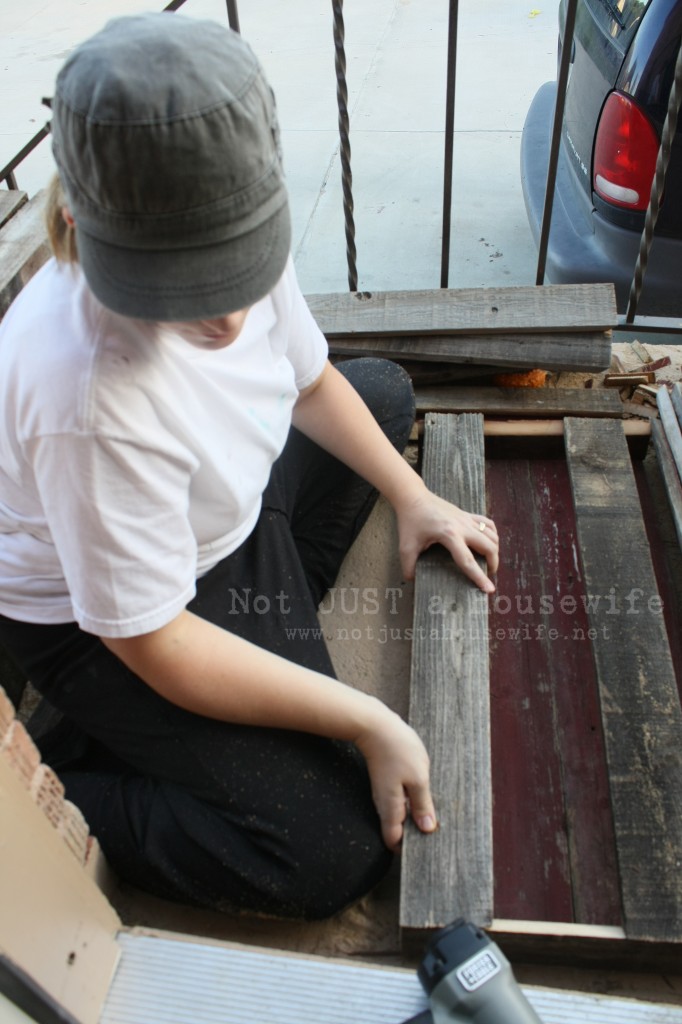
     

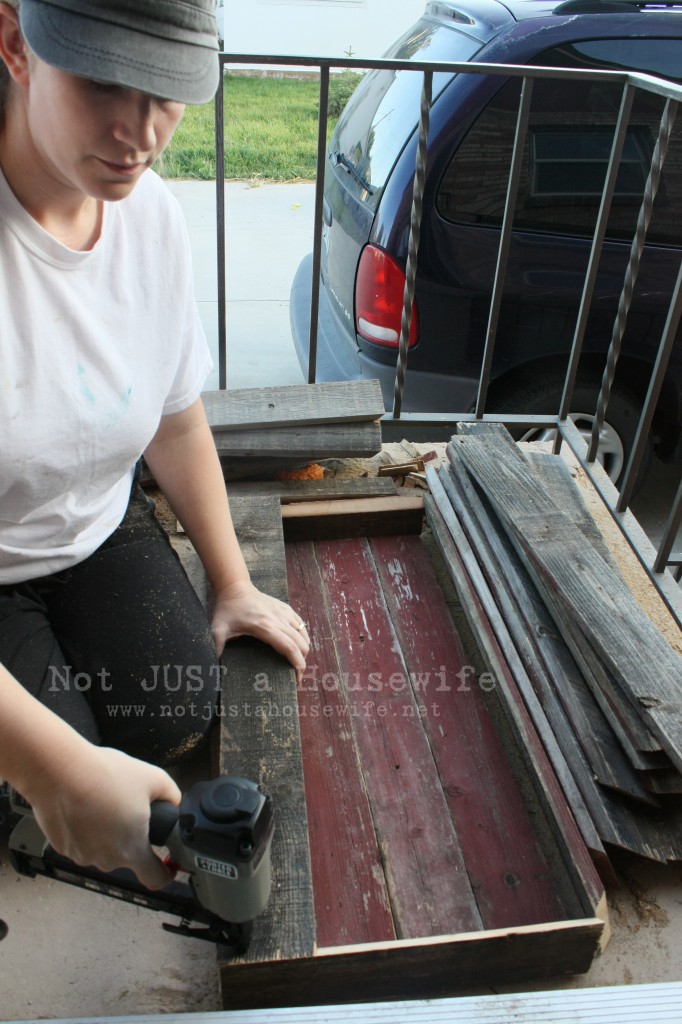
    Yes, I am doing this project on my 3 foot by 3 foot porch right outside my kitchen. (Dear Santa, I need a woodshop..........)


    Then I glued and nailed the pieces together.

    What you will have when you get done with that step is a long rectangular tube. You will have sides and a top and bottom. The next step is to mount some boards to your wall.


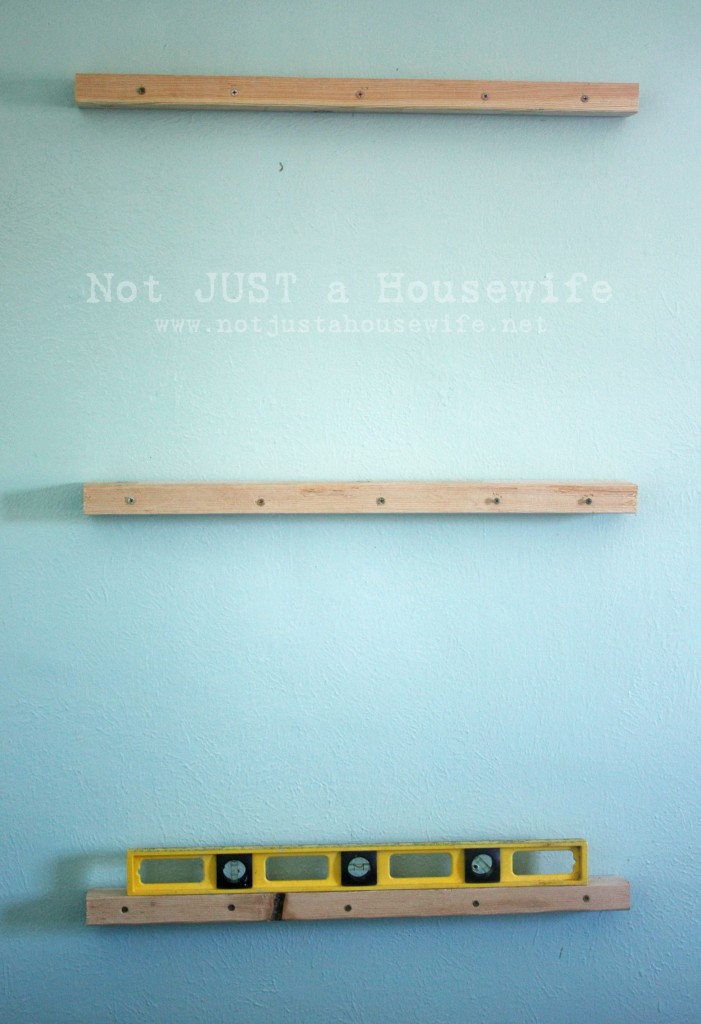
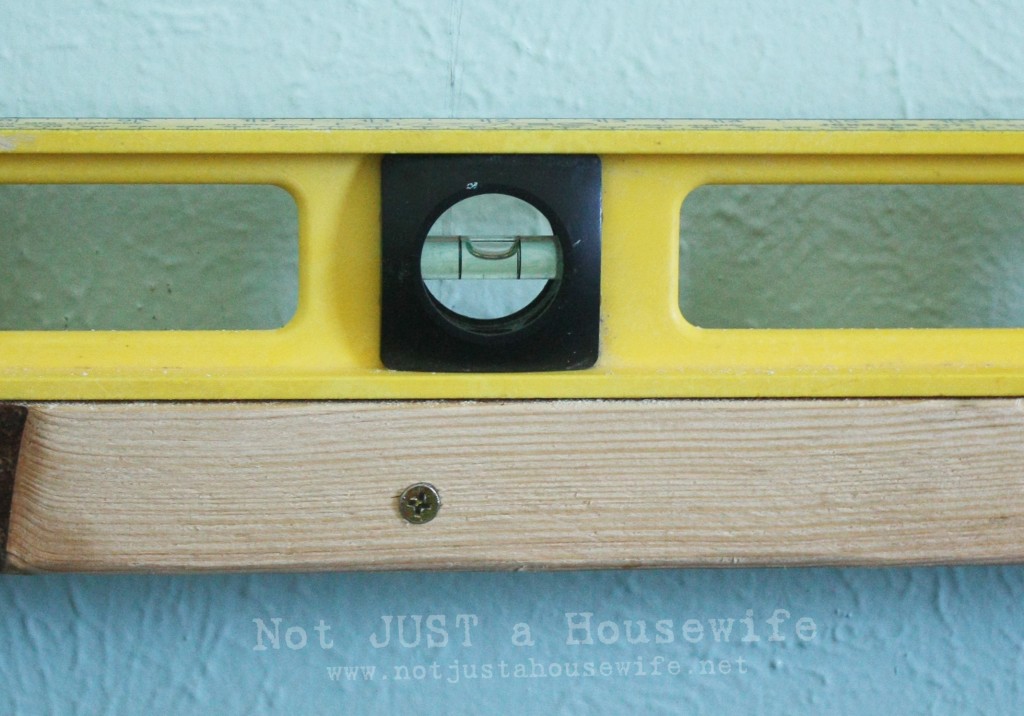
    These boards will be the way  you attach the shelves to the wall. I used 2x3 boards. I measured where I wanted them to be, marked it with pencil, and then I used my level to draw straight line. I drilled a pilot hole ( a hole drilled through the board that is smaller around than the screw) through the 2x3 before screwing them to the wall. I used 5 inch screws.Make sure they are level.

    I have lath and plaster walls since my house was built in 1949, but if you have a newer home make sure you look for studs.


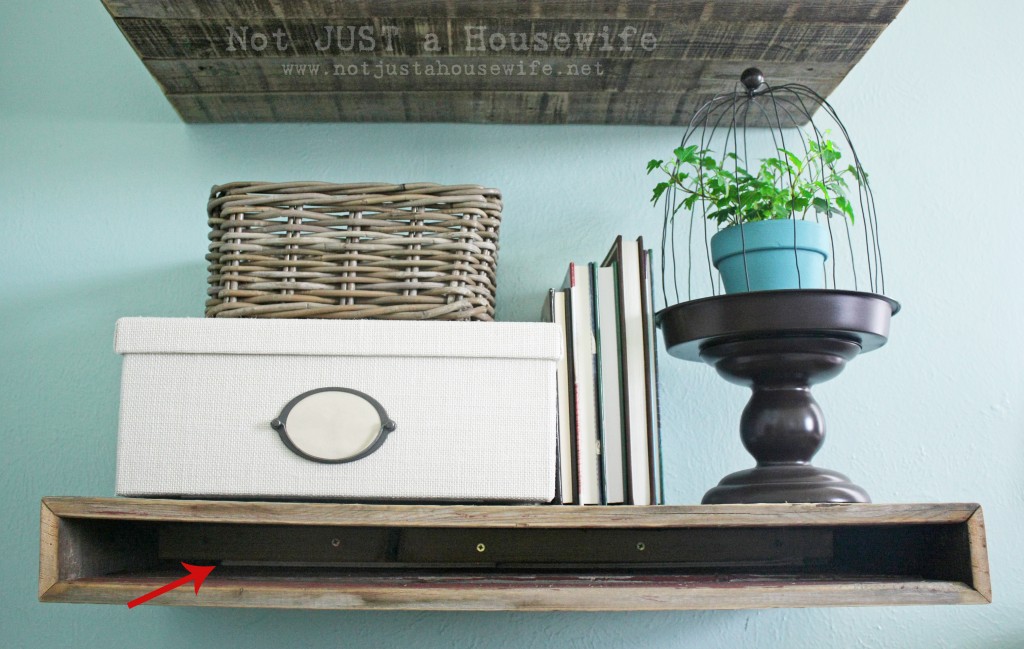
    Then you will take the shelf and slide it onto the 2x3 board. Usually when I build floating shelves with new wood they are a perfect fit and are nice and snug. But these old boards were a different story. Some were too snug, some were a little loose, and some were way, way loose. Some boards bowed up and some bowed down. I just rolled with it. I cut strips of thin plywood and shoved them under the 2x3. You can see it where the red arrow is in the picture. Then when it was some what snug, I screwed screws through the top of the shelf down into the 2x3. I did about 5 screws across the top and then one screw in each side.


    As far as the drawer construction went, I waited until the shelf was built so I could get an accurate measurement. I used thin plywood for the bottom and 1x2 for the sides. I just nailed them together (with a little glue).

    They are very basic. No fancy sliding hardware to make them glide in and out. But they work well and I think it adds to the rustic-ness (yes spellcheck, that is a word!).

    Thanks for letting me share this with you! As always, if you have any questions just email me :)


    Pin It

    other posts

    You will also like:
    • Let's Chat About Flooring.....Let's Chat About Flooring.....
    • It's That Time Of Year Again.....It's That Time Of Year Again.....
    • Peanut Butter and Chocolate SpidersPeanut Butter and Chocolate Spiders
    • Dragon pumpkinDragon pumpkin
    • Refreshing My Bedroom For Spring!Refreshing My Bedroom For Spring!
    • The Sofa SagaThe Sofa Saga
    • A Bloggers Day Out!A Bloggers Day Out!
    • Backyard Landscaping Project REVEAL!Backyard Landscaping Project REVEAL!

    « How to build a Storage Bench
    Cake Batter Fudge »

    Filed Under: DIY & Tutorials, Favorites, Furniture, Home Decor, Power Tools 120 Comments

    Subscribe

    for your weekly DIY fix.

    Reader Interactions

    Comments

    1. Leanne

      December 05, 2011 at 7:27 am

      Now I love your shelves even more. The drawer for extra storage is genius! I have to think of a room I can use these in.

      Reply
    2. Becca

      December 05, 2011 at 7:39 am

      This was so freaking clever! Wow! Love this!!

      Reply
    3. Andrea

      December 05, 2011 at 8:04 am

      I love these! Just like you, I want a table saw. Been asking hubby for one but he's not buying it.

      Reply
    4. Bella

      December 05, 2011 at 8:05 am

      I think I died a little. Your floating shelves have hidden drawers...OH EM GEE. Ingenious!

      Reply
    5. Shannon Brooks

      December 05, 2011 at 8:19 am

      Oh my goodness! I love that they are drawers too! Sneaky, sneaky! hehe So awesome!! :c)

      Reply
    6. Amy {The Idea Room}

      December 05, 2011 at 8:56 am

      These shelves are so great. Love that they are drawers too. You are pretty handy with them power tools!

      Reply
    7. OKIFOLKI

      December 05, 2011 at 9:23 am

      Both beautiful AND functional! The secret drawer is a touch of genius! I love these and will definitely be making some for our home too. *Pinned* Thank you!

      Btw - There's nothing I like better than the natural colour of wood against clear blues. Lovely!

      Reply
    8. Jody

      December 05, 2011 at 9:25 am

      They look beautiful with the rest of your color and decor! I LOVE the mini-drawers in them!

      Reply
    9. Anna@DirectionsNotIncluded

      December 05, 2011 at 9:39 am

      Love. Love. Love. Genius idea!!!

      Reply
    10. Laura @ Laura's Crafty Life

      December 05, 2011 at 10:31 am

      I love that you have drawers in those shelves. That is great! What a great use of space! I love how your shelves turned out. :)

      Reply
    11. MC

      December 05, 2011 at 10:56 am

      Very cool! Way to get down with the power tools.

      Reply
    12. Kristi @ Addicted 2 Decorating

      December 05, 2011 at 11:36 am

      Brilliant! I love that they have little drawers. Makes them even more spectacular. Such a great project, and the look perfect in your new office!

      Reply
    13. Mary C.

      December 05, 2011 at 1:01 pm

      omg, I have been dying to build some floating shelves and THIS is the PERFECT thing! so much simpler than others I've seen and cooler too!

      thanks so much!

      Reply
    14. Venassa

      December 05, 2011 at 1:07 pm

      I never would've guessed there was a drawer hidden in those! I love that it's made out of wood that looks like real wood. It gives it and earthy feel.

      I'm in love with your entire office.

      Reply
    15. Jessie K

      December 05, 2011 at 2:40 pm

      I love! I hope you don't mind if I steal this idea someday for my dream home! All credits to you, of course! :)

      Followed you from Crafts Keep Me Sane.

      Reply
    16. Michael @ Blue Velvet Chair

      December 05, 2011 at 3:02 pm

      So glad you used reclaimed wood! Had to share with my readers over at Blue Velvet Chair...recycled and repurposed is what we love!

      http://bluevelvetchair.blogspot.com/2011/12/reclaimed-wood-shelves.html

      Michael

      Reply
    17. Jackt @ small home love

      December 05, 2011 at 3:15 pm

      Yay, finally the tutorial for the shelves, Iv'e been waiting for this. And now that you revealed they are drawers I love them even more. Granted this will go on my huge list of projects but I will eventually make them for the living room.
      Thanks for the tutorial and I adore this room!!!

      Reply
    18. Karah @ thespacebetweenblog

      December 05, 2011 at 5:14 pm

      These are awesome!! I love they they are old pickets. What a great upcycle!!! Nice work.
      Karah @ thespacebetweenblog

      Reply
    19. Randall

      December 06, 2011 at 12:36 pm

      I agree with everyone here: very creative/innovative use of reclaimed material. You could even hide jewellery in there!

      Reply
    20. Tanya H.

      December 06, 2011 at 4:55 pm

      Great tips. Canada's largest IKEA store will be opening here in Ottawa tomorrow and I'll definitely be picking up a few items.

      Reply
    21. Michelle

      December 06, 2011 at 9:36 pm

      You are my hero with the power tools! Those shelves/drawers are amazing!

      Reply
    22. Make and Do Girl

      December 07, 2011 at 8:17 pm

      This is such a great idea! Loose papers are my nemesis. I love that you found a sneak (and attractive!) way to contain them. Awesome.

      Reply
    23. Brinda

      December 08, 2011 at 9:19 am

      You never cease to amaze me! Love the shelves, and the hidden drawers. Genius.

      Reply
    24. Kimberly @ The Brown Eyes Have It

      December 08, 2011 at 5:03 pm

      These shelves are so cool! The best floating shelves I've ever seen, and you built them yourself! I'm so impressed. Your whole office is just fabulous! I love the color scheme! Actually, there's nothing I don't love about it. I just love it all (as you can tell by the abundance of !s) lol

      Reply
    25. Courtney @ Between U & Me

      December 09, 2011 at 10:07 am

      This is so fun! I LOVE it! I would love if you would share this at my Crazy Cute Party happening right now! I've got a totally awesome giveaway that you could win just for linking up! Come on over! ;D

      http://www.betweenuandme.com

      Oh! And I'm your newest follower!

      Reply
    26. Linda

      December 10, 2011 at 1:12 am

      Totally awesome tutorial as always and I'm going to have to have a go at these.
      I have a table saw (well hubby does) but it's the one tool that scares the life out of me for some reason and the only power tool I refuse to use. lol.

      Reply
    27. Jennie Larsen

      December 10, 2011 at 9:34 am

      YOU HAVE BEEN FEATURED ON COM, WOOT WOOT. winks, jen

      love ya, you are amazing.

      Reply
    28. Ruth

      December 11, 2011 at 6:30 pm

      I love your shelves. They are amazing, especially with the drawers. Your office is gorgeous.
      Ruth

      Reply
    29. Brooke (Siayla)

      December 11, 2011 at 11:59 pm

      I love your shelves!!! They are amazing! Visiting from Whipperberry :)

      Reply
    30. brooke adkins

      December 13, 2011 at 4:17 am

      amazing!!!!!!!!!!! stacy , i love it all , Would love for you to share your Beauty at my New link party http://www.getouttamyheadplease.com/2011/12/show-it-off-link-party-2.html

      Reply
    31. Tiffany Taylor

      December 14, 2011 at 4:06 pm

      Oh my goodness, I love love love the drawers! I loved the shelves & how they add so much storage space. But the drawers, aaaahhh! So awesome. I hope to be able to do this one day.

      Reply
    32. Tiffany Taylor

      December 14, 2011 at 4:09 pm

      Oh my goodness, I love love love the drawers! I already loved the shelves & the fact that they're made from reclaimed wood. I love the coloring scheme. But the drawers? aaaaahhhh, I'm just speechless. I hope to be able to do something like this one day.

      Reply
    33. Lynsey

      February 22, 2012 at 2:02 am

      These are so amazing, exactly what I've been looking for however I don't think in a million years I could make them

      Reply
    34. Michelle

      February 25, 2012 at 3:40 pm

      great tutorial-i love hidden storage!!

      Reply
    35. Callie

      February 28, 2012 at 11:43 pm

      Hi Stacy! I know I'm dropping by writing on all your older posts, sorry :| :) But I love these shelves!! I actually have been hunting everywhere lately for floating shelves because I don't have time to make them at the moment. It turns out that most store-bought floating shelves are pretty crappy! (that is, made of MDF and prone to breaking easily, or the brackets v. hard to affix to the wall). So it made me think when I saw this post - you could totally sell shelves like these! You should have an etsy shop for such things (if you have time - haha) :) I looked on etsy for floating shelves in my searching, and would have loved to buy there (don't have the $100+ to put towards it, but if I wasn't a grad student!) but none of those have a built-in drawer, which is such a neat feature! :)

      Reply
    36. Vanessa

      March 08, 2012 at 12:50 am

      This is SO inspiring - I'm just discovering the world of reclaimed wood and am falling in love - I need some sort of beautifully cool displays for my inventory on a zero budget and felt rather hopeless until I saw this post!

      Reply
    37. cindy

      April 24, 2012 at 5:48 am

      wow, very impressive. Mad skillz!

      I must give these a try. I noticed that the ends are mitred- I assume that those cuts require a table saw (sigh! to have a table saw) or did you use a sliding compound mitre saw?

      thank you for the inspiration!

      Reply
    38. Jessica @ Running With Scissors

      May 23, 2012 at 8:43 pm

      Just found your site and I am so impressed! I love it when I find women who build themselves. I've built a few things and love these floating shelves, the rustic wood mixed with the modern design and the thickness. Very cool. I've built basic white floating shelves with a 1x2 frame attaching to the wall then the cover sliding over the top. Drawers are an awesome idea!

      Reply
    39. Andrea

      June 09, 2012 at 8:12 am

      These are great and just what I've been looking for in my own home and my DIY nature. Just wondering though about the strength and weight they can handle. How much weight would be safe?
      Thanks so much!

      Reply
    40. glenda

      July 30, 2012 at 11:50 am

      I can't find the words to describe my love for these shelves, they are absolutely amazing. You are quite the talent, and how did you come up with the design? you are a true inspiration. Love, love it.

      Reply
    41. Rachel

      September 26, 2012 at 5:24 am

      I absolutely LOVE these! I am going to try to make them from some old pallets. How wide were each of your fence pieces? i know you said you used 4 for the top and bottom but im just wondering if my pallet boards are skinnier or wider. Thanks!

      Reply
    42. Janet

      October 02, 2012 at 9:50 am

      Not knowing any other moms like me, I am glad I have discovered some in the blog world. I too, am an avid woodworker. Unlike you, I didn't start when I was a kid though. I started cause my husband has no interest in it and because we didn't have the money to hire it out. I agree, it's much better than just being able to buy everything new. I am pregnant with my 10th kid and I also lust after a table saw and dream of wood shop. I don't really like using the table saw but they are certainly useful. My favorite saw is a miter saw. The first saw I bought myself (that wasn't one of my brother-in-laws cast-offs) was a jigsaw. I chose a barrel grip one that I bought online because the handle is closer to your work (better control?). I did not know this meant giving up a variable speed trigger! So mine is either on, or off. Oh well. When you buy a table saw, mention what kind you went with and whether you like it.
      You do beautiful work. The shelves are beautiful. I am looking forward to browsing the rest of your blog (as I just stumbled across it today) and bookmarking it for the future. You welcomed questions. I have two. So you put the "2" side of the board against the wall when you mounted the 2x3 cleat? And also, how did Better Homes and Gardens become aware of you (and Reader's Digest, etc) in order to contact you?

      Reply
    43. Maine Andy

      December 16, 2012 at 10:22 am

      Aesome!

      Reply
    44. Daryl

      February 08, 2013 at 5:19 pm

      Wonderful! Just what I was looking for and more! I am going to make some.

      Reply
    45. Tona shaw

      April 19, 2013 at 12:45 am

      Hello there

      I think these shelves are amazing I am going to pinch this idea for my allotment shed (which is really my surrogate beach hut LOL )
      Thanks

      Reply
    46. candace

      November 15, 2013 at 9:43 pm

      Brilliant! And Lovely!

      Reply
    47. Gilmer Gal

      December 26, 2013 at 12:07 pm

      I stumbled across this project as I was wandering through the Ana White blog. This little shelf is going to go with a jewelry chest I am making. I think above the chest, I'll put one of these "secret" drawers just below the mirror. I can put trays out on top, and put my most expensive and treasured pieces in this drawer. Then it will be hidden for "just in case." Thanks so much for the tutorial!

      Reply
    48. Http://Www.youtube.com/watch?v=A9OKJuhkQ3U

      January 09, 2014 at 6:53 am

      Besides good clothes, well matched accessories, too, play an
      important part in men. This project will need lots of new businesses to
      feed it. All that is necessary are people to maintain the website and those that work in the warehouse to ship
      the order to the customer.

      Reply
    49. Kayla

      March 14, 2014 at 2:07 pm

      I am completely in love with these drawers (and your office)! Question though.. How deep are the shelves? Everywhere i have read, floating shelves shouldn't really be any deeper than 8".. And 8" deep shelves just aren't going to cut it for me! Hoping yours are deeper :) :)

      Reply
    50. Tricycle for kids

      June 09, 2014 at 12:19 pm

      I drop a comment whenever I appreciate a post on a site or if I have something to valuable to
      contribute to the conversation. It's triggered by
      the passion communicated in the article I looked at.
      And on this post Reclaimed Wood Floating Shelves | Not JUST A Housewife.
      I was actually moved enough to drop a comment :) I actually do have a
      couple of questions for you if you tend not to mind.
      Could it be only me or does it look like like some
      of these remarks look like written by brain dead folks? :-P And, if you
      are posting on additional sites, I'd like to keep up with anything new you have to post.
      Would you make a list the complete urls of all your communal pages like your
      twitter feed, Facebook page or linkedin profile?

      Reply
    51. laura

      December 09, 2014 at 6:04 pm

      Do you make these for other people ?

      Reply
    52. Nancy

      May 29, 2015 at 11:17 am

      Hi Stacy, these are great shelves but I am a bit concerned about how strong they are since they have drawers. I would love to make them for my bathroom but I'm not sure they would hold all my stuff. What do you think?

      Reply
    53. Victoria Mery Diaz

      December 23, 2015 at 12:36 pm

      I love the way you made shelves out of wood from branches and used wood. Love it.

      Reply
    54. Kerry

      March 24, 2016 at 9:21 pm

      You are awesome

      Reply
    55. Sam

      March 06, 2017 at 1:26 pm

      Thank you for sharing. I was looking for exactly this. I plan to have a floating desk and monitors backed with distressed wood and a dual flexiarm. As they say in France, "C'est la pièce de résistance !"

      Reply
    56. Donna Weigel

      April 28, 2017 at 6:36 am

      Girl, you ROCK!!!! I love the secret drawers!!!

      Reply
    57. Allen Michael

      February 02, 2018 at 2:37 am

      I feel like it's a challenge to build floating shelves, especially with how to make it sturdy and reliable. I'm impressed with how you added secret drawers to it too. This is a really great project! Thanks for sharing.

      Reply
    58. Dawn Morries

      March 22, 2018 at 7:47 am

      I can't wait to make these for my home. I love the hidden drawers for storage. Thanks

      Reply
    59. Malisha Mishel

      September 13, 2018 at 10:45 pm

      That's a great idea! Need some reclaimed wood floating shelves. I will do it for sure. Gonna be my next project! Thank you so much for sharing! :)

      Reply
    60. Dean Phillips

      April 04, 2019 at 4:13 pm

      I loved how you said that you should utilize the vertical space of your apartment if you do not have a lot of room. My wife and I just moved into our first apartment and we have had no space to put our books and movie collection. We may have to look into ordering some materials that can help us install hidden shelves on our wall.

      Reply
    61. Donald Moyer

      December 26, 2020 at 8:55 am

      The hidden drawers are awesome and the fact that a woman thought up and created them is even more amazing. I don't think I could have come up with that and I worked with a handyman for three years.

      Reply
    62. Steve Hart

      February 08, 2021 at 8:20 pm

      Nice idea. I love it. Can you add the plan also?

      Reply

    Trackbacks

    1. DIY Reclaimed Wood Floating Shelves | Shelterness says:
      December 13, 2011 at 8:00 am

      [...] In this case they won’t cost you anything if you have some tools to cut this wood. Visit notjustahousewife for full instructions on how to make these cool [...]

      Reply
    2. Tutes & Tips Not to Miss {39} | Home Stories A to Z says:
      December 19, 2011 at 9:26 am

      [...] Reclaimed Wood Floating Shelves by Not Just a Housewife. [...]

      Reply
    3. Top 10 Tuesday {16}: Not Your Average Shelf | Design, Dining + Diapers says:
      January 3, 2012 at 1:16 am

      [...] 8. Fabulous reclaimed wood shelves with a hidden drawer (source: Not Just A Housewife) [...]

      Reply
    4. bullfrogs & bulldogs | reclaimed wood shelves: my top 5 choices says:
      January 18, 2012 at 9:21 am

      [...] Not Just Your Housewife: Floating Reclaimed Wood Shelves [...]

      Reply
    5. { Tutorial } Repisas con madera usada – Toco Madera Útil y Bonito says:
      March 12, 2012 at 8:59 pm

      [...] más información visita la web de Stacy, autora de este tutorial espectacular para decorar nuestra oficina [...]

      Reply
    6. RECLAIMED » Winston Harrison Design says:
      May 28, 2012 at 11:59 pm

      [...] 1 // 2 // 3 // 4 // 5 // 6 // 7 // 8  [...]

      Reply
    7. Yellow Zebra Striped Magazine Storage Boxes says:
      June 11, 2012 at 8:46 am

      [...] what I was going to do with these boxes until I saw Stacy’s (Not Just A Housewife) beautiful home office reveal. She painted her white Ikea magazine boxes [...]

      Reply
    8. Reclaimed Wood Shelves says:
      June 15, 2012 at 11:13 am

      [...] Not Just a Housewife gets big props from BVC today with her reclaimed wood shelves! [...]

      Reply
    9. Feature Friday: Not Just a Housewife & The Shabby Nest - SNAP! Creativity says:
      July 13, 2012 at 12:52 am

      [...] Privacy Screen 2. Scrap Wood Lamp 3. Mason Jar Wall Planter 4. Reclaimed Wood Shelves 5. Drive in Movie [...]

      Reply
    10. Cool floating shelf with hidden drawer ← Floating Shelf says:
      December 19, 2012 at 7:08 pm

      [...] Here is the link to the tutorial: http://www.notjustahousewife.net/2011/12/reclaimed-wood-floating-shelves.html [...]

      Reply
    11. 14 Inspiring DIY projects featuring reclaimed wood furniture says:
      January 14, 2013 at 4:35 am

      [...] If you prefer something simple, then maybe you could try making some shelves. All you have to do is cut the wood to the desired dimensions and then mount the shelves onto the wall. It’s easy and it doesn’t take much time. Also, a few extra shelves are always a nice addition.{found on notjustahousewife}. [...]

      Reply
    12. Interesting and Eco-Friendly Wall Designs | Blackle Mag says:
      April 17, 2013 at 7:26 pm

      [...] Another way to make your wall useful is to hang up shelving. Shelves do not have to be bought in a box, but nearly any flat, sturdy item that can be securely suspended on a wall can be reprocessed as a shelf. Pallets, crates and wooden boxes make ideal shelving units or floating shelves. [...]

      Reply
    13. 21 Floating Shelves Decorating Ideas | Decoholic says:
      April 22, 2013 at 12:50 pm

      [...] DIY floating shelf with drawe. The drawers are only 2 inches deep, but they are perfect for paper! How to by not just a housewife. [...]

      Reply
    14. DIY Shelves that You Can Make - MotivaNova - MotivaNova says:
      December 30, 2013 at 7:03 am

      […] DIY Tutorial at notjustahousewife.net […]

      Reply
    15. Top 10 Practical DIY Shelves - Top Inspired says:
      January 9, 2014 at 11:39 am

      […] DIY Project and Photo credit to notjustahousewife.net […]

      Reply
    16. diy reclaimed wood floating shelf | The Wood and Furniture Projects says:
      January 28, 2014 at 10:54 pm

      […] http://www.notjustahousewife.net […]

      Reply
    17. Natural wood floating shelves | Shelf Wall says:
      April 16, 2014 at 8:12 pm

      […] Reclaimed Wood Shelves – Not JUST A Housewife Just found your site and I am so impressed! I love it when I find women who build themselves. I’ve built a few things and love these floating shelves, the rustic … […]

      Reply
    18. Reclaimed wood shelves and ledges | Shelf Wall says:
      April 17, 2014 at 6:01 am

      […] Reclaimed Wood Shelves – Not JUST A Housewife Now I love your shelves even more. The drawer for extra storage is genius! I have to think of a room I can use these in. […]

      Reply
    19. Reclaimed wood floating shelf | Shelf Wall says:
      May 1, 2014 at 8:40 am

      […] Reclaimed Wood Shelves – Not JUST A Housewife Just found your site and I am so impressed! I love it when I find women who build themselves. I’ve built a few things and love these floating shelves, the rustic … […]

      Reply
    20. Reclaimed wood wall shelf | Shelf Wall says:
      May 4, 2014 at 6:32 pm

      […] Reclaimed Wood Shelves – Not JUST A Housewife I have been so excited to share this tutorial with you. Out of all the elements in my new office I have received the most emails about these shelves. […]

      Reply
    21. 40 Brilliant DIY Shelves That Will Beautify Your Home - DIY & Crafts says:
      August 10, 2014 at 8:58 am

      […] DIY Instructions and Project Credit – Notjustahousewife […]

      Reply
    22. 25 Invisible Floating Bookshelf Projects - Guru Koala says:
      November 7, 2014 at 10:41 am

      […] 9. Reclaimed Wood Floating Shelves source […]

      Reply
    23. 5 Genius Hidden Storage Solutions for a  Small Space - Arts and Classy says:
      December 12, 2014 at 12:47 pm

      […] Image Source […]

      Reply
    24. 10 Unique DIY Shelves for Home Storage | DIY and Crafts says:
      December 29, 2014 at 2:51 am

      […] Image: source […]

      Reply
    25. Floating Shelves Wood Plans | Bagus Best Online says:
      January 24, 2015 at 6:42 am

      […] Reclaimed wood floating shelves | not just a housewife […]

      Reply
    26. 15 Cool DIY Furniture Projects for Your Living Room | Interior Design Blogs says:
      August 21, 2015 at 1:35 pm

      […] 12. Build These Reclaimed Wood Storage Floating Shelves with a Drawer Image via: notjustahousewife […]

      Reply
    27. 60 Ways To Make DIY Shelves A Part Of Your Home’s Décor - Proverbial31 says:
      November 23, 2015 at 7:11 am

      […] Floating shelves are extremely practical in areas such as the kitchen or the home office where you need to store a lot of things but you also want to be able to easily reach and grab them without having to open and close doors every time. And if you want to be creative, you can make your floating shelves double as drawers. Find out more about this on notjustahousewife. […]

      Reply
    28. 60 Ways To Make DIY Shelves A Part Of Your Home’s Décor « Club Oferteproprietari.ro says:
      November 23, 2015 at 7:52 am

      […] Floating shelves are extremely practical in areas such as the kitchen or the home office where you need to store a lot of things but you also want to be able to easily reach and grab them without having to open and close doors every time. And if you want to be creative, you can make your floating shelves double as drawers. Find out more about this on notjustahousewife. […]

      Reply
    29. 35+ Simple and Amazing DIY Shelves for the House - Decorextra says:
      December 1, 2015 at 7:09 pm

      […] Source: Notjustahousewife […]

      Reply
    30. DIY Floating Shelves says:
      January 4, 2016 at 8:36 am

      […] Reclaimed Wood Floating Shelves (via Not JUST a Housewife) […]

      Reply
    31. Amazing Hidden Storage Ideas says:
      February 19, 2016 at 7:47 am

      […] Idea Details : notjustahousewife […]

      Reply
    32. 15 Hidden Storage Ideas To Fill Your HouseHold Space | WaaDIY says:
      February 26, 2016 at 7:50 pm

      […] Idea Details : notjustahousewife […]

      Reply
    33. 25 Creative Hidden Storage Ideas For Small Spaces - Noted List says:
      April 20, 2016 at 7:39 pm

      […] notjustahousewife. […]

      Reply
    34. Diy Floating Shelves Plans – Luna S Ramsey says:
      June 30, 2016 at 4:55 am

      […] diynetwork learn about shelving solutions including tips for constructing wall shelves, floating. Reclaimed wood floating shelves not just a housewife. Just found your site and i am so impressed! I love it when i find women who build themselves. […]

      Reply
    35. 20 Clever Hidden Storage Ideas – Kosip says:
      August 14, 2016 at 6:09 pm

      […] Fabulous reclaimed wood shelves with a hidden drawer, source […]

      Reply
    36. 50 DIY Shelves - Build Your own Shelves - DIY & Crafts says:
      January 11, 2017 at 12:45 pm

      […] Spice up the boring interior of home by building some artistic shelves there! Choose these floating wooden shelves that come with beautifully inserted drawers, so will also enhance the storage space of that particular interior! Build these shelves for free using old wood from home or the shipping pallets! Step-by-step tutorial here notjustahousewife […]

      Reply
    37. 27 Mind Blowing Hidden Storage Ideas For Every Part Of Your Home says:
      February 18, 2017 at 1:00 am

      […] Photo via: notjustahousewife.net […]

      Reply
    38. 23 Super Cool Ideas For Hidden Storage That You Should See Today | homedesignfind says:
      February 20, 2017 at 2:13 pm

      […] Source […]

      Reply
    39. 23 Super coole Ideen für versteckt Lagerung, dass Sie sollten sehen heute | iHousDekor says:
      February 20, 2017 at 4:39 pm

      […] Quelle […]

      Reply
    40. 23 Super Cool Ideas For Hidden Storage That You Should See Today - The Veranda of ideas says:
      February 20, 2017 at 6:32 pm

      […] Source […]

      Reply
    41. 23 Super Cool Ideas For Hidden Storage That You Should See Today | WORLD DECOR says:
      February 21, 2017 at 2:38 am

      […] Resource […]

      Reply
    42. Top 5 Hidden Storage Ideas for the Home ⋆ Productive Motherhood says:
      March 3, 2017 at 1:58 pm

      […] over at Not Just a Housewife walks us through creating rustic floating shelves with a […]

      Reply
    43. 14 Hidden Storage Ideas - says:
      May 1, 2017 at 9:41 am

      […] Get the most out of these reclaimed wood shelves by adding hidden drawers.  What a great addition to any office or den space!  Find the DIY tutorial from Not Just A Housewife. […]

      Reply
    44. 20+ Clever Hidden Storage Ideas Perfect for Any Home | OFriendly says:
      June 9, 2017 at 2:23 am

      […] via notjustahousewife […]

      Reply
    45. DIY – HIDDEN STORAGE | F & M Plumbing Blog says:
      June 26, 2017 at 11:35 am

      […] 1. Reclaimed Wood Shelves Get the most out of these reclaimed wood shelves by adding hidden drawers.  What a great addition to any office or den space!  Find the DIY tutorial from Not Just A Housewife. […]

      Reply
    46. Top 8 Brilliant DIY Wall Shelves to Beautify Your Home says:
      February 10, 2018 at 11:21 pm

      […] Image: notjustahousewife […]

      Reply
    47. Small Woodworking Projects for Beginners: DO Not Make This Mistake! - Best Home Gears says:
      April 23, 2018 at 4:35 am

      […] extra storage space but don’t want to have too many cabinets around your bedroom. Stacy at Not Just A Housewife shows how you can pick something as simple as old fence pickets and convert them into […]

      Reply
    48. 4 Ways to Go Green Within your Home says:
      May 1, 2018 at 6:20 pm

      […] to research home decor options that are both affordable and eco-friendly. Some DIY favorites are shelves made from reclaimed wood, and organizational bathroom containers made from mason jars. There are also, many companies today […]

      Reply
    49. DIY Floating Shelves – How to Make DIY Floating Shelves – Craft Ideas says:
      July 12, 2019 at 12:33 am

      […] notjustahousewife.net […]

      Reply
    50. Clever Hidden Storage Ideas – dle-destek.com says:
      July 1, 2020 at 6:15 am

      […] Fabulous shelves made of old wood with hidden drawer, source […]

      Reply
    51. 3 Ideas of DIY Crafting Hacks Using Repurposed Wood - Remoodel.com says:
      July 2, 2020 at 9:31 pm

      […] image source […]

      Reply
    52. 12 DIY Shelves to Get You Organized- A Cultivated Nest says:
      September 16, 2020 at 11:55 am

      […] Reclaimed Wood Floating Shelves from Not Just A Housewife […]

      Reply
    53. 20 DIY Shelves Ideas, Beautifying Your House - Remodel Or Move says:
      February 2, 2021 at 12:10 pm

      […] cute. They are also easy to create. And several of them can indeed give you enormous storage space. Click here to see how you can create […]

      Reply
    54. 92 Great and Unique DIY Shelving Ideas » DIY Crafts says:
      July 7, 2021 at 9:48 am

      […] Let these floating wood shelves also organize your room clutters, made of recycled wood, and hence will cost you almost nothing but a little creative work! Grab the plywood, reclaimed wood planks, and some other wood boards to duplicate these shelves that also come with drawers in them! This is here a next-level floating shelf plan to DIY at home! notjustahousewife […]

      Reply
    55. 30 Unique DIY Hidden Storage Ideas (Space Saving and Secret) says:
      August 19, 2021 at 12:45 pm

      […] You will surely fall in love with this great hidden storage idea that involves building floating shelves. The idea is to build floating wall shelves with built-in storage drawers. You need 1x2s, 1x3s, plywood, wood screws, miter saw, level, and a brad nailer to complete this fabulous hidden storage easily. The floating wall shelves will rock to display your items, while the secrete items can be stored in the built-in hidden drawers that make great shelf fronts when closed. One of the quick and easy hidden storage solutions for all home lovers. notjustahouse […]

      Reply
    56. 20 Types Of Shelves For A Better Organized Home - AYCEE SALES says:
      August 28, 2021 at 3:08 pm

      […] floating shelves that were featured in a tutorial on notjustahousewife definitely look really nice. They’re made of reclaimed wood which gives them lots of character […]

      Reply
    57. Clever Hidden Storage Ideas – zuludecor.com says:
      August 4, 2022 at 3:48 am

      […] Fabulous shelves made of old wood with hidden drawer, source […]

      Reply
    58. 16 DIY Cabinets to Get You Organized- A Cultivated Nest - My Blog says:
      September 1, 2022 at 8:05 am

      […] Reclaimed Wooden Floating Cabinets from Not Simply A Housewife […]

      Reply

    Comment Below! Cancel reply

    Your email address will not be published. Required fields are marked *

    This site uses Akismet to reduce spam. Learn how your comment data is processed.

    Primary Sidebar

    stacyHey! I'm Stacy and am a DIY addict. I love to get my hands dirty, whether it's sawdust, paint, or dirt. My goal is to help YOU learn to fix up your home and yard. No matter the style or size, I think everyone should love their home. And it doesn't takes a big budget to get there. Let's DIY together!

    Subscribe to My Blog!

    Search this site

    categories


    Subscribe

    Footer

    Welcome! I'm sharing our adventures as we fix up our 1938 cottage. Whether it is big or small, I think everyone should love their home and I don't think it takes a lot of money to make a space your own

    About Stacy

    • Facebook
    • Instagram
    • Pinterest
    • Twitter

    My Favorites

    copyright

    All images and content are copyrighted via Stacy Risenmay unless otherwise stated. If you'd like to share my work, please link back to this blog.
    Thank you for visiting!


    Footer

    ↑ back to top

    About

    • Meet Stacy
    • Privacy Policy
    • Contact

    Categories 

    • Home Decor
    • Outdoor Projects & Gardening
    • DIY & Tutorials
    • Kid Activities
    • Recipes
    • Travel
    • Cleaning
    • Houseplants
    • Staining
    • Painting
    • Power Tools
    • Holiday Ideas

    Newsletter

    • Sign Up! for emails and updates

    As an Amazon Associate I earn from qualifying purchases.

    Copyright © 2020 Brunch Pro on the Brunch Pro Theme


    Privacy Policy
    Welcome! Thanks for visiting.
    Hi! I'm Stacy and I want to help YOU become a DIY rockstar! Sign up for my email list so each project, tip, and trick will go directly to your inbox :)
    Your information will *never* be shared or sold to a 3rd party. Pinky promise :)
    Welcome!
    Hi! I'm Stacy and I blog about fixing up our 1938 cottage. Join the thousand of others who get my posts sent to their inbox for FREE!
    Your information will *never* be shared or sold to a 3rd party.