
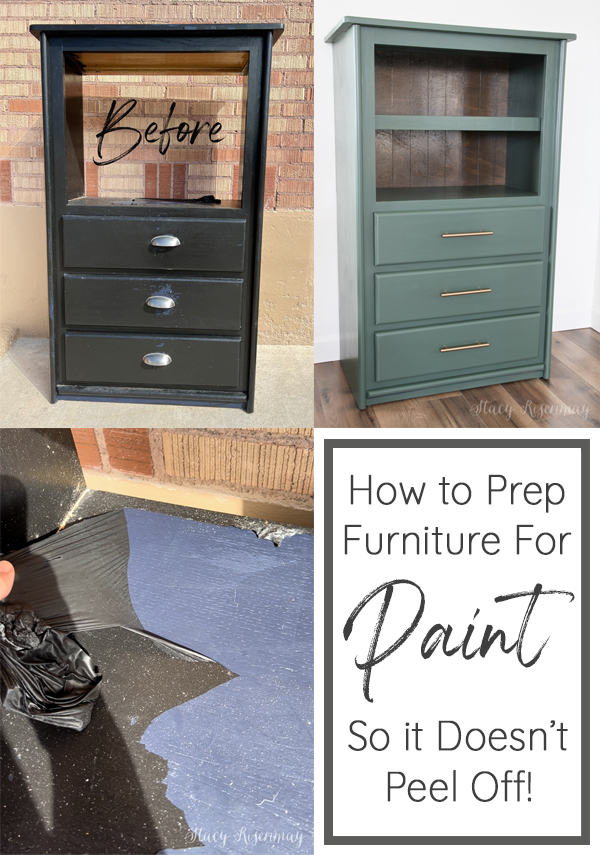
I recently bought an armoire type dresser off an online yard sale site based on a blurry cell phone pic and the hope that it was real wood. It is so hard to find real wood furniture pieces these days! The lady I bought it from said she wasn't sure but that it was very heavy, so fingers crossed, I sent Shane to pick it up after work one night. When he brought it home, and I saw it for the first time in person, I knew this was going to be a bigger project than I had originally planned. It was obvious from the peeling paint, that the person who painted it last, did not properly prep it. I decided rather than throwing in the towel, I would use it as a cautionary tale and a good example of why properly preparing a piece of wood furniture is so important. So, here is my guide for how to prep furniture for paint!
Keep reading for your chance to win a Super Finish Max!
This post is sponsored by HomeRight but all ideas and opinions are 100% my own. This post contains affiliate links.
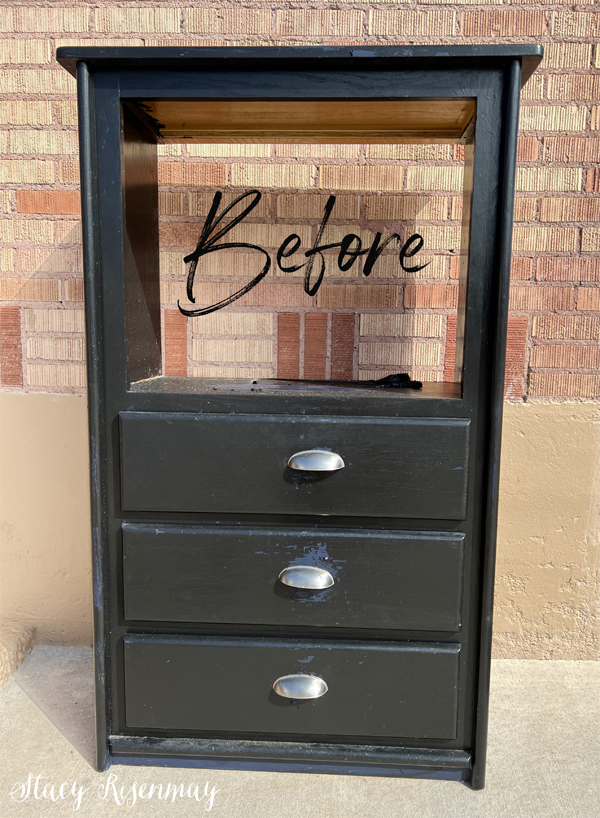
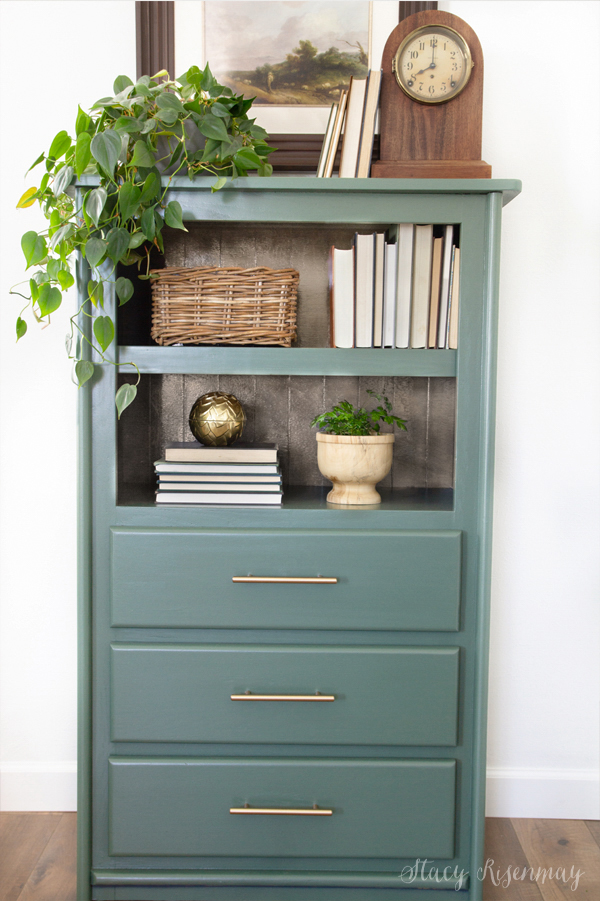
Let's not focus on the fact that the drawer pulls are put on off center and that they are not even lined up (eyes twitching), but instead look at the bones. It is 100% solid wood. It had a nice, basic design that would fit into any style of home. So we are going to work with it and it will be fabulous in the end.
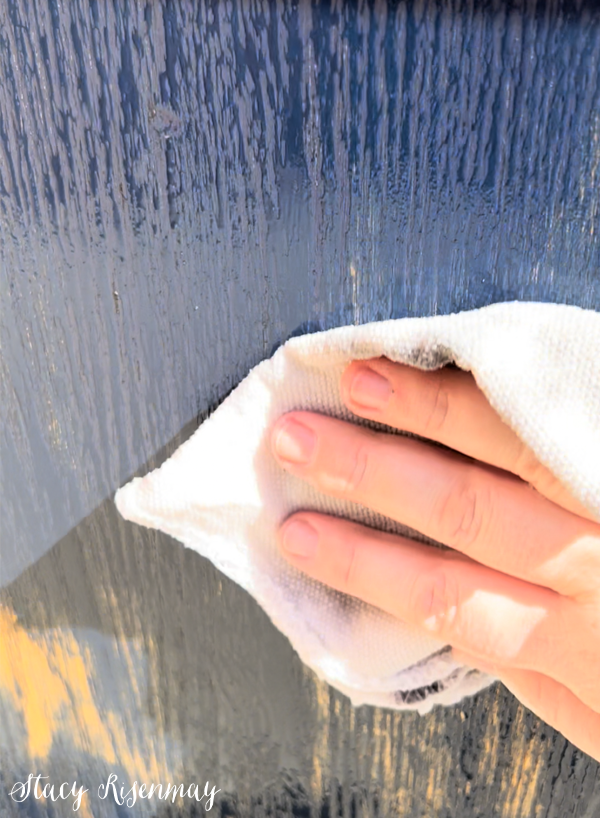
There was a little rip in the paint so I grabbed the edge of it and to my surprise, the paint peeled right off in a big sheet! Why would paint peel right off you ask? Well, the armoire wasn't cleaned properly or sanded before adding a new coat of paint. I think a lot of people think "It has already been painted once. I don't need to do all that prep work!" Well, unfortunately, that is not the case. Any time you are painting something, whether it is bare wood or a previously painted surface, you need to clean and prep it. I have said it over and over on my blog, a paint job is only as good as the prep work put into it. And while prep is not nearly as fun or satisfying as applying that fresh coat of paint, it is necessary.
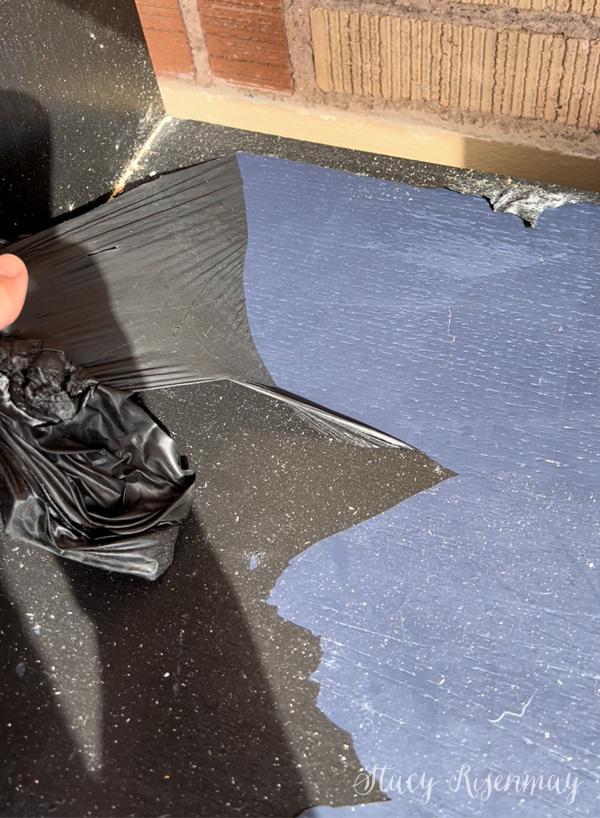
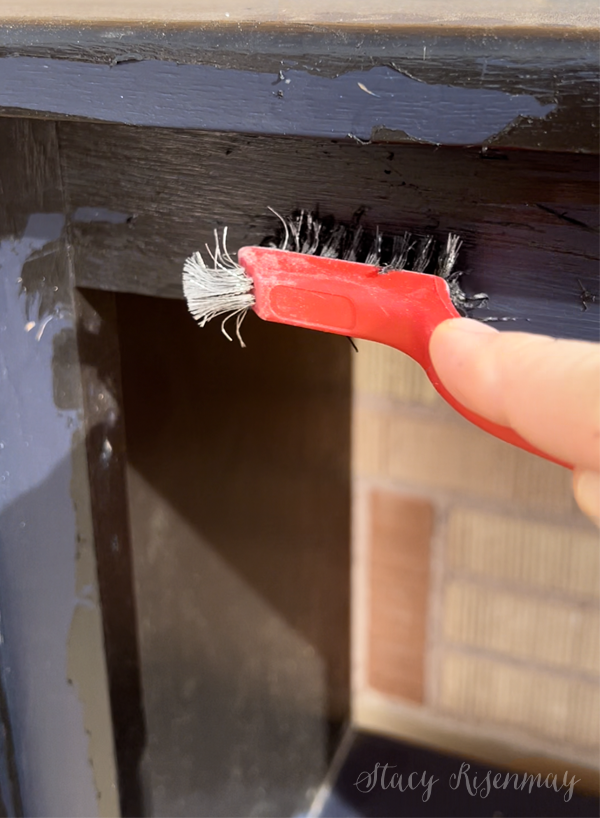
The first step was to get as much of the existing paint off as possible. My inner first grader liked peeling the paint off at first (since it reminded me of putting glue on my hands), but once all the easy big pieces came off, it became a lot less fun. Where the paint was applied much thinner, it didn't peel. I could scratch it with my finger nails, but that would have taken 9 years. The best way to get the rest off was to use a wire brush. I found some and had my kids come help me brush the last of it off. The reason I did not sand it at this point was that the paint was kind of sticky. Kind of like it had never fully cured. It gummed up my sandpaper within a few strokes. I needed to get as much of the black paint off as possible before I could sand. This quick "weekend" project, ended up taking much more time than I had hoped.
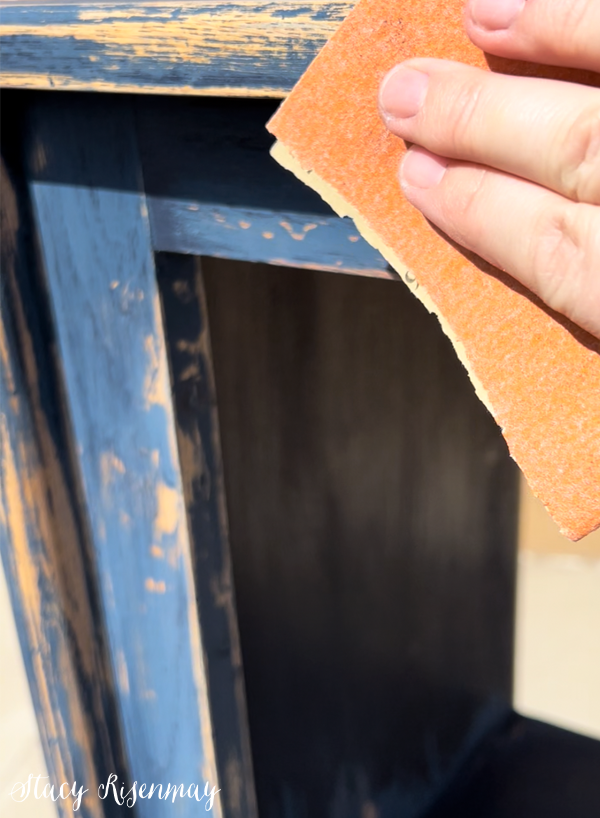
Eventually we were able to brush the majority of the top layer of paint off and I could finally sand. Sanding is so important! Paint also needs something to "grip". If not, it will literally peel right off. Sanding it gives the surface texture.I decided to hand sand furniture this time but sometimes I will use an orbital sander to speed things up. I went over the whole armoire with a 150 and then a 220 grit sandpaper. The dresser was in really good shape as far as not having scratches or dings. The only things I had to fill with wood filler were the holes for the old drawer pulls.
It was time to give it a good cleaning! Paint doesn't stick well to dirt, dust, or grease so grab some rags or tack cloth. I washed it with soapy water and then rinsed it with clean water. I repeated the process until no more blue residue showed on my white work rags. I dried it off and moved it to a tarp so I could get ready to paint!
I picked a moody green paint color with blue undertones. I am using a latex paint and primer together. I like Behr from Home Depot and I prefer satin over a glossy finish. If your paint doesn't have primer in it, you will need to add a coat of primer before adding any paint. Make sure that if you are using a water based paint that you use a water based primer. Oil based paint requires an oil based primer. This sprayer can also be used with chalk paint if that is how you want to go.
I added the paint to my paint sprayer (I used the Super Finish Max this time) and slightly watered it down, making sure to mix the water in well using paint sticks. I always test it out on a piece of cardboard before spraying on the furniture so I adjust the spray to right where I want it. It is better to do multiple thin coats of paint instead of one or two thick coats. The first coat of paint won't look amazing as it probably won't be full coverage. But don't worry, it will look better and better with each thin coat.
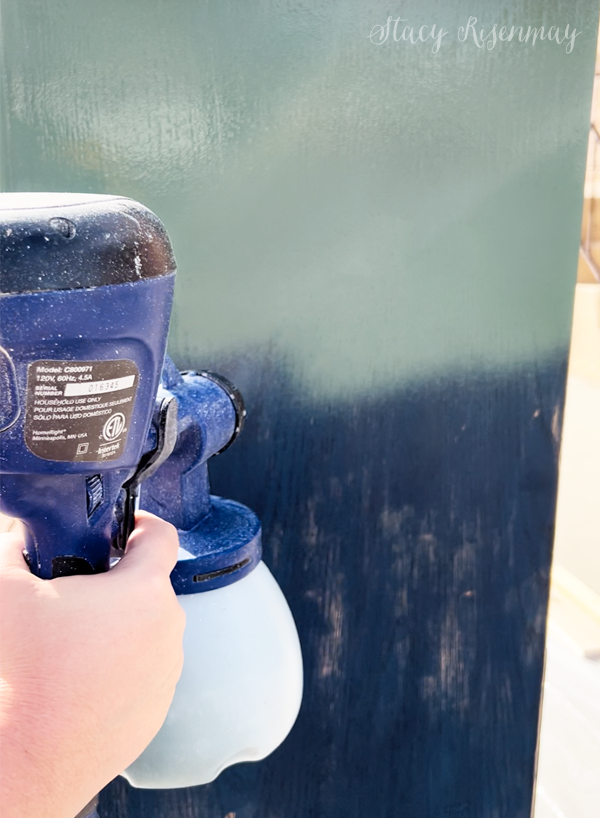
I let the paint dry in between coats. It's a good idea to have a foam brush handy JUST IN CASE you get the sprayer too close or hover too long in one spot and a drip happens. It is nice to quickly grab the brush and smooth it out before it starts to dry.
Once the armoire and its drawers were all painted and it had dried, I moved it inside. It had such a smooth finish! I love paint sprayers for that reason. Not only are they QUICK, but they give the best paint finish.
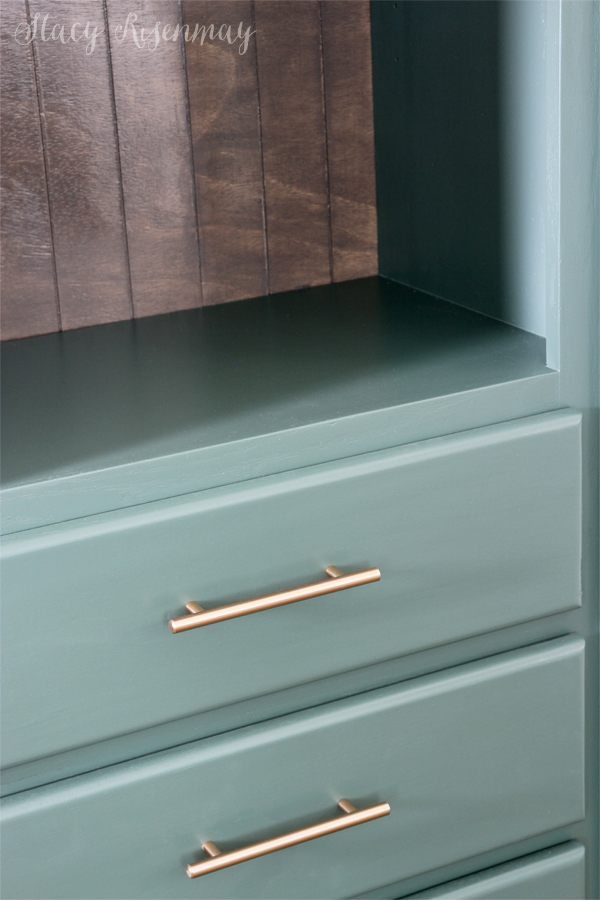
I added new drawer pulls. I chose a brushed gold T bar style pulls and I love how the gold looks against the green! I also decided to add a back to the top portion. While I was painting, my son cut a piece of plywood to size and even cut grooves into for me. It is nice to have another DIYer in the house to help when needed!
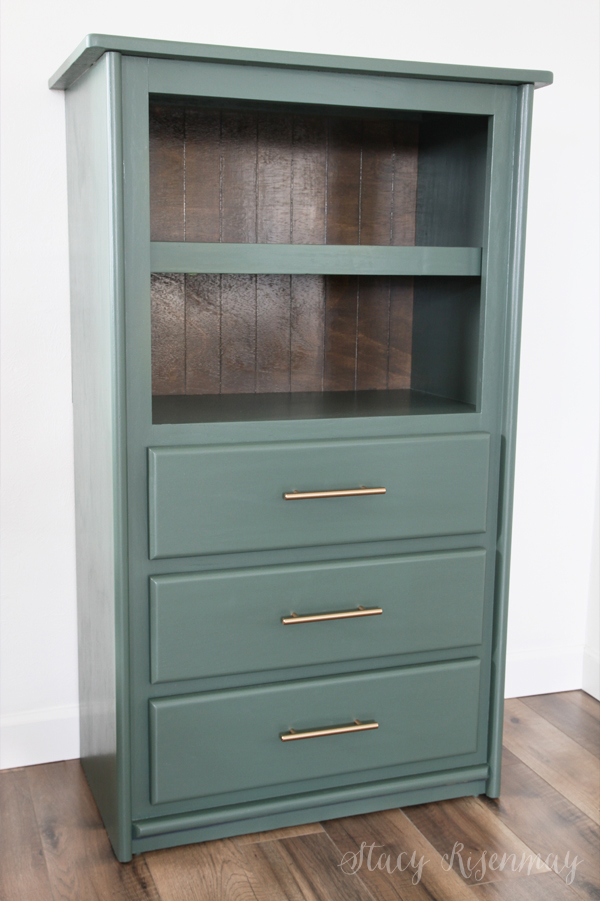
DIY projects (even ones that are hard work) are so worth it! And this painting project was no exception. This $20 armoire never looked so good. I love a good furniture makeover. Seeing an old piece of furniture turn into something shiny and new will never get old.
Stay tuned tomorrow for another post sharing FOUR ways to style a dresser/armoire like this!
Giveaway!
Enter below using the Rafflecopter widget for a chance to win a Super Finish Max Sprayer from HomeRight!
You must be at least 18 years old and a resident of the USA to enter. The giveaway will go from March 30, 2022 until April 6 ,2022. The winner will be chosen by random.org and will be notified by email. The winner will have 48 hours to respond before a new winner will be chosen. The shipping of the prize is the responsibility of the company, in this case HomeRight & Wagner.
a Rafflecopter giveawayPIN For Later:


I have some bedside tables that need painted.
Love this! Refinishing furniture is such a great way to build patience!
My bedroom furniture! Thanks for all the great tips, techniques and ideas.
The Kitchen Table
That furniture piece turned out beautiful. Doesn’t hurt that it’s my favorite color too????
I would paint an old book case - it is crying for some paint!
I have MANY things that need painting, all of which would be so. much. easier. with a sprayer, but the first thing I want to paint is this lovely little wood antique desk with some "feminine" looking trim...I want to paint this a blush pink for my granddaughter. I know the lighter color will really highlight those gorgeous details, and the sprayer will make sure I get in all the nooks & crannies! Thank you so much for the giveaway. =)
My kitchen cabinets are in desperate need of a makeover. A sprayer would make it so much easier!
Just purchased a sander and have a vintage side table my late father made.
Wow, that looks amazing - great job and great tutorial! I would love to paint my kitchen cabinets!
Many thanks for the proper way to paint. I look forward to doing my own pieces and hopefully they will look as great as your piece does!
I need to finish a writing desk/chest.
I have an antique shif-a-robe that I need tore-do. This would be perfect for that. Thanks for the great give away.
I love the color and pulls!
I have some outdoor furniture.
I have a changing table.
Wow, Stacy! That's amazing and so beautiful! You never cease to amaze me with your incredible talent.
I would like to paint the walls in each of the rooms of our home.
You did a fabulous job on that little cabinet! I'm not normally a green person, but I really love that particular color! I have several pieces of furniture I need to paint... including my late MIL's china cabinet. A sprayer would be so helpful! Thank you for the opportunity to win a sprayer! xo
The first thing I'd paint is the brick front of my house.
I love that piece of furniture. You did a great job on the refinishing and love the color. I have several pieces I would like to paint and would love a smooth finish like you get with a sprayer. Nice to have a bit of help with your talented son.
Love that color!
Love the color and the sprayer made it so much easier. So much better than rolling!! Excellent job <3
I have some old wooden chairs I want to paint.
Stacy, you did an AMAZING job on that old piece of furniture! I love how you told the story and came to the end result! My kitchen cabinets look like that and could really your your expertise! Or the paint sprayer now that I know how to prep the wood! ;-)
Thanks so much for another great blog!!!
I have a dresser all sanded, waiting for me to do something with it.
Stacy, you did such an amazing job - as always! What a great transformation and really love the new handles :-) We have several paint projects that are waiting to be tackled, so the sprayer would come in very handy. Thank you for sharing this with us and thank you for the chance!
I would paint the privacy screen on my patio.
(My eyes twitched too when I saw the off-center, misaligned drawer pulls, lol.) Your project turned out great!
I have an "heirloom dresser" that definitely needs refinishing. I have been putting it off but this blog post has inspired me. You make everything seem so doable!
I have an old desk I have wanted to do for years.
Wow. What a terrific makeover--well worth all the work. I love the color and the new handles. Great inspiration for the cabinet I've been wanting to paint. Now I know how to do it properly.
I just picked up a pair of well made bedside tables which I am planning on painting. They were previously painted so I will be sure to prep well. I wonder if chalk paint can be sprayed.
It can!
This turned out so beautiful! I love that smooth finish. So professional looking. Also love the color and pulls you chose!
Thank you for the giveaway! I would LOVE one of these. I have so many projects needing painting!
I have several pieces of furniture and some doors that need painting. This would be a huge help.
Hello I am currently working on my own furniture painting project and I absolutely LOVE LOVE LOVE this color. Do you happen to know the exact name of this color and/or who it was made by?
I would love to use this on my project!
-Megan <3
Mountain Pine by Behr :)