
It is that time of year again when my kitchen table becomes my garden bench and I plant hundreds of seeds for the upcoming growing season. I love getting a head start on the growing season each winter by starting my own seedlings. If you have also started seeds indoors and they have started germinating, you might be wondering what to do next. Here is how to grow seedlings that are strong, healthy, and can be successfully transplanted outside in the spring.
This post is sponsored by Digz Gardening but all ideas and opinions are 100% my own.

How To Grow Seedlings
First of all, congrats on having gone to all the effort of sowing seeds indoors. It can be a messy job. Whether you used egg cartons, plastic seed cells, or some other seed-starting containers, seed germination is the funnest part of the process. I love anticipating the seeds popping up out of the dirt and getting so excited when they finally do make an appearance. There's a good portion of the winter months when my dining table is covered in seed packets, seed trays, and sprinkled with soil. One day I will be lucky enough to get a greenhouse. But until then, my kitchen will have to do. If you haven't started sowing seed yet, I have another post all about how to get started.
Thinning Your Seedlings
Some seeds are so tiny they are practically dust. It can be very hard to only get a few seeds in each cell or container. If you planted multiple seeds and they all germinated, you will need to thin the seedlings down to 1-2 per cell. This use to be so hard for me. I felt like I was killing all these potential plants. So I get the feeling of wanting to save them all. But I promise if you thin them, the ones that you keep, will thrive without the competition for water and nutrients. You will be surprised at how fast they grow after you thin them.


I use either small pointy scissors or small snips like these from Digz Gardening. Make sure they are sharp. Be gentle as you handle the seedlings and go slowly so you don't cut more than you want. I pick the two largest/strongest looking seedlings to keep and cut away the rest. I do not pull the seedling out because you run the risk of disturbing the roots of the seedling you want to keep.
In the past I have pulled apart the seedlings and tried to transplant the thinned ones into new cells. Sometimes they survive but their growth is stunted. They never seem to take off like the ones I thin with snips.

Immediately after thinning it will go from looking full, to looking bare and you may panic thinking "What have I done!" Give it a few days and I guarantee you will see growth. It is all part of the process.
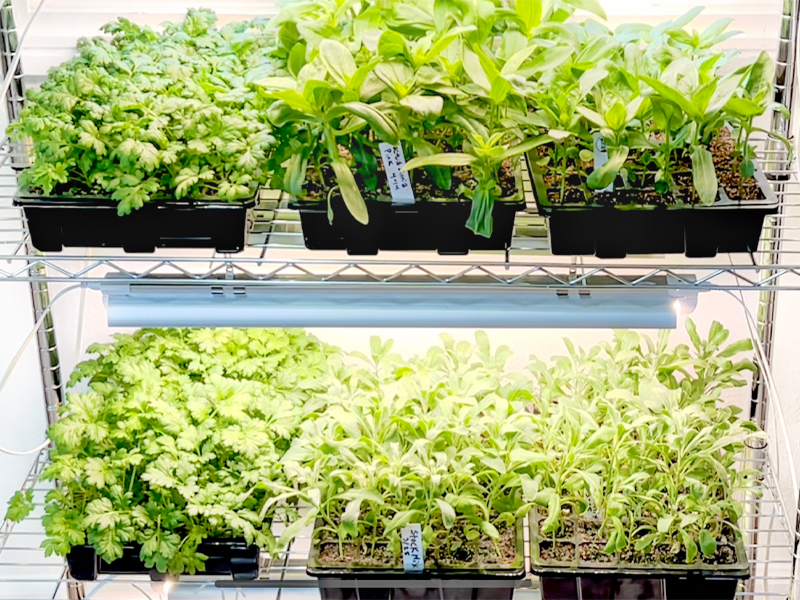
Give Your Seedling Plenty of Light
One of the biggest questions I get is "What is wrong with my seedlings? They are so tall and are falling over." Leggy seedlings are a common mistake that happens when you are starting out growing seeds indoors. It is a result of the young seedlings not having enough light. Not only do these young plants need plenty of light, the light source needs to be close to the seedlings. That is why I really believe if you are going to be starting seeds indoors that you should get grow lights. They are not expensive and will make such a difference.

If you don't have a grow light, the next best thing is to place them in direct sunlight in a south facing window. But given that seeds are started in the winter and early spring when the sun is not at its peak, even a south-facing window can still produce leggy seedlings. I hang the grow lights within 2-3 inches of the seedlings. As they grow taller, I can move the lights higher. I use S hooks and chain to adjust the height but you can use string or zip ties as well to adjust the artificial light.
Water & Fertilizer
The reason I like using plastic cell seedling trays trays, aside from the fate that they are reusable, is that it is the easiest way to bottom water. Water your seedling from the bottom so you don't disrupt the seeds while they are trying to germinate. Watering from the top can also wash away some of the soil. It is gentler for the baby plant to absorb water from the the bottom. Avoid adding too much water. The soil needs to be moist but not soggy. If you are going to water from the top instead of bottom watering, use a spray bottle to reduce the chance of disturbing the seeds or tiny seedling.
If your seed starting soil mix doesn't contain and fertilizer (most don't) then you will need to start fertilizing them when they are 3-4 inches tall and have at least one set of true leaves. Most seed starting mixes and growing medium are primarily peat moss or coco coir which are great for retaining moisture but don't give the new plant many nutrients. Choose a liquid fertilizer that is either specifically labeled for seedlings or one that is balanced (meaning the numbers are all the same).
Strengthen & Protect Your Plants
Your little plants need good air flow. Run a fan directed at your seedlings. I know this sounds weird, but it is one of the best things you can do for your seedlings. The fan blowing on them recreates outside conditions and will help strengthen them. When wind blows on the stems, it stimulates a hormone call auxin which strengthens the cells in the stems. Wind also prevents fungus and mold from growing on the soil surface which causes damping off (a fungal disease where the base of the plant rots and dies). So blast that fan for healthy seedlings!
If you don't have a fan or that seem like too much of a hassle, brush your hands over the seedlings daily to stimulate that hormone.
Transplanting Into Larger Containers
I really try to avoid up potting my seedlings since a larger pot means they will take up more space. Since I don't have a greenhouse, space is at a premium in my basement where my shelves are set up. But there are some plants that grow big quickly (like tomatoes) that will need to be potted up into larger pots. I use 4" pots and I place them in large 19x11 aluminum trays. This way it makes moving them around easier and I can still bottom water.


Most of my seedlings stay in their trays but depending on the type of plant, I will also pot up the ones that are getting root bound like these dahlias. If you see a lot of roots coming out the bottom or the plant itself is getting really big, you may need to choose a larger container. I like to use a potting mix with lots of organic material in it so I don't have to fertilize it with the liquid fertilizer anymore.
Side Note: Not all 4 inch pots have the same dimensions. The pots I bought this year are shorter and wider so less fit into my aluminum trays. Just something to think about if space is an issue.

Harden Off Your Seedlings Before Planting Outside
This is where some people misstep and have plants die. If you skip this step, you risk all your hard work being undone. Your plants have been in a very controlled environment their whole lives where the air temperature has stayed the same. If you were to plant them directly outside, even if all chance of frost has past, they may go into shock and either struggle, or die completely. Help them gradually get used to their new environment by taking them outside for a little bit each day.

Every day you can increase the amount of time they are out until they can handle being outside all day. Start out by putting them in the shade and work up to them being in the sun. If they are in the sun, keep an eye on the moisture levels since the little cells or containers can dry out quickly. This is the most nerve wracking part for me. I set alarms on my phone and I usually put them where I can easily see them so I don;t forget they are out there.
Planting
Aaaaah! You finally made it to the most satisfying part of this whole process. Planting day. Make sure all chance of a last frost has passed for you particular zone. In my Zone 6b, I have to wait until mid May. Some of my seeds I started in January. So it is definitely a reason to do a little happy dance when I can finally get things in the ground. And when you see them thrive and start to produce, you know all your work was well worth it. Not to mention all the money you have saved by starting seeds indoors.

PIN For Later:

If you ever have any questions about this process, please don't hesitate to comment or even email me. I am happy to help you on your gardening journey.


Hi Stacy, I love your post about starting plants from seed. It is the first time I heard of cutting out the other seedlings instead of pulling them out. I also love the fan tip! I have a shelving unit like yours and wonder if you can recommend a grow light like yours. I only start flowers from seeds.
Thank you!
Hi Carol!
Thank you :) I get my grow lights from amazon. https://amzn.to/4uqmj4a