• Skip to primary navigation
  • Skip to main content
  • Skip to primary sidebar
  • Skip to footer
Stacy Risenmay
  • Home
  • About me
  • PRESS
  • Contact Me
  • My Book
    • Facebook
    • Instagram
    • Pinterest
    • Twitter
menu icon
go to homepage
subscribe
search icon
Homepage link
  • Home
  • About me
  • Project Gallery
  • Our House
  • PRESS
  • Contact Me
  • Privacy Policy
    • Facebook
    • Instagram
    • Pinterest
    • Twitter
  • ×

    Painted Rug Tutorial

    By Stacy 21 Comments

    Paint is a magical thing! It is such an inexpensive way to transform a space or an object. I paint pretty much anything, fabric and rugs included.

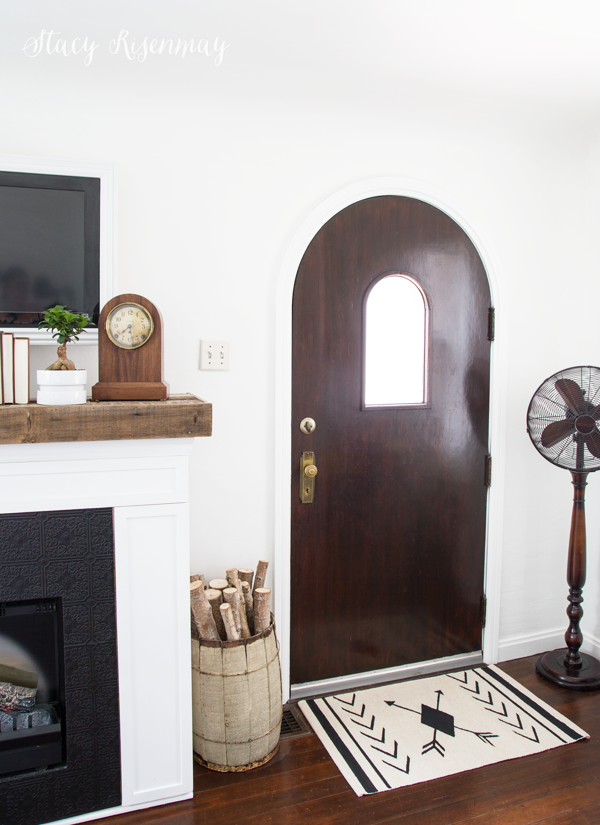
    This rug is actually for the laundry room redo I did for my friend, but I can't share it quite yet, so I staged it in my house. I am not going to lie, for more than half a second I considered keeping it. I am so happy with how it turned out! Even with having to stop and start due to filming, taking pictures, and figuring out lighting, it still only took me about 3 hours. I could have had it done in half the time without the production side of things.

    -painted-rug-tutorial


    #1.

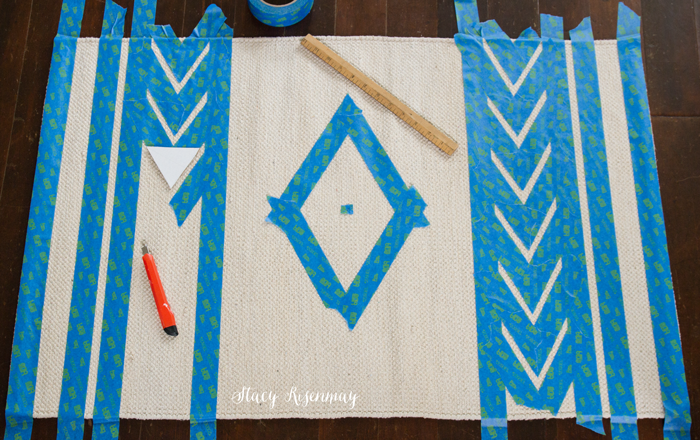
    The first thing you need to do is figure out a design. I doodled on a scratch paper until I came up with a design I liked.

    #2.

    Gather the supplies you will need. I used a ruler, painters tape, a razor blade knife, a natural fiber flat weave rug, and cardboard. I bought this rug from Wayfair but I have bought similar rugs on Amazon and from The Company Store. I shop around for a good deal ($15- $30).

    #3.

    Find the center of the rug and mark it with a tiny piece of tape then start taping off your design.  I measured and marked a diamond onto thin cardboard and used it as a template for the center shape. Then I cut off the tip of the diamond and used it to measure and space the Vs. You may need to use the razor every once in a while to trim the tape. Don't press too hard or you risk cutting the fibers of the rug.
    rug-tutoral

    #4.

    Press the tape down really well with your fingers to ensure it has adhered well.

    #5.

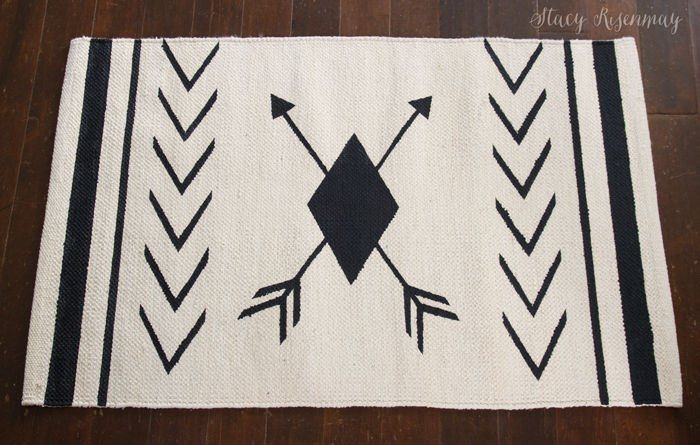
    Using a foam brush, dab the paint onto the rug. Don't add too much at a time or you risk bleeding. When don't remove the tape before the paint dries.


    painted-rug-b&w


    This rug was a lot less complicated than the last rug I painted. Remember my painted kilim rug?


    black-and-white-painted-rug-tutorial


    This video shows the whole process sped up to about ONE minute!


    Have you ever painted fabric or a rug? If not, would you ever try?

    You will also like:

    • Wooden Star SignWooden Star Sign
    • TV clip with MINWAXTV clip with MINWAX
    • Citrus Hot DrinkCitrus Hot Drink
    • Painting PillowsPainting Pillows
    • Celebration of Service with Home DepotCelebration of Service with Home Depot
    • My Dining Room!!!!My Dining Room!!!!
    • Shadow Box Shelf TutorialShadow Box Shelf Tutorial
    • Haven Bound {Being a Mentor}Haven Bound {Being a Mentor}

    « What I'm Crushing On {Faceted}
    Hexagon Planters »

    Filed Under: DIY & Tutorials, Favorites 21 Comments

    Subscribe

    for your weekly DIY fix.

    Reader Interactions

    Comments

    1. cath

      May 23, 2016 at 8:37 am

      Adorable. Fits right into your house. (Love that door--you're so lucky to have it.) Thanks for the tutorial.

      Reply
    2. Meegan

      May 23, 2016 at 4:25 pm

      Love this! The rug is adorable and so detailed. Thanks so much.

      Reply
    3. nancy

      May 24, 2016 at 5:57 am

      So glad to see this post. I just picked up a 5'x5' poly backed painters tarp to attempt to paint an outdoor rug for my deck. Thanks for the tips about the foam brush and when to remove the painters tape. The first thing I did was iron out the folds and roll it up. Kinda nervous about starting the project..but, hey, it's a blank "canvas." Anything special I should do when painting on that medium?

      Reply
      • Stacy

        May 24, 2016 at 2:06 pm

        I use the same tips when painting on canvas. Good luck! Sounds like a fun project :)

        Reply
    4. Amy Anderson

      May 24, 2016 at 4:04 pm

      I'm LOVING your design! Super cute!

      Reply
    5. Celeste Coffman

      May 25, 2016 at 9:49 am

      Thanks for showing exactly how to lay out the tape for the chevron! I would never have been able to imagine how to do it so perfectly. The arrow motif is so on-trend right now; I love it.
      I never post crafts on my coaching/counseling blog but I still love to follow those who do!

      Reply
    6. Tania

      May 29, 2016 at 8:08 am

      Love it! No, I have never painted a rug and YES, I would definitely try it! I loved the video too, it was cute and fun to watch!!

      Tania

      Reply
    7. Amy Latta

      May 31, 2016 at 8:07 am

      Loving the design! Thanks for sharing your how-to!

      Reply
    8. Laura Kelly

      May 31, 2016 at 9:05 am

      This is super cool! I love your design!

      Reply
    9. Jennifer Priest

      May 31, 2016 at 10:55 am

      So cool! I love how you made the pattern with tape, not a stencil. Anyone can make this with your tutorial.

      Reply
    10. Tara

      May 31, 2016 at 11:28 am

      Wow! Stacy! you did an amazing job!

      I want to try my hand at painting a rug now!

      Reply
    11. Gina

      June 01, 2016 at 6:15 pm

      I love the design you came up with! This is the perfect sort of rug for my home!

      Reply
    12. Terry

      June 02, 2016 at 6:57 pm

      WOW! First off... let me just say how I admire your patience! This turned out lovely! I like the way you think! Well done and the design is pure original! Thank you for sharing how you did it! If you'd like to share this or any other project at one more party, I host Making Broken Beautiful every Thursday thru Sunday. The Party has just started and I'd love it if you came and inspired!
      Smiles!
      Terry
      The Curator's Collection & Making Broken Beautiful Thursday
      http://thecuratorscollection.wordpress.com

      Reply
    13. Wendi@H2OBungalow

      June 03, 2016 at 3:44 am

      Loved your tutorial and the idea of making a custom rug. I bet you did have a hard time handing it over to your friend for her new space. Looking forward to seeing what you've got in store for your makeover! I'm featuring your creative rug this weekend in the DIY Sunday Showcase! Congratulations :)

      Reply
    14. bonbon ~ Farmhouse 40

      June 06, 2016 at 2:05 pm

      Thanks so much for sharing at INSPIRE ME MONDAY link party. You are one of my featured links this week. I hope you will stop by and check it out

      Reply
    15. Terry

      June 08, 2016 at 8:17 am

      Stacy! Just a quick note to let you know I am featuring your awesome tutorial at this week's Making Broken Beautiful party! Thank you so much for sharing this inspiration! I hope you have an amazing day!
      Smiles!
      Terry
      The Curator's Collection & Making Broken Beautiful Thursday

      Reply
    16. Michelle James

      June 09, 2016 at 3:22 pm

      This is truly beautiful! Thanks for sharing this great tutorial at #HomeMattersParty

      Reply
    17. Koko

      September 22, 2016 at 9:24 am

      I know this is about your rug (which I love btw...) but that front door! OMG. Love the rounded top. So sweet that is! Love your photos. What a pro!

      Reply
    18. Rhonda Crow

      September 24, 2018 at 10:47 am

      Your self painted area rugs are terrific idea! I'm not much of a shopper, Where do you find the area rugs?

      Reply

    Trackbacks

    1. diy Sunday Showcase 6/4, & FAVES - PinkWhen says:
      June 4, 2016 at 4:00 pm

      […] Wendi’s favorite last week is the painted rug tutorial. […]

      Reply
    2. INSPIRE ME MONDAY #85 - FARMHOUSE 40 says:
      June 6, 2016 at 1:44 pm

      […] Painted Rug Tutorial shared by Not Just A House Wife […]

      Reply

    Comment Below! Cancel reply

    Your email address will not be published. Required fields are marked *

    This site uses Akismet to reduce spam. Learn how your comment data is processed.

    Primary Sidebar

    stacyHey! I'm Stacy and am a DIY addict. I love to get my hands dirty, whether it's sawdust, paint, or dirt. My goal is to help YOU learn to fix up your home and yard. No matter the style or size, I think everyone should love their home. And it doesn't takes a big budget to get there. Let's DIY together!

    Subscribe to My Blog!

    Search this site

    categories


    Subscribe

    Footer

    Welcome! I'm sharing our adventures as we fix up our 1938 cottage. Whether it is big or small, I think everyone should love their home and I don't think it takes a lot of money to make a space your own

    About Stacy

    • Facebook
    • Instagram
    • Pinterest
    • Twitter

    My Favorites

    copyright

    All images and content are copyrighted via Stacy Risenmay unless otherwise stated. If you'd like to share my work, please link back to this blog.
    Thank you for visiting!


    Footer

    ↑ back to top

    About

    • Meet Stacy
    • Privacy Policy
    • Contact

    Categories 

    • Home Decor
    • Outdoor Projects & Gardening
    • DIY & Tutorials
    • Kid Activities
    • Recipes
    • Travel
    • Cleaning
    • Houseplants
    • Staining
    • Painting
    • Power Tools
    • Holiday Ideas

    Newsletter

    • Sign Up! for emails and updates

    As an Amazon Associate I earn from qualifying purchases.

    Copyright © 2020 Brunch Pro on the Brunch Pro Theme


    Privacy Policy
    Welcome! Thanks for visiting.
    Hi! I'm Stacy and I want to help YOU become a DIY rockstar! Sign up for my email list so each project, tip, and trick will go directly to your inbox :)
    Your information will *never* be shared or sold to a 3rd party. Pinky promise :)
    Welcome!
    Hi! I'm Stacy and I blog about fixing up our 1938 cottage. Join the thousand of others who get my posts sent to their inbox for FREE!
    Your information will *never* be shared or sold to a 3rd party.