• Skip to primary navigation
  • Skip to main content
  • Skip to primary sidebar
  • Skip to footer
Stacy Risenmay
  • Home
  • About me
  • PRESS
  • Contact Me
  • My Book
    • Facebook
    • Instagram
    • Pinterest
    • Twitter
menu icon
go to homepage
subscribe
search icon
Homepage link
  • Home
  • About me
  • Project Gallery
  • Our House
  • PRESS
  • Contact Me
  • Privacy Policy
    • Facebook
    • Instagram
    • Pinterest
    • Twitter
  • ×

    DIY Resin Drawer Knobs

    By Stacy 40 Comments

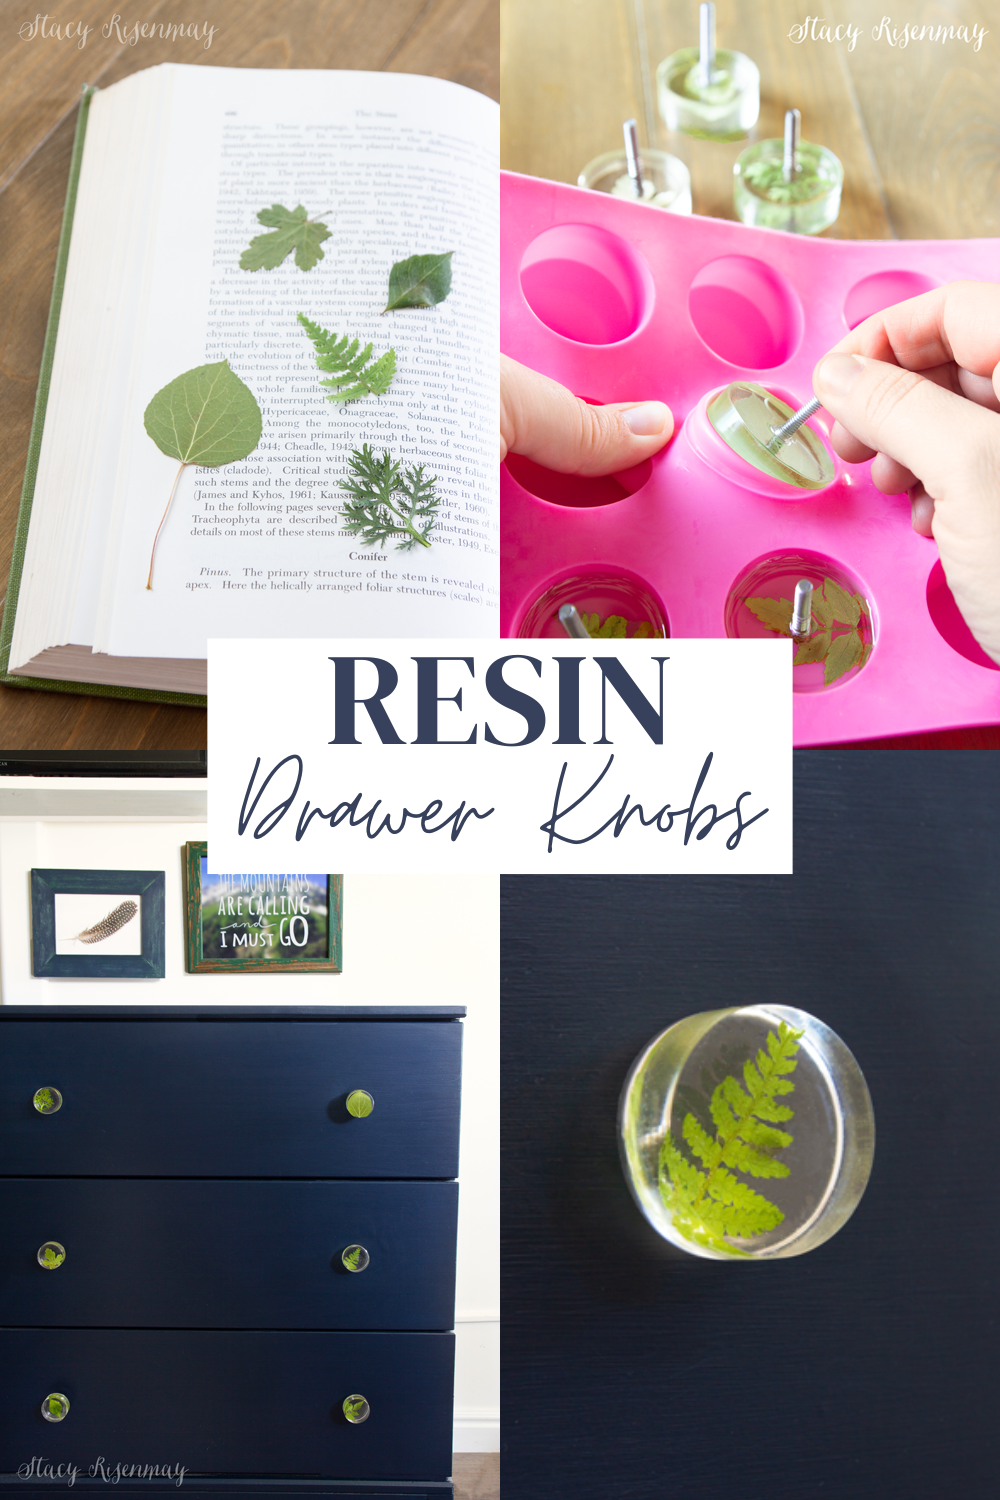
    I have an obsession with playing around with resin. I am not sure what it is about it that is so fascinating, but I just love it! In the past I made some leaf resin magnets for our fridge. They are still on there and I smile every time I open the fridge and see them. We have lots of pressed leaves from our hikes and our travels and I'm always looking for ways to use them. Today I am sharing how I made these resin drawer knobs. I'm partnering up with Wagner to show you how their new heat gun can help you with this fun and easy project!


    resin and leaf knobs


    Supplies Needed for Resin Drawer Knobs:

    Silicone Mold

    Two-part Resin

    Heat Gun

    Pressed Leaves

    Skewer Sticks

    Tape

    Screws

    making resin knobs


    The leaves need to be pressed and completely dry or they will not hold up well in the resin.


    pressed leaves


    Step 1: After gathering the supplies, mix equal parts of each bottle into a container and stir until well mixed. Pour enough resin into each mold to cover the bottom.

    Step 2: Use a Wagner HT400 heat gun to remove any air bubbles from the resin. It is so fun to watch them instantly pop and disappear!

    Step 3: Wait for 15-20 minutes and then add the pressed leaves to the resin.

    Step 4: Add more resin to the molds.

    Step 5: Use the Wagner HT400 heat gun again to pop any remaining bubbles.

    Step 6: It is time to add the screws. I actually used threaded rods since I didn’t want the head of a screw to show through some of the more delicate leaves like the ferns. You can use screws if your leaves are more solid. Using skewer sticks and tape, create a way for the screws to stay upright while the resin hardens.

    Step 7: After the 24-hour cure time has passed, you can safely remove the knobs from the molds.

    making resin knobs


    taking resin knobs out of the mold


    Add the knobs to your dresser for a whole new look! I love how the green leaves look against the navy blue. Best of all, my boys love the new knobs.


    resin knob with leaf


    Their room faces east and a window is right across from the dresser so the morning light really makes them look their best.


    resin leaf knobs on dresser


    Sometimes making small changes like switching out throw pillows or hardware can make all the difference!


    leaf resin drawer knobs


    You can see past heat gun projects I have done HERE.


    GIVEAWAY!

    Wagner is giving away one of their new heat guns to a lucky reader!

    The new Wagner HT400  is a small and mighty household heat gun perfect for projects like crafting, embossing, shrinking wire tubes, removing decals and labels and shrink wrapping gifts.


    Enter below using the rafflecopter widget.

    a Rafflecopter giveaway

    You will also like:

    • Leaf Resin MagnetsLeaf Resin Magnets
    • Chicken Coop Makeover {Giveaway!}Chicken Coop Makeover {Giveaway!}
    • DIY Icicle OrnamentDIY Icicle Ornament
    • Tips for Painting Kitchen CabinetsTips for Painting Kitchen Cabinets
    • DIY Modern Beds {Teen & Tween Room}DIY Modern Beds {Teen & Tween Room}
    • Garage Door Makeover {Giveaway!}Garage Door Makeover {Giveaway!}
    • Fireplace Makeover {Giveaway!}Fireplace Makeover {Giveaway!}
    • New Cabinets Doors!New Cabinets Doors!

    « 20 Wall hangings that will add texture to your space
    DIY Braided Fabric Basket »

    Filed Under: DIY & Tutorials 40 Comments

    Subscribe

    for your weekly DIY fix.

    Reader Interactions

    Comments

    1. Tyneisha

      August 27, 2019 at 12:47 pm

      So many uses for heat guns! I would love to use it to make bracelets for my children.

      Reply
    2. Whitney

      August 27, 2019 at 6:36 pm

      They are also handy for doing repairs on sprinkler systems that are poly pipe. Heat up the pipe and the fitting slides right on.

      Reply
    3. Kelly D

      August 27, 2019 at 8:01 pm

      I would use this to make jewelry and crafts.

      Reply
    4. Annette

      August 27, 2019 at 8:29 pm

      Wow, that's so creative and beautiful. It's been awhile since I had a glue gun, but would like to have one to make some holiday decorations.

      Reply
    5. Anne Marie

      August 28, 2019 at 5:04 am

      I would use this in my many craft projects.

      Reply
    6. Audrey Stewart

      August 28, 2019 at 7:03 am

      I would gift it to my husband.

      Reply
    7. Jenifer

      August 28, 2019 at 7:11 am

      I would definitely use this for craft projects. The knobs would be the first thing I tried. Love them!

      Reply
    8. Linda Nelson

      August 28, 2019 at 7:12 am

      What a great giveaway!

      Reply
    9. Leslie Kiley

      August 28, 2019 at 7:14 am

      I Have a ton of uses for the heat gun! I would use it in my crafting the most

      Reply
    10. BETH CLARK

      August 28, 2019 at 7:54 am

      I not really for sure what I would use it for but I would have fun using it.

      Reply
    11. Colleen

      August 28, 2019 at 7:55 am

      I would love to win the Wagner Heat Gun! There are so many ways I could use this.

      Reply
    12. Danita

      August 28, 2019 at 8:40 am

      Wow! AWESOME!!!! I LOVE these! You are just so creative!!!!

      Reply
    13. Nancy

      August 28, 2019 at 9:10 am

      What a great idea but.....Better check again...You're missing Step 2 in your directions. They don't correlate to your pics.

      Reply
    14. Vickie V

      August 28, 2019 at 9:25 am

      DH is wanting to help loosen old multiple layers of paint for our house remodel.

      Reply
    15. Lisa Smith

      August 28, 2019 at 9:38 am

      I would try making these knobs and I would use it for embossing.... I have borrowed one in the past. The dresser looks great!

      Reply
    16. Noreen

      August 28, 2019 at 9:44 am

      I love how the leaves look against the dark blue background. I could make some beautiful magnets, too.

      Reply
    17. carol clark

      August 28, 2019 at 10:18 am

      id use it for hanging rope on wood

      Reply
    18. Tim

      August 28, 2019 at 10:28 am

      my wife and kids would use it for the many craft projects they regularly do, but I also think there are many DIY repairs that could use this.

      Reply
    19. Cheryl

      August 28, 2019 at 10:40 am

      I would carefully use it for defrosting my freezer(s).

      Reply
    20. kesha

      August 28, 2019 at 10:45 am

      I would love to have it for craft projects and embossing!

      Reply
    21. rana durham

      August 28, 2019 at 10:51 am

      I would use the heating gun on Upholstering Furniture .

      Reply
    22. Laura Laskey

      August 28, 2019 at 12:00 pm

      I would probably start right in on these knobs! They are so pretty!

      Reply
    23. Renee

      August 28, 2019 at 1:00 pm

      I would love to recreate some of these knobs using vegetable plant leaves and herb cuttings from our garden. And I want to try some pour painting on canvas and wood.

      Reply
    24. Nathalie B.

      August 28, 2019 at 6:42 pm

      I would use this in my craft projects.

      Reply
    25. beverly e

      August 28, 2019 at 9:27 pm

      I could use this for so many crafting projects! Thank you for the chance to win one!

      Reply
    26. jeremy mclaughlin

      August 29, 2019 at 8:09 am

      Use for craft projects.

      Reply
    27. Abigail

      August 29, 2019 at 8:19 am

      I want to make those drawer pulls immediately!!!! They look amazing!!!

      Reply
    28. Shanna Uptergrove

      August 29, 2019 at 12:21 pm

      I would love to make some magnets the way you made those knobs! So freaking neat. And my daughter is always wanting to paint glass bottles and they always have labels to take off- this would ease the nightmare of that!!!

      Reply
    29. Jessie Morrow

      September 01, 2019 at 3:35 pm

      These drawer knobs are beautiful. Thanks for the idea!

      Reply
    30. NANCY

      September 03, 2019 at 5:20 am

      That's really unique. I would definitely try the project you did for my kitchen knobs.

      Reply
    31. Dynal Roberson

      September 03, 2019 at 10:27 am

      Wow, there are so many projects that this would be useful for, how can I choose just one?

      Reply
    32. Cassandra D

      September 03, 2019 at 7:50 pm

      To make coasters and for decorative signs for the garden.

      Reply
    33. Tabathia B

      September 03, 2019 at 9:25 pm

      Making wreaths for the front door

      Reply
    34. Megan

      January 04, 2020 at 7:34 am

      Hi! Can you drop the link for the mold that you used? Would love to try this! Thanks! :)

      Reply
      • Stacy

        January 07, 2020 at 3:54 pm

        I added a link to it in the post under the supply list!

        Reply
    35. Alicia @thediyhomemaker

      January 20, 2020 at 6:27 pm

      Stacy,

      These resin door knobs are simply amazing and beautiful. I do a lot of repurposing and I can see these on a number of different projects.
      Thanks for the inspiration!

      Reply
    36. Joan Lyerly

      February 19, 2020 at 5:24 pm

      I love the knobs! And I have the same mold and use resin all the time. However, how do you leave a space between the knob and the drawer where you can use your fingers to pull the drawer open?

      Reply
      • Stacy

        February 25, 2020 at 11:30 am

        Yes. I didn't screw it in all the way. I used screws that were longer than I would normally use. I have also used small hollow metal rods cut down to 1" or less before. Slipped over the screw before attaching it. They act as a spacer. It works great for when you are using them as wall hooks. I use 3" rods for that :)

        Reply
    37. Laura R.

      May 16, 2022 at 10:42 am

      I love your idea, I am trying to make them for a baby room but I'm having trouble with the leaves. How where you able to maintain that vibrant green color on the leaves? Mine turned all brownish and fade, not beautiful at all.

      Thank you very much.

      Reply
      • Stacy

        May 25, 2022 at 4:07 pm

        If they get a lot of sun exposure, they can turn brown over time. One thing you can do is after drying your leaves, water down some green paint (or use water colors) and paint them green. Then they will stay green over time.

        Reply

    Comment Below! Cancel reply

    Your email address will not be published. Required fields are marked *

    This site uses Akismet to reduce spam. Learn how your comment data is processed.

    Primary Sidebar

    stacyHey! I'm Stacy and am a DIY addict. I love to get my hands dirty, whether it's sawdust, paint, or dirt. My goal is to help YOU learn to fix up your home and yard. No matter the style or size, I think everyone should love their home. And it doesn't takes a big budget to get there. Let's DIY together!

    Subscribe to My Blog!

    Search this site

    categories


    Subscribe

    Footer

    Welcome! I'm sharing our adventures as we fix up our 1938 cottage. Whether it is big or small, I think everyone should love their home and I don't think it takes a lot of money to make a space your own

    About Stacy

    • Facebook
    • Instagram
    • Pinterest
    • Twitter

    My Favorites

    copyright

    All images and content are copyrighted via Stacy Risenmay unless otherwise stated. If you'd like to share my work, please link back to this blog.
    Thank you for visiting!


    Footer

    ↑ back to top

    About

    • Meet Stacy
    • Privacy Policy
    • Contact

    Categories 

    • Home Decor
    • Outdoor Projects & Gardening
    • DIY & Tutorials
    • Kid Activities
    • Recipes
    • Travel
    • Cleaning
    • Houseplants
    • Staining
    • Painting
    • Power Tools
    • Holiday Ideas

    Newsletter

    • Sign Up! for emails and updates

    As an Amazon Associate I earn from qualifying purchases.

    Copyright © 2020 Brunch Pro on the Brunch Pro Theme


    Privacy Policy
    Welcome! Thanks for visiting.
    Hi! I'm Stacy and I want to help YOU become a DIY rockstar! Sign up for my email list so each project, tip, and trick will go directly to your inbox :)
    Your information will *never* be shared or sold to a 3rd party. Pinky promise :)
    Welcome!
    Hi! I'm Stacy and I blog about fixing up our 1938 cottage. Join the thousand of others who get my posts sent to their inbox for FREE!
    Your information will *never* be shared or sold to a 3rd party.