• Skip to primary navigation
  • Skip to main content
  • Skip to primary sidebar
  • Skip to footer
Stacy Risenmay
  • Home
  • About me
  • PRESS
  • Contact Me
  • My Book
    • Facebook
    • Instagram
    • Pinterest
    • Twitter
menu icon
go to homepage
subscribe
search icon
Homepage link
  • Home
  • About me
  • Project Gallery
  • Our House
  • PRESS
  • Contact Me
  • Privacy Policy
    • Facebook
    • Instagram
    • Pinterest
    • Twitter
  • ×

    Budget Bedroom Makeover {Reveal!}

    By Stacy 10 Comments

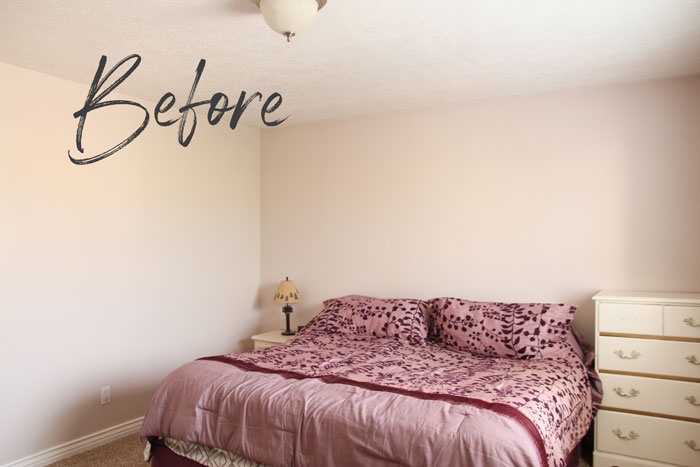
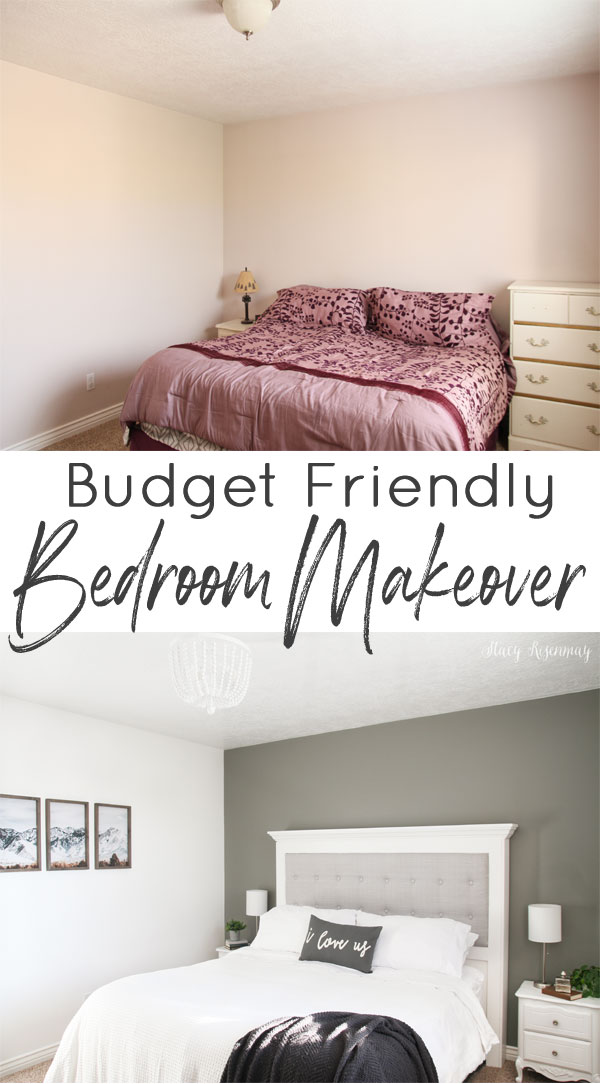
    The master bedroom seems to be the last place that people decorate in their homes. It's a very overlooked space. But I think it is important to make your bedroom feel like your own little retreat. I had the opportunity recently, to makeover the bedroom of a sweet couple I know who in 20 years of marriage, have never really decorated their space. In just a few days, Shane and I were able to complete this budget bedroom makeover.

    *This post is sponsored by HomeRight but the thoughts and ideas are 100% my own. Contains affiliate links.

    Budget Bedroom Makeover

    budget bedroom makeover before

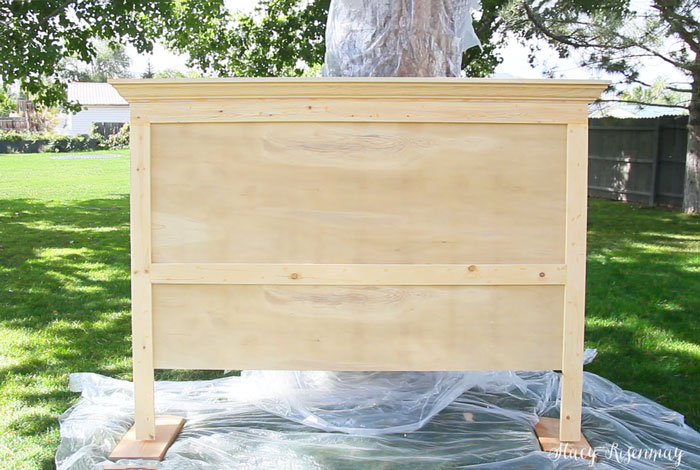
    The number one goal was to make a headboard for this space.

    old side table that will get painted

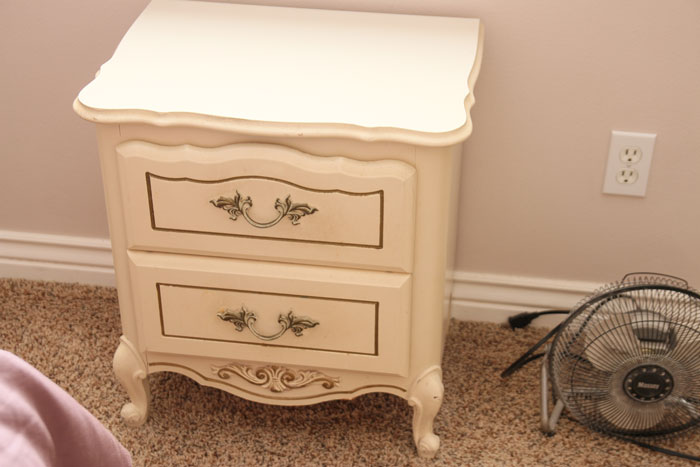
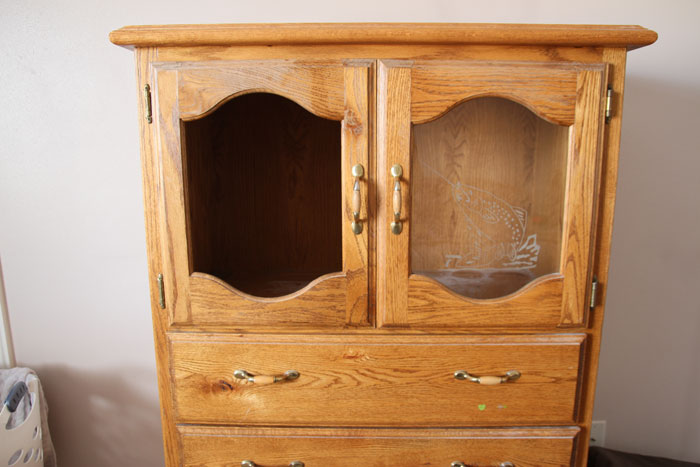
    In order to keep within the budget, we decided to use all the existing furniture.

    old dresser that will get painted

    When it came time to start the bed, I was in the thick of canning salsa. I had drawn up the plans and created a shopping list so Shane cut the wood for me. I may or may not have had a hard time giving up that job and watched him longingly from the kitchen window. But it is nice getting two things done at once. A Saturday morning later, we had a counter full of jars of salsa and a pile of cut lumber :)

    I built the bed and got it all sanded and prepped for paint. I am offering building plans for this headboard. CLICK HERE >>> Headboard Building Plans

    Keep reading to see the hidden storage!

    DIY wood headboard

    I used my HomeRight Super Finish Max to apply the white paint. There is no way I could have done this makeover in just a weekend if it wasn't for this sprayer. I used it not only for the bed, but for all the furniture. It is so quick and easy!

    *Pro Tip: When you paint unfinished wood, the paint will raise the grain and it will feel rough. Use 150 or 220 grit sandpaper to lightly sand after the first coat. This will ensure a smooth, professional finish.

    painting DIY headboard

    After painting the room and furniture, it was time to style the space!

    Budget Bedroom Makeover Reveal!

    Before starting this makeover, I had looked through the wife's Pinterest boards. Often times people won't be able to articulate what their design style is, or they think they don't have one. But by looking at what they have pinned (what they are drawn to) it becomes clear what style they like. Most of the spaces she had pinned were gray and white. Her style was definitely more on the traditional side.

    DIY Budget bedroom makeover

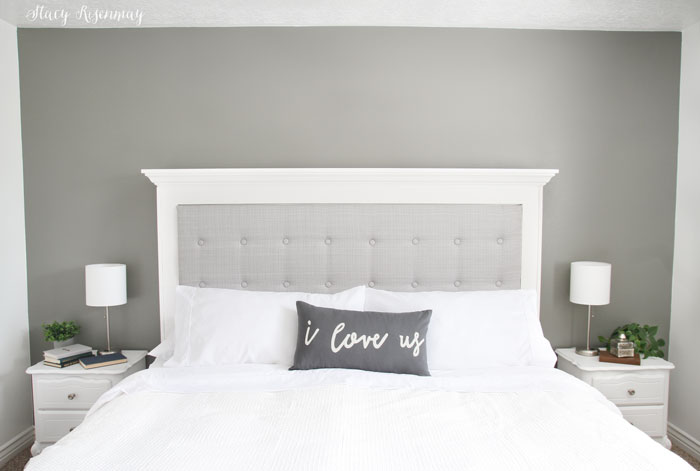
    I added a tufted insert on the headboard. I could have also added vertical boarts to create a grid instead. But I love the softness the fabric brings to headboard.

    The lavender/tan walls were painted. I chose white and the focus wall got painted a warm gray. Gray and white can often come off cold, so I wanted a very warm gray. This room also faces south & west so it get lots of warm light during the day. The carpet is tan and I added lots of greenery which both also help.

    budget bedroom makeover

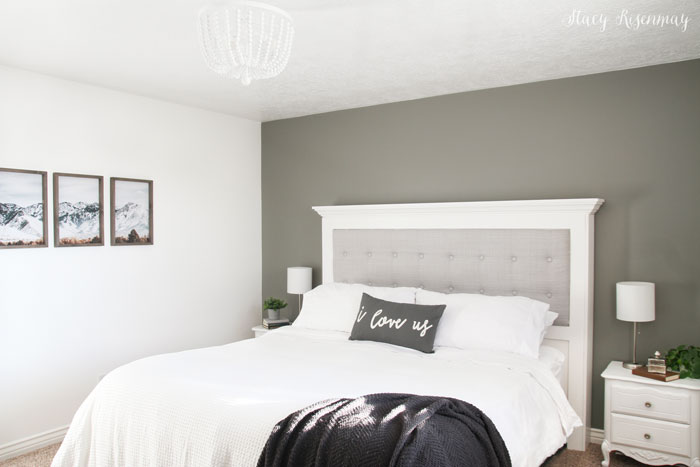
    I added photos and art to the wall, a new light fixture, bedside lamps, bedding, and little touches throughout the room.

    budget friendly makeover

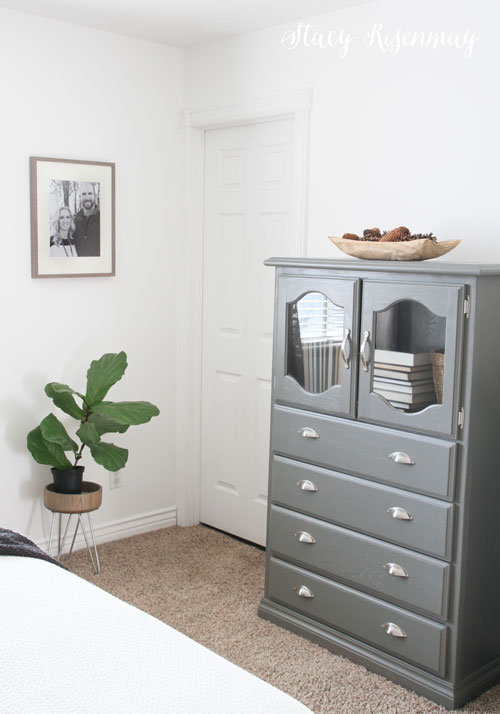
    The two dressers were painted the same dark gray that I used on my sister's kitchen island. I added new hardware to both and new glass to the door on the taller dresser.

    furniture painted gray for budget bedroom makeover

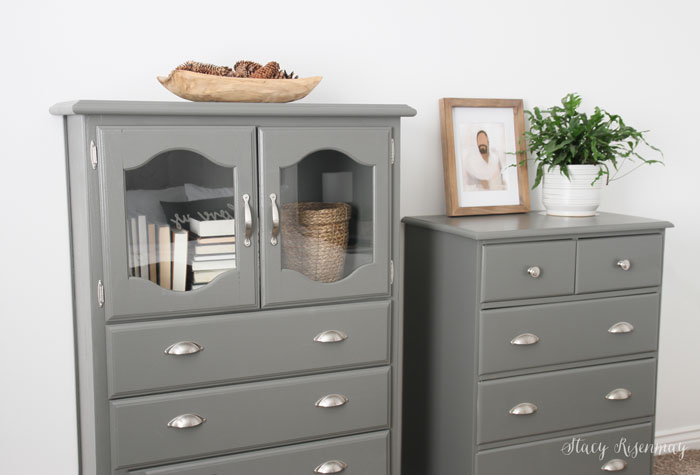
    Even though the dressers are two different styles, by painting them the same and using similar hardware, it makes them look cohesive.

    The paint sprayer gave them a satin smooth finish!

    DIY Headboard with storage

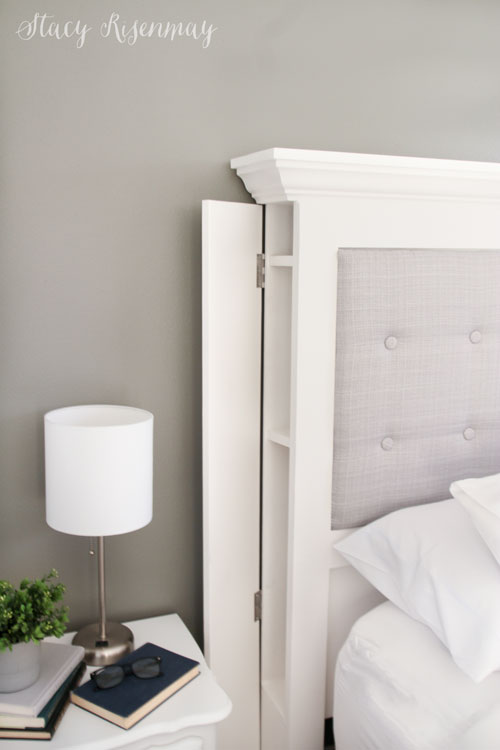
    At their request, I made the headboard have easy to reach storage. The sides open to reveal shelves for things like books, medication, chargers, etc. Like I said before, I will be making the building plans for this headboard available (hopefully next week).

    This budget bedroom makeover relied heavily on the power of paint. Being able to reuse the existing furniture really helped the budget. And having a paint sprayer made it possible to complete the space in just a few days.

    What space do you have that needs a little weekend budget makeover?

    Pin For Later:

    More Budget Friendly Makeovers:

    Teen Boy's Bedroom

    Vintage Green Boy's Room

    Kitchen Makeover

    Laundry Room Makeover

    Home Office Makeover

    You will also like:

    • The Power of Paint {Bed Makeover}The Power of Paint {Bed Makeover}
    • Home Office Makeover! {Create A Home Office}Home Office Makeover! {Create A Home Office}
    • Garage Attic Makeover REVEAL!!!Garage Attic Makeover REVEAL!!!
    • Metal Card Catalog MakeoverMetal Card Catalog Makeover
    • Teen Bedroom Makeover on a Budget!Teen Bedroom Makeover on a Budget!
    • Garage Door MakeoverGarage Door Makeover
    • Stairway & Hall MakeoversStairway & Hall Makeovers
    • Storage Bench Makeover {5 Easy Steps to Transform any Furniture Piece!}Storage Bench Makeover {5 Easy Steps to Transform any Furniture Piece!}

    « An Unusual Summer {Life Update}
    Visiting Yellowstone »

    Filed Under: DIY & Tutorials, Favorites, Painting 10 Comments

    Subscribe

    for your weekly DIY fix.

    Reader Interactions

    Comments

    1. Beverley L

      October 09, 2021 at 12:18 pm

      Great job. The hidden storage very cleverly done.Nice accent wall.

      Reply
      • Stacy

        October 23, 2021 at 9:40 pm

        Thank you! I love hidden storage so it was fun to incorporate that into the space.

        Reply
    2. Laura Harrie

      October 09, 2021 at 5:57 pm

      So well done, you are very creative!

      Reply
      • Stacy

        October 23, 2021 at 9:41 pm

        Thank you!

        Reply
    3. Elizabeth H

      October 09, 2021 at 7:28 pm

      Very nice as usual. Love the headboard. Good job.

      Reply
      • Stacy

        October 23, 2021 at 9:41 pm

        Thanks!

        Reply
    4. Danita

      October 11, 2021 at 12:19 pm

      LOVE it!

      Reply
      • Stacy

        October 23, 2021 at 9:42 pm

        Thanks Danita <3

        Reply
    5. patty cowan

      October 11, 2021 at 8:46 pm

      As usual, you excelled!!! I love gray and you made it look so fresh! GREAT job on the headboard! Too many exclamation marks?? I think not!!!

      Reply
      • Stacy

        October 23, 2021 at 9:43 pm

        Haha! I love exclamation points :) Thank you!!!!

        Reply

    Comment Below! Cancel reply

    Your email address will not be published. Required fields are marked *

    This site uses Akismet to reduce spam. Learn how your comment data is processed.

    Primary Sidebar

    stacyHey! I'm Stacy and am a DIY addict. I love to get my hands dirty, whether it's sawdust, paint, or dirt. My goal is to help YOU learn to fix up your home and yard. No matter the style or size, I think everyone should love their home. And it doesn't takes a big budget to get there. Let's DIY together!

    Subscribe to My Blog!

    Search this site

    categories


    Subscribe

    Footer

    Welcome! I'm sharing our adventures as we fix up our 1938 cottage. Whether it is big or small, I think everyone should love their home and I don't think it takes a lot of money to make a space your own

    About Stacy

    • Facebook
    • Instagram
    • Pinterest
    • Twitter

    My Favorites

    copyright

    All images and content are copyrighted via Stacy Risenmay unless otherwise stated. If you'd like to share my work, please link back to this blog.
    Thank you for visiting!


    Footer

    ↑ back to top

    About

    • Meet Stacy
    • Privacy Policy
    • Contact

    Categories 

    • Home Decor
    • Outdoor Projects & Gardening
    • DIY & Tutorials
    • Kid Activities
    • Recipes
    • Travel
    • Cleaning
    • Houseplants
    • Staining
    • Painting
    • Power Tools
    • Holiday Ideas

    Newsletter

    • Sign Up! for emails and updates

    As an Amazon Associate I earn from qualifying purchases.

    Copyright © 2020 Brunch Pro on the Brunch Pro Theme


    Privacy Policy
    Welcome! Thanks for visiting.
    Hi! I'm Stacy and I want to help YOU become a DIY rockstar! Sign up for my email list so each project, tip, and trick will go directly to your inbox :)
    Your information will *never* be shared or sold to a 3rd party. Pinky promise :)
    Welcome!
    Hi! I'm Stacy and I blog about fixing up our 1938 cottage. Join the thousand of others who get my posts sent to their inbox for FREE!
    Your information will *never* be shared or sold to a 3rd party.