• Skip to primary navigation
  • Skip to main content
  • Skip to primary sidebar
  • Skip to footer
Stacy Risenmay
  • Home
  • About me
  • PRESS
  • Contact Me
  • My Book
    • Facebook
    • Instagram
    • Pinterest
    • Twitter
menu icon
go to homepage
subscribe
search icon
Homepage link
  • Home
  • About me
  • Project Gallery
  • Our House
  • PRESS
  • Contact Me
  • Privacy Policy
    • Facebook
    • Instagram
    • Pinterest
    • Twitter
  • ×

    Woven Leather Headboards

    By Stacy 8 Comments

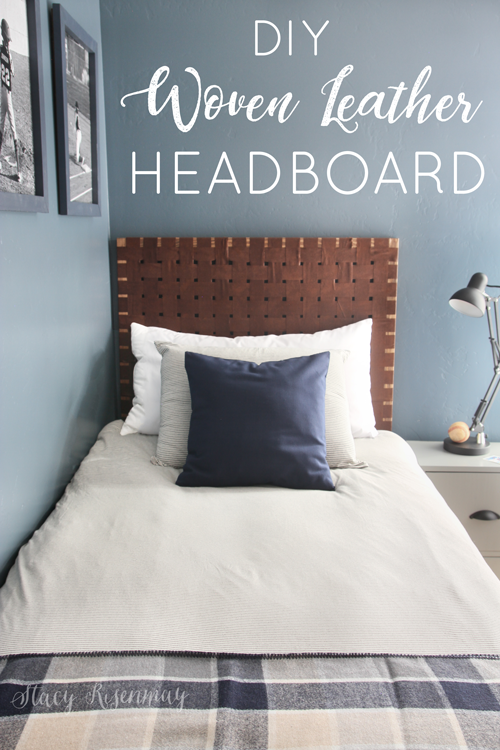
    Last week I shared the room makeover I did for my nephew and the most asked question I got through messages and emails was if I bought the headboard or made it. It was a total DIY. To buy one is hundreds of dollars so I knew it had to be a do-it-yourself project if I was going to keep this space under budget. Two of these woven leather headboards cost about $40 make (only $20 each!). It is probably the most money I have ever saved by DIYing.
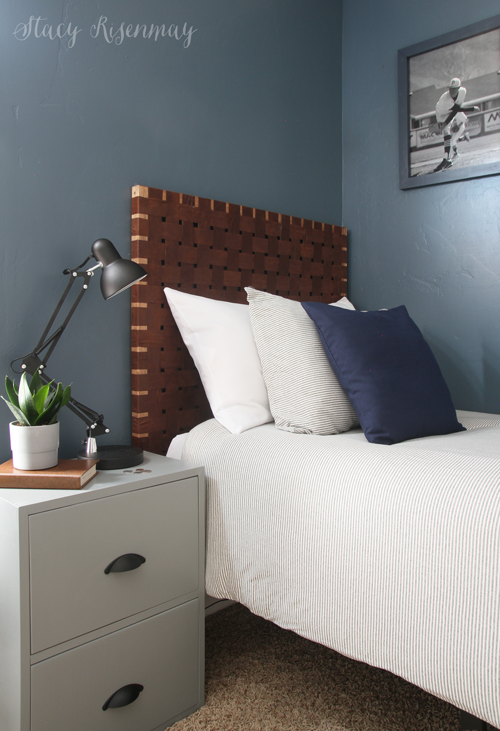


    The overall theme for the room was "baseball" and I thought that not only are these woven leather headboards super cool, but they give a subtle nod to baseball mitts. They are also super easy to make!
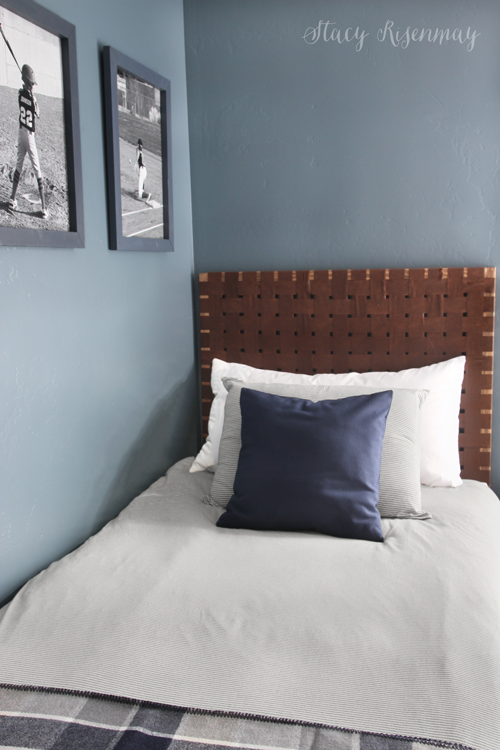
     

    Supplies For DIY Woven Leather Headboard

    2x2 Boards (4  8' boards)

    Wood Stain (Optional)

    2 ½" screws

    Faux Leather (2 yards per headboard) 

    Rotary Cutter

    Yardstick or Ruler

    Staple Gun + Staples


    How To Make A Woven Leather Headboard

    Step 1:

    Build the simple frame for the headboard. I built mine 39" x  44". I attached them together using 2 ½" wood screws and counter sunk them so they were less noticeable. I stained them with Early American by Minwax. One coat.

    Step 2:

    While the wood stain was drying on the frame, I started cutting the fabric. I was able to snag the fabric when it was 60% off. If you don't happen to catch it on sale, use the Joann Fabric 40% off coupon from their app. I used a large piece of hardboard as my work surface but a work table or cardboard would work too.  I decided since I had so many to cut out, it would be easier to make the strips of fabric be the same width as the carpenters square I was using. So instead of makerking each one, I simply used the ruler as a guide and straight edge for using the rotary cutter to cut the fabric.
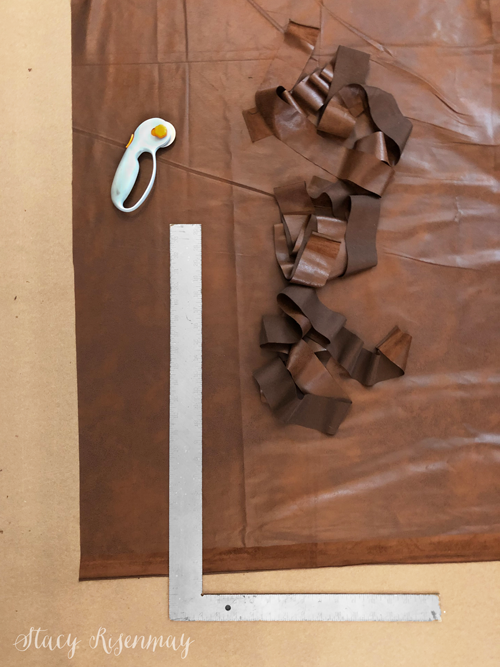


    Each headboard had 15 across and 15 down for a total of 30 strips of faux leather.


    Step 3:

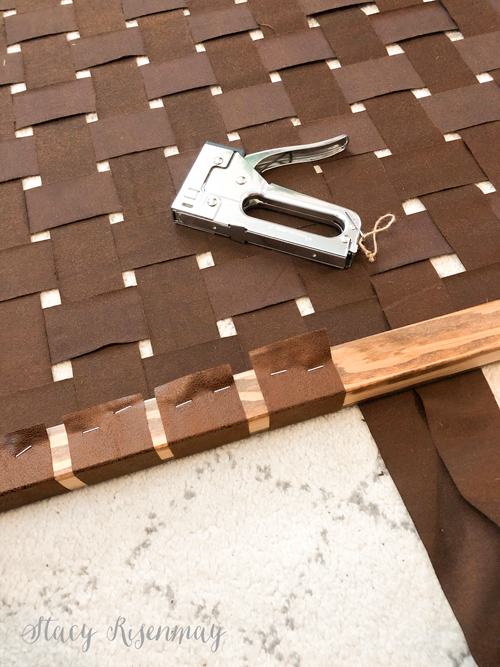
    I stapled the fabric strips about ½" apart.
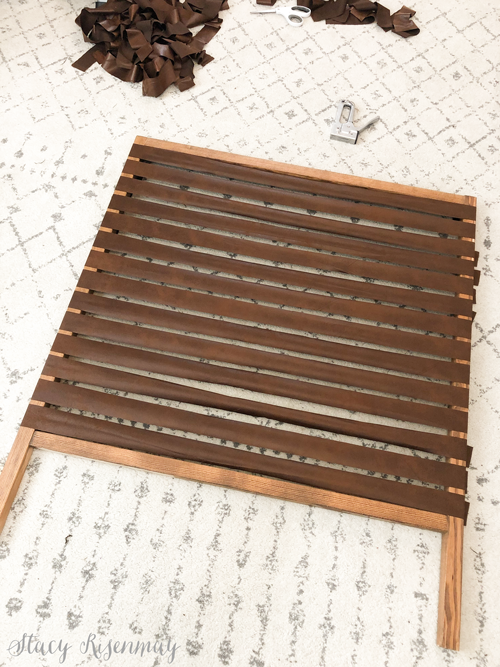
    Step 4:

    Once I had the horizontal strips stapled in place, I stapled the vertical strips along the top. Then I was able to start weaving them.
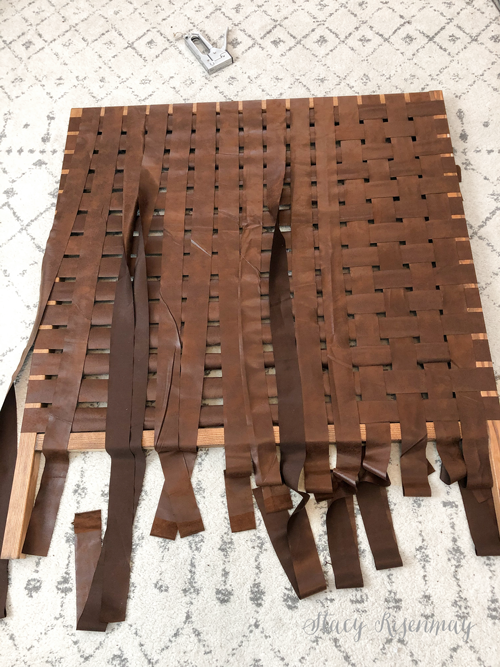


    *Tip:

    When stapling, don't pull too hard on the fabric or it will curl and distort the fabric strips.


    To mount it on the wall, I simply screwed it into studs on the wall. I placed it so the screws would be hidden under the leather. You can see the full room makeover HERE.


    So what do you think? I wouldn't mind a headboard like this in my own room. I think a woven leather headboard would go with a bunch of different design styles! 

    If you don't want a headboard but like the look of woven leather, I also made a leather pillow using the same technique! Check that tutorial out too :)


    PIN For Later:
     

    You will also like:

    • Easy DIY Outdoor ChairsEasy DIY Outdoor Chairs
    • Teen Bedroom Makeover on a Budget! {Giveaway}Teen Bedroom Makeover on a Budget! {Giveaway}
    • Top Projects of 2018Top Projects of 2018
    • DIY Woven Leather PillowDIY Woven Leather Pillow
    • DIY Floating Bathroom ShelvesDIY Floating Bathroom Shelves
    • DIY Modern Planter BoxDIY Modern Planter Box
    • Dining Room Table Makeover {Refinishing A Wood Veneer Table}Dining Room Table Makeover {Refinishing A Wood Veneer Table}
    • Easy DIY Terrarium LampEasy DIY Terrarium Lamp

    « Teen Bedroom Makeover on a Budget!
    DIY Fold Down Desk »

    Filed Under: DIY & Tutorials, Favorites, Furniture 8 Comments

    Subscribe

    for your weekly DIY fix.

    Reader Interactions

    Comments

    1. Sarah S.

      February 04, 2020 at 8:43 am

      I love the look of these! What a neat project idea and it ties in so nicely with the baseball theme. 👏🏻

      Reply
    2. Danita

      February 04, 2020 at 10:34 am

      I was wondering where you "found" those neat headboards. I should've known you FOUND a way to create them! Way to go Stacy! These are so awesome!!!

      Reply
      • Terri

        January 03, 2022 at 8:18 am

        How did you cut the leather strips so straight?

        Reply
        • Stacy

          January 09, 2022 at 10:04 pm

          I use a rotary cutter and I used a carpenter's square as a straight edge. Similar to how did it for this leather pillow:https://www.notjustahousewife.net/woven-leather-pillow/

          Reply
    3. Stephanie Trimmer

      September 23, 2021 at 10:06 am

      I’m loving this DYI headboard. I wanted the name brand version in a king size but you’re inspiring me to test my DIY skills and save a FEW THOUSAND dollars.
      I’ve got two questions-
      How well has this faux leather held up? And do you think with a king sized head board I should increase the leather strip size to 1 inch wide?
      Any guidance appreciated!!!!

      Reply
      • Stacy

        September 30, 2021 at 8:56 am

        The faux leather I used is slicker and thinner than real leather so it moves a bit when leaned against and bunches up. If I were to do it again, I would find a faux leather that was thicker. But other than that, it is great. I think going with thicker strips for a larger bed is probably a good idea.
        Good luck!

        Reply
    4. Whitney

      November 03, 2022 at 9:39 am

      Did you use the thicker side of the carpenter square for your guide? I’m going to do this for my sons baseball room!

      Reply
      • Stacy

        November 16, 2022 at 11:32 am

        Yes I did! A good tip is that thicker material will hold up better. The thin faux leather stuff I used moved and bunched up when leaned against often. Stiffer fabric or leather will work better.

        Reply

    Comment Below! Cancel reply

    Your email address will not be published. Required fields are marked *

    This site uses Akismet to reduce spam. Learn how your comment data is processed.

    Primary Sidebar

    stacyHey! I'm Stacy and am a DIY addict. I love to get my hands dirty, whether it's sawdust, paint, or dirt. My goal is to help YOU learn to fix up your home and yard. No matter the style or size, I think everyone should love their home. And it doesn't takes a big budget to get there. Let's DIY together!

    Subscribe to My Blog!

    Search this site

    categories


    Subscribe

    Footer

    Welcome! I'm sharing our adventures as we fix up our 1938 cottage. Whether it is big or small, I think everyone should love their home and I don't think it takes a lot of money to make a space your own

    About Stacy

    • Facebook
    • Instagram
    • Pinterest
    • Twitter

    My Favorites

    copyright

    All images and content are copyrighted via Stacy Risenmay unless otherwise stated. If you'd like to share my work, please link back to this blog.
    Thank you for visiting!


    Footer

    ↑ back to top

    About

    • Meet Stacy
    • Privacy Policy
    • Contact

    Categories 

    • Home Decor
    • Outdoor Projects & Gardening
    • DIY & Tutorials
    • Kid Activities
    • Recipes
    • Travel
    • Cleaning
    • Houseplants
    • Staining
    • Painting
    • Power Tools
    • Holiday Ideas

    Newsletter

    • Sign Up! for emails and updates

    As an Amazon Associate I earn from qualifying purchases.

    Copyright © 2020 Brunch Pro on the Brunch Pro Theme


    Privacy Policy
    Welcome! Thanks for visiting.
    Hi! I'm Stacy and I want to help YOU become a DIY rockstar! Sign up for my email list so each project, tip, and trick will go directly to your inbox :)
    Your information will *never* be shared or sold to a 3rd party. Pinky promise :)
    Welcome!
    Hi! I'm Stacy and I blog about fixing up our 1938 cottage. Join the thousand of others who get my posts sent to their inbox for FREE!
    Your information will *never* be shared or sold to a 3rd party.