
I was so excited when Lindsay came up with the idea to do Knocktoberfest. What the heck is Knocktoberfest? Well, 25 bloggers are sharing a knock off projects over the course of five days. If you are coming from Ashley's blog The Handmade Home, WELCOME :) She was the first stop on today's knock off tour. It all started Monday so if you need to, you can get caught up at Lindsay's blog Makely.
You know when you have an amazing idea? Like mind blowingly good. One that makes you say amazeballs even though you have NEVER said amazeballs.
And you find all the supplies you need except ONE.
And you order that one thing online and pay a boat load extra for 2 day shipping so you can have it done for knocktoberfest.
And then you find out that it is really coming from China. And it will in no way be here in 2 days.
GAH!
Yesterday when I finally realized that Plan A was not going to happen I had to scramble and come up with a Plan B. I had to be reasonable and find something that I could complete quickly and that I had all (if not most) of the supplies already.
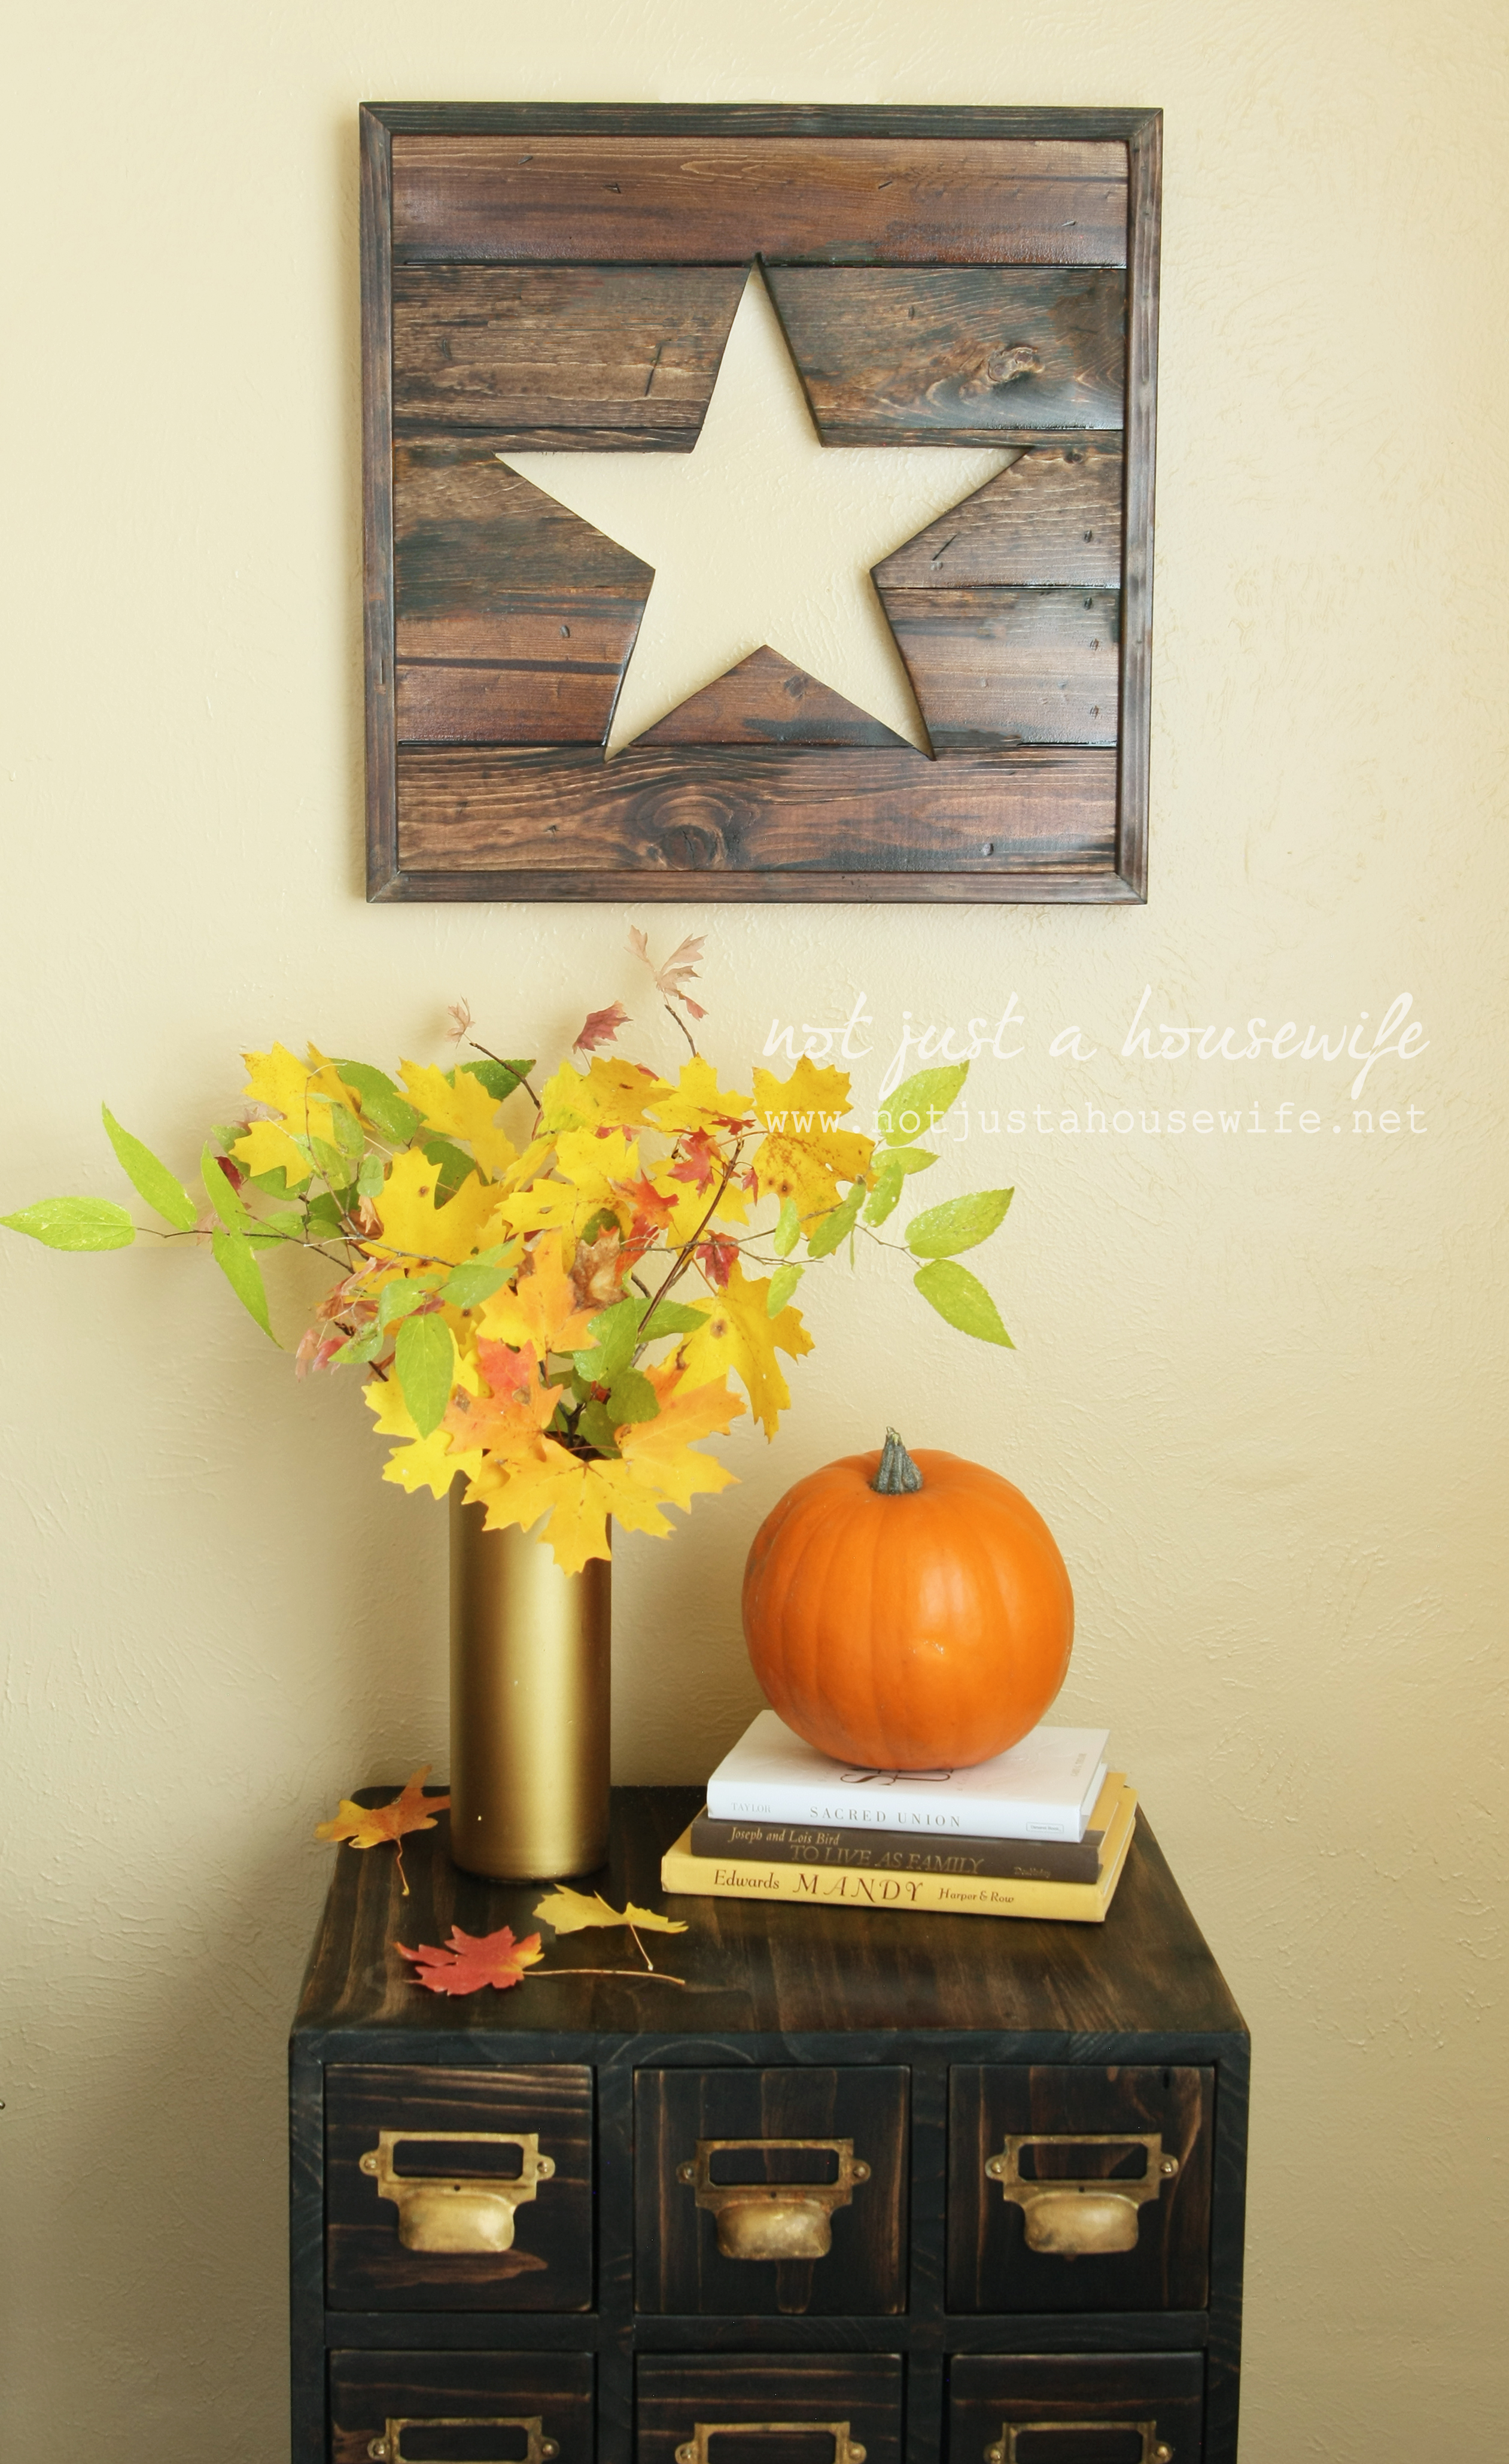
I found this beauty on Pottery Barn. And before I go any further I should state that this is my FIRST EVER knock off! So I wasn't sure if I should replicate it EXACTLY or do it close but with my taste in mind. I went with the latter :)

I knew it was something I could whip out in a day and it was something I genuinely wanted to have. It wood look good on a mantel or a wall. I was excited to make it!


I am going to show you how I did it based on the time frame and the materials I had on hand. And then I will tell you how I would have done it had I been able to go to the store and I had more time to plan.
The first step was to do the math. If I used 1x4 boards (which are really 3.5 inches instead of 4) and did 5 of them stacked, it would measure 17.5 inches tall. So I cut the 1x4 boards 17.5 inches long so it would end up being square.
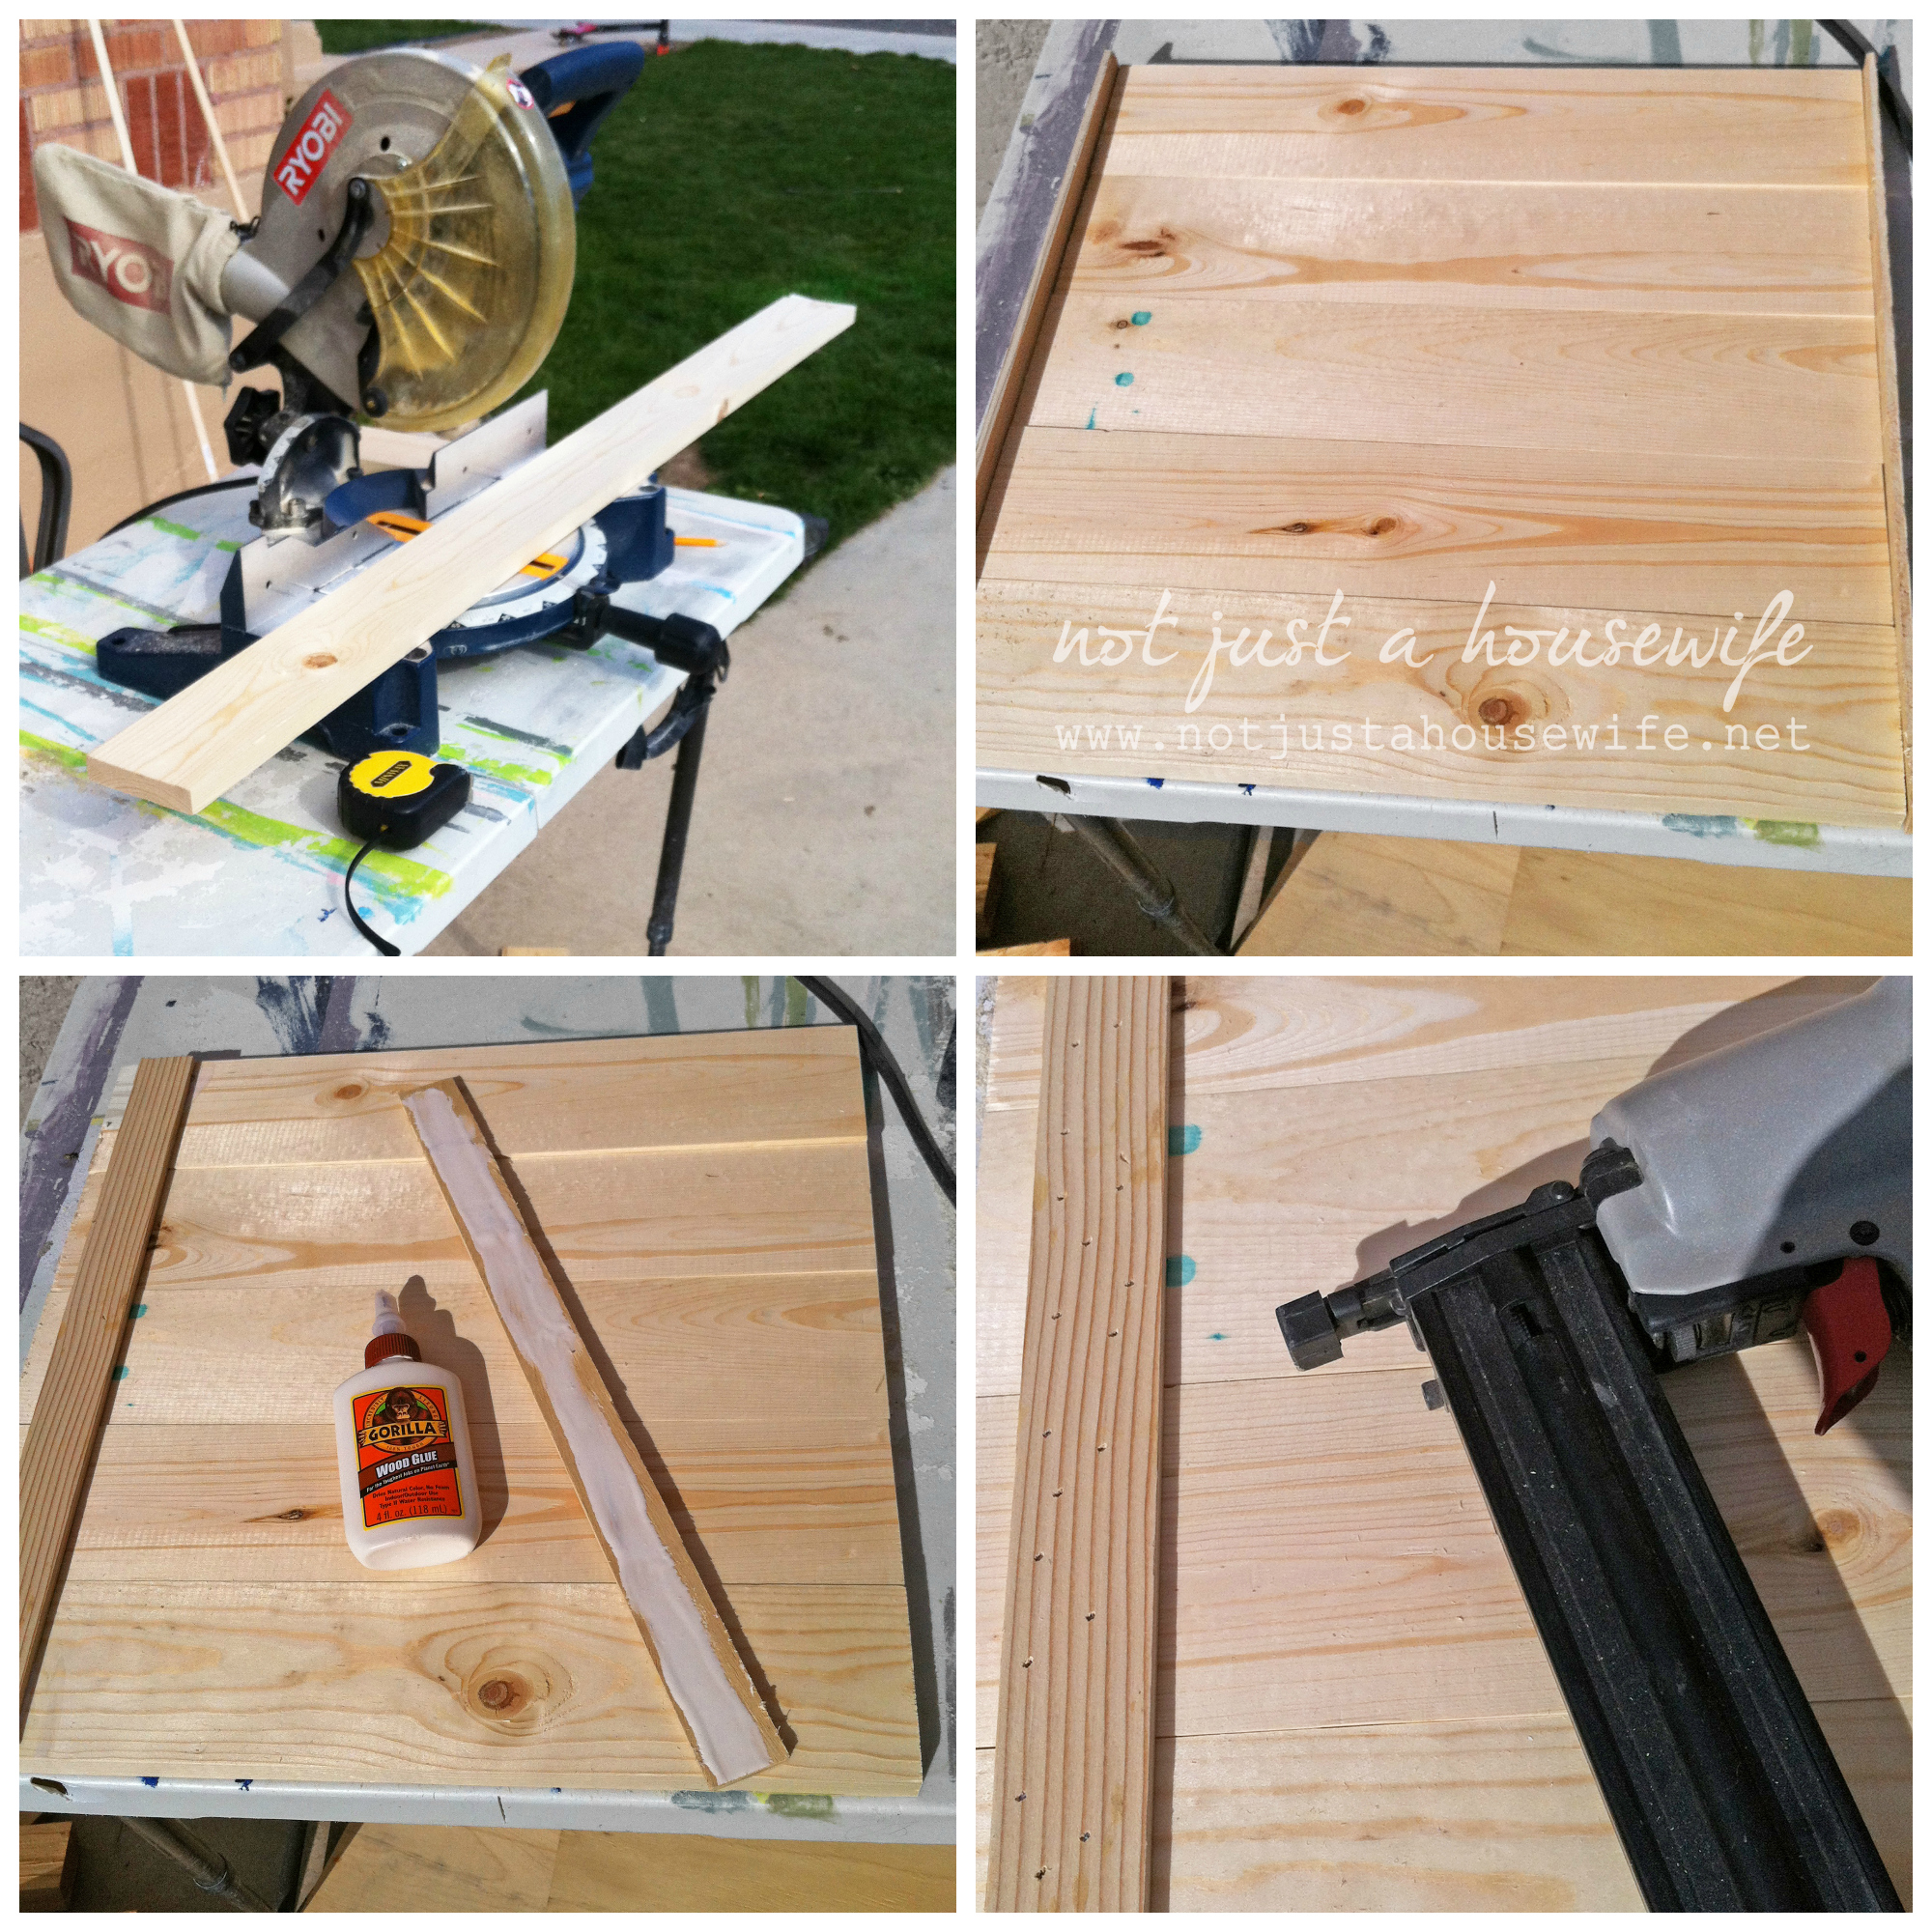
I needed a way to secure all the boards together. I had some lattice trim as well as scraps of thin plywood. I cut them to the right length. I glued and nailed them to the backside. The amount of nails may be overkill. I may have still been bitter about having to abandon Plan A.....
***Had I been able to, I would have bought ⅛ inch plywood (you can get it in small sheets at about 8-10 bucks) and cut a piece to fit the whole back of the project just like I did for my laundry room shelf.***
I used my Silhouette machine to cut out a 12" star. You can also print out a star from your computer or measure and draw lines with a ruler.
I traced the star after making sure it was center. I drilled a hole large enough for the jigsaw blade to fit. The I cut the star shape out. It was a little tricky since the boards were not super secure. This is one of the main reasons having the whole back covered would have been nice.
A piece of the star was not attached once it was cut because of where the seam was. Again, this would not have happened if the whole back was covered with thin plywood. It was simple to fix. I just added more strip to the back. It is actually really secure.

Like I mentioned above, I wanted mine to be a little more rustic than the Pottery Barn one. So I banged it a bit with both ends of the hammer. I scratched it, and banged it a tiny bit more. I sanded it really well with a fine grit (220) sandpaper before adding the trim.
I turned my miter saw to the 45 degree mark and cut the 1 inch trim like I would for a picture frame. Nailing the trim on made it even more secure.
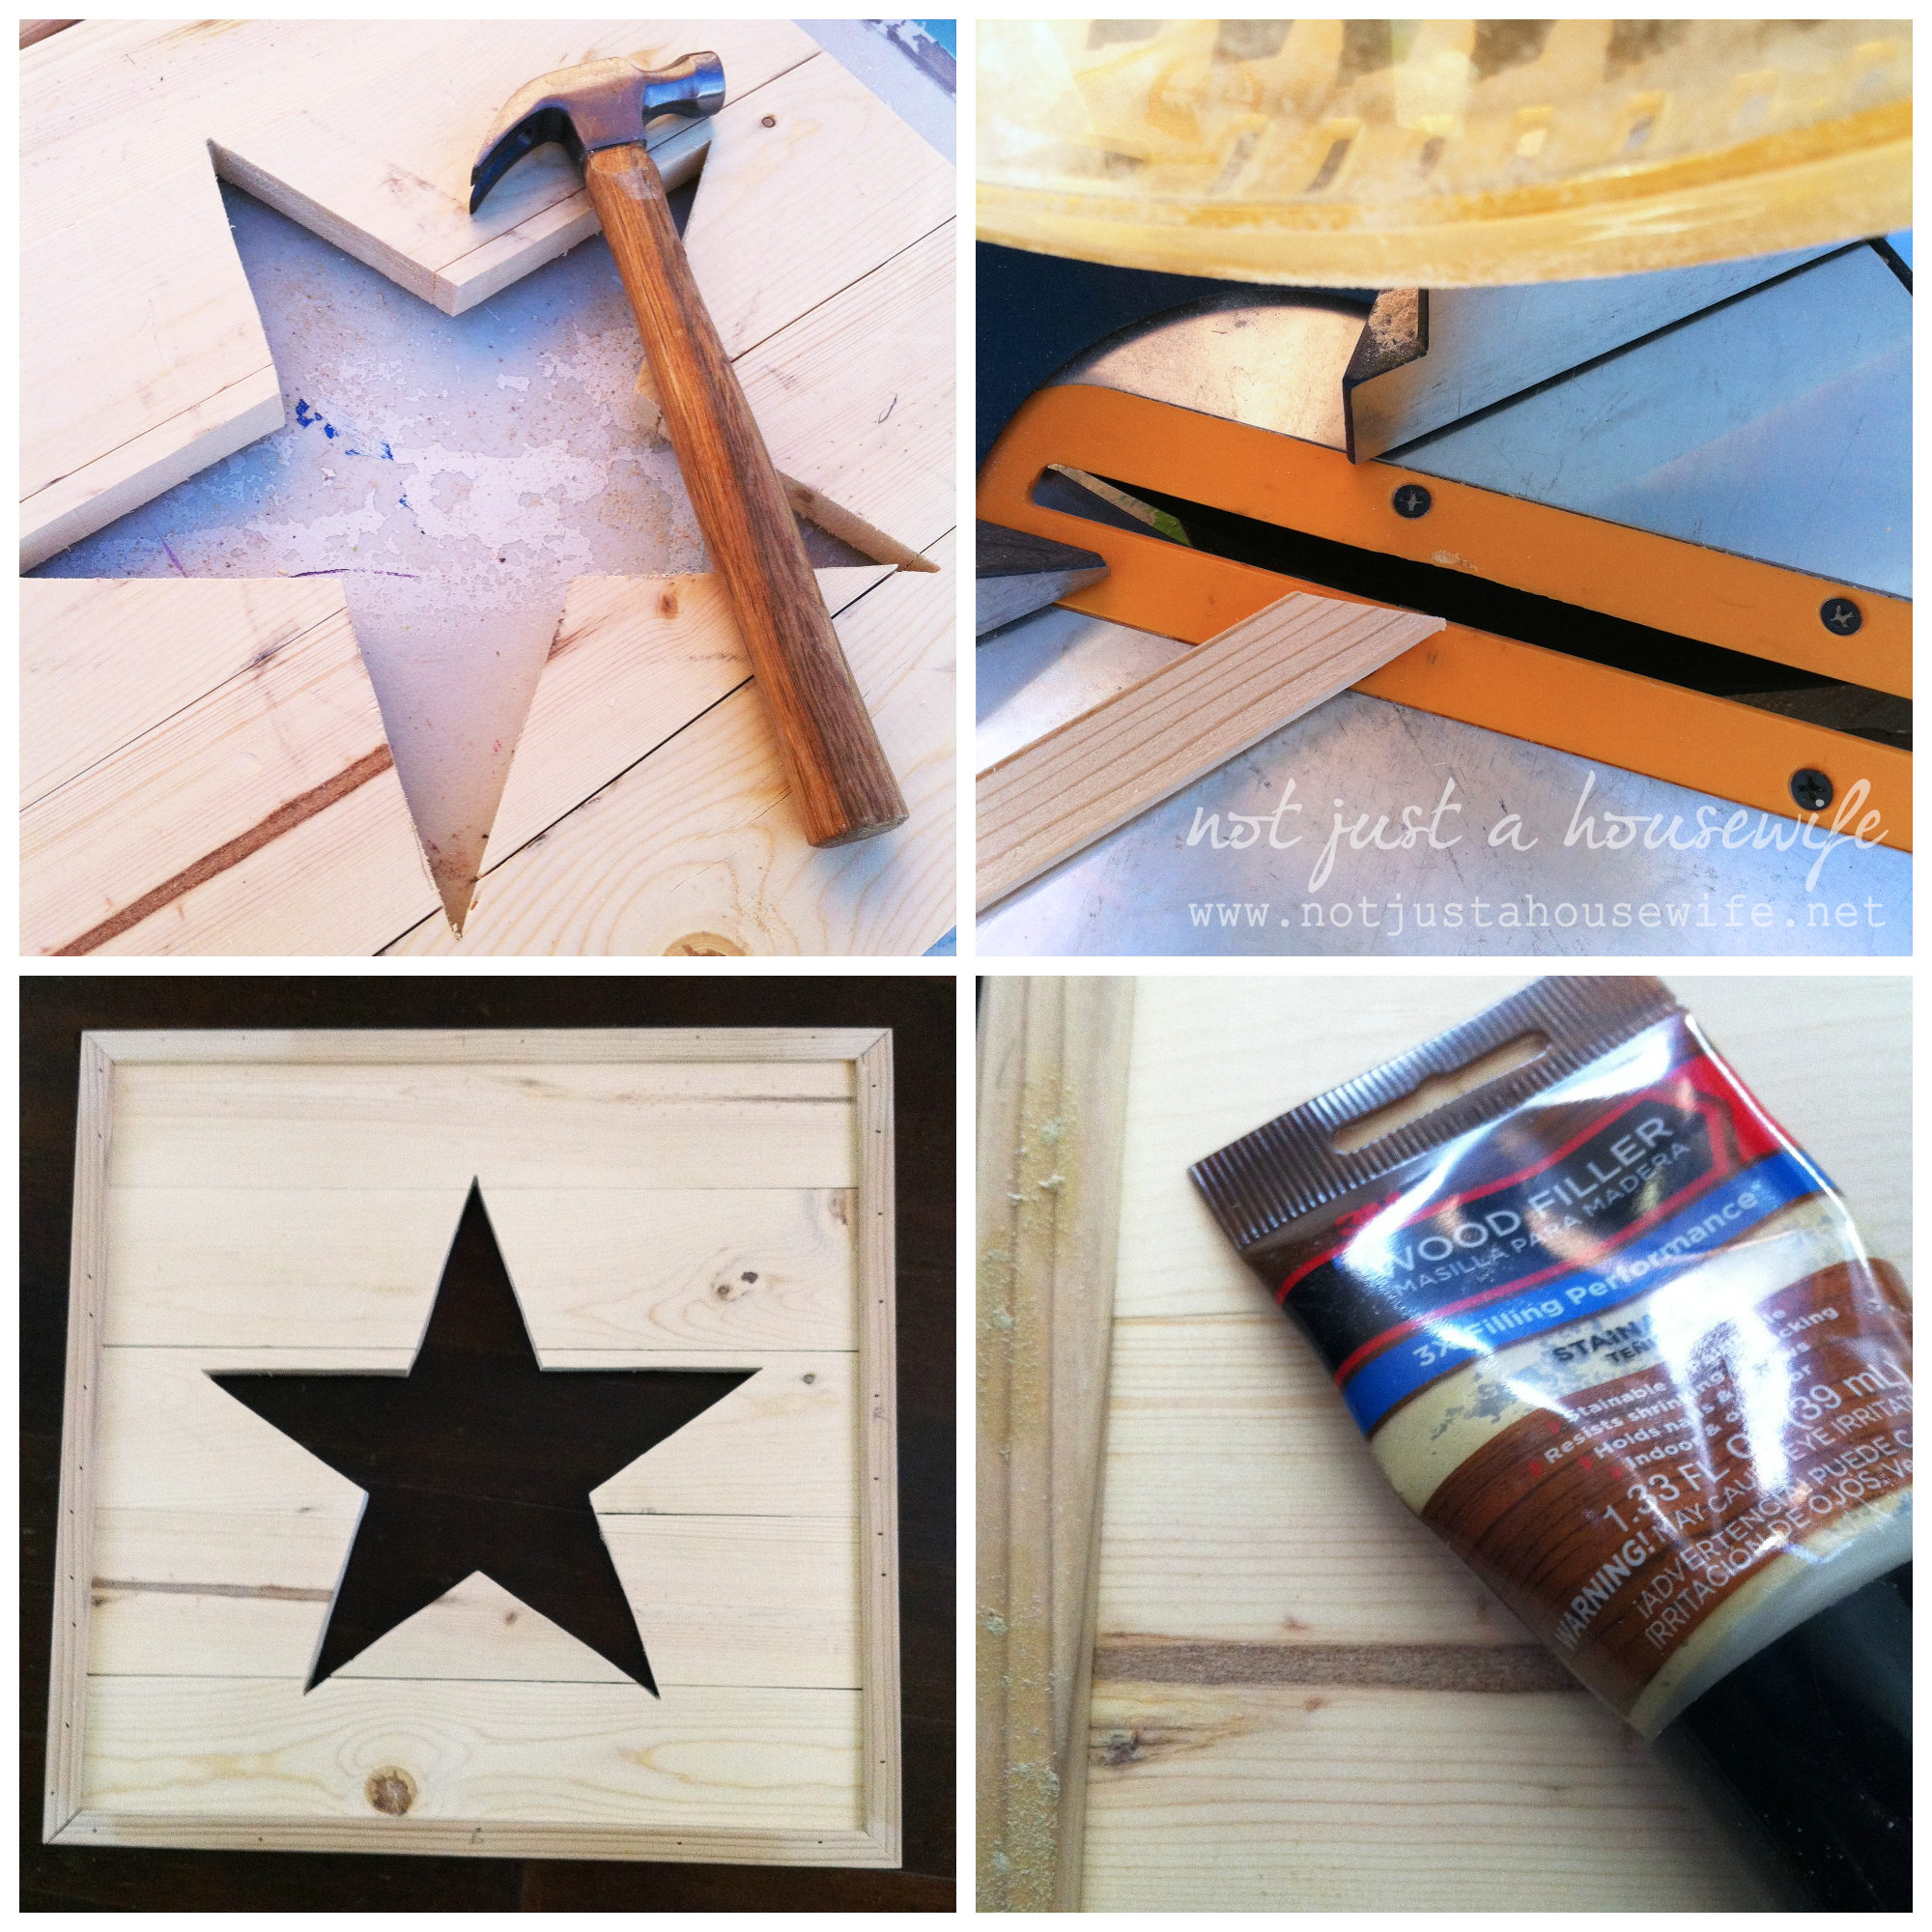
I puttied it using a stainable putty and after it had dried I sanded it smooth with a fine grit sandpaper.
I finished it off with a stain called Provincial from Minwax. It was the closest color to the PB one I had. It was actually a very close match!
The Pottery Barn sign was made from mahogany so there is less grain and no knot holes. Mine is made out of inexpensive pine so there is more wood grain and knots. I actually prefer the variation in the pine. It helps it look more rustic which is just what I was looking for.
I say $10 on here because if you were to buy the supplies that is approximately what it would cost you. BUT if you have wood on hand or you use reclaimed wood, it would basically be free.
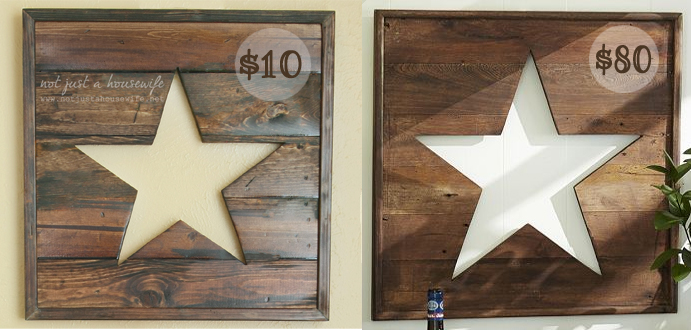
So what do you think? Does it stack up to the Pottery Barn version???
Now the next stop is Traci from Beneath My Heart. Go check out her amazing knock off!
*UPDATE* Here are all of the knock off projects :) Enjoy!
|
Monday, October 21
1. Lindsay - Makely School for Girls
|
| 2. Beth - Home Stories A to Z |
| 3. Gina - Shabby Creek Cottage |
| 4. Beckie - Infarrantly Creative |
| 5. Emily - Decorchick! |
| 6. Wendy - The Shabby Nest |
|
Tuesday, October 22
1. Donna - Funky Junk Interiors
|
| 2. Jess and Monica - East Coast Creative |
| 3. Jackie - Teal and Lime |
| 4. Jen - Tatertots and Jello |
| 5. Carmel - Our Fifth House |
|
Wednesday, October 23
1. Chris - Just a Girl
|
| 2. Lindsay - The White Buffalo Styling Company |
| 3. Melissa - The Inspired Room |
| 4. Ana - Ana White |
| 5. Marianne - Songbird |
| 6. Karianne - Thistlewood Farms |
|
Thursday, October 24
1. Roeshel - DIY Showoff
|
| 2. Sandra - Sawdust Girl |
| 3. Jamie - C.R.A.F.T. |
| 4. Cassity - Remodelaholic |
|
5. Melissa - 320 Sycamore
6. Mandi – Vintage Revivals
|
|
Friday, October 25
1. Ashley - The Handmade Home
|
| 2. Stacy - Not JUST a Housewife |
| 3. Traci - Beneath My Heart |
| 4. Brooke - All Things Thrifty |
| 5. Laura - Finding Home |
| 6. Sarah - Sarah M Dorsey Designs |


LOVE!!! I am a big Star fan :) and this is just GORGEOUS! Great job!!
I love stars too! Thanks :)
Love it. i have some pallets that I saved from my neighbor's trash. Hoping to try this with those.
I think it would look amazing made with reclaimed wood from a pallet! If I had had one that is the route I would have gone. Good luck!
I like yours better than the original! Awesome
Awww. Thanks!
I honestly like yours WAY MORE than the Pottery Barn one. Rustic was the way to go and the variations in the pine are perfect!
Thanks! I am glad I didn't try to make it exactly the same. :)
I love your version! I saw that in the catalog and thought that would be a fun knock off...and you nailed it! Thanks for sharing.
Now that I have one knock off under my belt I may just have to look through the catalog again :) It was a pretty easy one.
Love it! It definitely stacks up to the PB version, and the price tag makes it much more appealing! This is a project my sister (the other DIY Sister) would love. I will send it to her!
Thanks Bernadette!
Amazeballs indeed!!! Love it!
Hahaha! That word is growing on me :) Thanks!
Oh I love this, You did such a great job ~ Lisa
Thanks Lisa!
I love your version. The dark rich color is wonderful!
I normally always chose dark walnut but the provincial colors is awesome! I will start using it more :)
This makes me want to zip out to the shed right now and make one! Except I don't have half the tools....or skills.....Dad?!!!! :P
Have your dad help you. The tools are not as scary as you might think :)
Your version is beautiful! Rustic is always good!
Yes! Especially when paired with things that are as rustic. Rustic make my heart go pitter pat :)
Love the rustic pine version. And for the cost savings....wow!
I know! I keep thinking "How can they charge so much for things?" Ha! Because they are Pottery Barn.... :P
Stacey, You had me at star. I love it!
Thanks :) I love stars too!
I like your version so much better and boy what a savings. I'm enjoying this series. I like seeing what all you bloggers are knocking off. Very creative. Thanks for sharing.
I have never been super into knock off projects but I have to say I am LOVING this series too! So fun :)
"I may have still been bitter about having to abandon Plan A….. " You kill me! I laughed because I can totally relate. And no, yours doesn't "stack up" to the original...it outshines it by far!
Awww! Thank you! You made my day :)
I love it! Just like I love your whole living room design. So pretty! Thanks for sharing
Thank you. I was happy with how well the star fit in with my family room decor :)
I really love your version the best. The finish is gorgeous!
Thank you! I love the stain too.
I love it! Of course, being from the Lone Star State, I have an addiction to stars. :) You did a wonderful job on this and actually, I like the rustic feel better than PB's.
xo
Pat
Thanks! Rustic thing+starts= Me happy :) Maybe I should move to Texas!
Love, love, love it! That's a lot of love. I've shared, pinned and convinced my mom we both need to make one together.
Wow! Thanks for all the love :)
It's so much better than the PB version - in looks as well as savings. LOVE it, Stacy! Great job! Looking forward to Plan A. :)
Thanks ROESHEL!
I love your's even better Stacy and your vignette is so pretty. I've had so much fun visiting Knocktoberfest all week. I've been quiet up until now and just had to say how great your's came out. What a savings!!
Have a great Saturday...Tracy @ Cottonpickincute
Aww! I am so glad you decided to comment. That made my whole day :)
I tend to lean towards more rustic so I definitely think that yours is the better version. I would definitely put that in my home. LOVE !
Thank you Gina!
LOVE this!! I have a star thing going on myself and love how this one looks like more modern art vs primitive art. It's gorgeous!
I saw your version and thought it WAS the pottery barn one! I like yours better! You did an excellent job with your knock off! Now I want to make one too!
Wow! Thanks :)
You should! It was pretty simple to do.
That is gorgeous!!! You did an amazing job!
Thank you !
Great choice. I love it. Totally agree on the wood. Mad skills.
Thanks. I almost didn't go with pine but I am glad I did :)
What a great knockoff - yours is close replica but I do love the look of the pine. I NEED to make one of these for Christmas!! What size wood did you use for the frame, btw?
Thanks :)
I bought 1 inch trim. You get it in the section of the store with all of the molding. It has slightly rounded edges and is pretty cheap. I use it a lot.
this is wonderful! i like your version better. the pine gave it so much more character.
Thanks! That is the main reason I love pine :)
I like yours WAY better than the PB version!
Thanks!
Love it! This might just be added to my to do list!
Love it and you know for Christmas, wouldn't it be cute to line the start with lights, just a thought!
Wanted also to invite you to link this project up with me for Friday Follow Along party @ http://thecraftiestallie.blogspot.com/
This is so so so awesome! I like yours better than PB's it is so cute!
I love this project - and I think not having what you were waiting for was meant to be - it is perfect just the way it is! Take care, Laura
I have been ogling at this star in the PB catalog but it is too small for my space. I never considered making one myself and just love what you created! I'm looking for this exact item but 36" rather than 24". I've scoured the internet and etsy and can't find one anywhere. For a sawless mama what do you recommend or would you perhaps make one I could purchase :) ? If you don't have an etsy store you must start one!
Thanks,
Sarah
I love your star!! We made one too!!
Hi Stacy!
You definitely inspired me to tackle this project! I fell in LOVE with the star on the PB website and then when I finally went around to purchase one...they were completely sold out. So...I printed out your tutorial and went out with my husband on Friday and got all the supplies. Together we made two of them. One I am sending to my sister for Christmas. I'm looking forward to more projects my husband and I can do together for our new home. Gives us another way to spend quality time together with not spendina a lot of money!
I've been raving about your website to my sister, aunt, and friends!
Leanne P.
Thank you for sharing this, I love it!! I think it turned out better than the PB one :)