• Skip to primary navigation
  • Skip to main content
  • Skip to primary sidebar
  • Skip to footer
Stacy Risenmay
  • Home
  • About me
  • PRESS
  • Contact Me
  • My Book
    • Facebook
    • Instagram
    • Pinterest
    • Twitter
menu icon
go to homepage
subscribe
search icon
Homepage link
  • Home
  • About me
  • Project Gallery
  • Our House
  • PRESS
  • Contact Me
  • Privacy Policy
    • Facebook
    • Instagram
    • Pinterest
    • Twitter
  • ×

    Wood Bead Planter

    By Stacy 17 Comments

    I spent the weekend enjoying the most amazing weather. October in Utah is perfection.....or at least it can be when mother nature is nice :)  I also spent the weekend doing a little DIY project that you are going to LOVE!

    handing-diy-wood-bead-planter

    I drew a sketch of this project months and months ago but it kept getting pushed back. When I partnered with Minwax for several posts, I knew this could be one of the projects which gave me the opportunity to finally cross it off my list :)


    hanging-wood-bead-planter


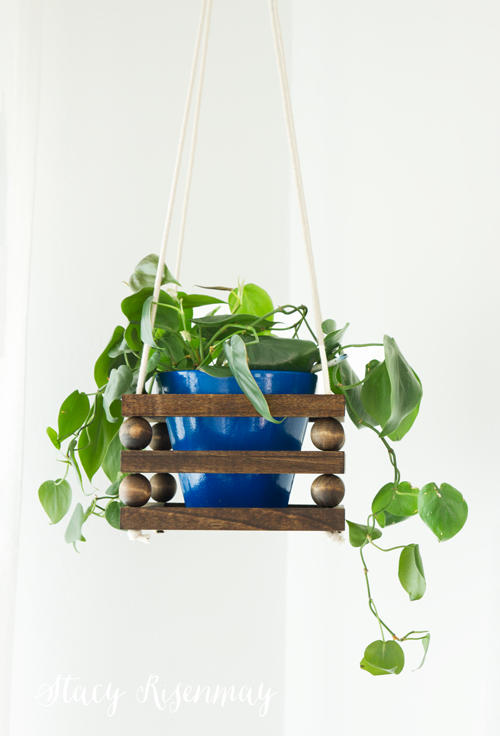
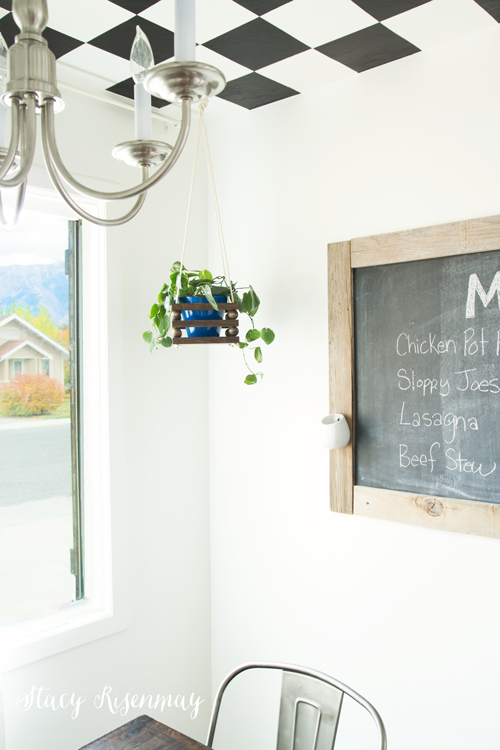
    I put it up in my dining room and I like it there but it really is for my future bedroom. Since I don't know when that room will get done, It has a temporary home that works for now.


    hanging-bead-planter

    Here is what you will need!

    Supplies:

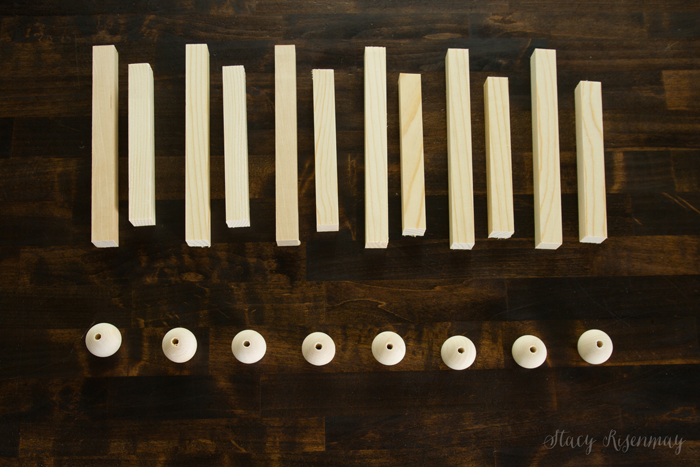
    (3) ¾" square dowels

    (8) 1" wooden beads

    sandpaper

    wood glue

    cotton rope ( I used clothes line)

    foam brush

    Minwax wood stain

    drill & drill bit the same size as hole in bead
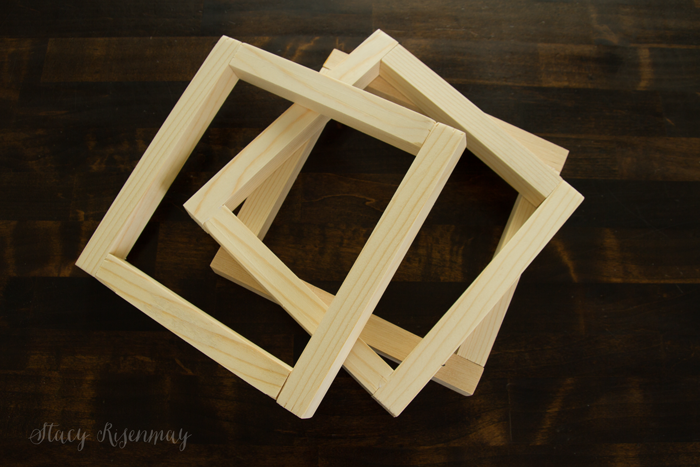
     

    Step 1

    I cut six pieces 7.5 inches long and six more pieces 6 inches long.


    wood-square-dowels-and-wood-beads


    Step 2

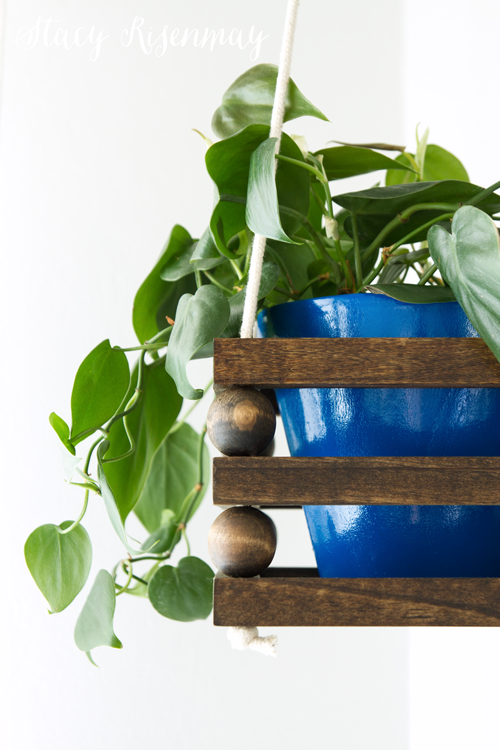
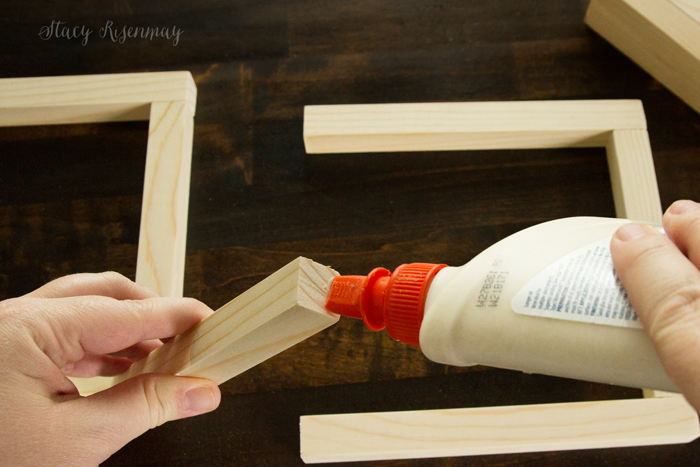
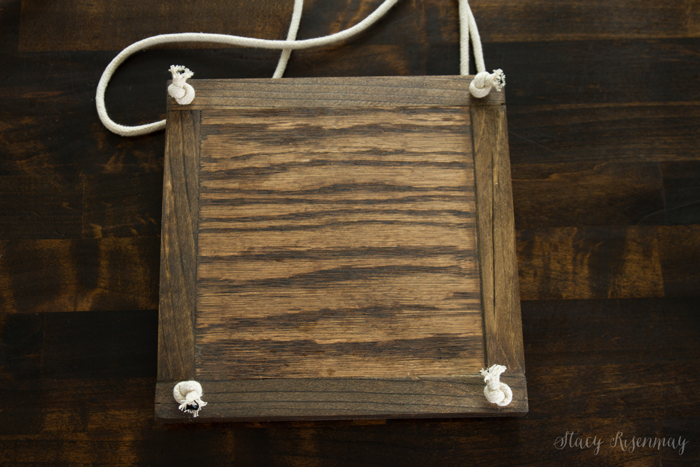
    Two of the 7.5 inch pieces and two of the 6 inch pieces will be glued together to form a square.


    glue-the-ends


    You will end up with three squares.
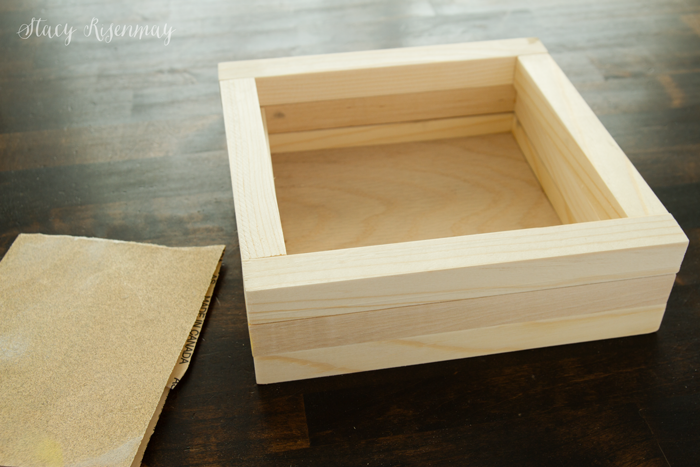
     

    squares-for-planter

    Step 3

    Trace the inside of one of the squares into a thin piece of plywood and cut it out to act as the bottom of the planter. It should fit snugly inside one of the squares. After you sand all the pieces, you will glue along the inside seam of the bottom piece. Wipe away excess glue with a damp paper towel since even the "stainable" wood glues don't stain as well as bare wood. The glue seams will be on the inside and won't really be visible once the planter is hanging.
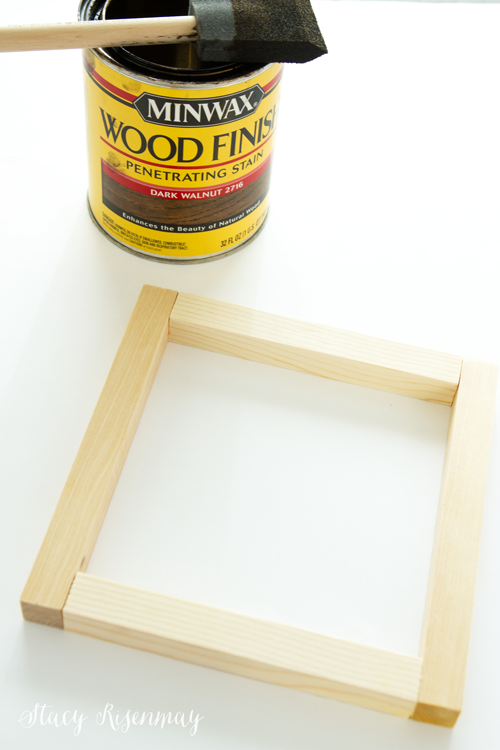
     

    final-sanding


    Step 4

    It is time to stain! I chose my old time favorite, Dark Walnut. I like to use a foam brush to apply the stain.

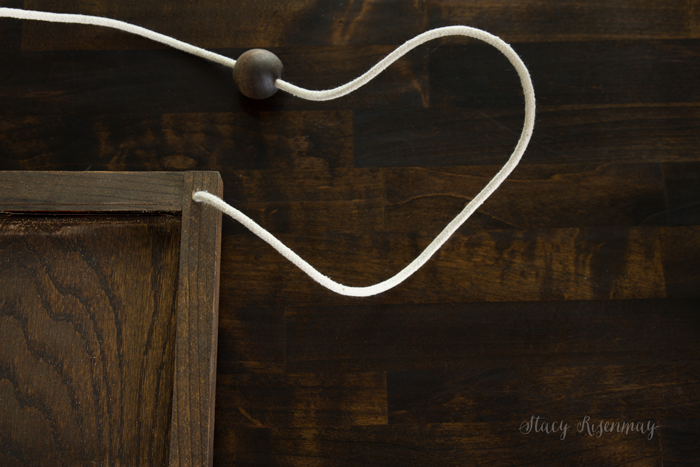
    *TIP* I used a paper clip that I straightened out a bit to dip the beads into the stain.
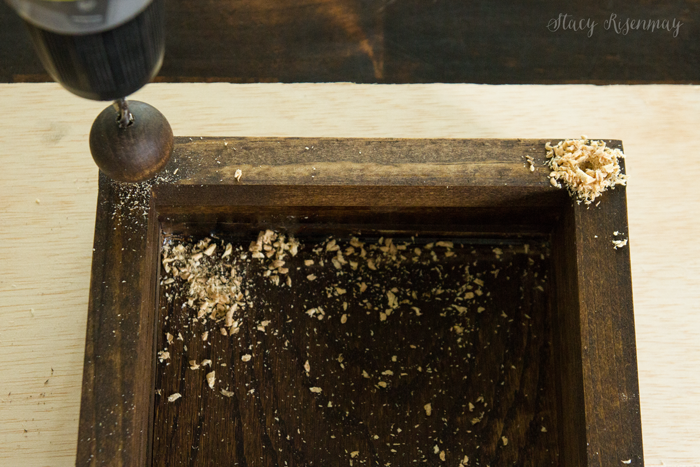
     

    stain-it-using-dark-walnut-stain


    Step 5

    Once the stain has dried, stack the squares up and using the bead as a guide, drill all the way through. Put a scrap piece of wood underneath to protect your work station.


    drilling-holes-for-rope


    Step 6

    Cut four pieces of rope to your desired length. Knot one end and add tape to the other end so it won't fray and so it will thread more easily. Thread the rope through the holes of the bottom piece.


    knot-rope-and-thread-it-through-the-bottom


    Turn it over and start threading the beads and other squares.


    thread-on-the-pieces


    Now it is ready for you to add a plant and hang it up!


    1hanging-planter


    What did you do over the weekend? And just for fun.... since it is Halloween today, did you dress up??? I was a party pooper this year BUT I was Gru from the movie Despicable Me last year and my dog Kevin was my minion.


    Here are my other Minwax Posts


    This post was sponsored by Minwax but the project idea and opinions are 100% mine :)

    You will also like:

    • To Paint or Not To Paint.... Wood FloorsTo Paint or Not To Paint.... Wood Floors
    • You asked....He answered :)You asked....He answered :)
    • Decorating Someone Else's House: Part TWODecorating Someone Else's House: Part TWO
    • DIY Father's Day GiftsDIY Father's Day Gifts
    • 2011 in review....2011 in review....
    • L Shaped Kid Beds with StorageL Shaped Kid Beds with Storage
    • How To Care For Bird's Nest FernsHow To Care For Bird's Nest Ferns
    • DIY Leather OrnamentsDIY Leather Ornaments

    « Seed Saving
    DIY Concrete Vase »

    Filed Under: DIY & Tutorials, Favorites, Houseplants 17 Comments

    Subscribe

    for your weekly DIY fix.

    Reader Interactions

    Comments

    1. Miriam

      October 31, 2016 at 7:17 am

      I LOVE Utah! Climate is much like here in Ohio. I visited Utah on the first of October in Provo for the BYU/University of Toledo football game on which my grandson plays. It was a whirlwind weekend but I didn't want to leave. LOVE your mountains. Love your blog. Thank you.
      Miriam in Ohio

      Reply
      • Stacy

        November 01, 2016 at 3:56 pm

        I have a good friend from high school who has lived in Ohio for years and she absolutely loves it. The way she talks it makes me want to visit! Thanks for your comment :)

        Reply
    2. Dyan

      October 31, 2016 at 8:05 am

      Adorable!

      Reply
    3. Carole @ Garden Up Green

      October 31, 2016 at 11:12 am

      Stacy this is super cute and I love the simplicity. I think that's why I like your projects so much everything is clean and simple. That royal blue I'm telling you I love it and once again that awesome chalk board. I'm inspired to bad I'm getting ready to sell our home. Well maybe the next place I can use some of this inspiration. Thanks for sharing your awesome!

      Reply
    4. Shonee

      November 03, 2016 at 3:11 pm

      Such a cute creative idea! I love it. This would be so perfect in my house :)

      Reply
    5. Mindi

      November 07, 2016 at 11:17 pm

      I love this so so much Stacy!

      Reply
    6. Cassie

      November 19, 2016 at 10:41 am

      Very cute plant hangar! Was thinking about making one for my college-age granddaughter who lives in the dorm. Please tell me, what did you to at the top, where it hangs from the ceiling? Thank you!

      Reply
      • Stacy

        November 19, 2016 at 10:43 am

        How fun! I just wrapped the extra rope around the hook in the ceiling. The hook I used was very utilitarian and so I thought it looked better wrapped so it looked like a big knot. You don't have to do that if you don't want.

        Reply
    7. Chrissy

      November 27, 2016 at 6:20 am

      This is so cute - adding to my things to build list.

      Reply

    Trackbacks

    1. 18 Creative DIY Planter Ideas says:
      March 2, 2017 at 4:00 am

      […] Wood Bead Planter […]

      Reply
    2. Meet Stacy! - Sawdust 2 Stitches says:
      November 28, 2018 at 11:11 am

      […] planters for them. This slatted one has a modern feel and was super easy to make! I have made a hanging beaded planter, a set of three hexagon planters, and even one that was made from a tree […]

      Reply
    3. 10 Creative Ways to Hang a Plant Outdoors - Craftered says:
      December 18, 2019 at 10:33 pm

      […] Take a cue from this blogger and feature a colorful pot in your homemade planter for a pop of color. Full Tutorial […]

      Reply
    4. DIY hängender Pflanzer – Calculating Infinity says:
      May 7, 2020 at 11:50 pm

      […] http://www.notjustahouse … […]

      Reply
    5. 25 DIY Wall Planters Teach You How To Greenify Your Home - mind-shopping says:
      February 11, 2021 at 12:20 am

      […] love this sophisticated wooden bead hanging wall planter from Notjustahousewife that would look fantastic in any kitchen or bedroom. The wooden hanger offers a sturdy home for […]

      Reply
    6. 21 fantastische DIYs, die Ihnen helfen, Ihren eigenen hängenden Garten zu gestalten - My Trending says:
      March 27, 2021 at 7:11 am

      […] Mit quadratischen Dübeln, Holzperlen, Sandpapier, Holzleim und Baumwollseil können Sie ganz einfach einen selbst herstellen. Details sind Hier. […]

      Reply
    7. 23 Cool DIY Wall Planter Ideas For Vertical Gardens – The Self-Sufficient Living says:
      April 17, 2021 at 3:53 pm

      […] is a great idea for brightening up a dim corner of a room- build this lovely wooden bead hanging planter and grow a plant that thrives in a low light […]

      Reply
    8. 35 Cool DIY Wall Planter Ideas For Vertical Gardens – The Self-Sufficient Living says:
      April 17, 2021 at 4:00 pm

      […] is a great idea for brightening up a dim corner of a room- build this lovely wooden bead hanging planter and grow a plant that thrives in a low light […]

      Reply

    Comment Below! Cancel reply

    Your email address will not be published. Required fields are marked *

    This site uses Akismet to reduce spam. Learn how your comment data is processed.

    Primary Sidebar

    stacyHey! I'm Stacy and am a DIY addict. I love to get my hands dirty, whether it's sawdust, paint, or dirt. My goal is to help YOU learn to fix up your home and yard. No matter the style or size, I think everyone should love their home. And it doesn't takes a big budget to get there. Let's DIY together!

    Subscribe to My Blog!

    Search this site

    categories


    Subscribe

    Footer

    Welcome! I'm sharing our adventures as we fix up our 1938 cottage. Whether it is big or small, I think everyone should love their home and I don't think it takes a lot of money to make a space your own

    About Stacy

    • Facebook
    • Instagram
    • Pinterest
    • Twitter

    My Favorites

    copyright

    All images and content are copyrighted via Stacy Risenmay unless otherwise stated. If you'd like to share my work, please link back to this blog.
    Thank you for visiting!


    Footer

    ↑ back to top

    About

    • Meet Stacy
    • Privacy Policy
    • Contact

    Categories 

    • Home Decor
    • Outdoor Projects & Gardening
    • DIY & Tutorials
    • Kid Activities
    • Recipes
    • Travel
    • Cleaning
    • Houseplants
    • Staining
    • Painting
    • Power Tools
    • Holiday Ideas

    Newsletter

    • Sign Up! for emails and updates

    As an Amazon Associate I earn from qualifying purchases.

    Copyright © 2020 Brunch Pro on the Brunch Pro Theme


    Privacy Policy
    Welcome! Thanks for visiting.
    Hi! I'm Stacy and I want to help YOU become a DIY rockstar! Sign up for my email list so each project, tip, and trick will go directly to your inbox :)
    Your information will *never* be shared or sold to a 3rd party. Pinky promise :)
    Welcome!
    Hi! I'm Stacy and I blog about fixing up our 1938 cottage. Join the thousand of others who get my posts sent to their inbox for FREE!
    Your information will *never* be shared or sold to a 3rd party.