

Hi! I’m so excited to host this new sewing series at Not JUST a Housewife.
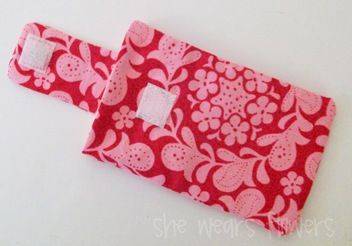
Today I will show you how to make a pretty lined iPod or phone case. My phone is always laying around or stuffed in my pocket and tends to get really dirty. Now, I just slide it in this soft case. It it is still light and small and can be stuffed easily in a pocket or left laying around, but it is a little more protected.
I am sure there are other tutorials online for this, but when I searched all I could find were patterns for sale. I didn’t want to buy a pattern—I knew this wasn’t going to be too hard to figure out—and it wasn’t! I did make a couple before I hammered out all of the little issues, but it wasn’t hard and didn’t take too long!
Materials
fabric (outside)
lining fabric (inside)
Velcro square
single side fusible, lightweight interfacing
ruler
Instructions
Make a pattern by tracing around your phone or iPod. Angle your pencil to be sure you are tracing right next to the phone.
Use a ruler to mark a seam allowance plus space for the the height of the phone. I measured my phone and it is almost ½ inch tall so I added ¼ inch to each side to allow for that. That means my seam allowance for the pattern (only) is ½ inch on each side—¼ inch seams plus ¼ inch space for the height. It is okay to have a little extra on the top and bottom, too, so I added ½ inch all of the way around.
Use a ruler to make those marks into straight lines and cut out the pattern piece.
Using a ruler, make a smaller rectangle for the closure tab. I just put my phone on the paper and estimated how big I wanted it to be. You can see where I changed my mind and made the tab a little wider. You will need to add ¼ inch seams on all sides.
I wanted the ends to curve, so I used the curved corners of my phone to trace the curve. Cut out pattern.
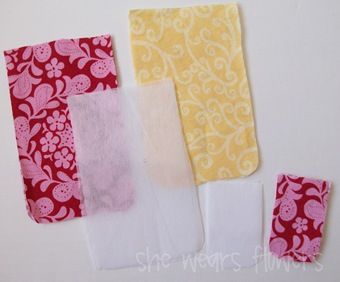
Using your patterns, cut two of everything from the fabric and interfacing.
(2 outside fabric pieces, 2 lining pieces, 2 tab pieces, 2 fabric-sized and 2 tab-sized pieces of interfacing)
NOTE: I thought I wanted the bottom ends to curve but it turned out to be a mess (Take 001) so just ignore that in my pictures and cut it out in a rectangle except for the tab pieces.
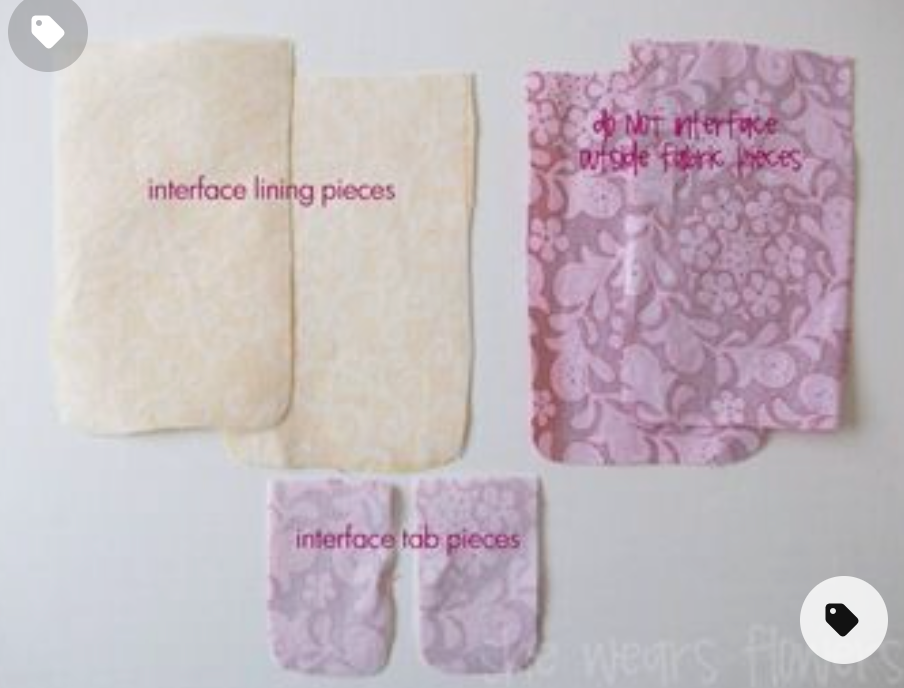
Iron on the interfacing according to the manufacturer’s directions. You need to put interfacing on each of the lining pieces and each of the tab pieces. The outside fabric pieces do not need interfacing.
Sew a Velcro square in the bottom center of one tab piece. Keep those ¼ inch seam allowances in mind as you do this. (Normally, I would use white thread for this, but it doesn’t show up well for a tutorial!)
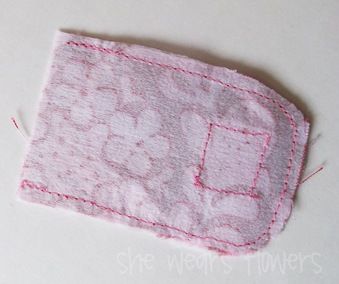
Place both tab pieces right sides together. Sew around three sides with a ¼ inch seam allowance.
Trim to ⅛ inch and clip curves to help it lay more smoothly when it is turned right side out.
Turn right side out and press seams flat. Do not iron over the Velcro—just iron the edges near it.
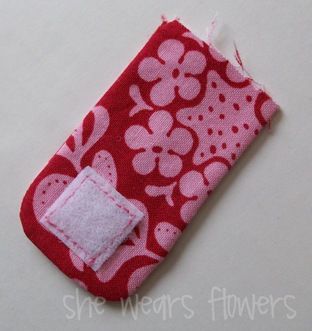
Center the tab piece on the outside fabric piece with the Velcro side facing up. Line up the raw edges.

Place a lining piece face down (right sides together) on top of the outside fabric and tab pieces.
Sew along the top edge with a ¼ inch seam allowance.

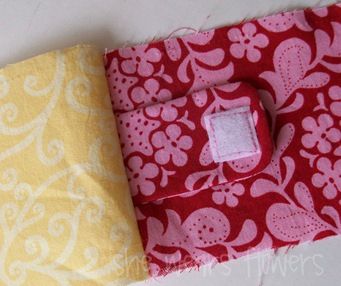
Repeat with the other fabric and lining piece. There will be no tab in this section.
Open out both sections and press flat. Press the seam towards the lining piece.
Place the two sections together with right sides together and matching lining to lining and outside fabric to outside fabric. Pin at the seams to be certain this part is in line. Don’t stress if the ends don’t line up exactly--remember that we had a little extra seam allowance anyhow.
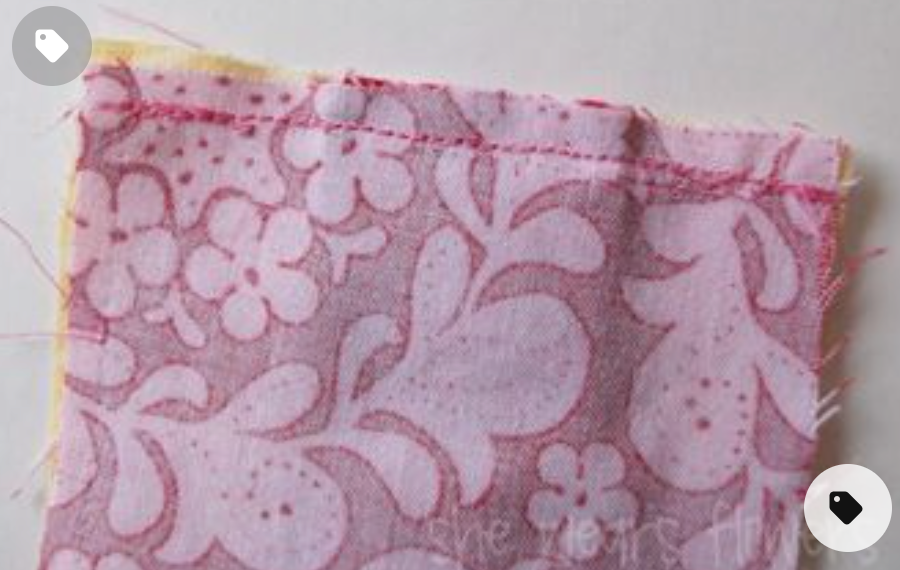
Sew the two long sides making certain the center seams are lined up. Leave ends open.
Turn right side out and stuff the lining inside the case. The interfacing makes it a little stiff, but it is very pliable.
Flip the whole thing inside out and slide the lining up out of the way. (You can probably turn it this way in the previous step, but I always have to make sure I have done it right before I sew it together!) The outside fabric pieces will be right sides together. Line them up and sew the end with a ¼ inch seam allowance.
Trim the corners.
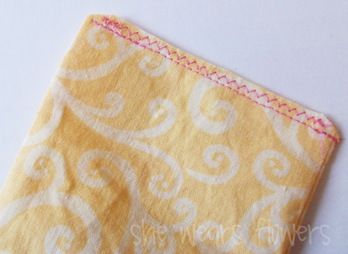
Pull the lining section over the outside fabric pieces you just sewed. Line up the ends, and sew using a ¼ inch seam allowance. I also zig zag stitched and trimmed along the edge since this is the right side and I don’t want it to fray or to pull out threads every time I pulled my phone out of the case. Stuff it back into the case.
Press everything flat especially around the top where the lining and fabric meet together. You can also topstitch around the top, but I didn’t think it was necessary--and I am a little opposed to sewing tiny things!
You will need to hand sew the other half of the Velcro onto the front of the case. You can actually machine sew it to the front before you sew the pieces together, but I have found that it never lines up regardless of how well I mark it. It is worth it to hand sew this little piece. I used a backstitch to sew it really securely.
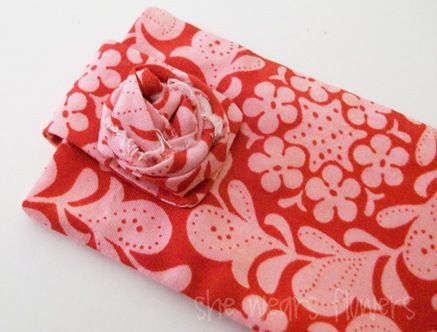
I added a fabric rosette to the end and hand sewed it on as well—just a little more pretty stuff for my case! You could do ruffles or beads or all kinds of things.
Now it’s pretty from any angle! I love the way it turned out.
And, my phone isn’t quite the crumb catcher it used to be-–YAY!
I’ve been a little crazy trying to figure out where to start and what to share so feel free to leave a comment telling me what you think about this tutorial, questions you may have and ideas for projects you’d like to see in the future!
You can also email me directly at shewearsflowers(at)gmail(dot)com.
Thanks for having me here Stacy!
Go visit Tammy's blog for more cute ideas!


I think your tutorial is awesome. I have been sewing for a bit but I consider myself a newbie as I still have troubles. Your tut was easy for me to understand and I think I could actually do it! Thank you, I may be brave enough to try this one!
This is great! Thanks for sharing!
I'm a novice with my sewing machine and have been putting off really learning for years but this looks so cute and straightforward I'm going to give it a try. I will post about it on my blog hopefully in the next week or two. Thanks for the inspiration!
can't wait to try this-i need a case for my phone and my girls need ones for their ipods-the flower on the front is perfect!
What a cute idea! I need to make one!
What a great idea, and it looks super easy. Thanks!
Brilliant tutorial. Im going to make one later today. x
Thank you for taking the time to post this tutorial!
I have made several if these as gifts! Quick and easy and so sweet! Instead of the lining and interfacing I used felt though, adds a bit of cushioning! Thanks again!
Thank you for this wonderful tutorial, Stacy! If it's not too much trouble, I was wondering if you could briefly explain how would you go about attaching an additional pocket and a button instead of velcro and at what point in the instructions would you do this? Thank you in advance!
Unfortunately this was not my post. Another blogger was a guest and she no longer blogs. I have no way of getting in touch with her. I am sorry!
Hi Angela,
I am a beginner as well but for a pocket I would sew it on the outer fabric before stitching the lining as indicated above. So take one piece of outer cloth and sew the pocket on then continue with the tutorial.
The button can be sewn on the case when finished with everything and the button hole on the strap instead of the velcro.
I hope that helps you. I do realize it is a couple months later.
Fantastic tutorial. I have made three of these now. It is a good way to use up scraps of cloth. I also used fleece as my inner fabric. Thanks.
Thanks for this tutorial. I have made three cases now using scraps including old jeans. It is a quick and easy gift to make
I am definitely going to try this. :) One tip, if you don't want to see the sewing in the velcro, you can use fusible velcro. Works like a charm.
Thanks for this I have just made one without a sewing machine so took me a while but it's worked out nicely.
Thanks for this I have just made one without a sewing machine so took me a while but it's worked out nicely.
Yes your tutorial is very easy to understand Thank You!
I just made one for my sister and she loved it :) thanks for sharing !
My sis has just asked me to make her an iphone case-I searched on pintrest and found u!!
Ur tutorial seems clear so (hopefully) I won't mess it up (too much!).
May even make myself and my DD one too,many thanks
NB-look forward to reading all ur other posts.x
My sis has just asked me to make her an iphone case-I searched on pinterest and found u!!
Ur tutorial seems clear so (hopefully) I won't mess it up (too much!).
May even make myself and my DD one too,many thanks
NB-look forward to reading all ur other posts.x
Thanks for a great tutorial. Am a complete novice but managed to follow all the information really easily. Delighted with the results! Thanks again.
Your instructions were perfect and easy to follow. I just finished my case and I love it! I sewed a slightly thick pellon on both of the linings instead of interfacing and it gave the case a nice padding. Thanks so much for posting this pattern and showing us how to make it.
I know this post is 5 years old lol, but I still wanted to say thank you. I used it as a reference today when making a cover for my husband's ipad mini. It was very versatile and provided a great basis!
Thanks!!
Outstanding post, I conceive blog owners should learn a
lot from this website its real user genial. So much
great info on here :D.