
When I was working on my friend's laundry room awhile back, I knew I had another room refresh coming up as part of my collaboration with ScotchBlue so I asked her if she had any other rooms that she wanted to have made over. She said she would love for me to tackle her little girl's room. A GIRL'S room. People. This was big. As a mom of four boys and a tomboy myself, I was about to enter uncharted waters. This would be a first for me.
I had a few goals.
1. Don't panic
2. Do a bedroom "refresh" instead of buying or creating everything new
3. Only spend around $200 including painting supplies
4. Complete the room in two days (a weekend project)
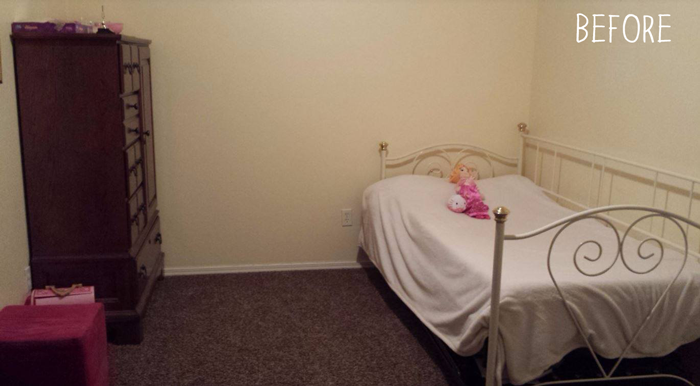
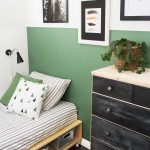
When I was in the planning stages I kept thinking of the color combination white, gold and blush. I said to my friend that I wanted a "barely there pink". A few things happened throughout the next phase that let me know this was actually meant to be. I went to pick out the pink paint and looked for one that was super light pink. We didn't need Pepto-Bismol walls! I found the perfect one and low and behold it was called "barely blush". I knew that my friend's daughter had a daybed and since we were doing a refresh, I wanted to use the existing furniture. I was worried it would need a complete overhaul. I kept chanting in my head "don't be dark and bulky, don't be dark and bulky." You guys. The bed ended up being WHITE AND GOLD. I kid you not. I could not have planned it better myself. So here I was, a tomboy who has never been overly fond of pink, decorating a girl's room..... in PINK.
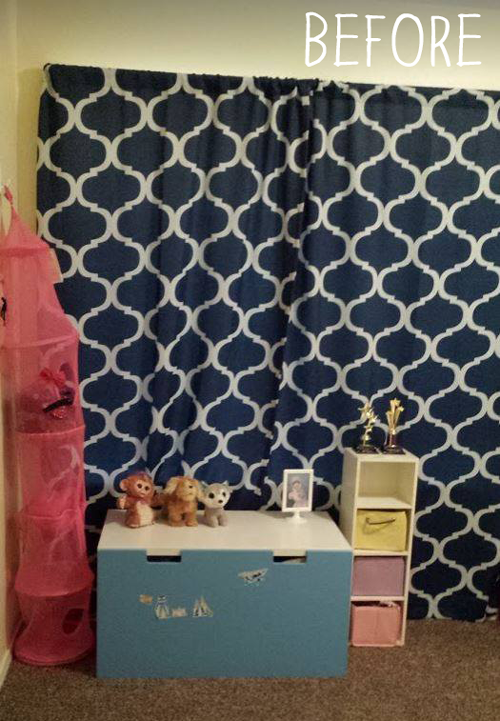
Here is what it looked like before.
And here is what it looked like AFTER!
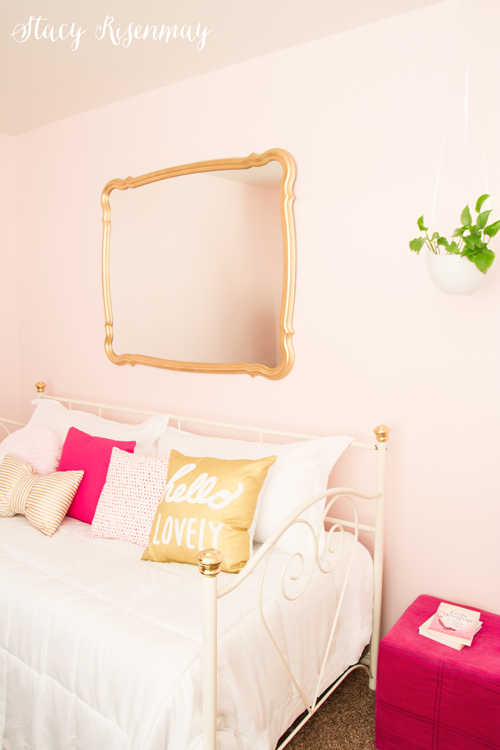
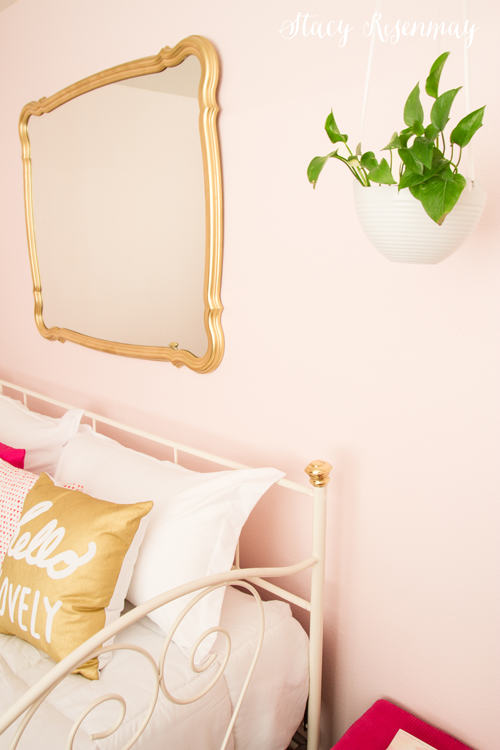
You might recognize the mirror as being the one from my secret garden. I had to take it down because of planting some higher shrubs against the fence that would cover up the mirror. I think it looks fabulous spray painted gold and hanging on the wall! Shane and I made sure to find a couple of studs and secured it well.
The hot pink cube was already in the room and now acts as a bedside tale.
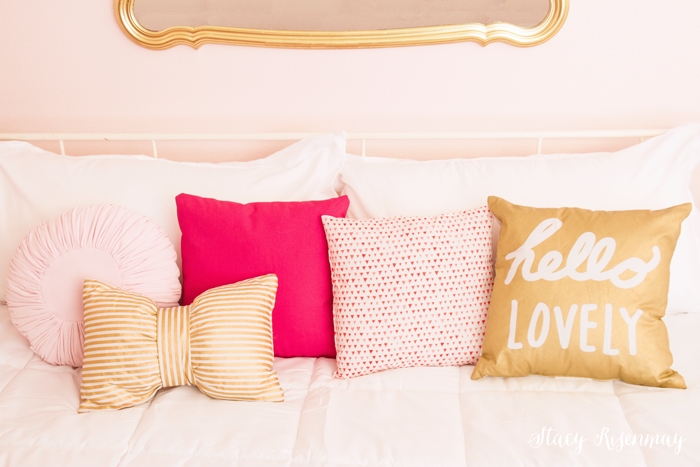
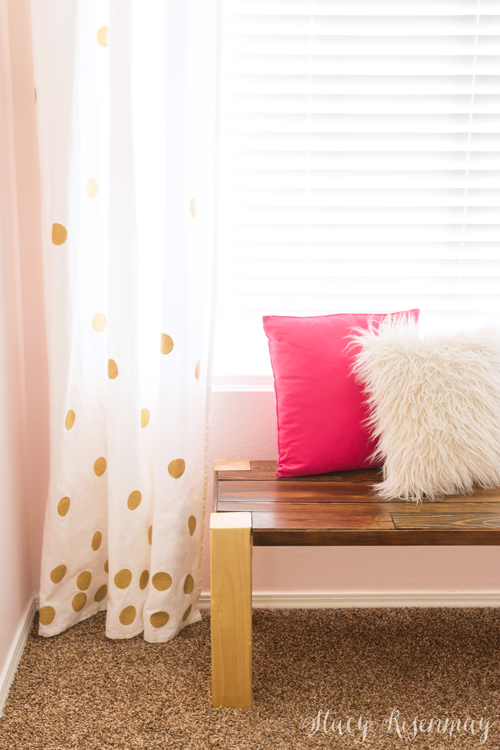
When it came to the budget I knew I would be fine with everything else but the pillows worried me. I knew they could potentially take up a big chunk of the money. I bought fabric and sewed the hot pink pillows as well as the pink triangle pattern pillow. The fur pillow is from Walmart and the others are from Target. Shane stopped by Target after work and facetimed me so I could see the selection. Bless his heart, here he was walking around holding his phone out and talking to it about pink pillows while others were giving him weird looks. He found a couple of them on clearance! I think the pale pink one was only $6. So the pillows were not my downfall after all :)
I painted gold polka dots onto $20 IKEA curtains. It was fast and easy since I did a confetti design instead of trying to cover the whole thing in circles.
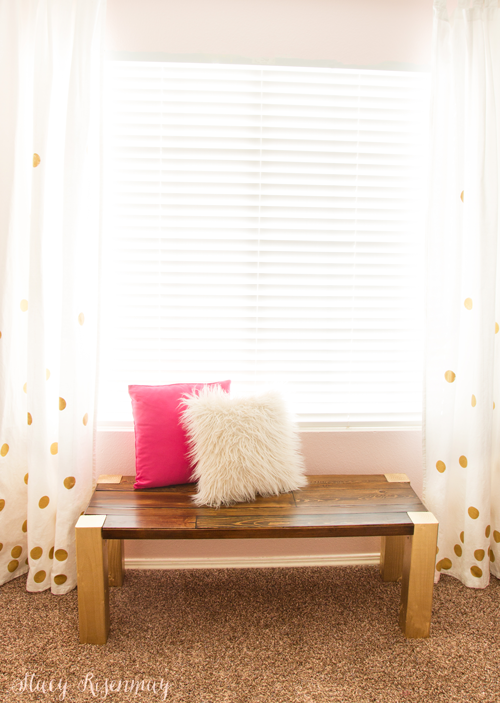
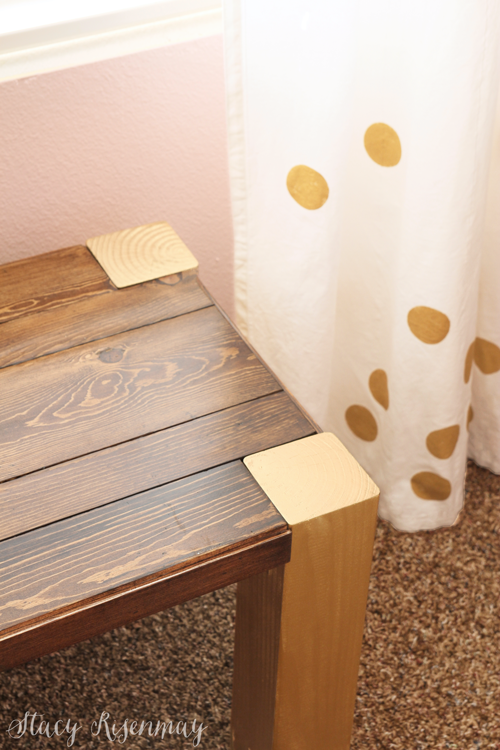
I had pretty much run out of money but still did not have something to go in front of the window. My first thought was to build a toy box because that was what was there before. I decided against it because this girl is entering the preteen stage and because her closet is pretty freaking big so storage was not really an issue. I opted for a bench that would create additional seating if she had friends over to hang out.
I made it out of scrap wood I had in my garage. I think if I would have bought the wood I would have made a few tiny adjustments, but since I was limited with the pieces I had on hand, I was did what I could. My kids really loved it and want me to make another one for us so there may be a tutorial coming in the near future!
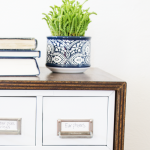
I didn't forget about her dresser. It has been made over as well.
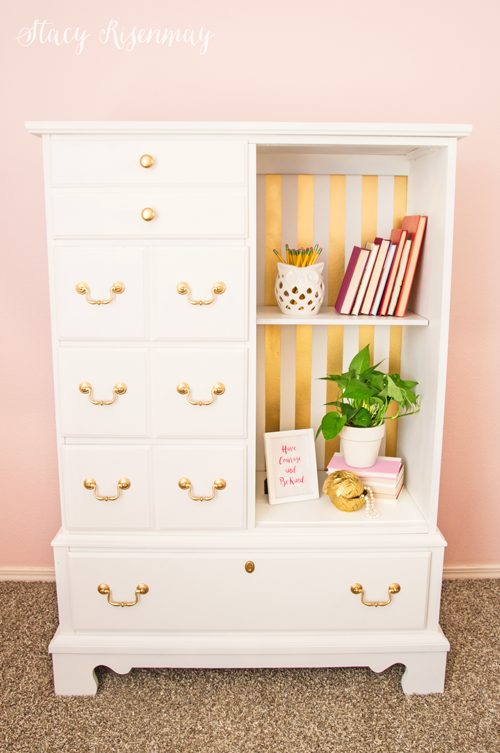
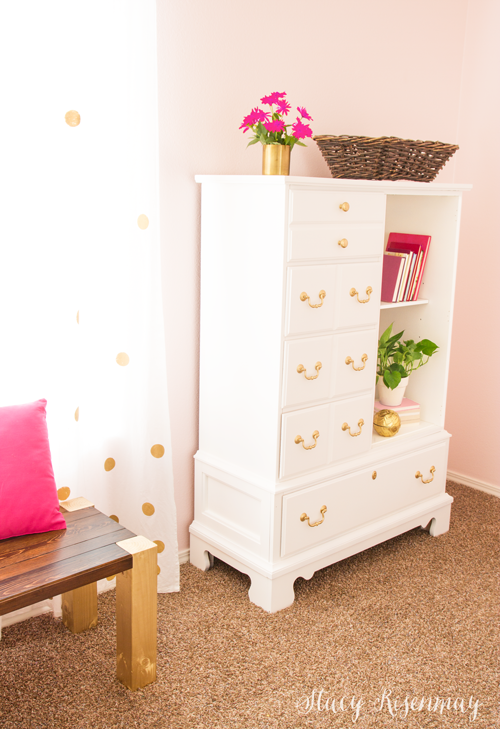
I have a whole blog post about how I made over the dresser.
Let's chat more about these beautiful walls! The room was a tan/yellow color before. I am not sure why I was so surprised, but the pale pink actually made the room brighter!
Materials Needed:
Scotch Blue PLATINUM Painter’s Tape, white paint, pink paint, foam brush, paint roller, paint tray, nail hole filler, soapy dish cloth, plastic tarp
Note: Follow all ScotchBlue™ Painter’s Tape package instructions for proper surface cleaning and prep, adhesion and removal.
Step 1: Fill any nail holes with putty. Either use a damp rag to wipe away excess putty while the putty is still wet or wait for the putty to dry and sand it smooth. Wash the walls really well and let them dry.
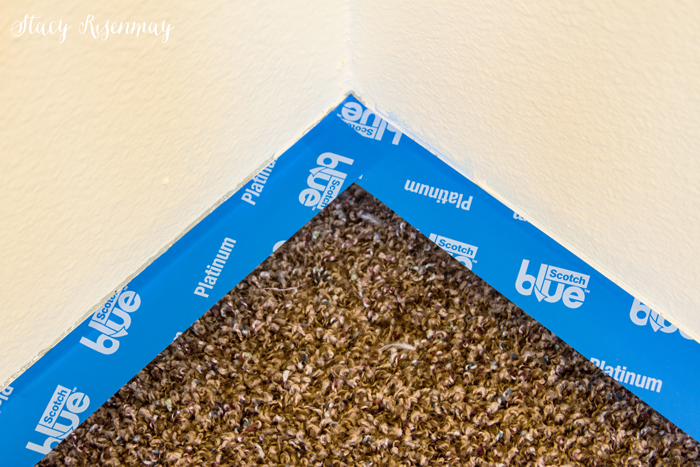
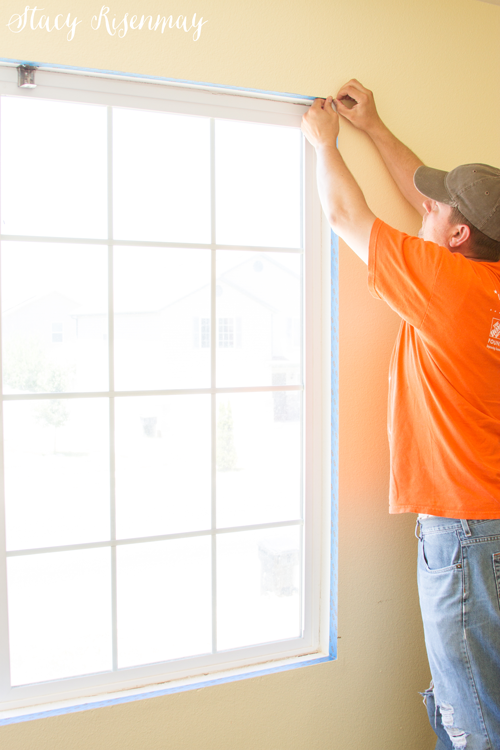
Step 2: Tape off any areas you do not want to get painted like outlets, baseboards, trim and the ceiling. ScotchBlue PLATINUM Painter’s Tape tears at a 90-degree angle and is perfect for corners! Lay down a tarp to protect the carpet.
Shane was able to help me with this room since we did the majority of the work on a Saturday. I love DIYing with him :) He comes in handy when I don't have a ladder.
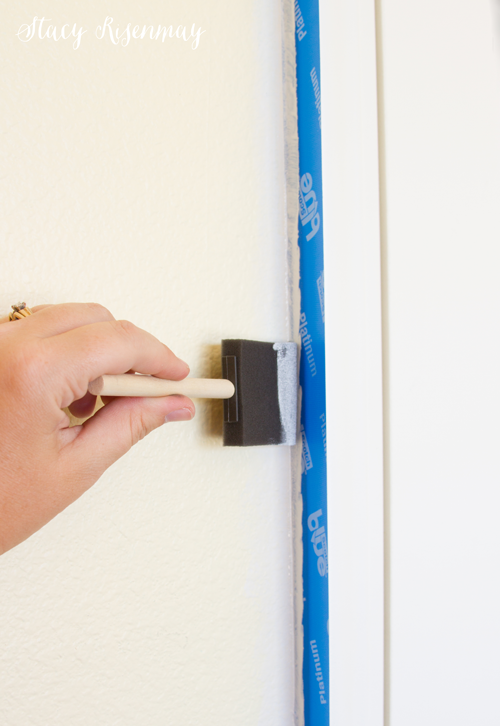
Step 3: Paint along the tape line using the existing paint color (white for trim) to seal the tape.
Step 4: Paint the room the new color! I chose Barely Blush by Glidden.

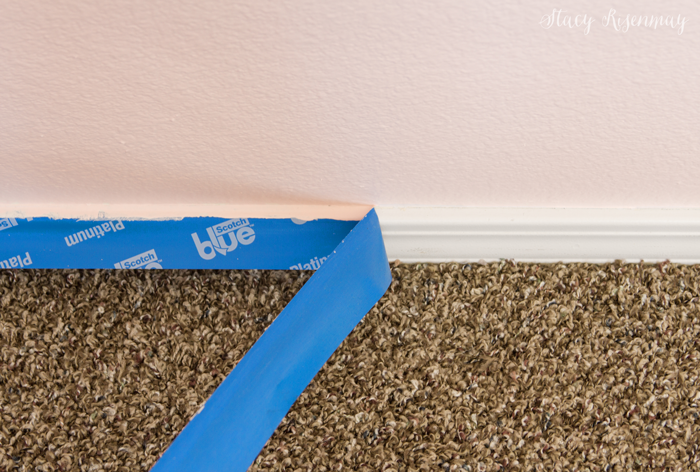
Step 5: When you have painted two coats of paint you can remove the tape. Pull the tape back on itself and pull from the wall at a 45-degree angle for best results. Look at that clean edge!!!
I am so happy with how it turned out. I have already agreed to do another little girl room for a neighbor. And guess what her little girl requested..... PINK!
I will have to see how I can do another pink room but change it up a bit :)
Do you have any weekend room makeovers planned? Are you waiting until it cools off a bit or trying to cram it in before the end of the summer? I would love t hear what you are up to!
You can visit the ScotchBlue page to find more projects like this for inspiration.
I have partnered with ScotchBlue again this year to bring you fun projects. I was compensated by ScotchBlue for my time but as always, my thoughts, project ideas, and opinions are 100% mine :)


Wow...it just goes to show what a lick of paint and a imagination can do! Looks amazing.....job well done. ;|)
Just Lovely!
That's really lovely. The mirror, paint, and curtains make the room glamorous!
Beautiful!!!! I never thought of panting curtains and I ljusy love what you did! Great job!
You did it again. Amazing transformation. Great idea to go for the more mature, elegant gold touches to carry her through the teen years, with the still playful touches here and there so she hasn't completely abandoned her childhood suddenly. No matter how old we are, we need a bit of both worlds. Love the polka curtains. I'm not fond of pink either, but I have to admit the walls do look good, and the hot pink accents pop and provide a good contrast to the other colors. The room would look a little monochromatic-bland without them. You have to do a bench tutorial because it's fabulous.
I'm in the middle of cleaning out my mother's house and worried about the possibility of having to stage it to sell it. Have you ever thought of staging houses as a way to use your terrific skills at decorating on a budget with what's at hand? Painting is bound to be step one in any staging.
It turned out so pretty! I love the pale pink color you used. I think the curtains are my favorite part. Love the polka dots just on the bottom!
Wow, absolutely beautiful! I love the wall color, mirror, curtains and that bench ~ I'm crazy about! Great job!
What a lovely transformation - the pink walls are perfect...Love, love, love the gold confetti curtains!
It's amazing how transformative paint can be. I love how this turned out!
I always love your room transformations! Another one which turned out great! It's amazing how you can make such a significant change on such a tiny budget!!!
The next space I'm working on is our garage "tween hang-out" and "home gym" multi-purpose space. I'm envisioning one side having a tv & gaming system, foos ball table, etc. for the kids to hang out with the neighborhood kids. It's going to take more than a weekend though! Step 1: clear out the crap! I'm motivated to start this weekend though :-)
this is a WOW room and for it to be by parents of 4 boys makes it even more amazing. You really aced it. it is hard to say any one thing is great but the curtains and the bench really stand out for me. the pillows are pretty nice too. everything together just really made up a great retreat for this young lady.
LOVE it. My girls would go crazy for this room!
The room looks stunning! Even I would love to have a room that looks like this. Thanks for sharing your awesome makeover with us at Merry Monday this week!
This came out so adorable. I love that bow pillow! I've been wanting to update my daughter's room for a while now, but I can't seem to want to part with some of her decor since she has had it for so long. This color scheme is so pretty.
Kate | TheOrganizedDream.com
This turned out so cute!! I love that you did this adorable project on a budget. My favorite part is the polka dotted curtains.
Thanks so much for joining Thoughts of Home on Thursday. Pinning and sharing on Facebook. :)
This came out so sweet! I love these colors together!
Such a beautiful room! You did an amazing job!
It's totally gorgeous! Love that shade of pink!
Could you tell me how you painted the gold dots on the curtains.
I got some vinyl that was sticky on the back (you could also use contact paper) and cut out circles to make a stencil. Then I used gold craft paint and a foam brush to paint the dots. I have pictures I could send if that would help :)
I'd love to see some photos of how you did the curtains.
Can I ask how you made your curtains?
Hi Stacy, my daughter love that bench and she wants us to make same as yr bench so can you please tell me what stain did you used for bench?