• Skip to primary navigation
  • Skip to main content
  • Skip to primary sidebar
  • Skip to footer
Stacy Risenmay
  • Home
  • About me
  • PRESS
  • Contact Me
  • My Book
    • Facebook
    • Instagram
    • Pinterest
    • Twitter
menu icon
go to homepage
subscribe
search icon
Homepage link
  • Home
  • About me
  • Project Gallery
  • Our House
  • PRESS
  • Contact Me
  • Privacy Policy
    • Facebook
    • Instagram
    • Pinterest
    • Twitter
  • ×

    White and Gold Dresser Makeover

    By Stacy 17 Comments

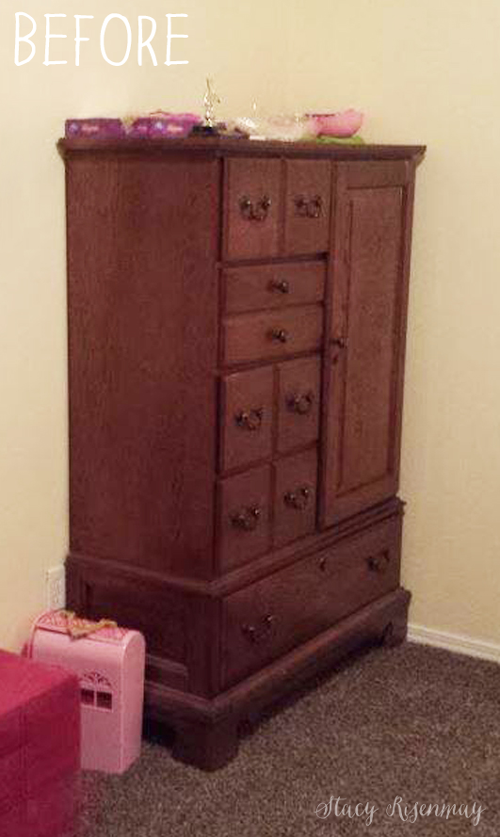
    Remember when this momma of boys decorated a PINK room for one of my past posts for ScotchBlue? Well, as promised, I have the dresser makeover to share! The dresser started out brown and it seemed a bit heavy and dark for the newly painted space. I knew I wanted to paint it white to brighten it up and have it seem less bulky but I didn't want it to be a boring old white dresser. So I decided to dress it up a bit!


    Dresser-before-painting


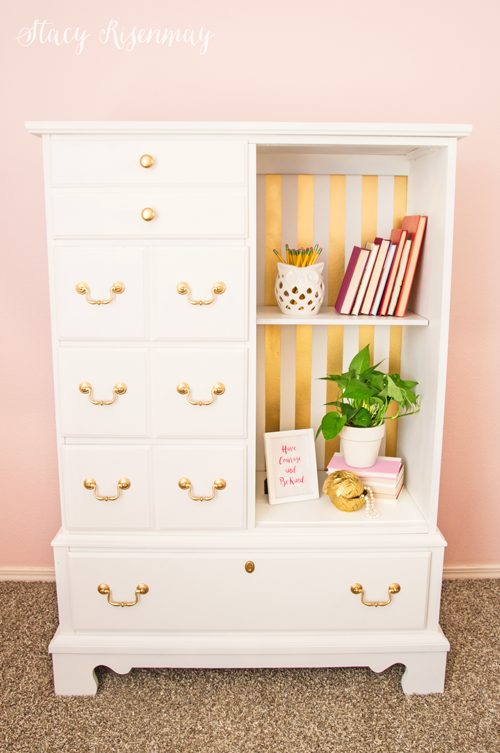
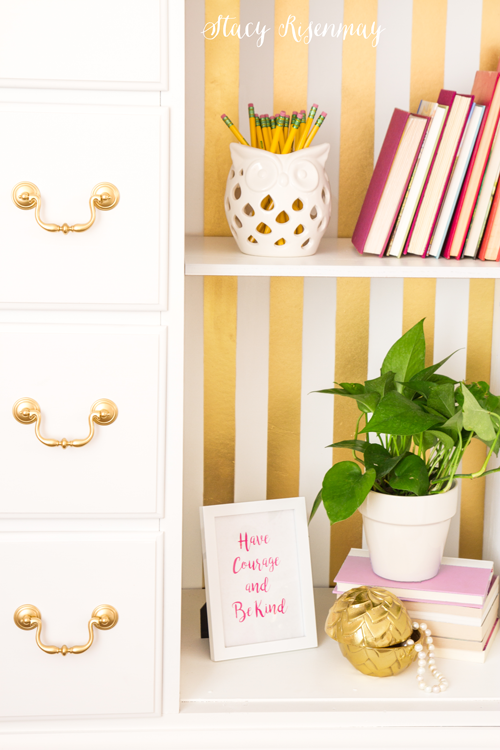
    Since there were already gold accents in the space, it seemed pretty obvious to add some gold to the dresser as well. The door was cracked in a place that I could not easily fix so I decided to not add it back onto the piece. That was okay though because it would allow for some opening shelving and a way to add more color!


    white and gold dresser


    Make sure to scroll down to the end so you can see it in the space!


    gold striped dresser


    Materials Needed:
    ScotchBlue Multi-surface Tape, white paint, gold spray paint, paint sprayer or foam roller, soapy dish rag, sandpaper, screwdriver

    Note: Follow all ScotchBlue™ Painter’s Tape package instructions for proper surface cleaning and prep, adhesion and removal.


    Step 1:

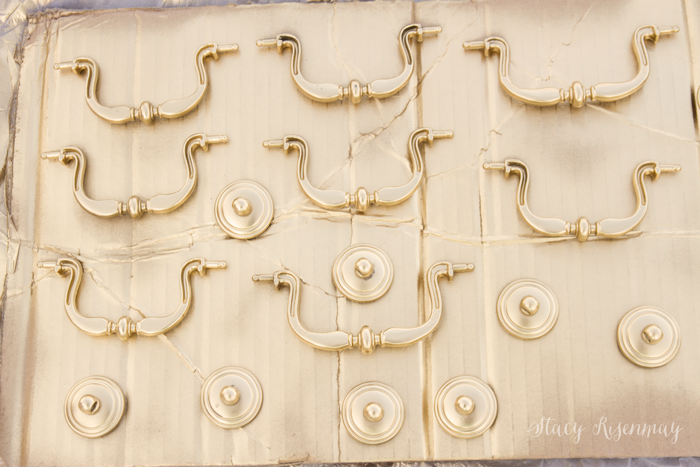
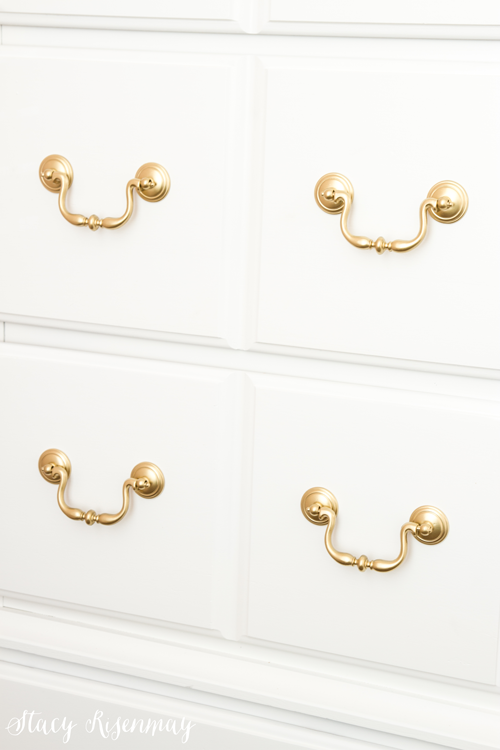
    Remove hardware with a screwdriver and clean them really well in soapy water. Once they are completely dry, spray paint them your color of choice.
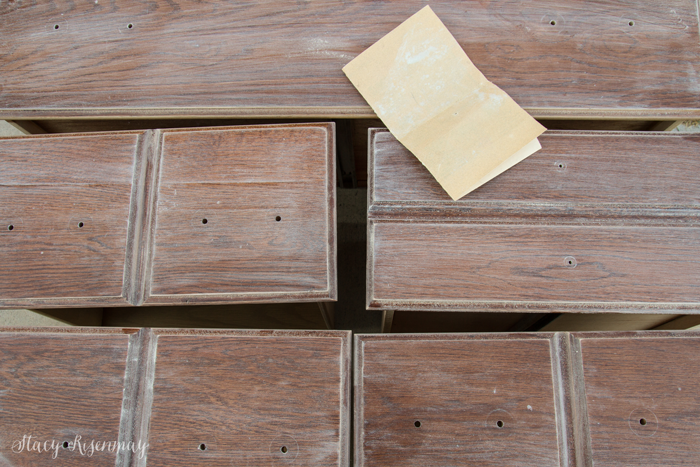
     

    step-1---spray-paint-the-hardware


    Step 2:

    I lightly sanded the whole thing, sanding along the grain, using a soft grit sandpaper. The surface needs to be roughed up a bit in order to allow the paint to grip properly. Wipe clean with a soapy rag when you are done.
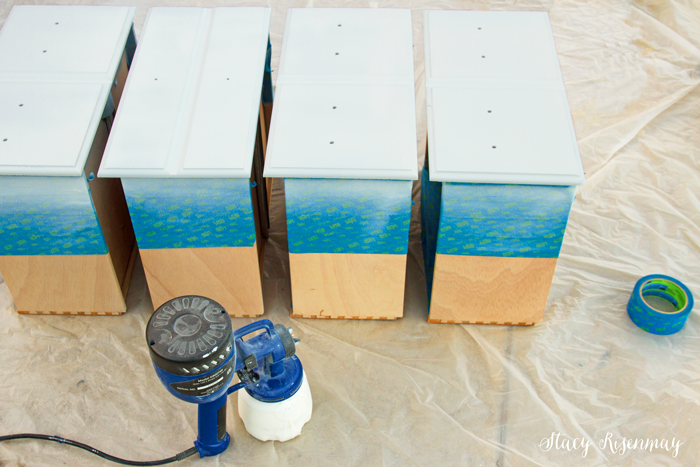
     

    Step-2--lightly-sand-before-painting


    Step 3:

    Tape off the drawers so they will be protected from overspray if using a paint sprayer or drips if you are using a foam roller. I used my Finish Max since it has minimal overspray :)
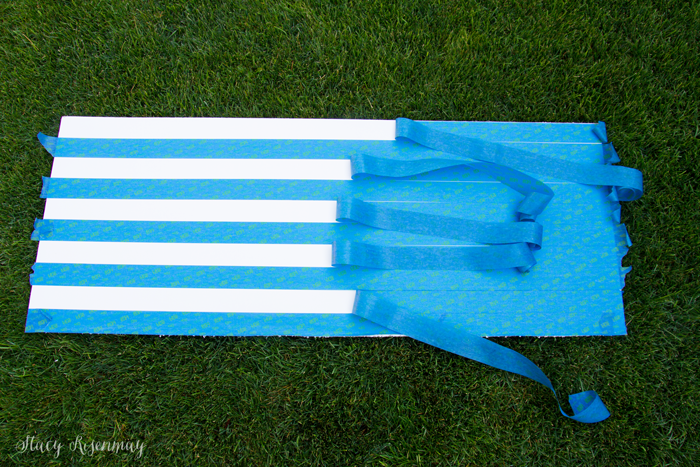
     

    step-3---tape-drawers-to-protect-from-overspray


    Step 4:

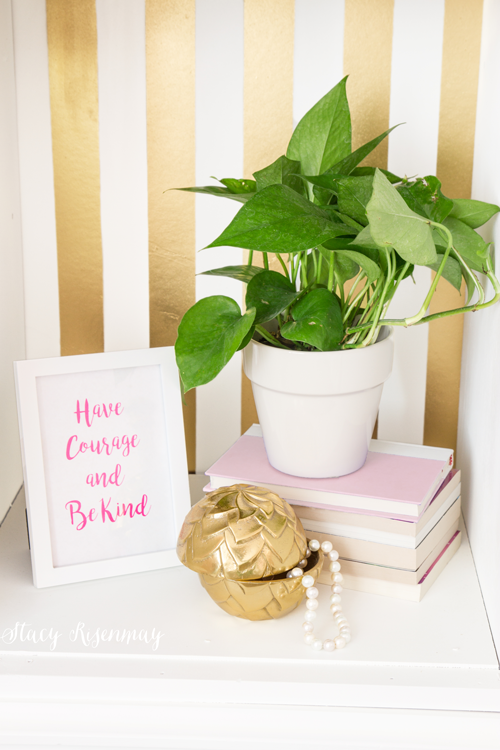
    Now the really fun part. It is time to add some stripes to the back of the dresser! The easiest way to get even stripes without measuring is to tape the whole thing off and then remove every other strip of tape. There are multiple widths of ScotchBlue tape so chose the width that works best for your project. Remember to wait 24 hours for the paint to dry before adhering painter’s tape.
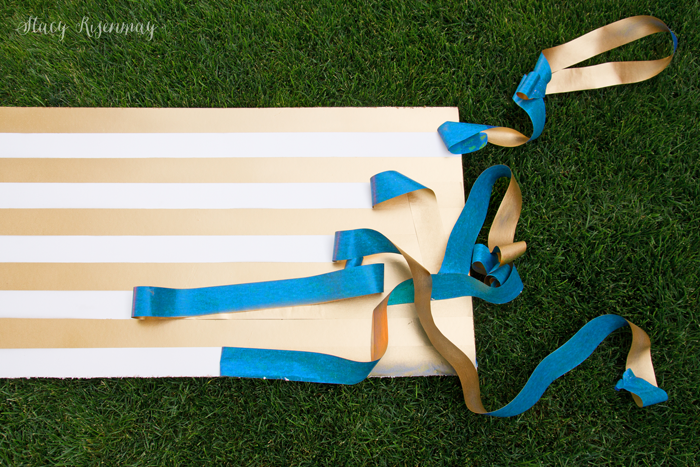
     

    Step-5---peel-off-every-other-strip-of-tape


    Step 5:

    Paint the stripes gold or your color of choice then remove the tape by pulling it back on itself and away at a 45-degree angle. I used the same spray paint that I used for the hardware. Since spray paint is so thin, I made sure I didn't spray too close to the board. Two thin coats is better than one thick one.


    Step-6---spray-paint-gold-then-remove-all-tape

    Step 6:

    Reattach the back to the painted dresser using small nails or screws and put the hardware back on the drawers.


    gold stripes on dresser


    I really have fallen in love with the whole white and gold combo.


    white dresser with gold handles


    And here it is in the space! If you missed the room reveal you can see it HERE.


    gold and white dresser


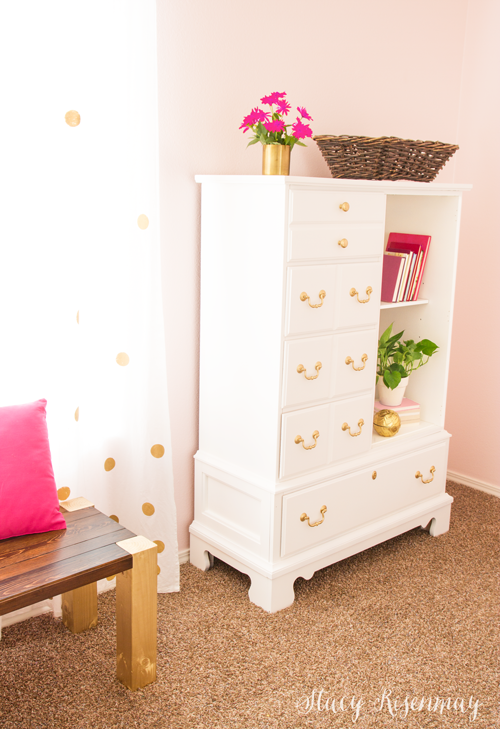
    What do you think about the door being removed? Should I have tried to fix it? Or do you like the open shelves?


    This post was sponsored by ScotchBlue but the ideas and opinions were all mine. For more projects  visit their inspiration hub!

    You will also like:

    • Laundry Room Makeover!Laundry Room Makeover!
    • Little Girl's Room Refresh {Gold, White, Blush}Little Girl's Room Refresh {Gold, White, Blush}
    • My Favorite Planter ProjectsMy Favorite Planter Projects
    • Dresser MakeoverDresser Makeover
    • To Paint or Not To Paint.... Wood FloorsTo Paint or Not To Paint.... Wood Floors
    • Closet Makeover!Closet Makeover!
    • Finish Max Sprayer GIVEAWAY!Finish Max Sprayer GIVEAWAY!
    • IKEA Hack Using Reclaimed WoodIKEA Hack Using Reclaimed Wood

    « Simple DIY Frame
    Pop Up Spray Tent GIVEAWAY! »

    Filed Under: DIY & Tutorials 17 Comments

    Subscribe

    for your weekly DIY fix.

    Reader Interactions

    Comments

    1. Cathy

      September 01, 2016 at 7:29 am

      I love it just the way it is! It gives it more interest without the doors. You did a great job with it.

      Reply
    2. doodletllc

      September 01, 2016 at 7:29 am

      I love how this piece was transformed. I would not have thought to remove the door...that is a genius. And gold stripes...perfect. Your tutorial is great...I also never thought to tape off the entire section and then remove strips for evenly spaced stripes. Very clever. I really do love this piece. Inspirational. Thanks for sharing!

      Reply
    3. Gail

      September 01, 2016 at 7:34 am

      Beautifully done! I like it without the door. It makes the piece seem not soooo heavy and it adds a touch of elegance with the gold stripe.

      Reply
    4. Miriam

      September 01, 2016 at 8:28 am

      You couldn't have done any better! Love the finished project!

      Reply
    5. Miriam

      September 01, 2016 at 8:30 am

      The finished project is perfect. Would not change a thing!

      Reply
    6. Danita

      September 01, 2016 at 9:03 am

      I still am amazed it is the same piece of furniture! But now that I see your steps I have to believe my eyes! Leaving the door off is a stroke of brilliance as it changes the dynamics of the whole piece. But I cold never think of that! That's why we NEED you Stacy!!! :-) Well executed design!!!

      Reply
    7. Sally Lawhead

      September 01, 2016 at 9:09 am

      Awesome job! I love it! I like the way you switched the drawers around too... and I'm also a fan of taking the door off. You have a great eye!....I'm sure I would have passed up the old dresser.

      Reply
    8. Carol Workman

      September 01, 2016 at 9:14 am

      Oh WOW - this dresser turned out so beautiful! Love how bright it is and without it's door. Thank you for sharing.

      Reply
    9. Elizabeth H

      September 01, 2016 at 10:12 am

      That is beautiful! Lucky girl.

      Reply
    10. chris aka monkey

      September 01, 2016 at 11:02 am

      it is fricking gorgeous xx

      Reply
    11. Whitney Hansen

      September 01, 2016 at 1:45 pm

      Very cute dresser redo. Love how it was just small accents of the gold, and I like the door left off of it!

      Reply
    12. Char Fisher

      September 01, 2016 at 4:38 pm

      Very elegant and a beautiful job you did! So impressed! Your ideas and skills transformed this once plain dresser into a work of art. Amazing!

      Reply
    13. cmt

      September 01, 2016 at 8:16 pm

      The shelves are a fantastic idea, and I love the gold stripes. Love the whole thing. I usually feel a bit sad when I see wood painted because I think the natural grain is usually nicer, but this looks fabulous painted, especially with the gold accessories. And with the gold polka dotted curtains, love the whole look. Sophisticated but fun. Inspiration to put things into their place.

      Reply
    14. Rebecca

      September 08, 2016 at 5:31 pm

      That's beautiful! I have an old changing table with a side cabinet that I've been trying to figure out what to do with once we don't need to change diapers any more. That open cabinet would be perfect. It looks so good on your dresser.

      Reply
    15. Emily

      September 10, 2016 at 3:26 pm

      This is absolutely beautiful! What an incredible difference! Thanks for linking up with Merry Monday this week.

      Reply
    16. Lucinda

      September 11, 2016 at 8:56 pm

      Ooh, so pretty. I love the gold. What brand did you use? I recently spray painted some items gold but it was darker and much less metallic than I'd hoped.

      Reply

    Trackbacks

    1. Busy Monday 233 | A Pinch of Joy says:
      September 11, 2016 at 2:34 pm

      […] Cookies  Healthy Helper Blog — The Don’t List of Life  Not Just a Housewife — White and Gold Dresser Makeover    Grab a featured button from the Button Box, upper […]

      Reply

    Comment Below! Cancel reply

    Your email address will not be published. Required fields are marked *

    This site uses Akismet to reduce spam. Learn how your comment data is processed.

    Primary Sidebar

    stacyHey! I'm Stacy and am a DIY addict. I love to get my hands dirty, whether it's sawdust, paint, or dirt. My goal is to help YOU learn to fix up your home and yard. No matter the style or size, I think everyone should love their home. And it doesn't takes a big budget to get there. Let's DIY together!

    Subscribe to My Blog!

    Search this site

    categories


    Subscribe

    Footer

    Welcome! I'm sharing our adventures as we fix up our 1938 cottage. Whether it is big or small, I think everyone should love their home and I don't think it takes a lot of money to make a space your own

    About Stacy

    • Facebook
    • Instagram
    • Pinterest
    • Twitter

    My Favorites

    copyright

    All images and content are copyrighted via Stacy Risenmay unless otherwise stated. If you'd like to share my work, please link back to this blog.
    Thank you for visiting!


    Footer

    ↑ back to top

    About

    • Meet Stacy
    • Privacy Policy
    • Contact

    Categories 

    • Home Decor
    • Outdoor Projects & Gardening
    • DIY & Tutorials
    • Kid Activities
    • Recipes
    • Travel
    • Cleaning
    • Houseplants
    • Staining
    • Painting
    • Power Tools
    • Holiday Ideas

    Newsletter

    • Sign Up! for emails and updates

    As an Amazon Associate I earn from qualifying purchases.

    Copyright © 2020 Brunch Pro on the Brunch Pro Theme


    Privacy Policy
    Welcome! Thanks for visiting.
    Hi! I'm Stacy and I want to help YOU become a DIY rockstar! Sign up for my email list so each project, tip, and trick will go directly to your inbox :)
    Your information will *never* be shared or sold to a 3rd party. Pinky promise :)
    Welcome!
    Hi! I'm Stacy and I blog about fixing up our 1938 cottage. Join the thousand of others who get my posts sent to their inbox for FREE!
    Your information will *never* be shared or sold to a 3rd party.