• Skip to primary navigation
  • Skip to main content
  • Skip to primary sidebar
  • Skip to footer
Stacy Risenmay
  • Home
  • About me
  • PRESS
  • Contact Me
  • My Book
    • Facebook
    • Instagram
    • Pinterest
    • Twitter
menu icon
go to homepage
subscribe
search icon
Homepage link
  • Home
  • About me
  • Project Gallery
  • Our House
  • PRESS
  • Contact Me
  • Privacy Policy
    • Facebook
    • Instagram
    • Pinterest
    • Twitter
  • ×

    Modern Industrial Bed with Storage

    By Stacy 12 Comments

    When I did the makeover for my cute neighbor, there were a couple of challenges and both of them impacted the bed. The room was super small so it limited where I could place the bed. The longest wall (where the bed already was) made the most sense so I kept it on that wall. The only floor vent was under the bed however so his mom would remove one of the drawers on this bed so the air could circulate.

    I knew I needed to make a bed that would allow for air flow but also still had some storage.


    old-bed


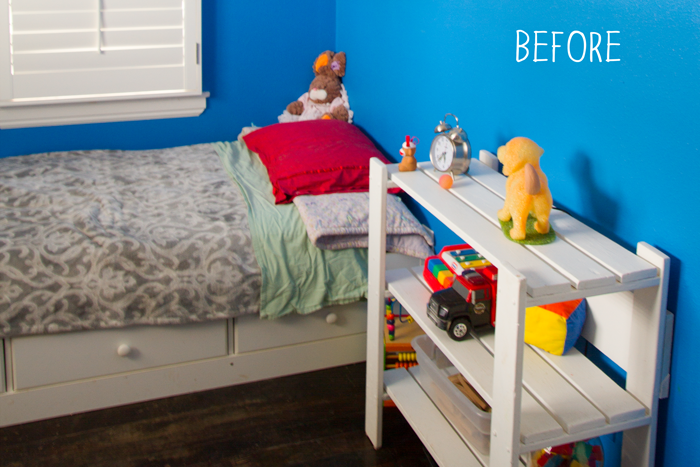
    And here is what I came up with!


    Modern industrial bed with storage!


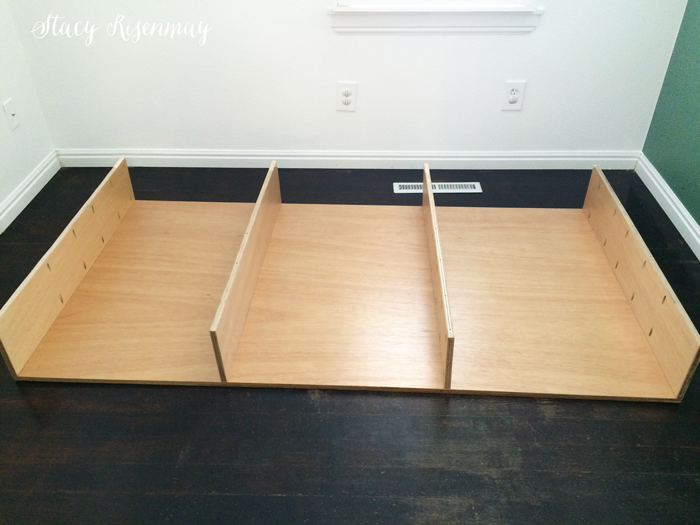
    I used two pieces of ¾ inch plywood. Ever since I made the card catalog table with my son, I have been loving the look of the lines on the edges of the plywood. I wanted to do another project where they were exposed.

    While at Home Depot I had them cut the pieces down for me A) so it was one less thing to cut when I got home but mainly because B) it fits better in the van cut down. I had them cut it so I had two pieces that were 40 inches by 76 inches. The leftover pieces became the center slats. Since 40 inches were cut off of the 48 inch by 96 inch plywood sheet, it left (just shy of) 8 inches. It actually worked out perfectly because with the casters and mattress it ended up being the right height for a child's bed.

    I drilled pocket holes on the center slats.


    drill-pocket-hole


    Kreg Jig Kit (affiliate)


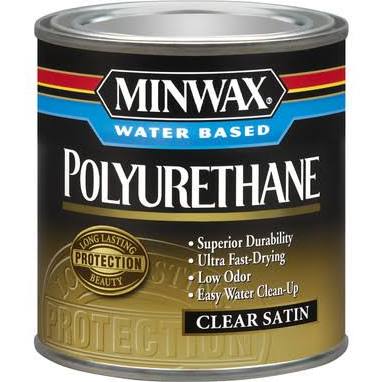
    I decided not to stain the bed. I wanted it to stay light so it wouldn't compete with the awesome worn black floors. Once all the pieces were cut, holes were drilled, and it was sanded, I added two layers of satin polyurethane.


    minwax polyurethane satin


    Because it is such a small, tight space, I opted to assemble the bed in the room. Here you can see the center slats I was talking about with the pocket holes.

    Once I screwed the slats onto the bottom board, I added the top board and screwed it into place.


    assembling the bed


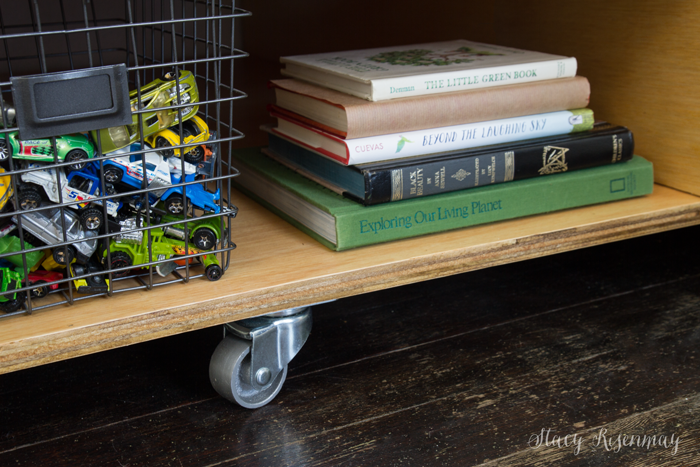
    I wanted the bed to easily be moved away from the wall for when they needed to access whatever they stored on the other side of the bed. If this were my kid's bed I would probably fold up out of season clothes and store them on the side that touches the wall. When they need to get to that side, instead of removing the things in the front and reaching all the way back, they can slide the bed away from the wall and reach in easily. I used 6 of these all metal casters.


    all metal casters

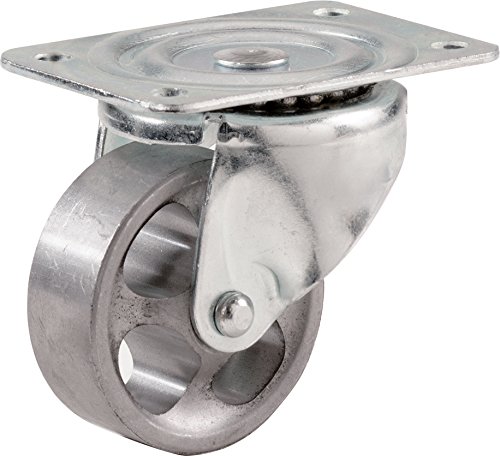
    All Metal Caster (affiliate)


    They raise the bed several inches and allow for the floor vent to circulate air.


    modern industrial bed


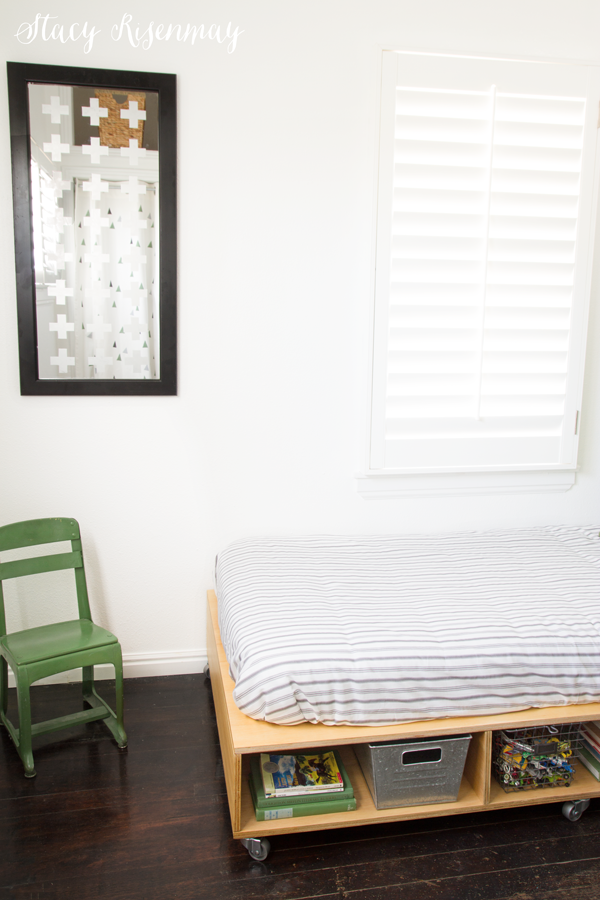
    I had to scoot the dresser out of the way so I could get the whole bed in the shot. I love how it looks!


    How to make this modern industrial bed!


    Modern industrial bed with storage!


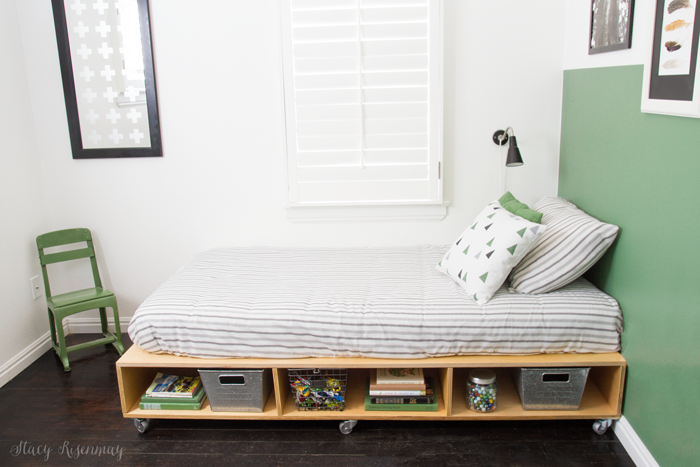
    This was the easiest bed I have ever made. My boys fell in love with it and they all want one now. I don't know for sure if it will work given the fact that we kind of need to g the bunk bed route, but I may be able to swing one.

    If you missed the room reveal you can see it HERE and I have a tutorial for the painted curtains HERE.


    The weekend is coming up. Do you have any projects planned?


    .


    You will also like:

    • Wood Bead PlanterWood Bead Planter
    • Wood Slice Plant StandWood Slice Plant Stand
    • Modern Card Catalog TableModern Card Catalog Table
    • How To Build A Wood Serving TrayHow To Build A Wood Serving Tray
    • Laundry Room Makeover!Laundry Room Makeover!
    • DIY Floating Bathroom ShelvesDIY Floating Bathroom Shelves
    • Bathroom Shelves!Bathroom Shelves!
    • Decorating someone else's house: Part 3 (building an entryway bench)Decorating someone else's house: Part 3 (building an entryway bench)

    « Painting Our Old Windows
    Dresser Makeover »

    Filed Under: DIY & Tutorials 12 Comments

    Subscribe

    for your weekly DIY fix.

    Reader Interactions

    Comments

    1. Julie Buck

      August 18, 2016 at 7:31 am

      Painting a basement bedroom which will become our master bedroom.

      Reply
    2. Darlene

      August 18, 2016 at 7:54 am

      Do the metal casters have a brake feature? How do you stop the bed from rolling around?

      Reply
      • Stacy

        August 18, 2016 at 10:51 am

        I actually meant to buy two that had brakes for the front corners but they were out of the ones with brakes. Since I was working with a deadline, I opted to use all regular ones. I told my neighbor that if there was an issue with it moving, we could replace two of them. It has been a few weeks and she said it is fine. In fact, I was over there yesterday to see the little boy's new lizard and we all sat on the bed like a couch. It never moved even with all of us on it. But yes, you could add a couple with brakes if you were worried about it.

        Reply
    3. Jeanne

      August 18, 2016 at 9:04 am

      Fabulous job - love the bed. Love the attention to detail. Thanks for sharing.

      Reply
    4. Joan

      August 18, 2016 at 12:11 pm

      Hi Stacy,
      I love receiving your emails and seeing how creative and energetic you are! I thought you might get a kick out of the fact that they all go to my spam file and I have to be sure to look for them before I trash its contents. I'm sure that the title "Not just a Housewife" is throwing someone off! It always amuses me. Thanks and keep up the good work.

      Reply
      • Stacy

        August 18, 2016 at 12:14 pm

        Hahaha! Shoot! I subscribe by email to my blog so I can make sure that it looks right and so if I stop getting them I know there is a problem I need to fix. Mine were going to my spam folder in Gmail for awhile but it fixed itself after awhile. Thanks for taking the extra step to find my emails. I will ask the company if there is anything I can do on my end to change it. Have a great weekend!

        Reply
    5. Jamie

      September 02, 2016 at 5:32 pm

      That turned out great! I love that style, and furniture that can do multiple things at once! :) Thank you for sharing with us at the #HomeMattersParty

      Reply
    6. Dee

      September 03, 2016 at 12:11 am

      What a perfect bed for kids! Thanks for sharing at Merry Monday!

      Reply

    Trackbacks

    1. Wonderful Wednesday Blog Hop #191 - Simplee Thrifty says:
      September 6, 2016 at 4:59 pm

      […] Modern Industrial Bed With Storage from Not Just A Housewife […]

      Reply
    2. Wonderful Wednesday Blog Hop #80 | My Life Abundant says:
      September 6, 2016 at 5:01 pm

      […] Grilled Eggplant Banh Mi Sliders by Strength and Sunshine Modern Industrial Bed With Storage from Not Just A Housewife […]

      Reply
    3. Wonderful Wednesday Blog Hop 191 - Crafty Mama in ME! says:
      September 6, 2016 at 5:02 pm

      […] Modern Industrial Bed With Storage from Not Just A Housewife […]

      Reply
    4. Wonderful Wednesday Blog Hop #191 | Downhill Run says:
      September 6, 2016 at 10:13 pm

      […] Modern Industrial Bed With Storage from Not Just A Housewife […]

      Reply

    Comment Below! Cancel reply

    Your email address will not be published. Required fields are marked *

    This site uses Akismet to reduce spam. Learn how your comment data is processed.

    Primary Sidebar

    stacyHey! I'm Stacy and am a DIY addict. I love to get my hands dirty, whether it's sawdust, paint, or dirt. My goal is to help YOU learn to fix up your home and yard. No matter the style or size, I think everyone should love their home. And it doesn't takes a big budget to get there. Let's DIY together!

    Subscribe to My Blog!

    Search this site

    categories


    Subscribe

    Footer

    Welcome! I'm sharing our adventures as we fix up our 1938 cottage. Whether it is big or small, I think everyone should love their home and I don't think it takes a lot of money to make a space your own

    About Stacy

    • Facebook
    • Instagram
    • Pinterest
    • Twitter

    My Favorites

    copyright

    All images and content are copyrighted via Stacy Risenmay unless otherwise stated. If you'd like to share my work, please link back to this blog.
    Thank you for visiting!


    Footer

    ↑ back to top

    About

    • Meet Stacy
    • Privacy Policy
    • Contact

    Categories 

    • Home Decor
    • Outdoor Projects & Gardening
    • DIY & Tutorials
    • Kid Activities
    • Recipes
    • Travel
    • Cleaning
    • Houseplants
    • Staining
    • Painting
    • Power Tools
    • Holiday Ideas

    Newsletter

    • Sign Up! for emails and updates

    As an Amazon Associate I earn from qualifying purchases.

    Copyright © 2020 Brunch Pro on the Brunch Pro Theme


    Privacy Policy
    Welcome! Thanks for visiting.
    Hi! I'm Stacy and I want to help YOU become a DIY rockstar! Sign up for my email list so each project, tip, and trick will go directly to your inbox :)
    Your information will *never* be shared or sold to a 3rd party. Pinky promise :)
    Welcome!
    Hi! I'm Stacy and I blog about fixing up our 1938 cottage. Join the thousand of others who get my posts sent to their inbox for FREE!
    Your information will *never* be shared or sold to a 3rd party.