• Skip to primary navigation
  • Skip to main content
  • Skip to primary sidebar
  • Skip to footer
Stacy Risenmay
  • Home
  • About me
  • PRESS
  • Contact Me
  • My Book
    • Facebook
    • Instagram
    • Pinterest
    • Twitter
menu icon
go to homepage
subscribe
search icon
Homepage link
  • Home
  • About me
  • Project Gallery
  • Our House
  • PRESS
  • Contact Me
  • Privacy Policy
    • Facebook
    • Instagram
    • Pinterest
    • Twitter
  • ×

    Topography Inspired Planter

    By Stacy 25 Comments

    Did anyone else have to create a topography map in school growing up? I remember cutting cardboard with an X-acto knife into dozens of oblong shapes and gluing them together. I can't remember what made me think of it the other day, but I started to think about how topography maps are really cool to look at. The thought process progressed and the next thing I know I am gathering plywood scraps and cutting out oblong shapes to glue together.


    wood topography insipred planter


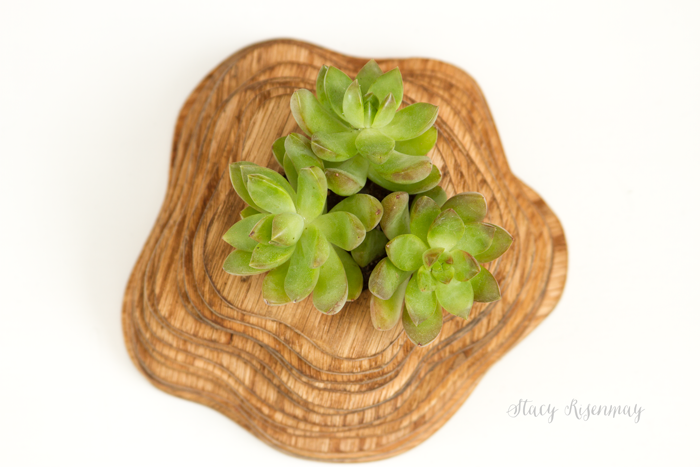
    I think the view from the top is my favorite!

    topography inspired planter


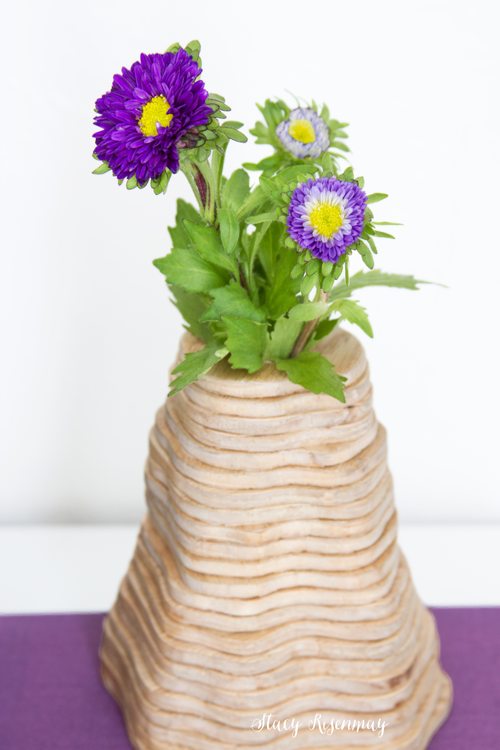
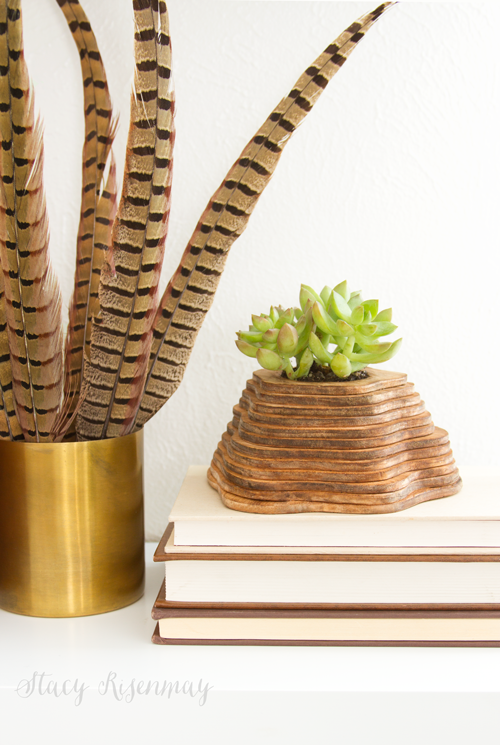
    My first idea was to make a vase and I made this before the planter. Since both the planter and the vase are basically made the same way, I have just one tutorial.


    topagraphy inspired vase


    Supplies Needed:

    (affiliate links)

    Plywood

    Pencil

    Wood Glue

    Spade Drill Bit

    Jig Saw

    18-Gauge Brad Nailer

    Drill

    Bud Vase (I like the test tube style) or Succulent Plant


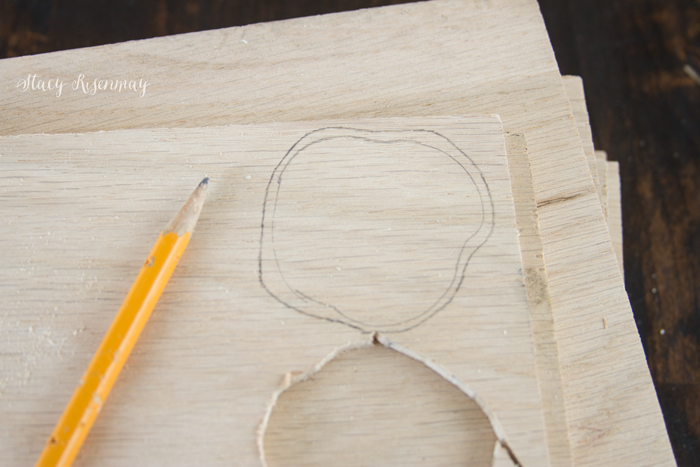
    #1. Start by drawing the smallest shape first. Just freehand it.


    draw-shape-on-plywood


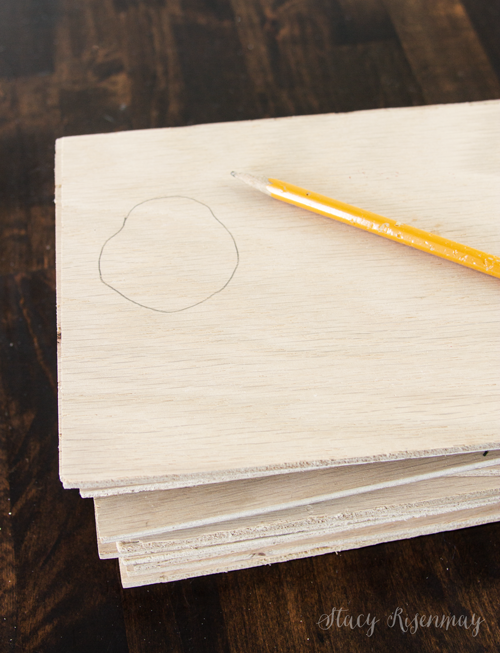
    #2. Cut out the first shape with a jig saw and then trace it. Once it is traced draw a shape slightly larger around it. This will be the line you follow to make the next cut.


    trace-the-shape-and-draw-a-little-bigger


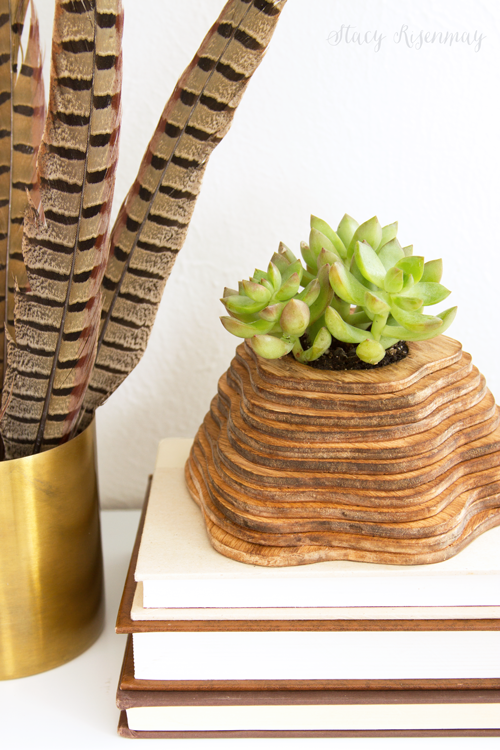
    #3. Continue doing that until you have a stack high enough for your bud vase to fit inside or deep enough for a small succulent.


    continue-to-cut-them-out-until-you-have-enough-stacked-up-for-a-vase-or-planter


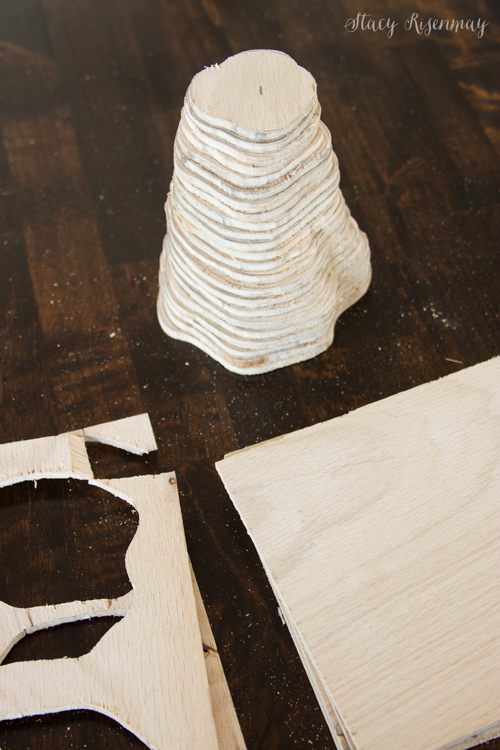
    #4. Sand them smooth.

    sand-wood-pieces

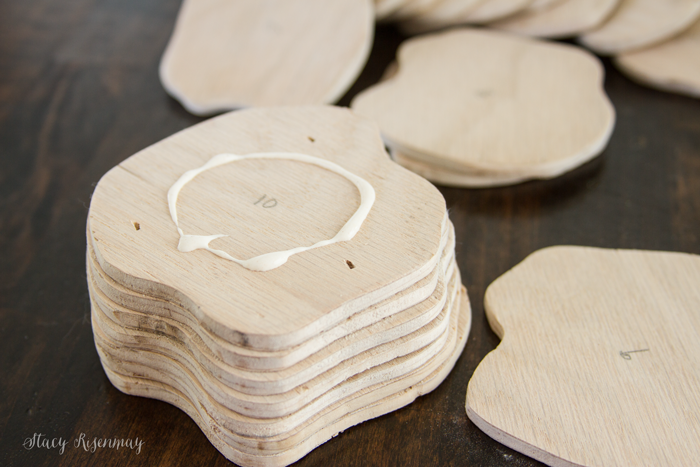
    #5. Start from the bottom and glue them together. Avoid getting glue in the center since you will be drilling a hole for the vase. Every few layers nail them together.

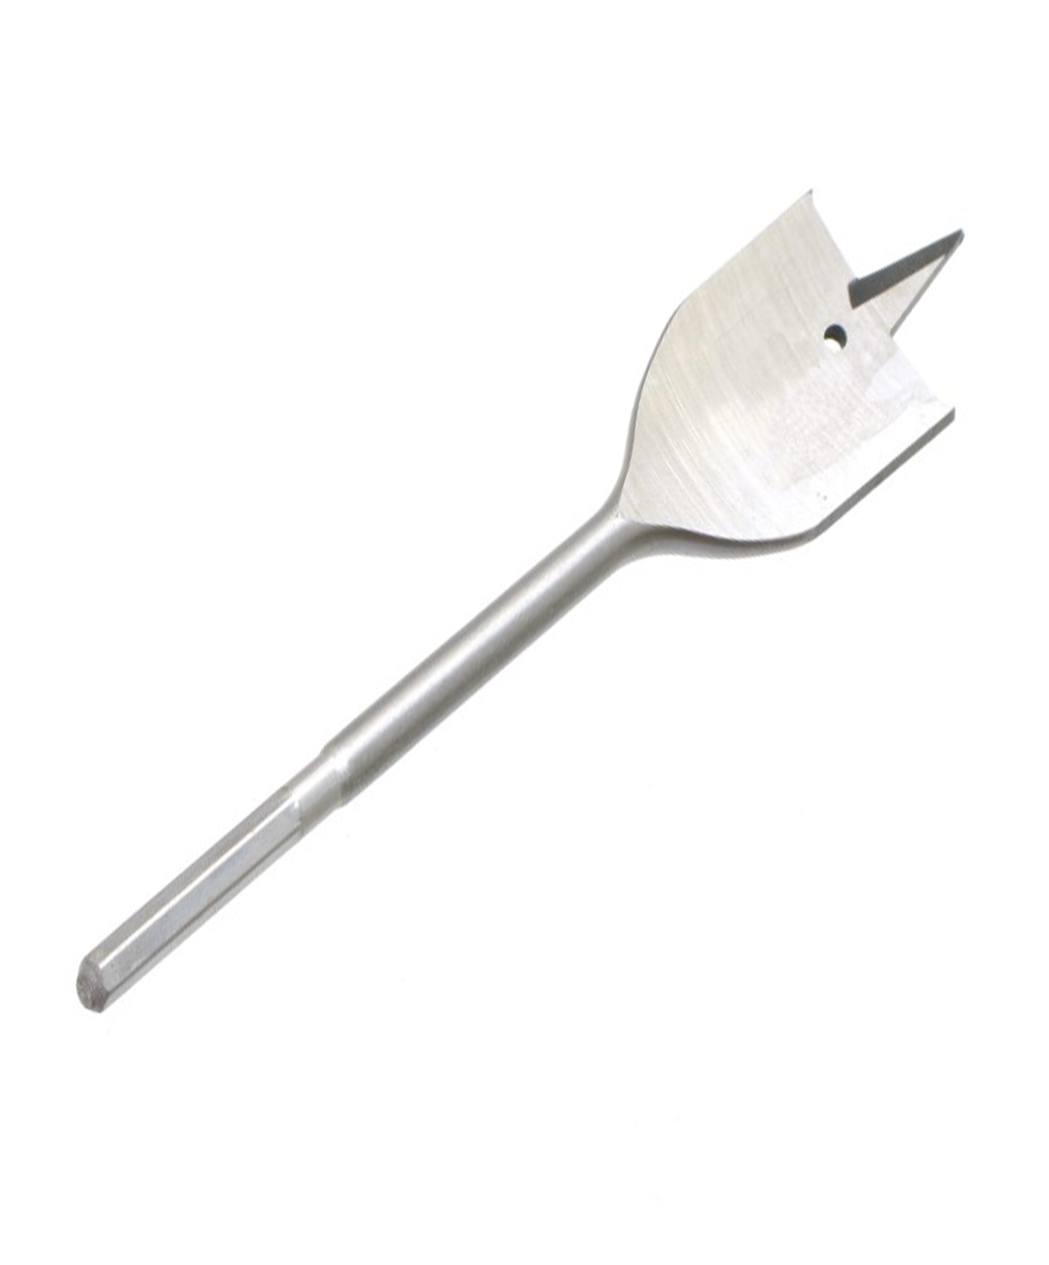
    *If you are making a planter, you will need a hole at least 2-3 inches wide which is wider than a paddle bit. Drill a hole large enough for the blade of a jig saw to fit through and then use the jig saw to cut a circle in the center. Don't cut a circle in the last one since that will be the bottom but do drill a hole for drainage.

    After the holes are cut for the planter, you can glue and nail them together.


    every-few-layers-nail-them-together


    #6. Once the glue has had a chance to dry, drill a hole deep enough that your bud vase will fit down inside.

    spade bit


    My bud vase fit right down in. But if you want, it would also look good to have a little of the glass bud vase peek out.


    wood vase


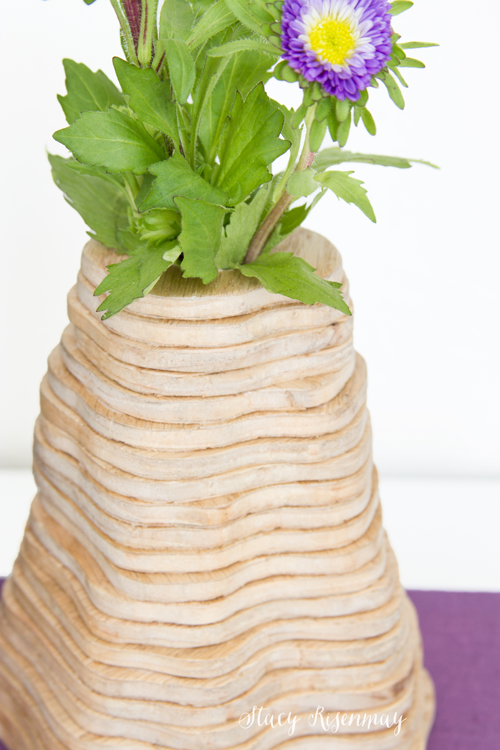
    I decided not to stain the vase. I added some wipe on poly and called it good.

    I decided to stain the planter in Early American from Minwax. Since the plywood is very porous, I added the wood conditioner before staining.


    wooden topography planter


    I think I might make a larger version out of solid wood. What do you think? Would it look good larger and on a patio?


    topography inspired planter


    You will also like:

    • My Front Door: Before and AfterMy Front Door: Before and After
    • Citrus Hot DrinkCitrus Hot Drink
    • Getting Your Home Guest ReadyGetting Your Home Guest Ready
    • Popcorn CakePopcorn Cake
    • Office UpdateOffice Update
    • Introducing a New Series!!!Introducing a New Series!!!
    • Gold Metal PlanterGold Metal Planter
    • Hooded Towel Turorial By: TammyHooded Towel Turorial By: Tammy

    « Metal Projects
    Wood Slice {Styled X3} »

    Filed Under: DIY & Tutorials, Houseplants 25 Comments

    Subscribe

    for your weekly DIY fix.

    Reader Interactions

    Comments

    1. Shawnna

      February 09, 2016 at 7:25 am

      oh this is so cool!

      Reply
      • Stacy

        February 09, 2016 at 11:26 am

        Thank you!

        Reply
    2. Amy

      February 09, 2016 at 11:25 am

      I had totally forgotten about doing that in school! But now that you say that I remember having to cut out cardboard...lots of cardboard! This looks great and I think you should do a larger one!

      Reply
      • Stacy

        February 09, 2016 at 11:27 am

        I think I will make a bigger one. I am curious what it would look like big and outside :)

        Reply
    3. Patty

      February 09, 2016 at 11:53 am

      I love this and yes a larger one would be beautiful on the patio. I love that each one would go with any style your home is just depending on how you finish it, I happen to love the way you finish yours, but you could paint it and do shabby sheek which would be really pretty, or paint and do a high gloss finish. I can think of all kinds of ways to finish these beauty's to make them fit your decor.

      Reply
      • Stacy

        February 09, 2016 at 1:05 pm

        You are absolutely right! I almost painted one white so it looked like ceramic. A bold color would be fun too!

        Reply
    4. cmt

      February 09, 2016 at 8:37 pm

      Clever. I like the one with the succulent--the proportions look good at that size. Looks great with the feathers. A larger one could be very interesting. Would you cut out the holes as you went along and cut smaller pieces from it?

      Reply
      • Stacy

        February 09, 2016 at 11:02 pm

        I agree. I feel like the vase was my practice round. And I guess I could use the parts I cut out for a smaller version. Good idea!

        Reply
    5. DazzleWhileFrazzled

      February 22, 2016 at 10:15 am

      So neat and creative! Love it!! Visiting from Monday Funday.

      Reply
    6. Kim~madeinaday

      February 23, 2016 at 11:30 am

      Wow I can't believe you cut each piece! Jigsaws scare me! Lol Very cool vase. Thanks for linking up to Merry Monday! Sharing on G+! Have a great week!
      Kim

      Reply
    7. Whitney

      February 23, 2016 at 11:01 pm

      I had to draw topographical maps for the first time in Geology 101 in college. What a cool idea to bounce off this process! My husband is a geologist, so I know he would love these too. Thanks for sharing this creative idea, Stacy! :)

      Reply
    8. Marie, The Interior Frugalista

      February 24, 2016 at 9:42 am

      LOVE it Stacy - what a cool idea! Hmmm, looking for ideas for my daughter's DIY Rustic wedding this summer and your awesome planter has got me thinking table centerpieces. Thanks for the inspiration!

      Reply
    9. Cassie @ Little Red Window

      February 25, 2016 at 5:58 am

      When I was in architecture school I spent hours and hours cutting topography for models, so I'm in love with this project! So gorgeous! Thanks for linking up with us at The DIY Collective, I hope you come back and join us again next thursday! xoxo, Cassie @ Little Red Window

      Reply
    10. Lara

      February 25, 2016 at 2:23 pm

      This is so awesome! I love succulents! Pinning!

      Reply
    11. amy @ one artsy mama

      February 29, 2016 at 3:04 pm

      SO COOL!

      Reply
    12. Deb

      March 17, 2016 at 3:50 pm

      Awesome and YES would look great as big planter.

      Reply

    Trackbacks

    1. Busy Monday 205 | A Pinch of Joy says:
      February 28, 2016 at 1:30 pm

      […] Trap  Suzy’s Artsy Crafty Sitcom — Ukrainian Egg Tutorial   Stacy Risenmay — Topography Inspired Planter   Simple Joys of Home — 25 Easy Ways to Save Money   25 easy ways to save money    Tabler […]

      Reply
    2. Merry Monday Link Party 93 - Spring says:
      February 28, 2016 at 7:01 pm

      […] pick : Paint Swirling DIY Vase @ Not Just a Housewife (PIN […]

      Reply
    3. Merry Monday Link Party #93 | two purple couches says:
      February 28, 2016 at 7:02 pm

      […] pick : Topography Inspired Planter @ Not Just a Housewife (PIN […]

      Reply
    4. Merry Monday Link Party #93 - Twelve On Main says:
      February 28, 2016 at 7:02 pm

      […] pick : Paint Swirling DIY Vase @ Not Just a Housewife (PIN […]

      Reply
    5. Merry Monday Link Party #93 - Inside the Fox Den says:
      February 28, 2016 at 7:03 pm

      […] pick : Topography Inspired Planter @ Not Just a Housewife (PIN […]

      Reply
    6. So Creative! - 12 Festive DIY Spring Projects! || Practically Functional says:
      February 29, 2016 at 8:38 am

      […] Topography Inspired Planter from Not Just A Housewife […]

      Reply
    7. Spring Projects says:
      March 1, 2016 at 9:01 pm

      […] Wooden Topography Planter | Stacy Risenmay – Not Just a Housewife […]

      Reply
    8. Spring Projects - Dandelion Patina says:
      March 1, 2016 at 9:14 pm

      […] Wooden Topography Planter | Stacy Risenmay – Not Just a Housewife […]

      Reply
    9. Creativity Unleashed No. 110 - And A HomeRight Giveaway! || Practically Functional says:
      March 12, 2016 at 7:58 pm

      […] DIY Geometric Coasters from Refresh Living Creating a Gnome Garden from Paint Yourself a Smile Topography Inspired Planter from Not Just a Housewife Restoration Hardware Inspired Vintage Mailroom Tray from The Kim Six […]

      Reply

    Comment Below! Cancel reply

    Your email address will not be published. Required fields are marked *

    This site uses Akismet to reduce spam. Learn how your comment data is processed.

    Primary Sidebar

    stacyHey! I'm Stacy and am a DIY addict. I love to get my hands dirty, whether it's sawdust, paint, or dirt. My goal is to help YOU learn to fix up your home and yard. No matter the style or size, I think everyone should love their home. And it doesn't takes a big budget to get there. Let's DIY together!

    Subscribe to My Blog!

    Search this site

    categories


    Subscribe

    Footer

    Welcome! I'm sharing our adventures as we fix up our 1938 cottage. Whether it is big or small, I think everyone should love their home and I don't think it takes a lot of money to make a space your own

    About Stacy

    • Facebook
    • Instagram
    • Pinterest
    • Twitter

    My Favorites

    copyright

    All images and content are copyrighted via Stacy Risenmay unless otherwise stated. If you'd like to share my work, please link back to this blog.
    Thank you for visiting!


    Footer

    ↑ back to top

    About

    • Meet Stacy
    • Privacy Policy
    • Contact

    Categories 

    • Home Decor
    • Outdoor Projects & Gardening
    • DIY & Tutorials
    • Kid Activities
    • Recipes
    • Travel
    • Cleaning
    • Houseplants
    • Staining
    • Painting
    • Power Tools
    • Holiday Ideas

    Newsletter

    • Sign Up! for emails and updates

    As an Amazon Associate I earn from qualifying purchases.

    Copyright © 2020 Brunch Pro on the Brunch Pro Theme


    Privacy Policy
    Welcome! Thanks for visiting.
    Hi! I'm Stacy and I want to help YOU become a DIY rockstar! Sign up for my email list so each project, tip, and trick will go directly to your inbox :)
    Your information will *never* be shared or sold to a 3rd party. Pinky promise :)
    Welcome!
    Hi! I'm Stacy and I blog about fixing up our 1938 cottage. Join the thousand of others who get my posts sent to their inbox for FREE!
    Your information will *never* be shared or sold to a 3rd party.