
My sister has lived in her new home for about a year now and has started to feel settled enough that she has been having me help her fix things up and decorate a bit. I was at her house and she was telling me about this darling farmhouse table that she wanted that was $1,000. I had her show it to me and low and behold it looked very similar to her current table. I told her I could save her a ton of money by refinishing her old one. I didn't know until I started in on the project that this tabletop was not solid wood. I've shared how to refinish a table before (that is solid wood) so this time it is all about refinishing a wood veneer table!

She was over the bar height table and bar stools. I told her I could cut the legs down. She didn't love the stain color and the spots where her daughter spilled fingernail polish remover. Easy. Sand the top down to the bare wood. She wanted white legs to brighten up her space. Super easy. Paint :)

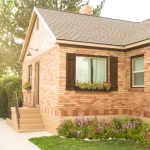
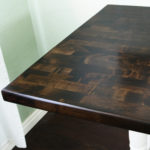
This was the table in her previous house.
I first approached this table makeover like I have others in the past. I grabbed my sander and started with a heavy grit sandpaper. I soon discovered that the top was not solid wood, but in fact a thin layer of wood veneer over plywood and then a layer of real wood. I found this out when a spot along the edge sanded down past the veneer. I knew I was going to have to do things a bit differently.
Here are my tips for refinishing a wood veneer table!
Removing the Old Finish
If I would have realized it was veneer beforehand, I probably would have used a stripper first. Then I would have hand sanded it the rest of the way.
Since I already had sanded ¼ of the table, I kept using the sander. BUT I switched out my heavy grit sandpaper for a medium grit (120 or 150). It made it go a bit slower but also made it so I didn't go through the veneer.
Be careful around the edges. There's a tendency to use more pressure around the edges and it wears them down more. The couple of places I sanded through the veneer were both along the edge. I ended up leaving the edges for last and doing most of it by hand. Since it is a thin veneer, it went faster than you might think.
Once you are done with the sander and the majority of the previous finish is gone, wipe off the dust. Get a 220 grit sand paper and sand the whole top by hand to get a very smooth finish. The sander will leave small (almost undetectable) marks in the raw wood. When you go to stain they will will become more noticeable. Doing this last step of hand sanding will make all the difference in your finished project.
Get really close and look to make sure all marks are gone. Sometimes wiping it down with a wet rag will mimic staining and allow you to see the areas that still have sander marks.
Staining and Sealing
Once it is all sanded, you are ready to stain! Since my sister's dream table had a grayish brown finish, I used Weather Oak by Minwax. I did two layers of stain and once it was completely dry, I sealed it with polyurethane.
Tabletops take a lot of wear and tear so it is recommended to do three coats of poly. Follow the directions and lightly sand between each coat for the best finish.

At first I was worried about cutting the legs since they are tapered and wouldn't lay flat on my miter saw. I was worried they would be slightly off from each other and the table would wobble. When we went to take the legs off to cut them, we realized they had adjustable feet. So after we cut them we added the adjustable feet back on and they helped balance out any imperfections with the cuts. So if you are shortening legs, add adjustable feet! Easy way to make sure your furniture won't wobble.

I am really happy with how it turned out and more importantly, my sister is too. She ended up buying new chairs and I think the new metal chairs fit the table much better.

I think the gray stain paired with the bright white legs is gorgeous!


Another thing she did to update her builder grade home was to buy all new lights. It took us all day to shop around for deals. I am a cheapskate even when it's not my money ;)

Have you ever refinished a table? What about refinishing a wood veneer table? What are you best tips.? I'd love to know so share in the comments!


It is gorgeous!!! Great job ?
Thanks so much for this post! I recently acquired a dining table with a veneer top (I highly suspect because of the repeat wood grain pattern on top). I also live in an apartment which requires that I do the refinishing inside, so a striping agent would not be an option. I like that I don't HAVE to use a stripping agent. However, my concern is the polyurethane. When the weather starts warming up here (I'm in Colorado), I can cross ventilate. But will that be enough? Or should I just chalk paint the whole thing and forget getting that perfect farmhouse table look I was after?
Hi Michelle!
I have used polyurethane indoors. I had to with this table since I completed the top in early December. Luckily we had some warm enough days that I could open windows and vent it enough. I think as long as you wait until the temps are decent you will be fine!
you did it indoors? how did you contain all the dust from sanding? :0
I did the sanding outside on my driveway (right after taking the before pic) but then it got cold enough that I decided to bring it inside to finish. Ideally I try to do big projects like this in the warmer months but sometimes it doesn’t work out like that.
I’m doing a similar table and am feeling I’ve taken on more than my knowledge base. When you sanded were you careful in each square to sand with the grain?
So, so much better!
Love this gray weathered stain color. Great job on the table.
Looks nice. Did you use brush-on or spray polyurethane? And water or oil based?
If you used brush-on, how did you minimize brush strokes?
Thanks!
I brushed it on but since then I have started spraying all my finishes and have fallen in love with that method!
When I brush on, I use a foam brush. I know some people say not to use a foam brush because of air bubbles, but I have never had a big issue with that. Not having bristles helps with not having stroke lines.
I used Minwax fast drying poly in oil based.
Wow oh wow!!! Now I wanna do mine!!!! What a beautiful update!
Who’s the older, you or your sister? Just curious, my sister and I are a little like this together?
Haha! She is older :) She’s into fashion and has a hair salon so she makes me cute and let’s me borrow clothes and I decorate and do projects for her. It’s a win win!
Also, do you have links for the lighting somewhere?
The dining room light was her one “splurge”. All the other lights were in the $40-70 range. This dining room light is from Pottery Barn and was on sale when she bought it making it $279 I believe. It was right around $300. Pottery Barn has sales on lighting pretty often so you can get a good deal if you are patient.
Love, love the table transformation and the chairs are perfect. Great transformation.
Hi Stacey,
Thank you for great helpful tips. I’m in process of refinishing our round breakfast table( Pier1). It had several ,t the wood, stain off, I tried to match missing stain. Used polyurethane ,water cleanup.You can see every brush stroke. So I’m back to sanding this off and once again trying to stain these areas to blend. I used Minwax walnut. stain and a t will not cover area to wood. Either looks black or missing. What can you suggest? I did use 220 sanding paper before the last attempt. Thank you!
Ohnoarn
Some woods with large wood grain can accept dark stain a lot on the softer areas and less in the harder areas, making it have light and dark areas instead of a more even look. A medium stain color or light stain color is your best bet.
Lovely, where did you purchase those wood slab chargers or did you make them? I have been looking for some.
I bought them at Walmart. They are part of the BHG line.
Hi! Love this! What white did you use for the legs? Thanks!
I used Rustoleum X2 (satin finish) and the color is simply called white.
Hi! Love this table. I just bought a similar dining room table. What color are the chairs? I’m looking for metal ones but can’t figure out what color I want.
They are gun metal! Here are the ones we ordered:https://amzn.to/3CzRpKx
Can you provide a link for where you got the metal dining chairs from?
My sister got them from Amazon. She bought them so I am not sure which seller. You could do a search for metal dining chairs.
What did you use to paint the legs white? I don’t think I saw it on your blog.
I used Rustoleum's X2 spray paint in white.
HI! I am in the process of re-finishing my veneer / wood oak table. The big flat pieces (table top and part of the base) are veneer and the edges and feet of the table are hard wood.
I don't want to stain the table, I want to keep the natural wood color ; I prefer light wood color. What do you recommend to finish the table? Varnish, polyurethane (oïl or water)?
I have done other staining varnishing jobs around the house for decoration so I know to be extra careful on cleanliness before starting to work and sanding between coats... just wish to know if you can help me out on the finishing. Many thanks
OH and I have access to a garage so ventilation and odour are not an issue, as well as having a place to let it dry between coats.
I like to use the fast drying polyurethane by Minwax. Three coats is recommended for tabletops. I have used it for years and years and it is very durable!
All done with 5 coats... very happy with the results.... Now I will attack the chairs... once I have found some fabric !!!
Thank you for your step by step directions. One question: What did you do with the spot along the edge that you sanded down past the veneer? I am in the same boat you are in.. I didn't know it wasn't a solid wood table until we used an oxalic acid solution on it to get rid of water rings/spots then sanded some more. I would prefer to still stain the table top, but I'm worried now I will have to paint it instead.
I stained the whole thing and then went back over the spots that I had sanded down too far and added a bit more stain. It is noticable to me since I know where they are, but my sister can't tell at all.
I must have sanded too long with using a 80 grit because there are so many scratches from the sander that I didnt notice until after I stained the table top. How do I get rid of these lines and remove the stain I just laid down yesterday?
I have done that before. The only way to get rid of scratches and the stain is to sand again. Use a 120 or 220 grit sand paper. Test by wiping with a wet rag. If when it is wet, it doesn't show scratches, then you are good to restain.
That table came out gorgeous! I have a Pier One coffee table that is in really sad shape. However, I love the style of it and have not found anything like it, even if I could afford it. I was really thrilled that, like my coffee table, the grain of the wood veneer on top is in different directions. I was worried about how I would handle that.
When you did the hand sanding to get the last of the sander marks out, how did you deal with the lines where the grains in different directions meet up? I think I'm going to actually take this project on and could use your wisdom.
It is tricky! I just had to be careful and go slow. You can also use and orbital sander.
I recently moved in with my partner. A new house we bought together. We had to plan and set up everything in a very short time. Finding the right appliances for the kitchen, setting up the bedroom, the outdoor and the garage. The toughest was the living room. Thank you for sharing the it. Articles and ideas like yours had really helped us get done with things conveniently. There is still a lot for us to do. Bit by bit we are getting there:)
Question - did you sand the legs too?
Yes, lightly. Just enough so the new paint would better adhere.
Love the table! Couple questions did you use an oil base stain or water base and I’ve read your previous posts where you said you like to use a sponge. Was a sponge what you used to apply and did you wipe any off? Also did you add poly to the legs? I had my legs painted in a chalk paint and they were hard to keep clean by my little monsters! I’m refinishing my table after failing the refinish last week. I tried my own method and it didn’t work out 😬 So now I’m trying to find a tutorial where I can get it right
I used an oil based stain since I wanted to use an oil based polyurethane. Oil based holds up better and since this gets daily use, I wanted the most durable option. I apply the stain with foam brushes, wait the recommended amount of time, and then wipe off any excess.
The legs were spray painted so there was no need to poly them. I never poly over painted finishes. It will yellow the color over time.
Chalk paint does need to be sealed but the preferred method is wax.
Several people have asked about oil or water base on the stain and application method, however it must be a big secret since it is never answered.
She did answer it. "Minwax fast drying poly in oil based"
I’m helping my step-daughter refinish a veneered oak dining table. The first thing I would say is DO NOT use Citristrip stripper. It left the wood black. While removing the black, the veneer was sanded through in a few places. I’m going to use a craft knife to create faux wood grain. Once the grain is “cut/scratched” what are the next steps?
Would you mind sharing the paint color you used on the legs?
I used Rustoleum's X2 spray paint in white
The finished table pictures are so covered with place settings and centre pieces I can't see what the actual refinish looked like?
Hi, I am considering refinishing a table as well. It is glossy throughout, even the legs. I wanted to paint it completely white instead of staining it for a country style, and I was wondering if you used a finish in the legs as well as the table top? Was it the same poly?
I spray painted the legs:) If you add a poly to white paint, it will yellow it. You shouldn't need to add a sealer if you use paint. Good luck with your project! Feel free to email me if you have any other questions.
How did you cut the legs down?
With a table saw.You could also use a miter saw if you were able to secure them while you cut so they were level.
Hi!
The table looks great! What did you do about the spots you sanded through? Aby tricks for camoflaugibg them? Did they stain like the rest of the veneer?
I am currently refinishing an oak pedestal table with a veneered top. There was a little water damage on one side near the center and I sanded right through! It's not gonna be a deal breaker because I had planned to put my grandma's pineapple doily in the center anyway but I'm looking for any ideas I can get to make it less noticeable!
Thanks,
Ashley
I added extra stain to those spots and then when the stain was mostly dry, I blended it (smudged it) a bit with my finger.
Hello, wondering if the legs have desirable wood under the black paint, I have a similar table, but want all stained wood instead of painted legs. I can't find anywhere what the legs look like under the paint of Ashley-like furniture!
I am not sure what type of wood it is, but they are 100% wood so I am sure with some elbow grease and a paint stripper, you could remove the paint.
thanks for the great tutorial. I wanted to ask if i have a sort of engrave in the wood panel like engraved shapes or something. will i still be able to veneer it ?
Veneer it? Or refinish it? If you mean refinish it, I think you still can. Maybe try a wood stripper and then lightly hand sand.
What brand of stripper do you use?
Citristrip
That's a beautiful stain color! Thanks for sharing!
I just scored this same table and chairs for $50 for our new home. I’ll be refinishing it with these tips! Going to start with stripping it since I know it’s veneer from the start.
I have a high gloss veneer dining table. The finish has cracked slightly, enough to be noticeable, but the edges of the crack haven’t really stuck up. You commented that finish remover is better for veneer. Would that lift the edges of the cracks? I am concerned about sanding through the veneer.
I'm not sure. Without actually seeing it, it is hard to say.
LOVE how this project finished!!! Do you mind sharing what stain you used for the top of the table? Hubby and I are refinishing our first dining room table this afternoon:)
I used Weather Oak by Minwax
This is so helpful but I wished I had seen this BEFORE I applied my first coat of stain. I forgot to lightly sand w 220 and can see exactly what you mention (sanding marks). Is it too late to lightly sand w 220 before doing a second coat and poly coating it?
I'm refinishing a tabletop. Do I have to use a stripper or can I just start sanding with 120 grit?
I usually just sand unless the sealer/finish is realy thick.