
My moss art is probably my favorite thing in my Secret Garden. This project started out as a complete failure. I had seen all over pinterest "moss graffiti" that was always words. I wanted so badly to give it a try, but to do my own version of it. Not a saying, but a design.
The problem was that there were plenty of articles that talked about it and tons that had "recipes." However, there was not a single one that I could find where the person had actually done it. Almost every article had the SAME picture. So I decided to try it and see if it would really works.

ATTEMPT #1 {REAL MOSS}

This wall of my house is on the north. It is mostly shady and there was already moss growing on the ground along the wall. I figured this would be the best place to try out moss graffiti.
The recipe that sounded like it was the best included buttermilk, water retention gel, moss, and water. Water retention gel actually comes as granules. I bought mine online after doing a search for it. I found that the amount of water retention gel that they were saying to add was way too much. I played around until I had what I thought was a good consistency.


It looked like manure and I was grossed out to touch it. It felt like what I imagine a fresh pile of manure would feel like too and it stunk. Uggg. But I powered through. I taped up my stencil with painters tape. It held surprisingly well. This stunning stencil is from Cutting Edge Stencils and is called Zamira. They actually had it enlarged for me when they discovered what I was doing with it :) I {heart} them.

I used my hands to smear it on. I wanted to push and smear it really well so it got stuck in all the grooves of the brick. It obviously took longer than if I had been painting, but I also only had one to do and not the whole wall. I got done and when the water retention gel's moisture got sucked into the dry brick, I realized that it was too thin. There was still too much gel and not enough moss. I made some more and barely put any gel in at all.

This picture is just showing how I had to flip the stencil over to get the full design.
Here you can see that I added a thicker application of the moss.
Now here is the sad part of the story. The big fat fail. Up until this point I had full control of the project. But from this point on it was Mother Nature that had the upper hand. We had record low humidity. And record high heat. I also got started on this project later in the spring than I had hoped. I was shooting for March and ended up getting to it in early May.
I did everything I could possible do. I started out spraying it with water from a spray bottle every morning and evening. The brick was absorbing the water too quickly so I bought a misting system and hung it above. That helped and I started to see some growth. But it just got too hot to quick. The 100 degree weather was too much. At this point I decided to come up with a plan B. At first I was going to get plywood and blend up some more moss and try to grow in indoors where I could control the environment a bit more. But I didn't want to wait the 6 weeks it usually takes for the moss to grow. So I decided to use preserved moss.
OPTION #2 {PRESERVED SHEET MOSS}
I bought the thinnest plywood I could find since I didn't want it to be heavy. You can get plywood in 4 feet by 4 feet pieces instead of the regular 8x4 and it will save you money. Plus, the end project is almost 4x4 anyway.
I stained it grey because I wanted it to look weathered and also to match the rest of my secret garden.
I then used the same stencil and traced it with a pencil.

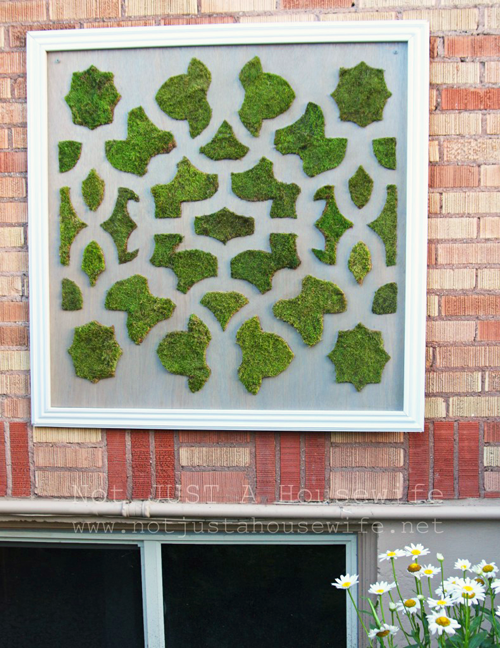
I bought 7 bags of preserved sheet moss at Hobby Lobby. I had a bunch of extra scrap pieces so I probably could have gotten away with less. I would lay a piece of moss down on one of the designs and slowly cut along the lines. I would have to blow to get the dirt and tiny pieces of moss out of the way so I could see the line. Most took 2 or three pieces of moss. Only the little ones were able to be cut out of a single piece of moss. As soon as I had it cut out I used a glue gun to adhere it to the board. Where the seams were (where the two pieces of moss touched) I kind of fluffed it up so the seam was not as noticeable. And in a few cases I would glue small pieces of moss on the seam. This took me three days of doing a few here and a few there as my kids and schedule would allow.


It looked like a hot mess while I was working on it and I was beginning to worry. But as soon as I got the shop vac and cleaned it up I was amazed!
This next step is the most important step if you will be hanging your moss art outdoors.
This NEEDS to be sealed. Preserved moss is dyed so it will look green. In the sun it will fade and if it gets wet, the dye washes off. If you hang it like it is without sealing it, as soon as it get wet, you will have green streaks running down the board.
I use Helmsman on almost everything I put outside (ie. furniture) and most of the time I use the kind in a can and use a brush. But with this project I used it in the spray can.
I sprayed the crap out of it. I saturated the moss. I think I ended up doing 4 coats and used two bottles. Over kill? Maybe. But while I was sealing this out in my garage (with the door open) we were having intense rain storms. I wanted to make sure it held up alright. After I hung it we had another storm (the one that knocked my huge tree over). It has rained several times since and it has held up so far. Not only does the Helmsman Spray help seal it but it also has UV blockers to help prevent fading. If it does fade, you can also freshen it up like I showed with my topiary.

I already had the molding/trim since I had planned on framing the real moss that was growing directly on the brick. I cut it and added it to the board. Since the board is so thin, I screwed the molding on from the back. I thought it would hold better than nailing with my nail gun. As far as hanging it on the side of my house, my husband and I screwed it directly into the brick.
The real moss is actually still on my house. It is just covered up by the plywood version. I am still determined to see if I can make it work under better weather conditions. I have moss growing on my garage roof like crazy so I figure it could totally work. But I love this version too :)
I am glad for the first failure because I realized that there are many of you that live in places where growing moss is not an option. And there are those of you who may not want to stick you hand in the manure-like moss and go to all the effort to get it to grow. So there are two options depending on you and where you live that you can try!


This is definitely my favorite piece in your secret garden! :)
It's amazing! I just absolutely love it. It would be a neat piece inside the home too.
Sorry about your first attempt, although it seems it would have worked if not for record highs this summer.
How did the moss do? Is it still alive?
I had it up for a couple of years but ultimately decided to take it down because I was tired of babying it. I just live in too dry a climate to make it work.
Looks really great! Moss graffiti sounds great in theory, but playing with dirt was never my idea of fun, so I guess that's a no for me. Sorry that it didn't work out for you after all the effort! With dried moss, you might even keep one indoors. I could imagine it'll look great with a christmasy decoration!
This turned out SO gorgeous and I love that you shared the fail (for now!) and the final project!
wow what a great project, not sure I could have not the first one.
Wow, you are a determined girl! Good for you because it is gorgeous and worth all the effort (says the girl who put in no effort!)!!
Good for you for not giving up! Your final attempt looks gorgeous! (Years ago I ruined my blender making moss for a project that failed....double fail!)
Love it love it love it!!! Thanks for the fantastic tutorial. Your secret room is beautiful! Hooray for you!
I just stumbled upon your site. May I say...I just LOVE everything on here, U inspire me!!! thank you for sharing all of your ideas i'M HOOKED!!!!!!!!!
I share your thoughts from your first paragraph. I want to try this moss graffiti, but it sounds everyone just talks about it, noone is actually doing it. There are about 15 pictures circulating on the net altogether.
So your post was a refreshment. although hearing about the failed attempt is not good :( Have you re-tried since? did it work this time?
thanks!
Your secret garden is to die for, especially since I live in Arizona & mine would be filled with cacti, hehe. Just a thought for anyone wishing to try the moss project. Seal your masonry/brick/stucco first. This way any moisture won't be lost to the walls versus the moss.
This is such a cool project! I know it was a pain...but so worth it!! For us anyway! :)
Absolutely amazing! I admire your fortitude. This is so unique and pretty, it must bring you a lot of joy. I have your "secret" garden pinned , and I refer to it often. Great job ! Thanks...
I love this, and am planning on trying it for a joint mothers' - fathers' day gift at my parents house. I emailed you with a question, but I thought I would post here too... just trying to ask someone who has done it and failed before I go do it for the first time.
Thanks in advance, even if you get to me after I have started. I plan on spending more time on this site!!!
Wow, this mirrors my experience with moss art exactly, except that I started on plywood. I think I'll try once more to grow it but I'd that doesn't work, I'll definitely try your method- thanks!
Hi, I'm thinking of doing up some moss art to hang in my bedroom and I've a few questions! Does it stink when the moss is fully grown? Also, does it attract any pests?
I live in Singapore and we have crazy high humidity all year long so I think growing the moss would be easy; it's just the maintenance after that that worries me.
Thanks!
Great stuff! Your work is amazing! What advice might you have for installing something like this indoors? I would like to do something on an interior wall, but because I don't want to damage the wall I'm trying to find a medium on which to mount the moss. Do you think a cork board might work, for example? Thanks!
Thank you so kindly for your tutorial! For the longest time I've been looking for inspiration for piece of art to go over the box that will hold out outdoor tv cabinet on the patio. This is it! I cannot wait to get this project started. I will send you my final result. Thanks again!
I go to Purdue University, and my group in the Honors College is doing a moss graffiti project. I was wondering, when you were figuring out how much gel you needed, what did you go off of?
I would love to talk to you about your success as I am having none.
Please email me when you get a chance m.davis10@hotmail.com
:) thanks
Love your post! I am about to give it a shot. My only thing is...absolutely nothing I’ve read says where to get live moss! I was able to find some by a creek in my back yard, but nothing I found is big or clumpy like your pic. Where do you get it?
I gathered it from around our house and little from up the canyon near our home. Just use what is available :)