
Let me tell you a little story. Once upon a time my bathroom faucet broke. We bought a new one. I couldn't replace it myself because the fittings were all rusted and too tight. Enter my not so handy hubby with big muscles. He had to remove the sink in order to get the faucet off. Problem #1: The sink was the original 70+ year old sink. It was held in there by some fancy old clips. They were so corroded that they snapped and broke. Problem #2: Those particular clips are no longer manufactured (trust me, I called everyone). We tried every clip on the market and none of them worked. So we needed to get another sink. Problem #3: The old sink was a weird size. We couldn't find a sink that would fit the hole. I searched for 2 weeks online. Nothin'. Sooooooo, that meant we now needed a new counter top as well. Problem #4: My hubby was unemployed at the time and we had very little moola. So I did what any self respecting DIYer would do. I made my own! Total cost for a new sink, faucet, and counter top $89.00!!! No kidding.
I think I can handle that. Especially since this is a somewhat temporary fix until I can afford the real thing :)
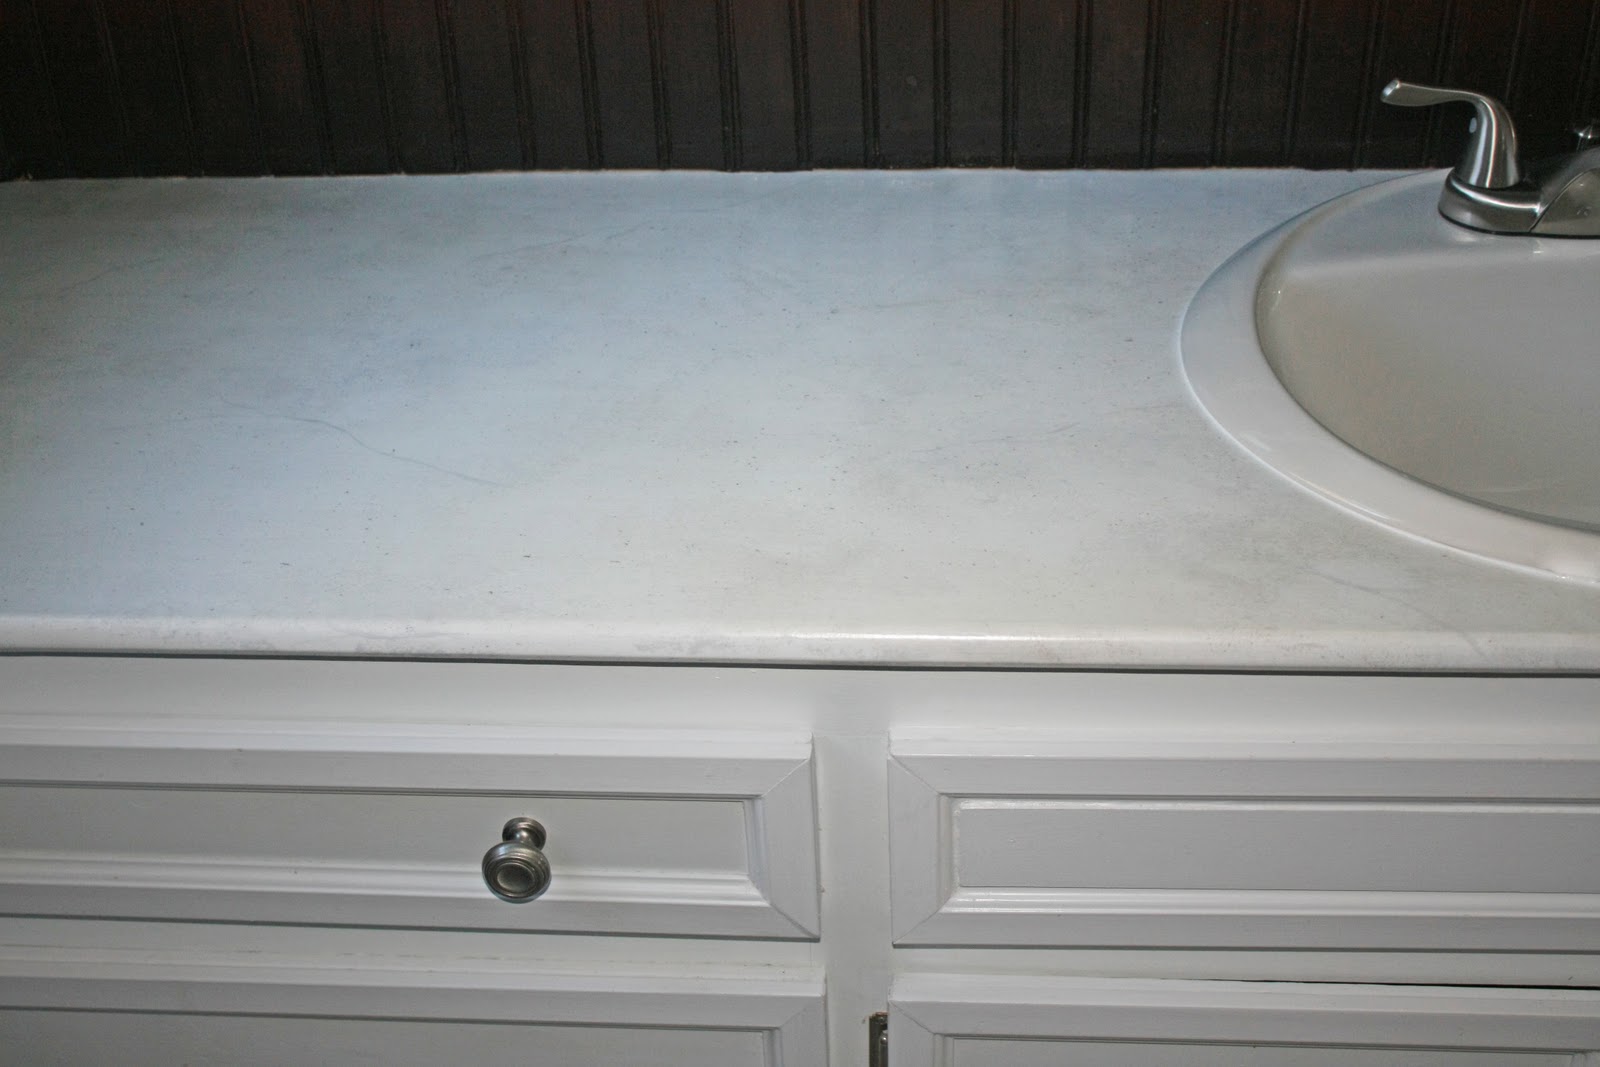
The After:
I wish that my bathroom had better natural lighting because this does NOT do it justice. So you are all invited to my house to see it in person :)

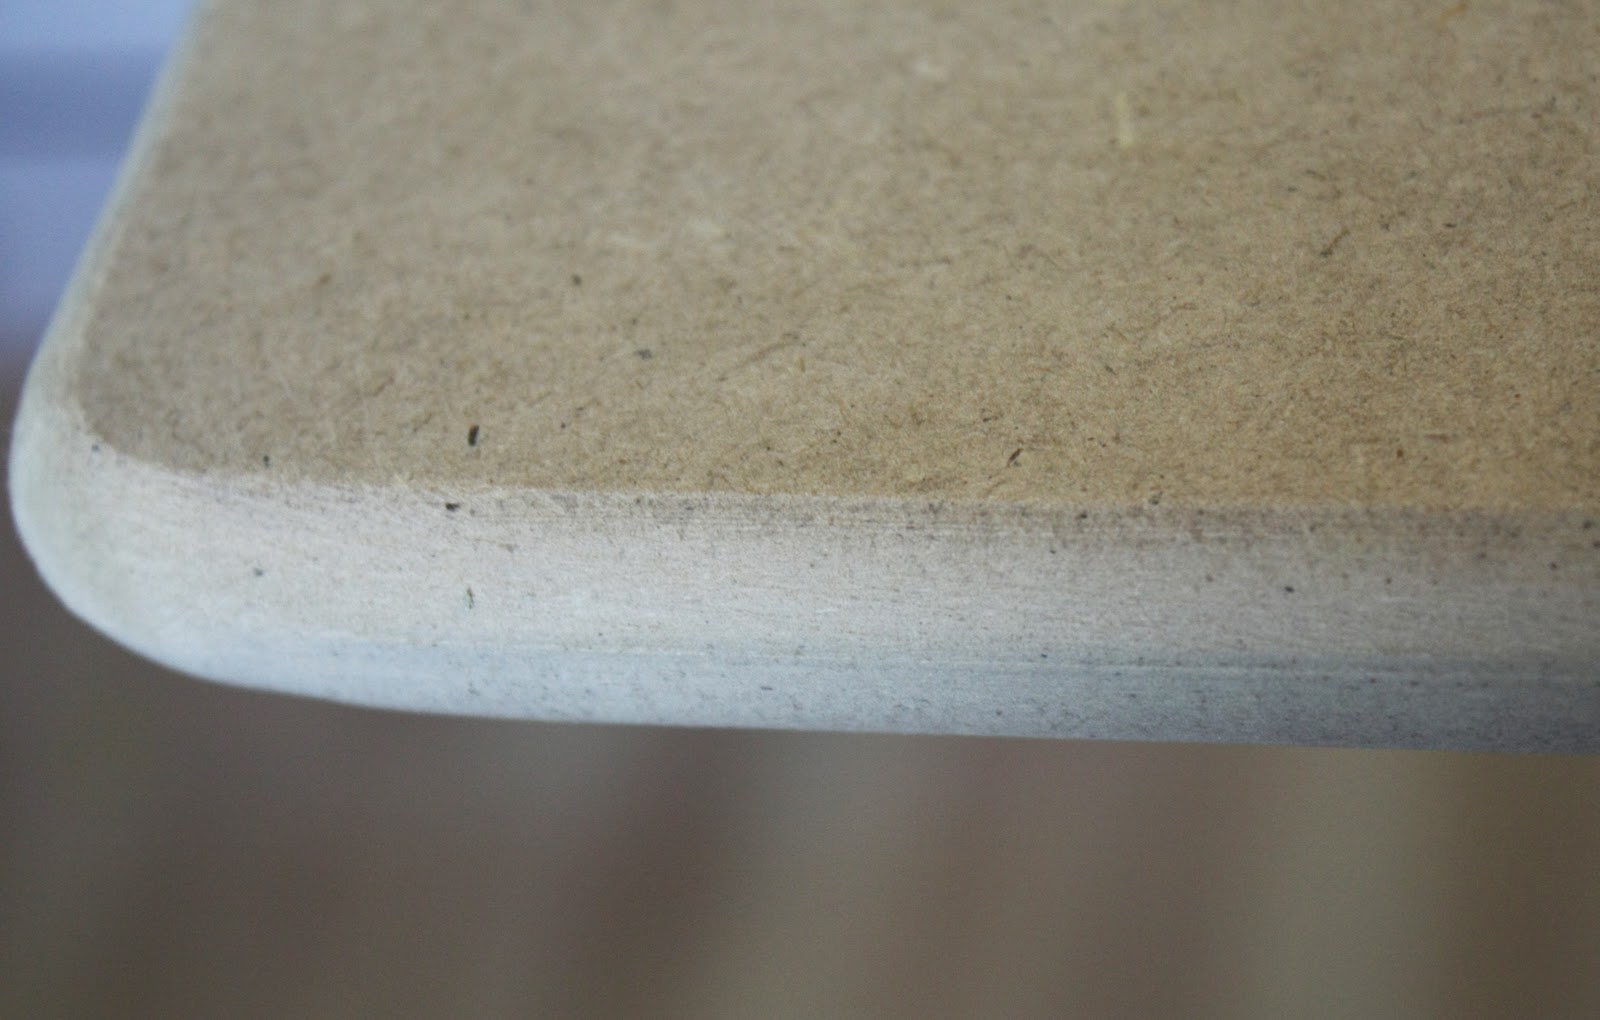
Since the far shot doesn't show any of the detail, here is a close up. . . (still doesn't do it justice).

The Before:
Not terrible. But the metal around the edge and around the sink was hard to keep clean and made it a little dated.

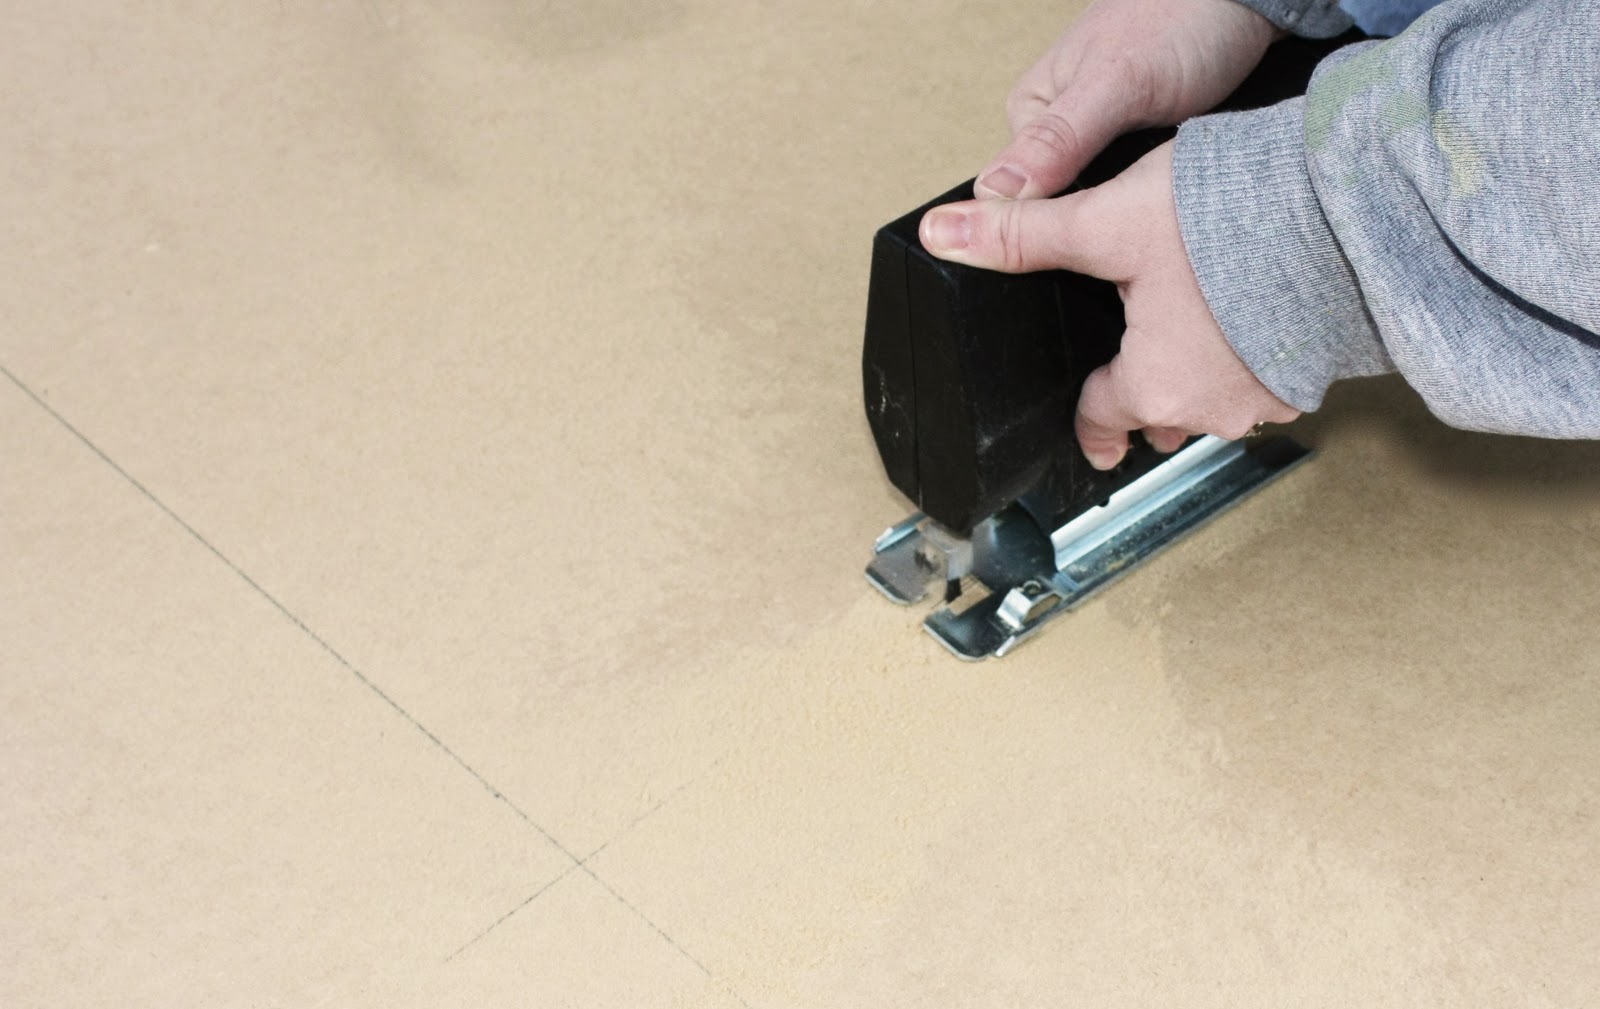
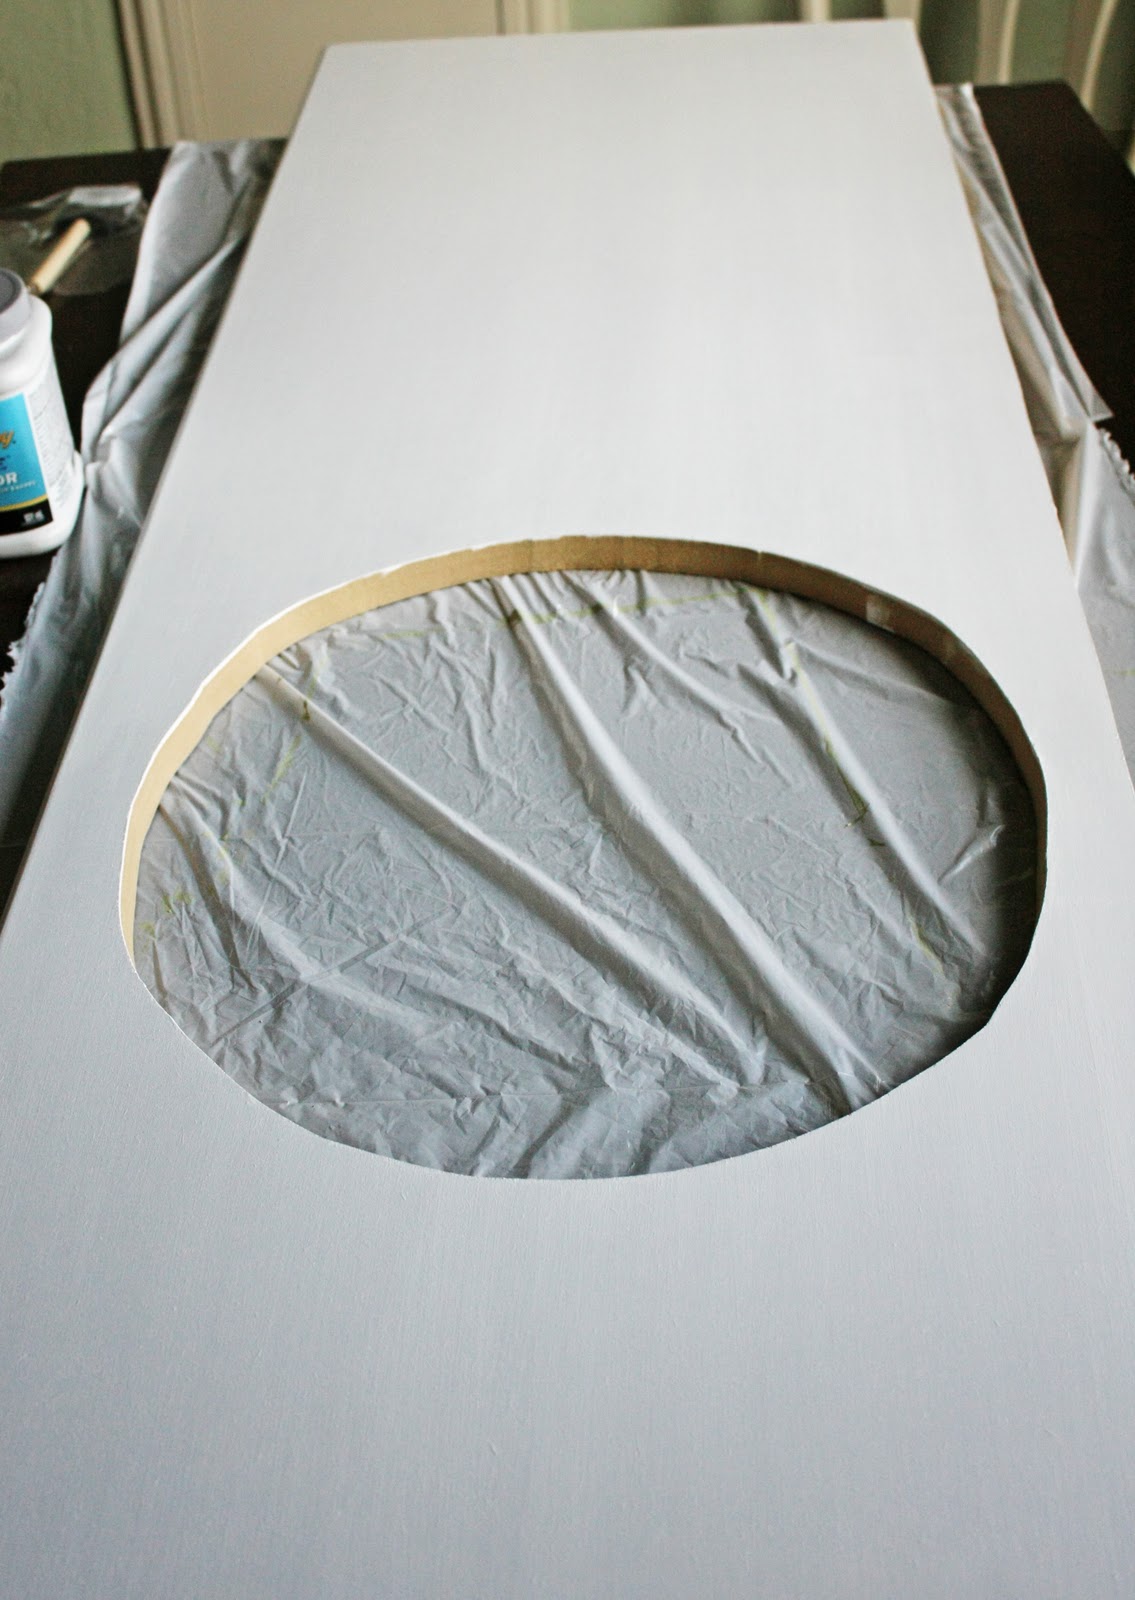
I started with a sheet of MDF. It cost 34 dollars and some change. I only used a small amount and I have since made several other projects with the left overs! I measured the size for the counter top and used a jigsaw to cut it. You can also use a table saw.
Once it was cut I drew a hole for the sink. I used a drill to create a starting place for the jigsaw.
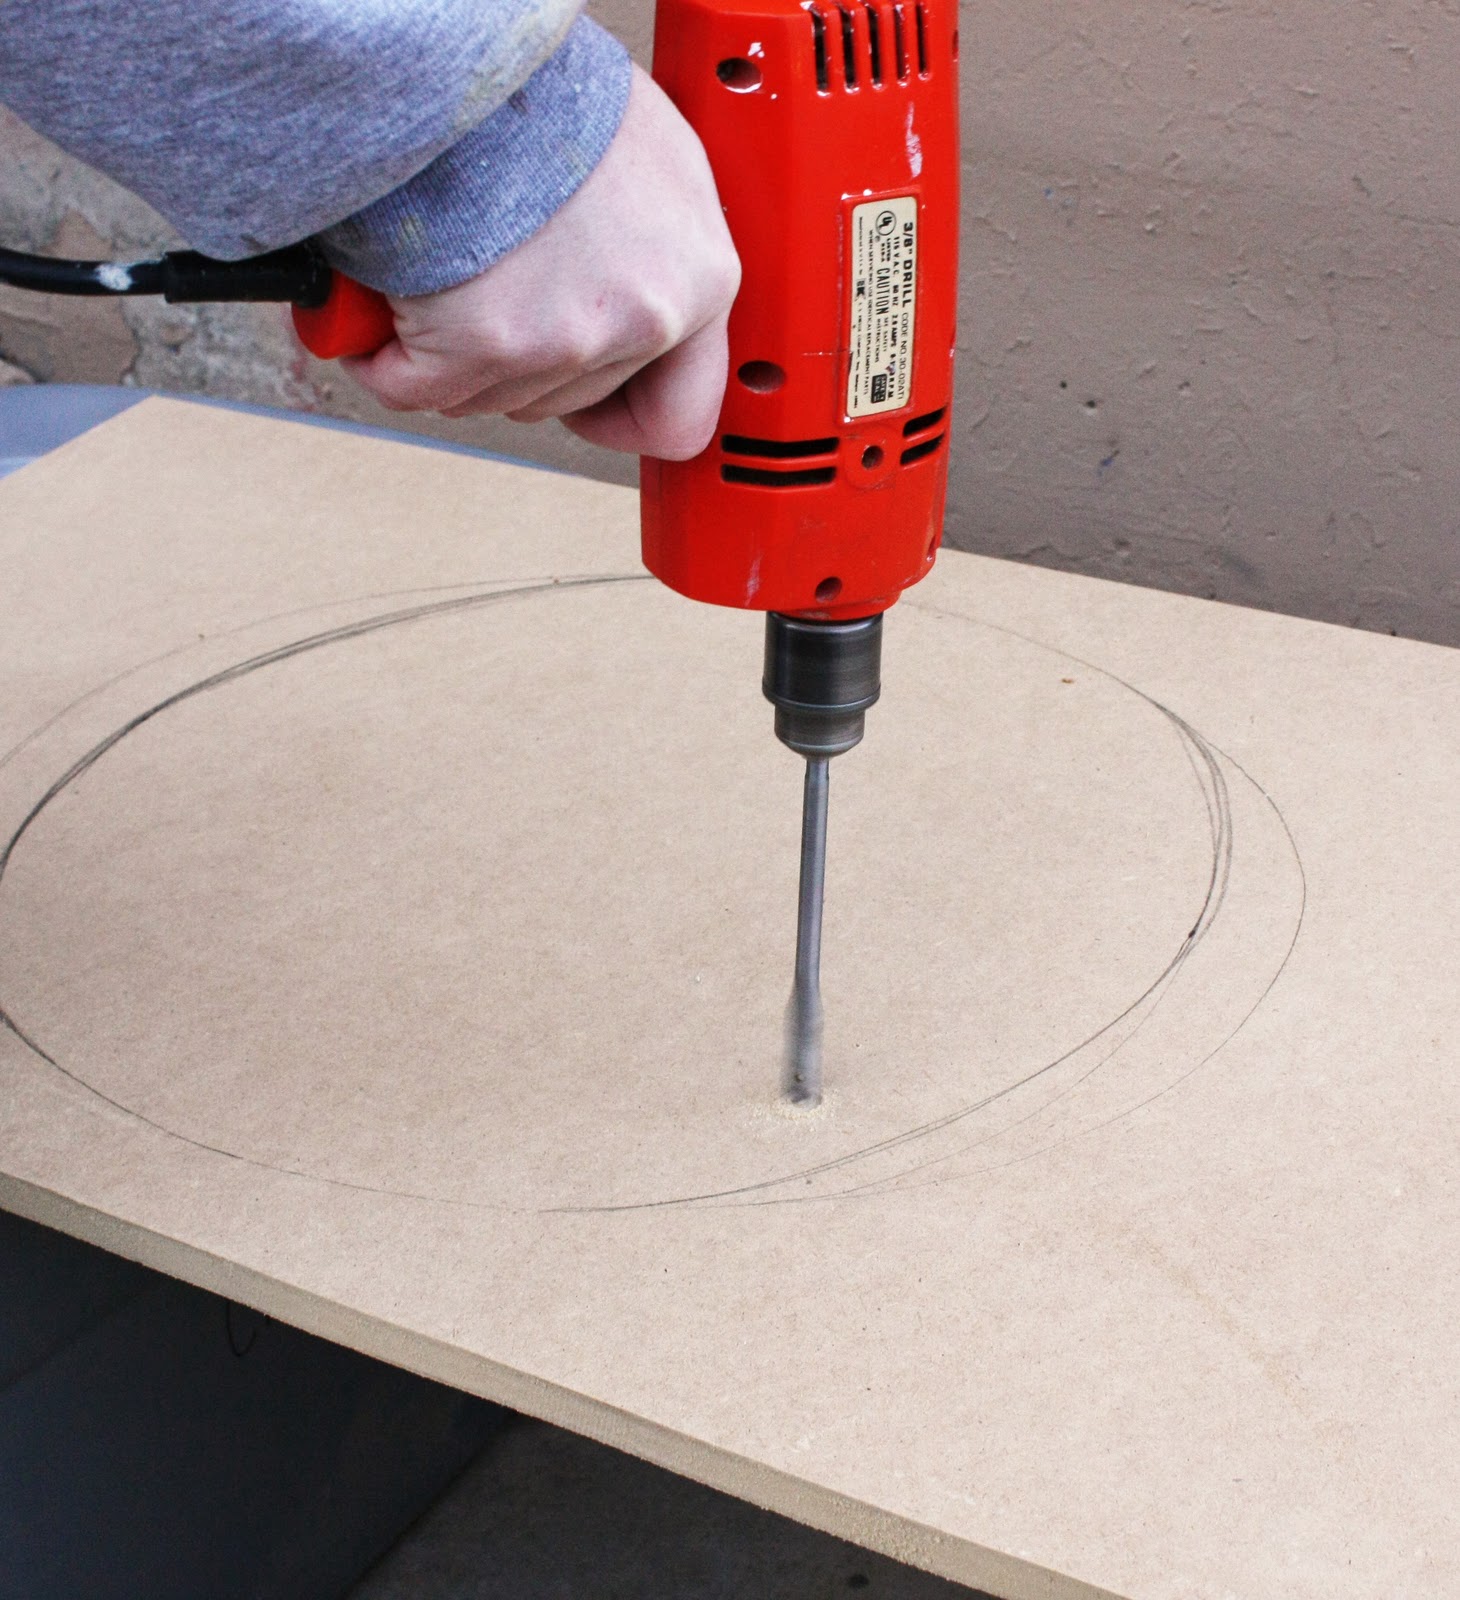
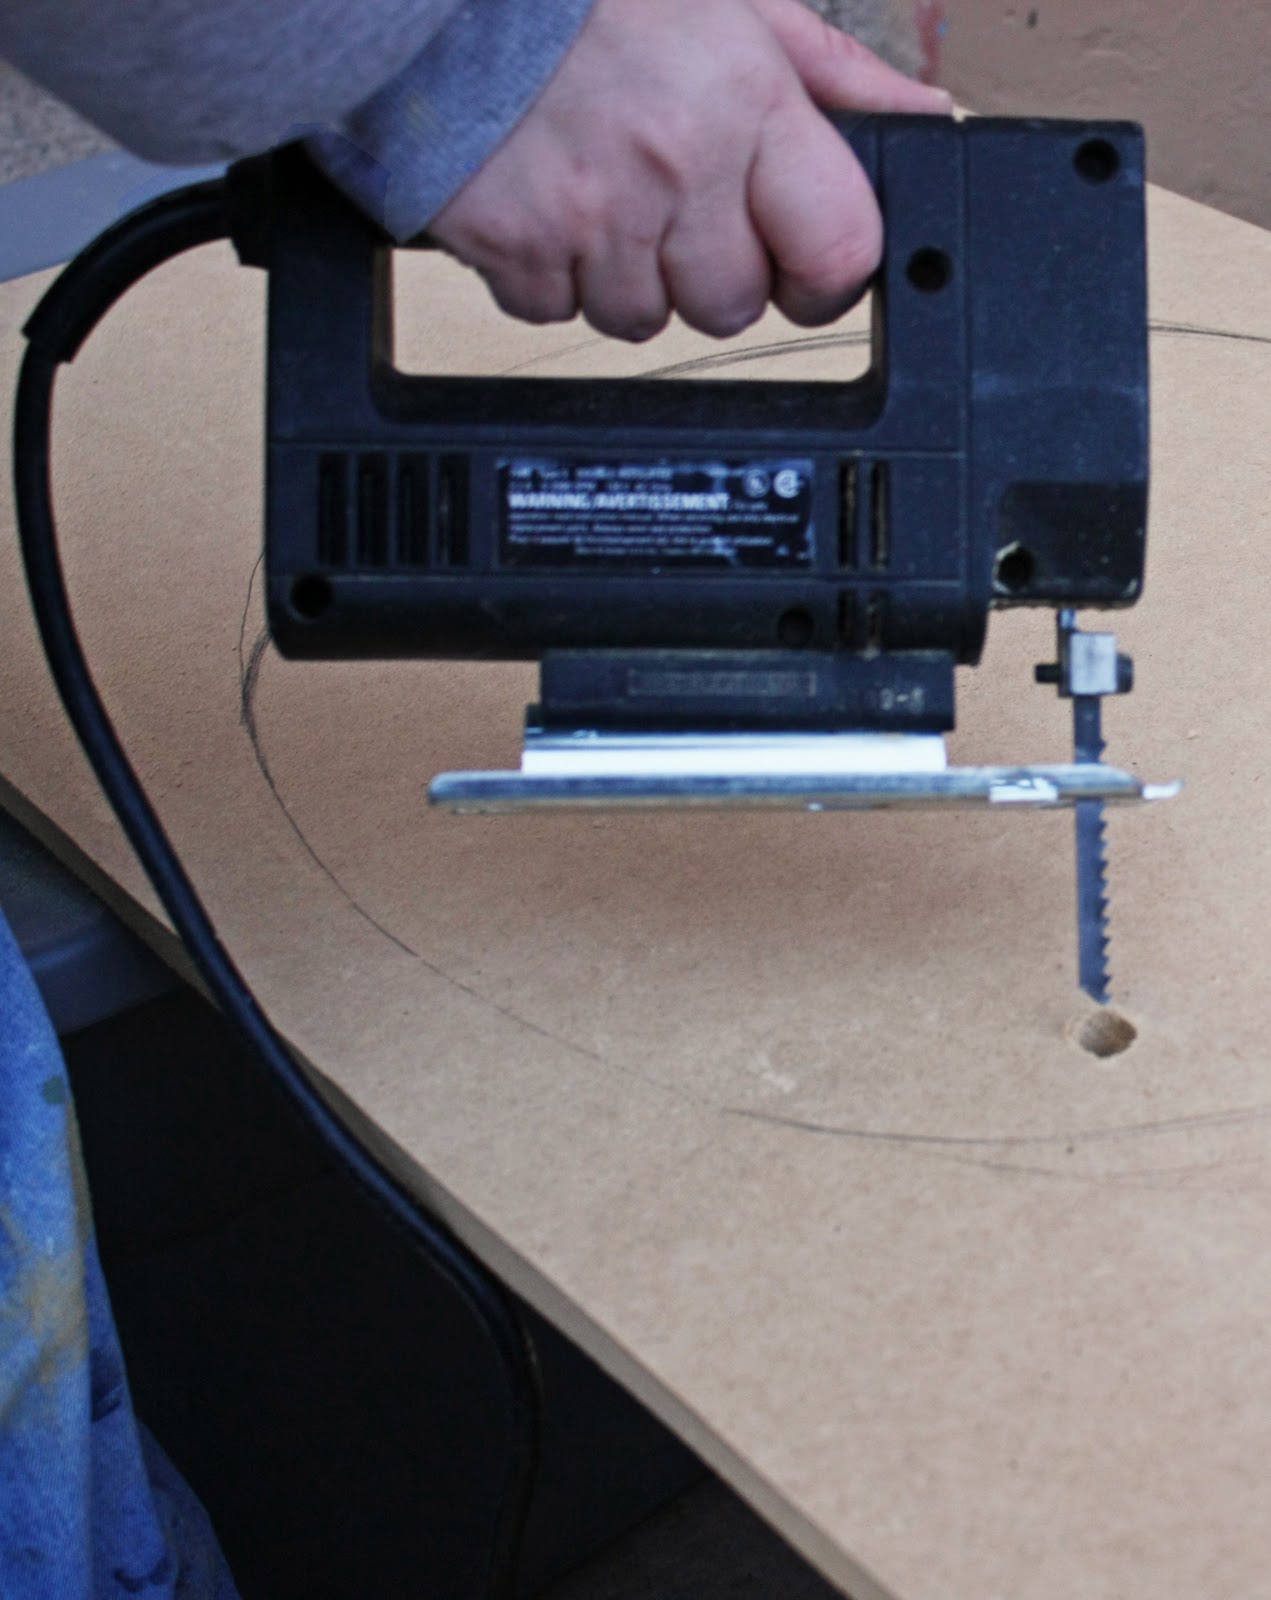
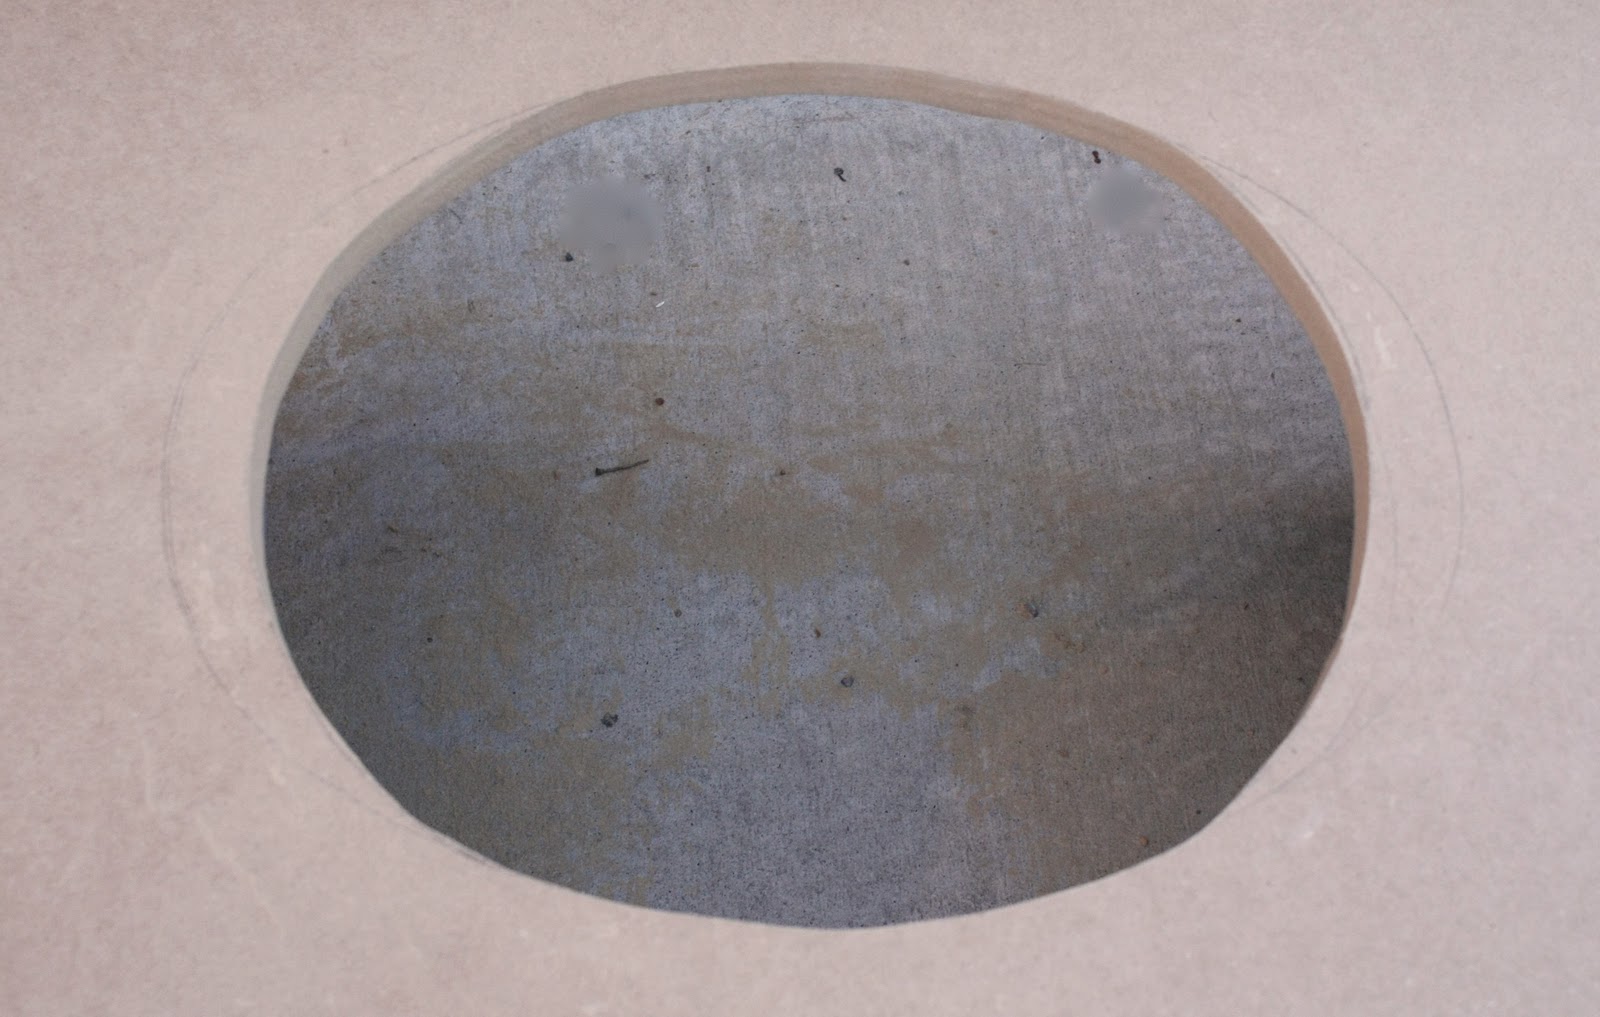
I didn't worry about it being perfect because the sink is a top mount and you won't see it.
I don't have a router so I called a cute neighbor to see if I could use his. He is an older gentleman and he was a bit skeptical about a girl using power tools. It must be a generation thing :) I was happy to let him do it for me. He did a great job!
I painted it white. Yep. It is on my kitchen table. Don't worry. I had it all done and cleaned up before the hubby got home :)
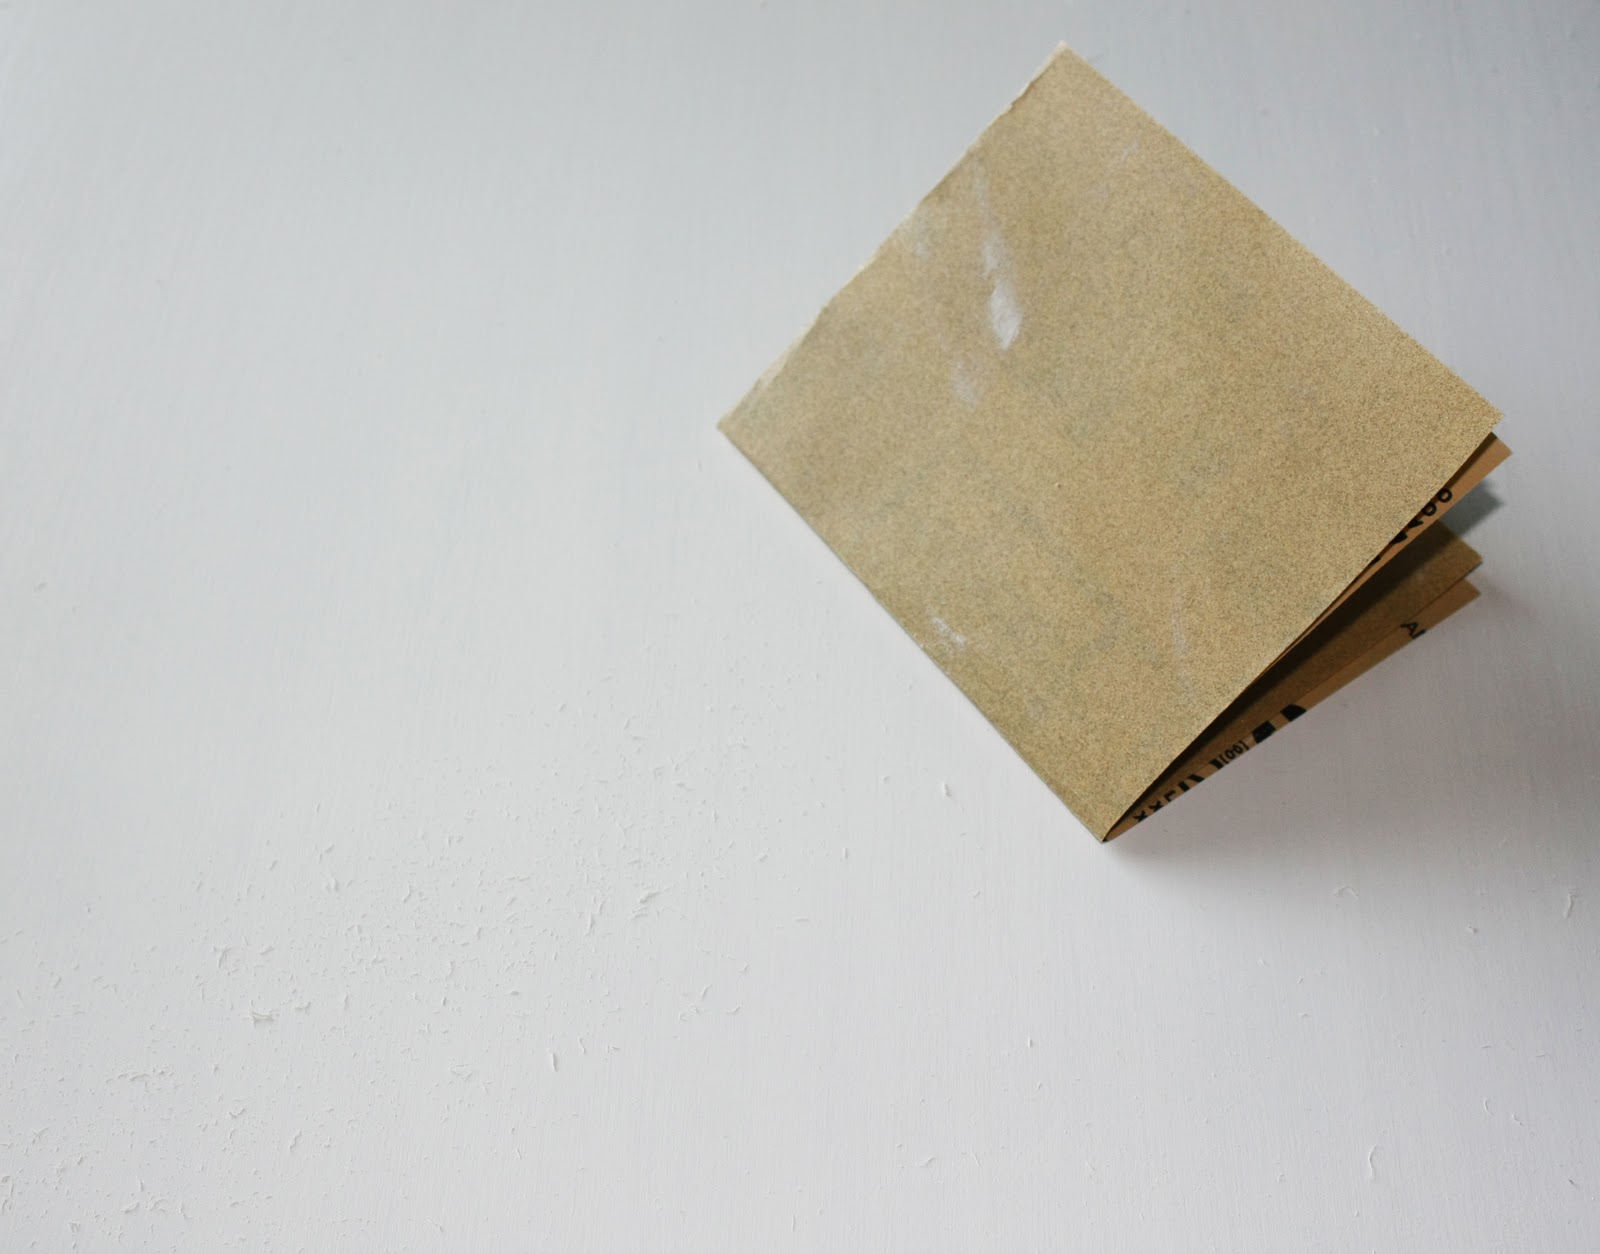
When raw unfinished wood, or MDF in this case, gets painted it can become rough. I used a fine grit sand paper to buff it smooth. 150 or 220 grit would work.
Now came the fun part! Faux finishing. I wanted it to be subtle. I wanted it to look like natural stone. I took the white paint I had used as the base color and poured some into clear cups. I mixed a tiny bit of black craft paint into one and a little brown craft paint into the other. The third got a bit of both.
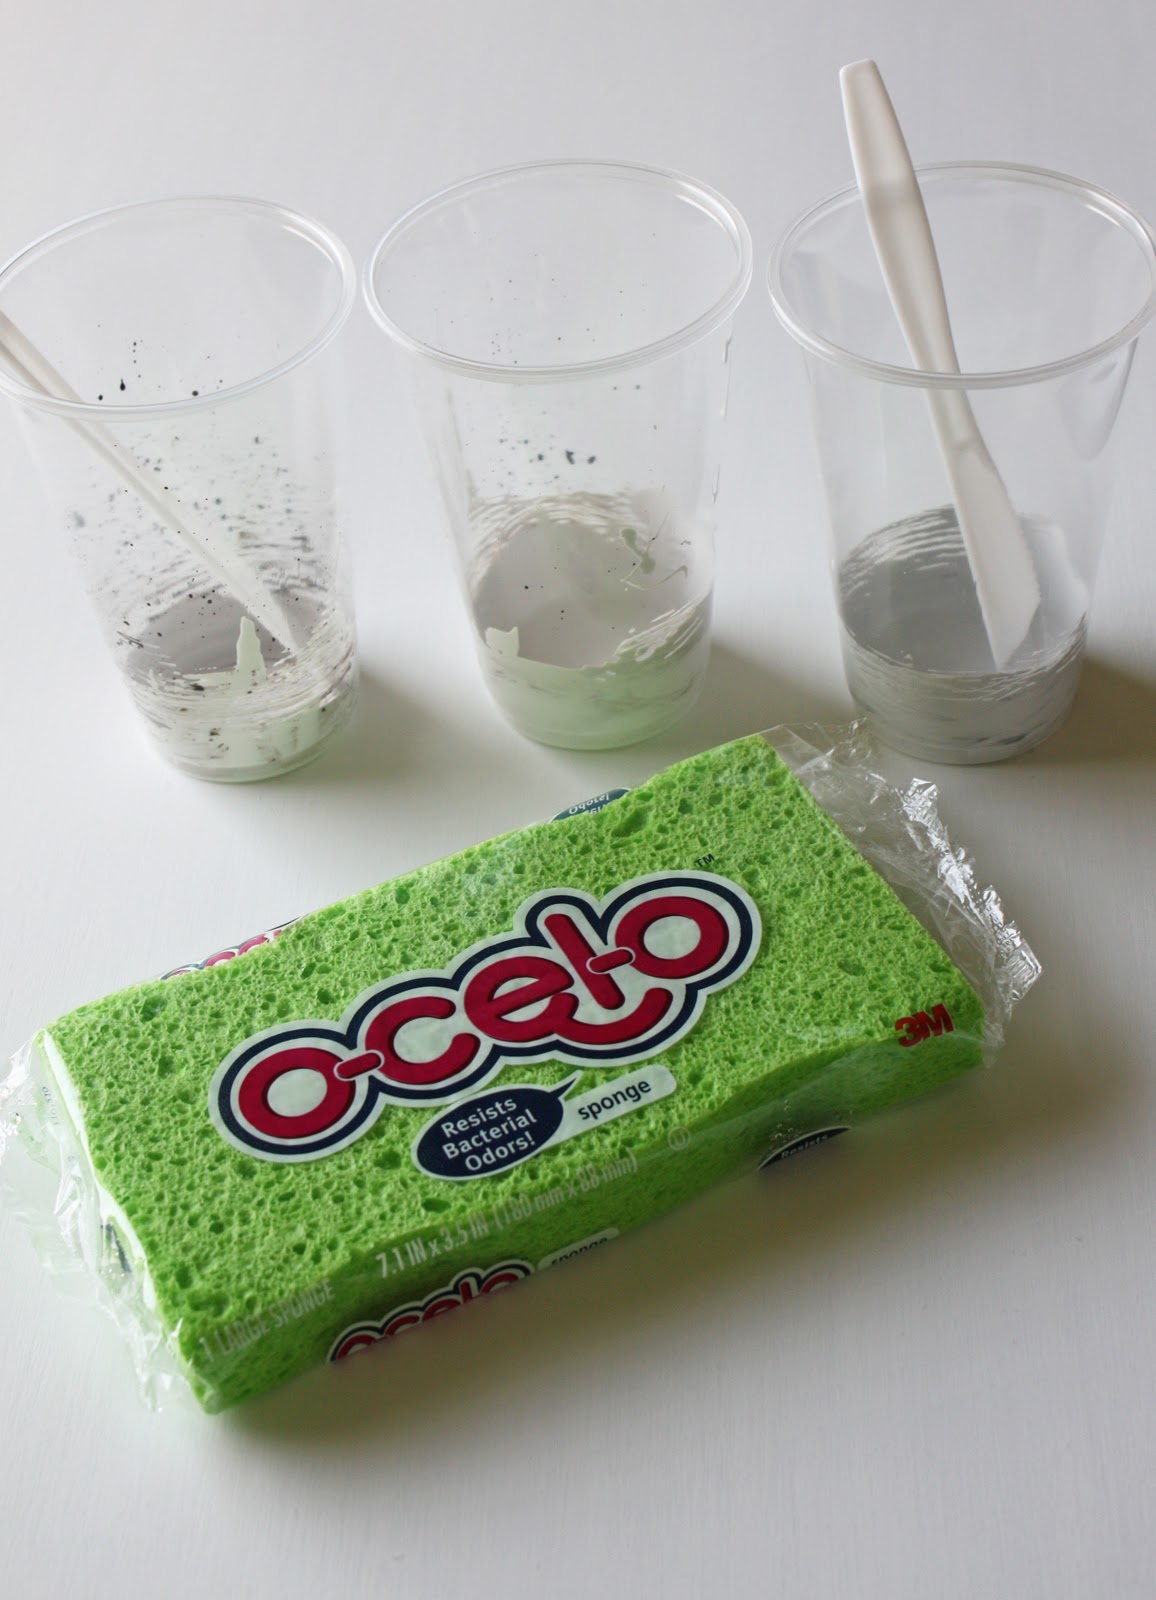
Once I started trying to sponge I realized it would have been easier to have the paint in a bowl rather that cups. But it worked alright. I lightly sponged on the paint. I didn't go all crazy. I figured I could add more later if I thought it wasn't enough.

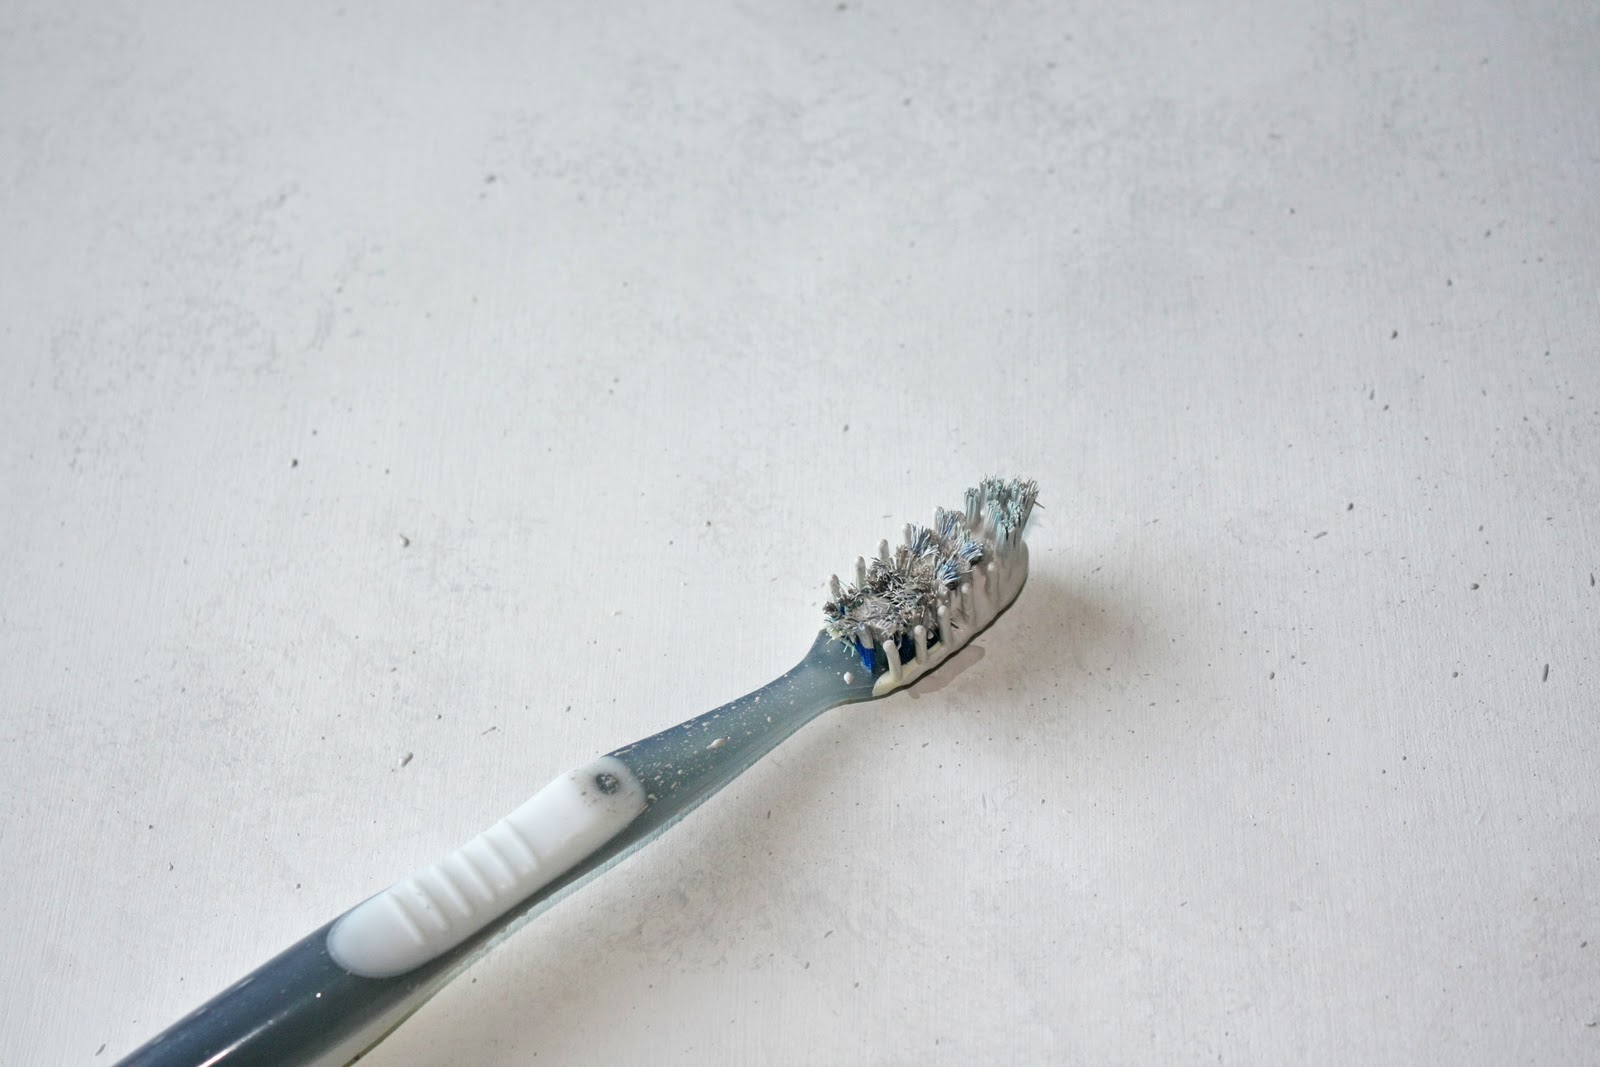
The I used an old trick my mom used to do when she was tole painting with the church ladies in the 80's. I flicked paint with an old (washed) toothbrush. I liked the speckled look.
Then I used a small pointed paint brush to draw on some veins.

Because I wanted it as smooth as possible to resemble a real polished stone counter top, I lightly sanded it again.
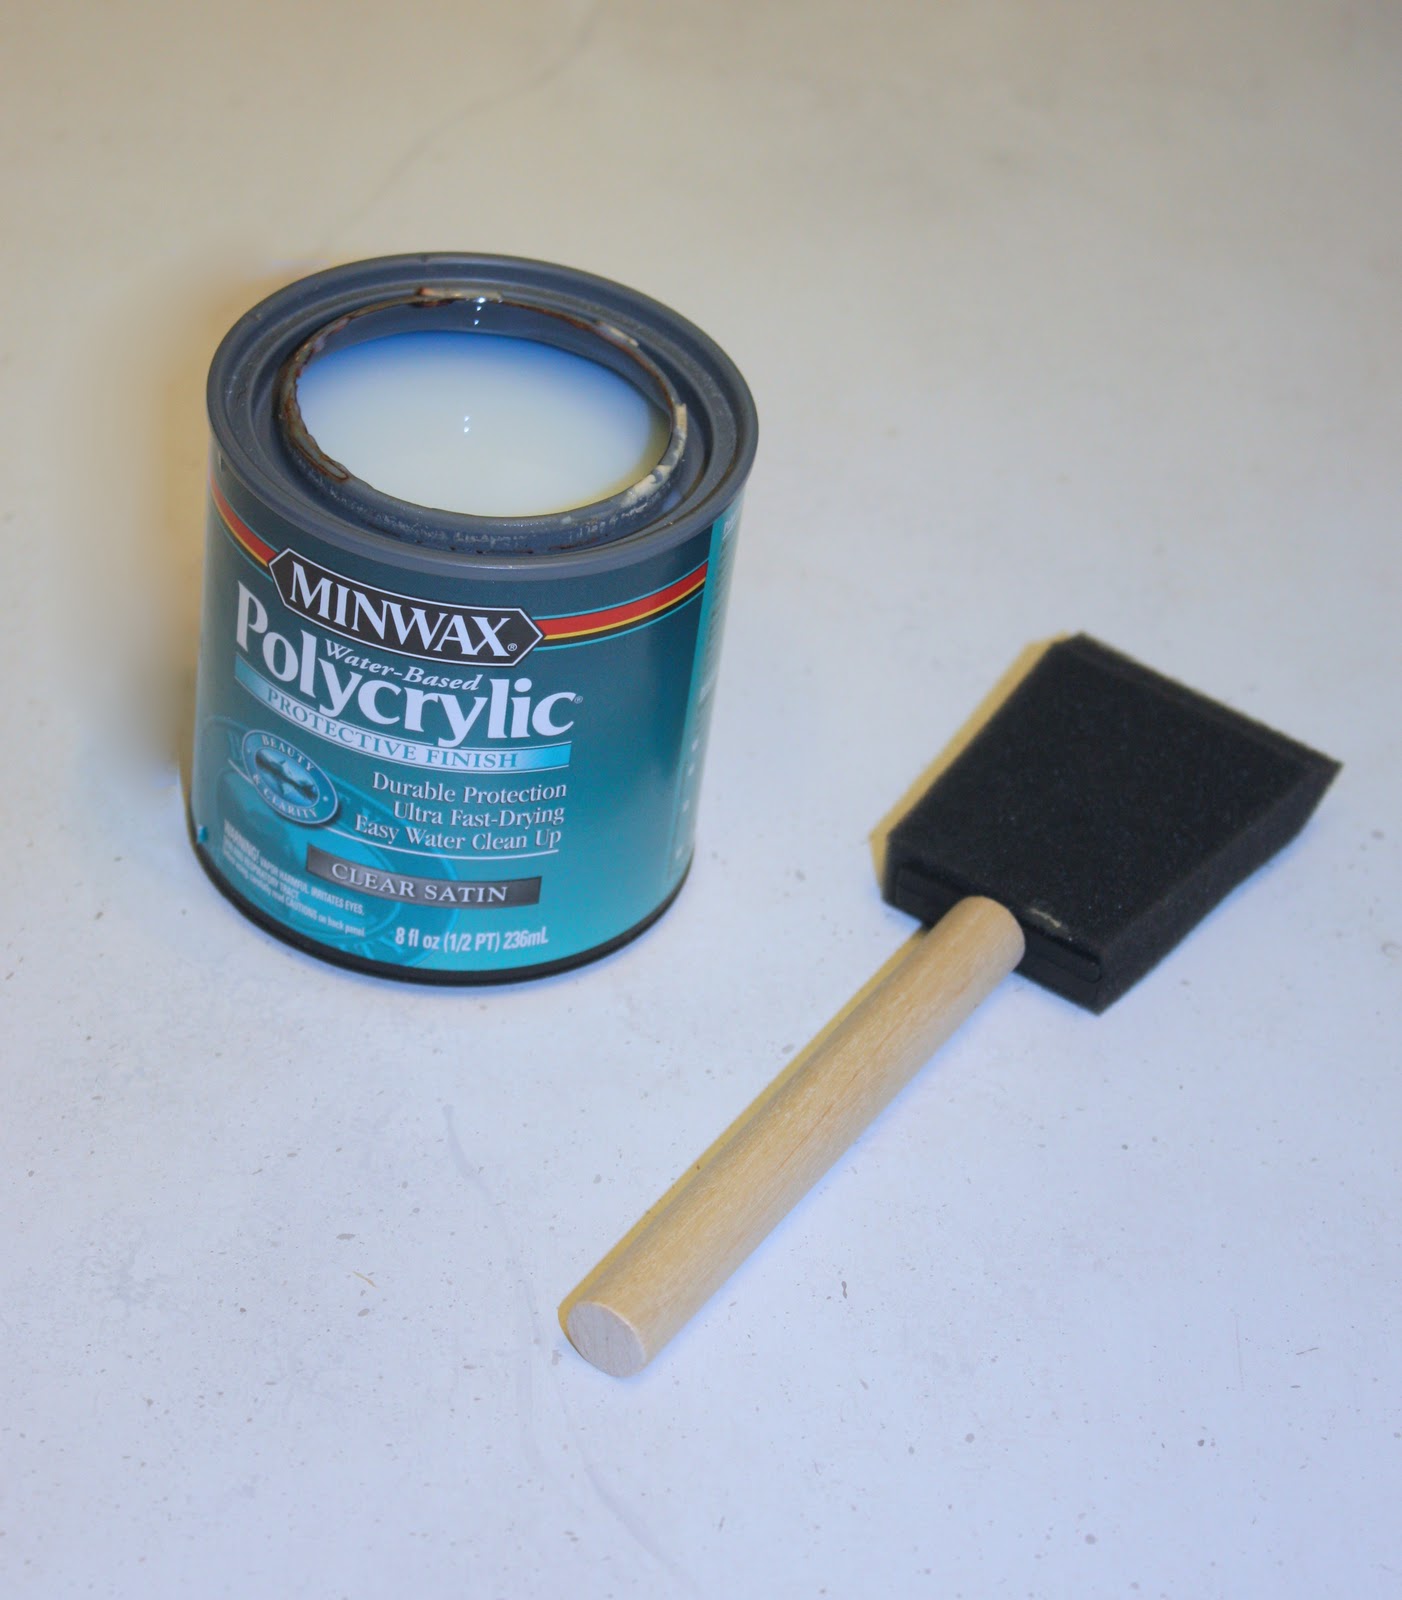
I then installed it. I used liquid nails all along the top of the vanity and then just laid the counter top on. I let it dry and then it was time to seal it. Because it was white I needed to use Polycrylic. According to Minwax Polycrylic doesn't yellow like Polyurethane can. I have never used it before because it is notorious for being streaky and it was for the first 3 0r 4 coats. But after awhile it evened out. They key is to use a FOAM brush. Don't use a regular brush or you will have lines from the bristles. I ended up using the whole can which was 8 or 9 coats. You need to lightly sand in between each coat with a fine grit (150 or 220) sandpaper so each layer with stick to each other.
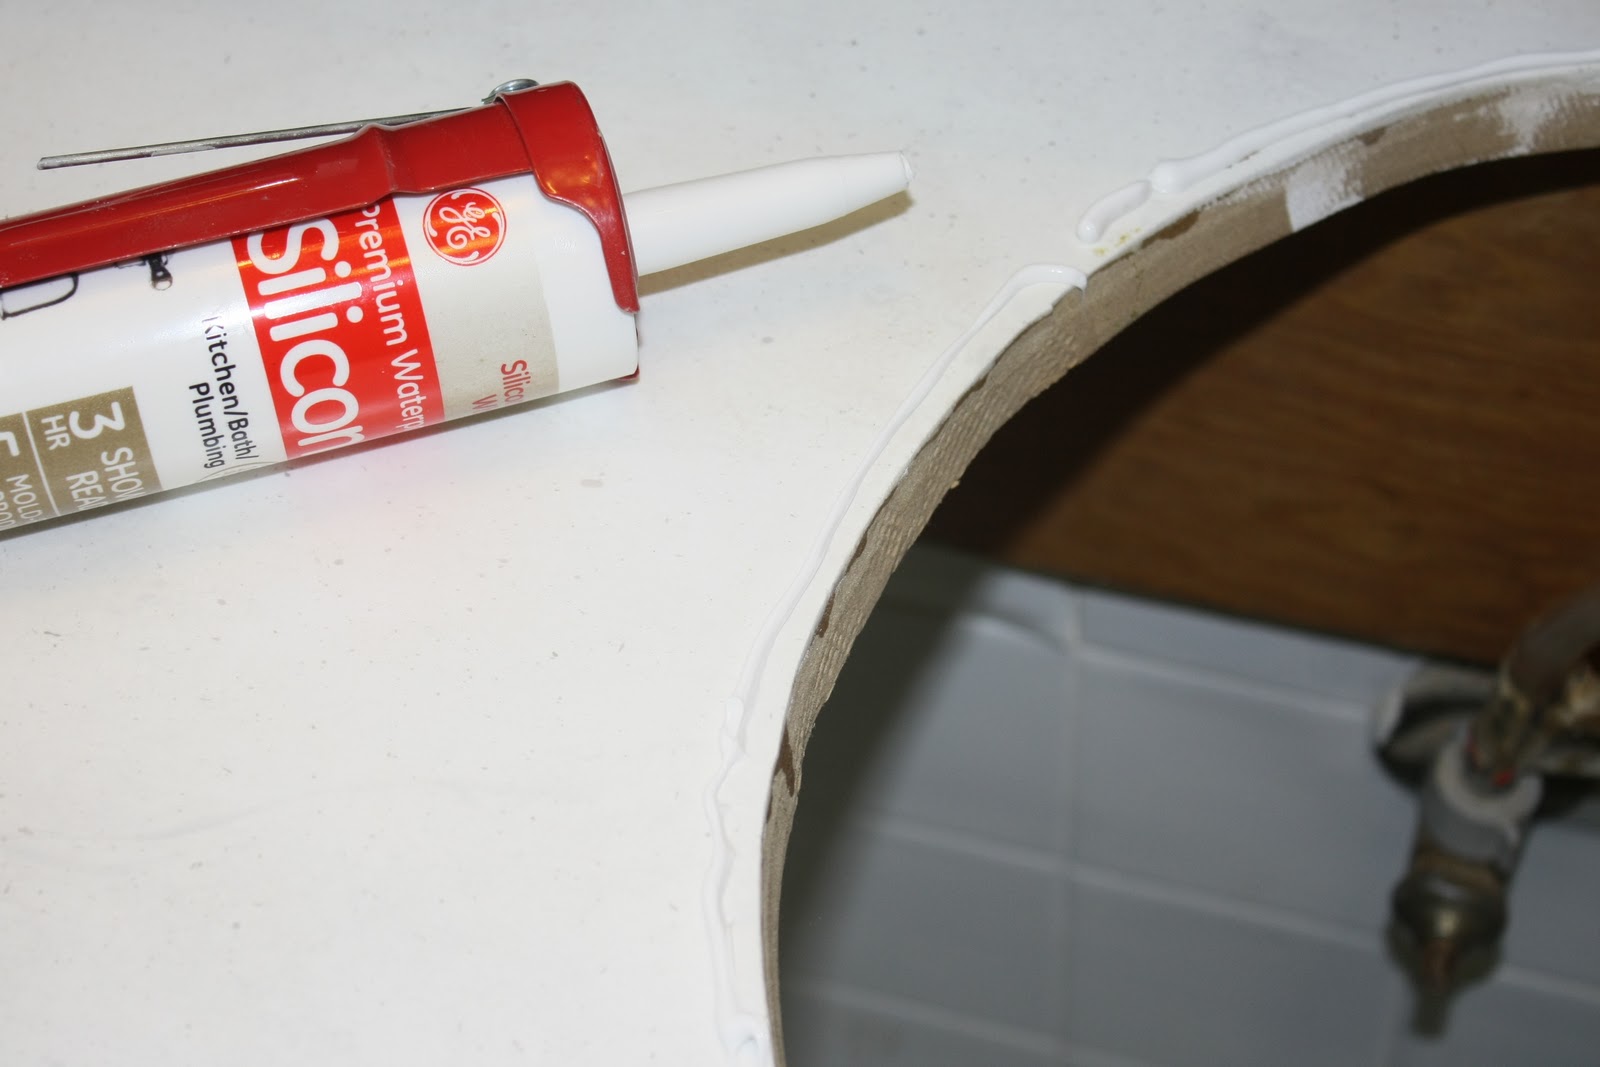
After it had dried I added the sink. By the way, we got our sink at the Habitat For Humanity Store for $15 bucks! Didn't know they had a store? Find one and check it out! I caulked around the hole, set the sink in, and then caulked around the sink.
And there you have it! Faucet: $30 Sink: $15 MDF: $35 Polycrylic: $9

I know that this is just a temporary solution, but I really like how it turned out! I don't think I will have a hard time living with it until I can get the real thing.
***UPDATE*** Shortly after installing this counter top one of my boys flooed the sink and we didn't discover it until the morning. It hadn't fully cured and so the water got to the MDF. MDF expands when wet and doesn't flatten back out. If I were to do this again I would have used plywood or something else other than MDF.


I have a friend who ran out of money building their house and used plywood for their kitchen counters, they stained and sealed them and routed the edges. It held over for long enough for them to save for granite. Looks great! I am always so inspired by women who tackle big projects like this, I'm kind of a weenie in that department.
I have pine for my kitchen countertops,,,, I will be posting about my kitchen remodel soon, and while there are some issues with it, after about 2 years, I think I can deal with it, for the money saved.
Your counter looks really good Stacy,,, good job!!!!!
Hugs,
Bella :)
Looks fantastic! You did a great job! I faux painted some MDF to look like soapstone for my Garden Window Sill and it's held up really well. Thanks for sharing.
Wow! I'm impressed! You did a fantastic job on that countertop and sink!
I think you just gave me the solution for my kitchen countertops! Moved to a new house & was renovating when I lost my job. The counter is UGLY & we let them get worse by letting stuff drip all over when redoing the cabinets....plus ripping some of the back splash off...
you have done an amazing job!!! It's beautiful!
I am just amazed with you!! Turned out great!
Great idea, I love it, can you come to my house and help me with my bathroom?!
This is a fantastic idea! We are just getting ready to remodel our kitchen and plan to do all the work ourselves. Our project should take about 6-9 months to complete. I've been looking for a temporary countertop idea. Thanks for sharing!
How brilliant you are...great job!!!
You are Superwoman! So impressed with the way you tackle projects easily and they come out so amazing!
Looks awesome! SO glad you found a cheap sink at the ReStore place too!
You're awesome!
Awesome job! I am not worthy, I am not worthy!
cool project! I just wish that I had the time and patience for such detail work. Thanks for your tip on the polycrylic, I had no idea that the other stuff yellows. I love Re-store.....
Great Job Stacy! I love how it turned out.
It looks great! I can just picture our moms tole painting the church. That made me laugh to think of it!!
Awesome Idea! Way to be thrifty!
wow, you did an awesome job!!
What a great job! We have the same sort of old counter/sink with the metal around the edges in our bathroom. I am not brave enough redoing it by myself, but yours came out really nice!
Visiting today from Thrilling Thursday at Paisley Passions!
I am super impressed. You did a great job. Do you give power tool lessons?
megan
craftycpa.blogspot.com
Super neat! I was actually thinking of doing something like this to our FLOOR until we can afford linoleum; crazy, huh? But we got the addition and things added up much more than what we expected. I may use paper bags as a "cover" and then poly over them. I hope I have the great success you did!! :)
Wow, you're faux finish is excellent! Way to save some $$$! I love it!
I'm working on something VERY similar in my kitchen! I'm putting on the Polyurethane right now so I haven't showed the end result yet. I love how it's turning out! I even did the same "toothbrush" trick you did! Looks great!
You are amazing! It looks great!
Amazing and Brave---I LOVE IT!
Very clever! thanks for sharing!
Wow! That's great! We are thinking of doing something with ours until...
Sexy Nerd made us a countertop for our bathroom. He topped it with tiny glass backsplash tiles.
If you get a chance, I'd love for you to link this up for my Not "Baaad" blog hop, which is up right now. It's unlike other linkies in that you actually compete with the other linked posts for my Best in Show award :)
what a cleaver solution! I'm your newest follower ;)
Brilliant idea and great job. And no I didn't know Habitat for Humanity had a store. Another nice nugget of information. Thanks.
Get outta here! You are my hero!
Amazing!
Way impressive! Nice job!
Really great job! I love how it looks.
http://www.itsybitsypaperblog.com
That is fantastic! What great deals you got too
Great job! I seriously love the Restore. Great deals, interesting stuff, and it helps a very good cause. I just painted my garage with paint from the Restore.
Unbelievable! Everything - first, the guts to even try this. second, MDF? Seriously?. Third, okay, you get the idea. I'm more than impressed.
But I have to tell you, my favorite thing about your entire post - besides the great project - is the bit about the tole painters in the '80's. {ggg} I tried, I really, really tried to tole paint. Just.Not.My.Style. Even in the '80's.
But I do remember the toothbrush/flicking/technique!
I have power tool envy...
:D
d counter top pine. With red oak trim and Refacig my cabinets with red Oak vaneer and havein
I am giveing my kitchen cabinets and counter top a complete. Tune up useing pioneer plywood.
With red oak trim and red oak vaneer I think it will realty look Shit hot
Seriously you have way better ideas than the ladies on t.v. including Martha
Why is it a temporary solution? Will it not hold up? I am curious because the custom Formica counter-tops are just MDF on the inside and yours looks a lot nicer than the Formica because there aren't any seams.