
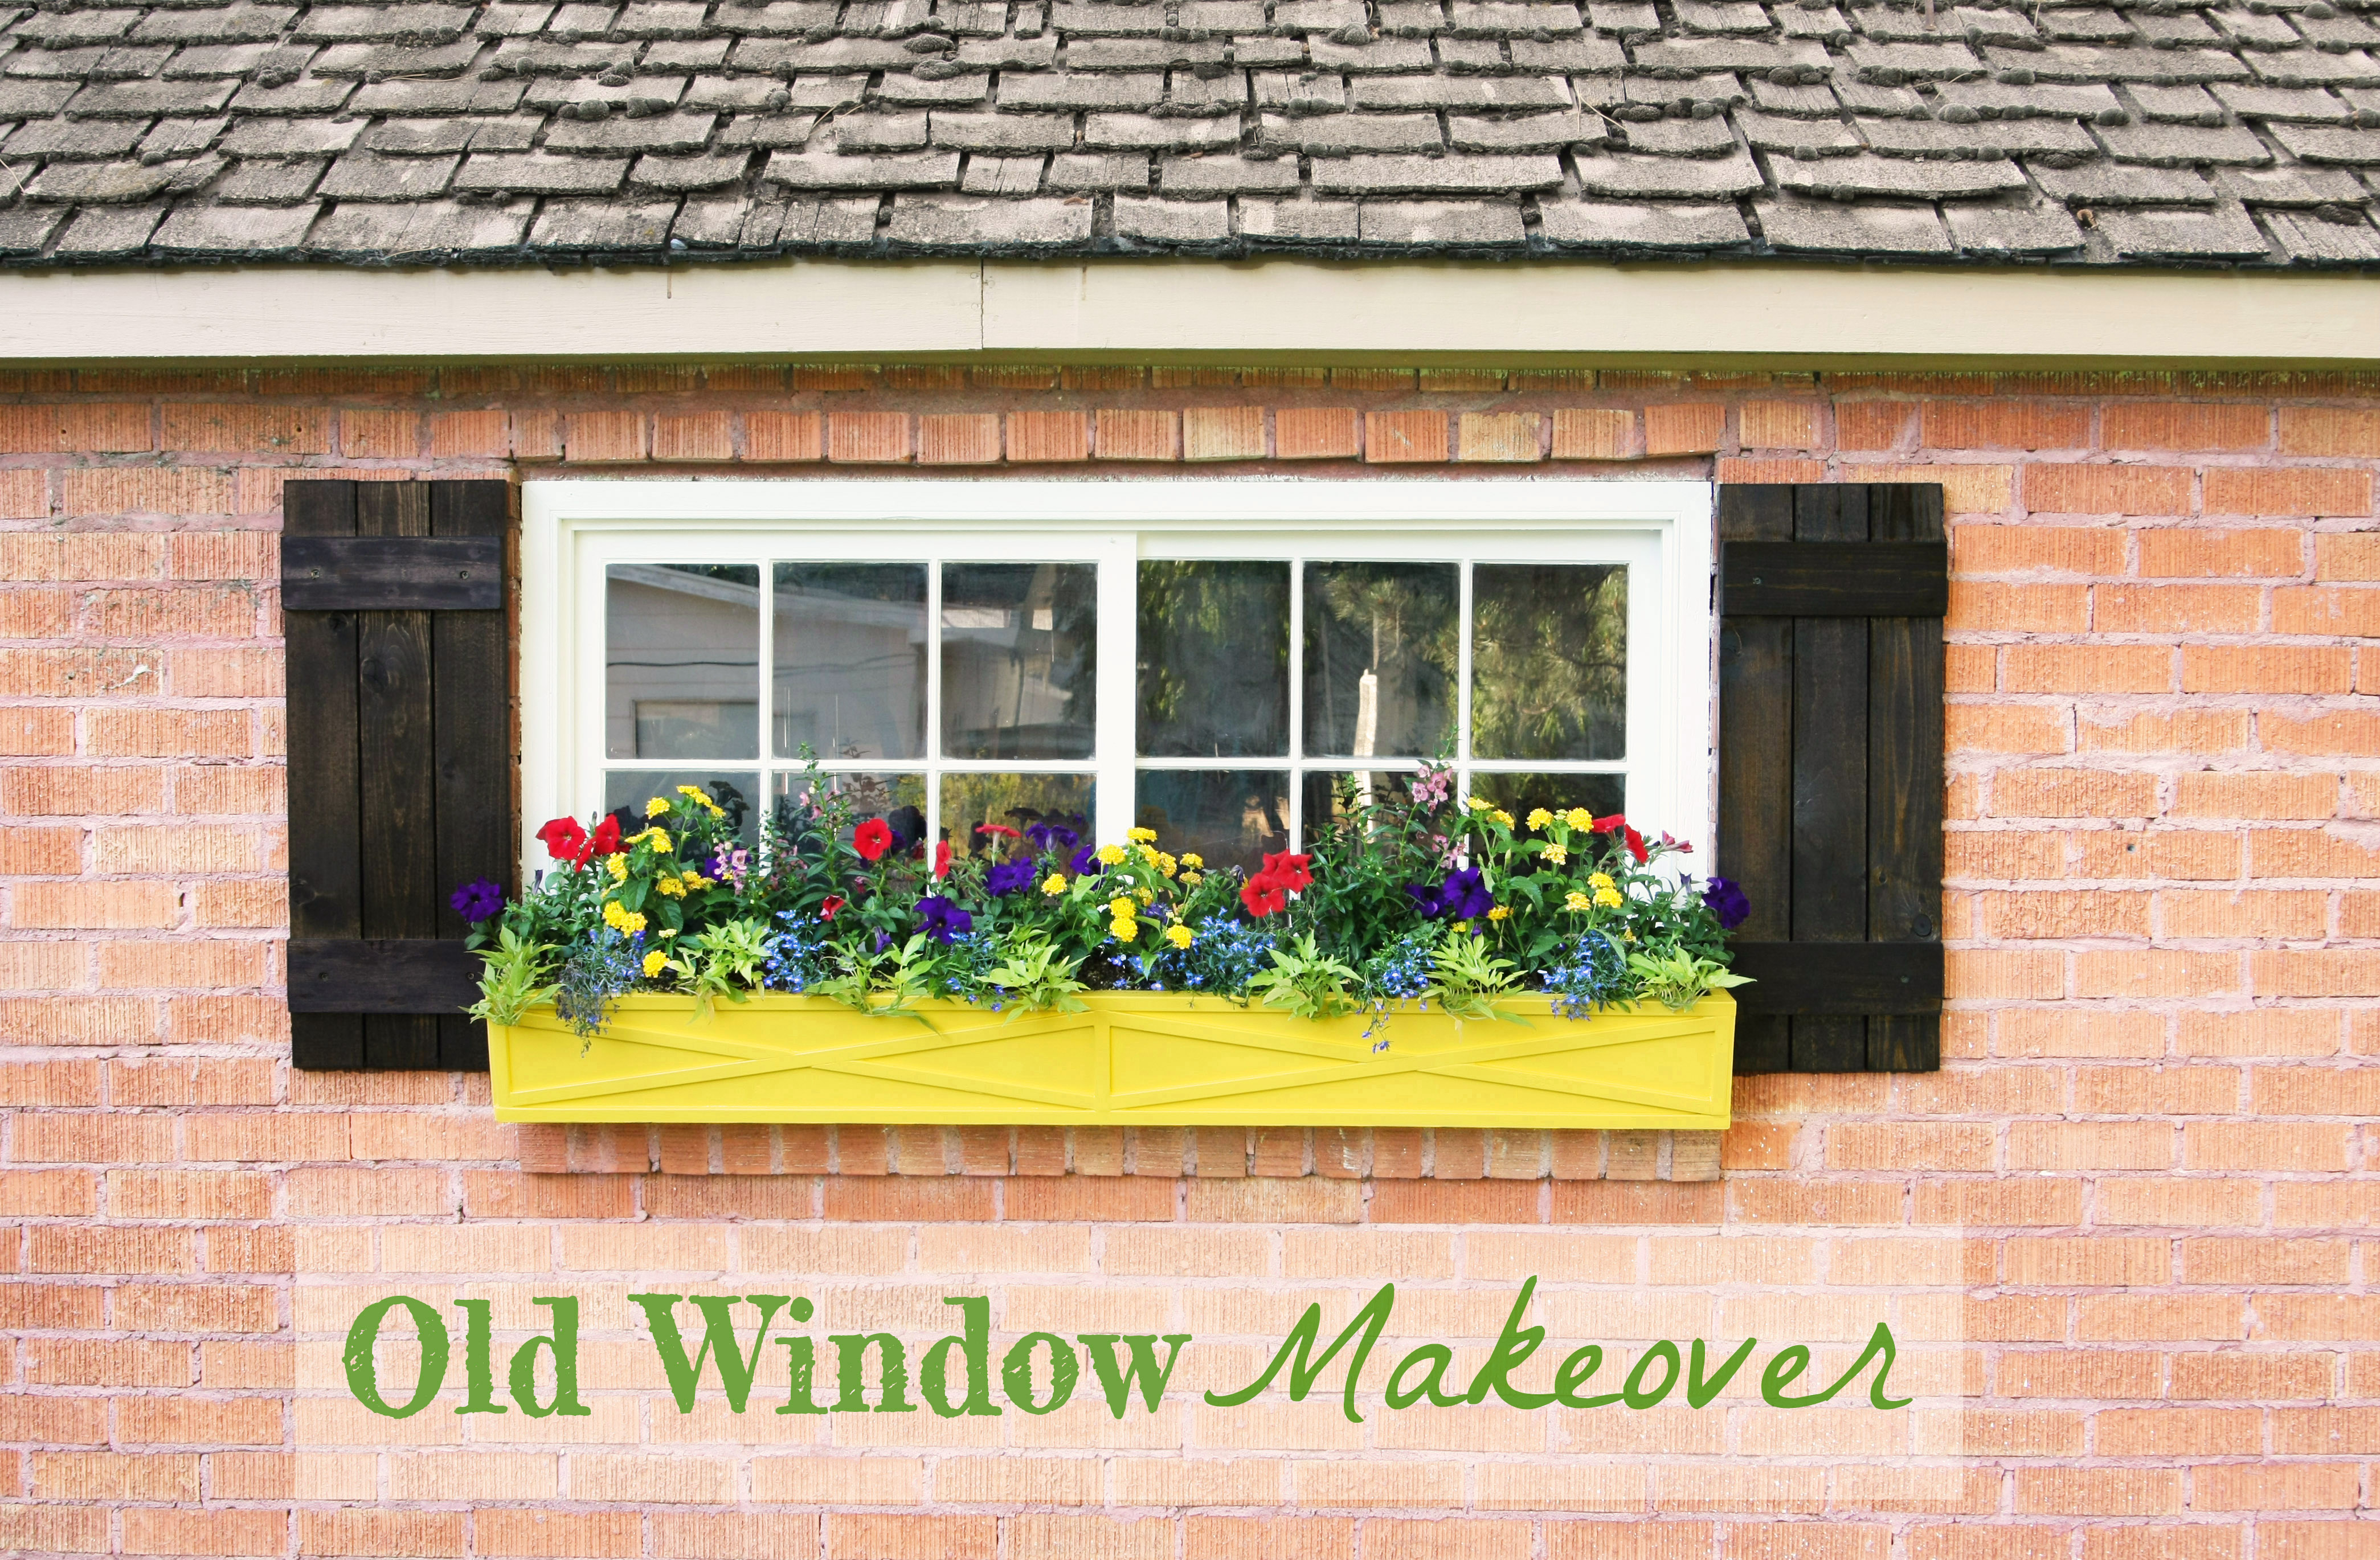
The window on the side of our garage is one of the first things you see when you walk in our backyard. It was faded green, chippy, paint was on the glass, and it had a broken pane. It was sad. It was not a huge project to tackle and yet it sat there that way for 6 years. Sometimes the little things on my list get skipped so I can do the more exciting jobs. Painting windows is not as fun as other things. But when faced with unemployment, sometimes the big fun things like bathroom renovations have to come to a screeching halt and smaller, more affordable projects get a chance to be crossed off the (giant, ever growing) to-do list.
Sorry for the low quality picture. I forgot to take a real before shot (head hung in shame) so I found one on my cell phone that had the window in the background and enlarged it. The fuzzy picture actually makes the window look better!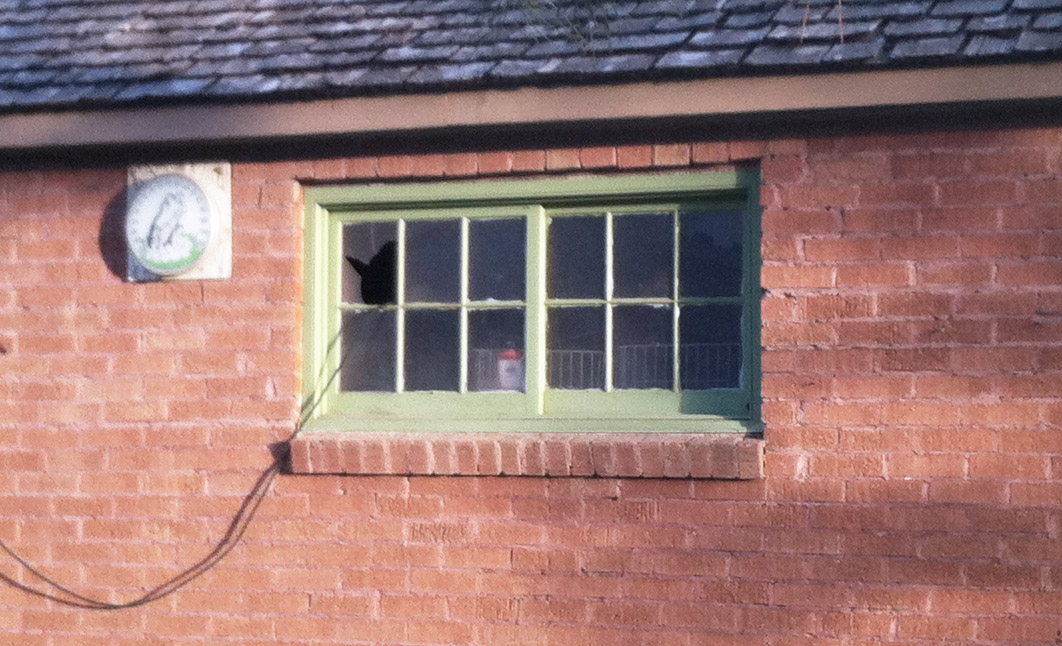
Let's do a little side by side comparison......

I have teamed up with 3MDIY.com again to show you the way to repaint an old window. I went a little further and made it all perdy :)
Here is what you will need:
*Paint Scraper * 3M Tekk ProtectionGoggles *Paint Brush *High Quality Exterior Paint & Prime
*Wire Brush * 3M Tekk Protection Respirator *Paint Thinner *ScotchBlue™ Painter's Tape
*3M Wood Filler *Paintable Window Caulk *3M Advanced Abrasives Sandpaper *Gloves
(Not pictured) *3M Lead Check Kit *Paper Towels

The first steps are here in this handy dandy video. I shot it in two days in 100+ degree weather while our air conditioner was broke. It was miserable. So enjoy watching it while you are sitting in your air conditioned house :) I recommend doing a project like this on a cooler day.....
There is a lot of important information in the video. Plus you should watch so you can check out my sweet farmer's tan. :P
(if it is blurry, adjust the settings to make it 350p or higher by clicking the gear icon under the video)
(many snow cones were consumed while filming this video)
Okay so now that you have tested for lead, removed the paint from the glass, removed loose caulk, scraped off the paint, and sanded, you are ready for the next steps!
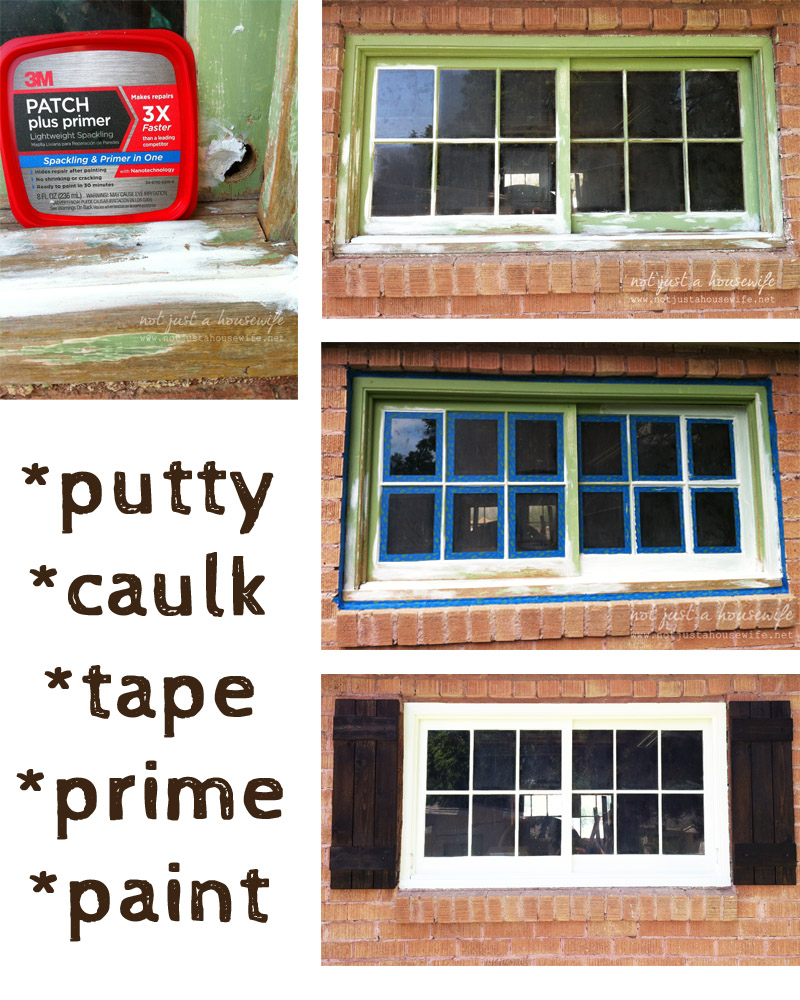 *If you had to remove any or all of the caulk, you will need to re-caulk the window now. Make sure you use an exterior window caulk that is paintable. And make sure you have plenty of paper towels handy! It can be messy.
*If your window has any hole or cracks then use a sandable, paintable, stainable putty. Let it dry completely and light sand it to smooth it out.
*Tape off the windows to protect the wall and the glass. I know after all this prep work you will want to tape it off quickly. But go slow enough that you have all the glass (even the little corners) taped and rub the tape to make sure it is all the way on there (especially edges). This will make it so you do not have to go back with a razor blade or paint scraper.
*Use a quality primer that will bond well. When the primer is dry, paint it the desired color. If you are painting the window a darker color you can have your primer tinted at the Home improvement store (and by "home improvement store" we all know I mean Home Depot :) ).
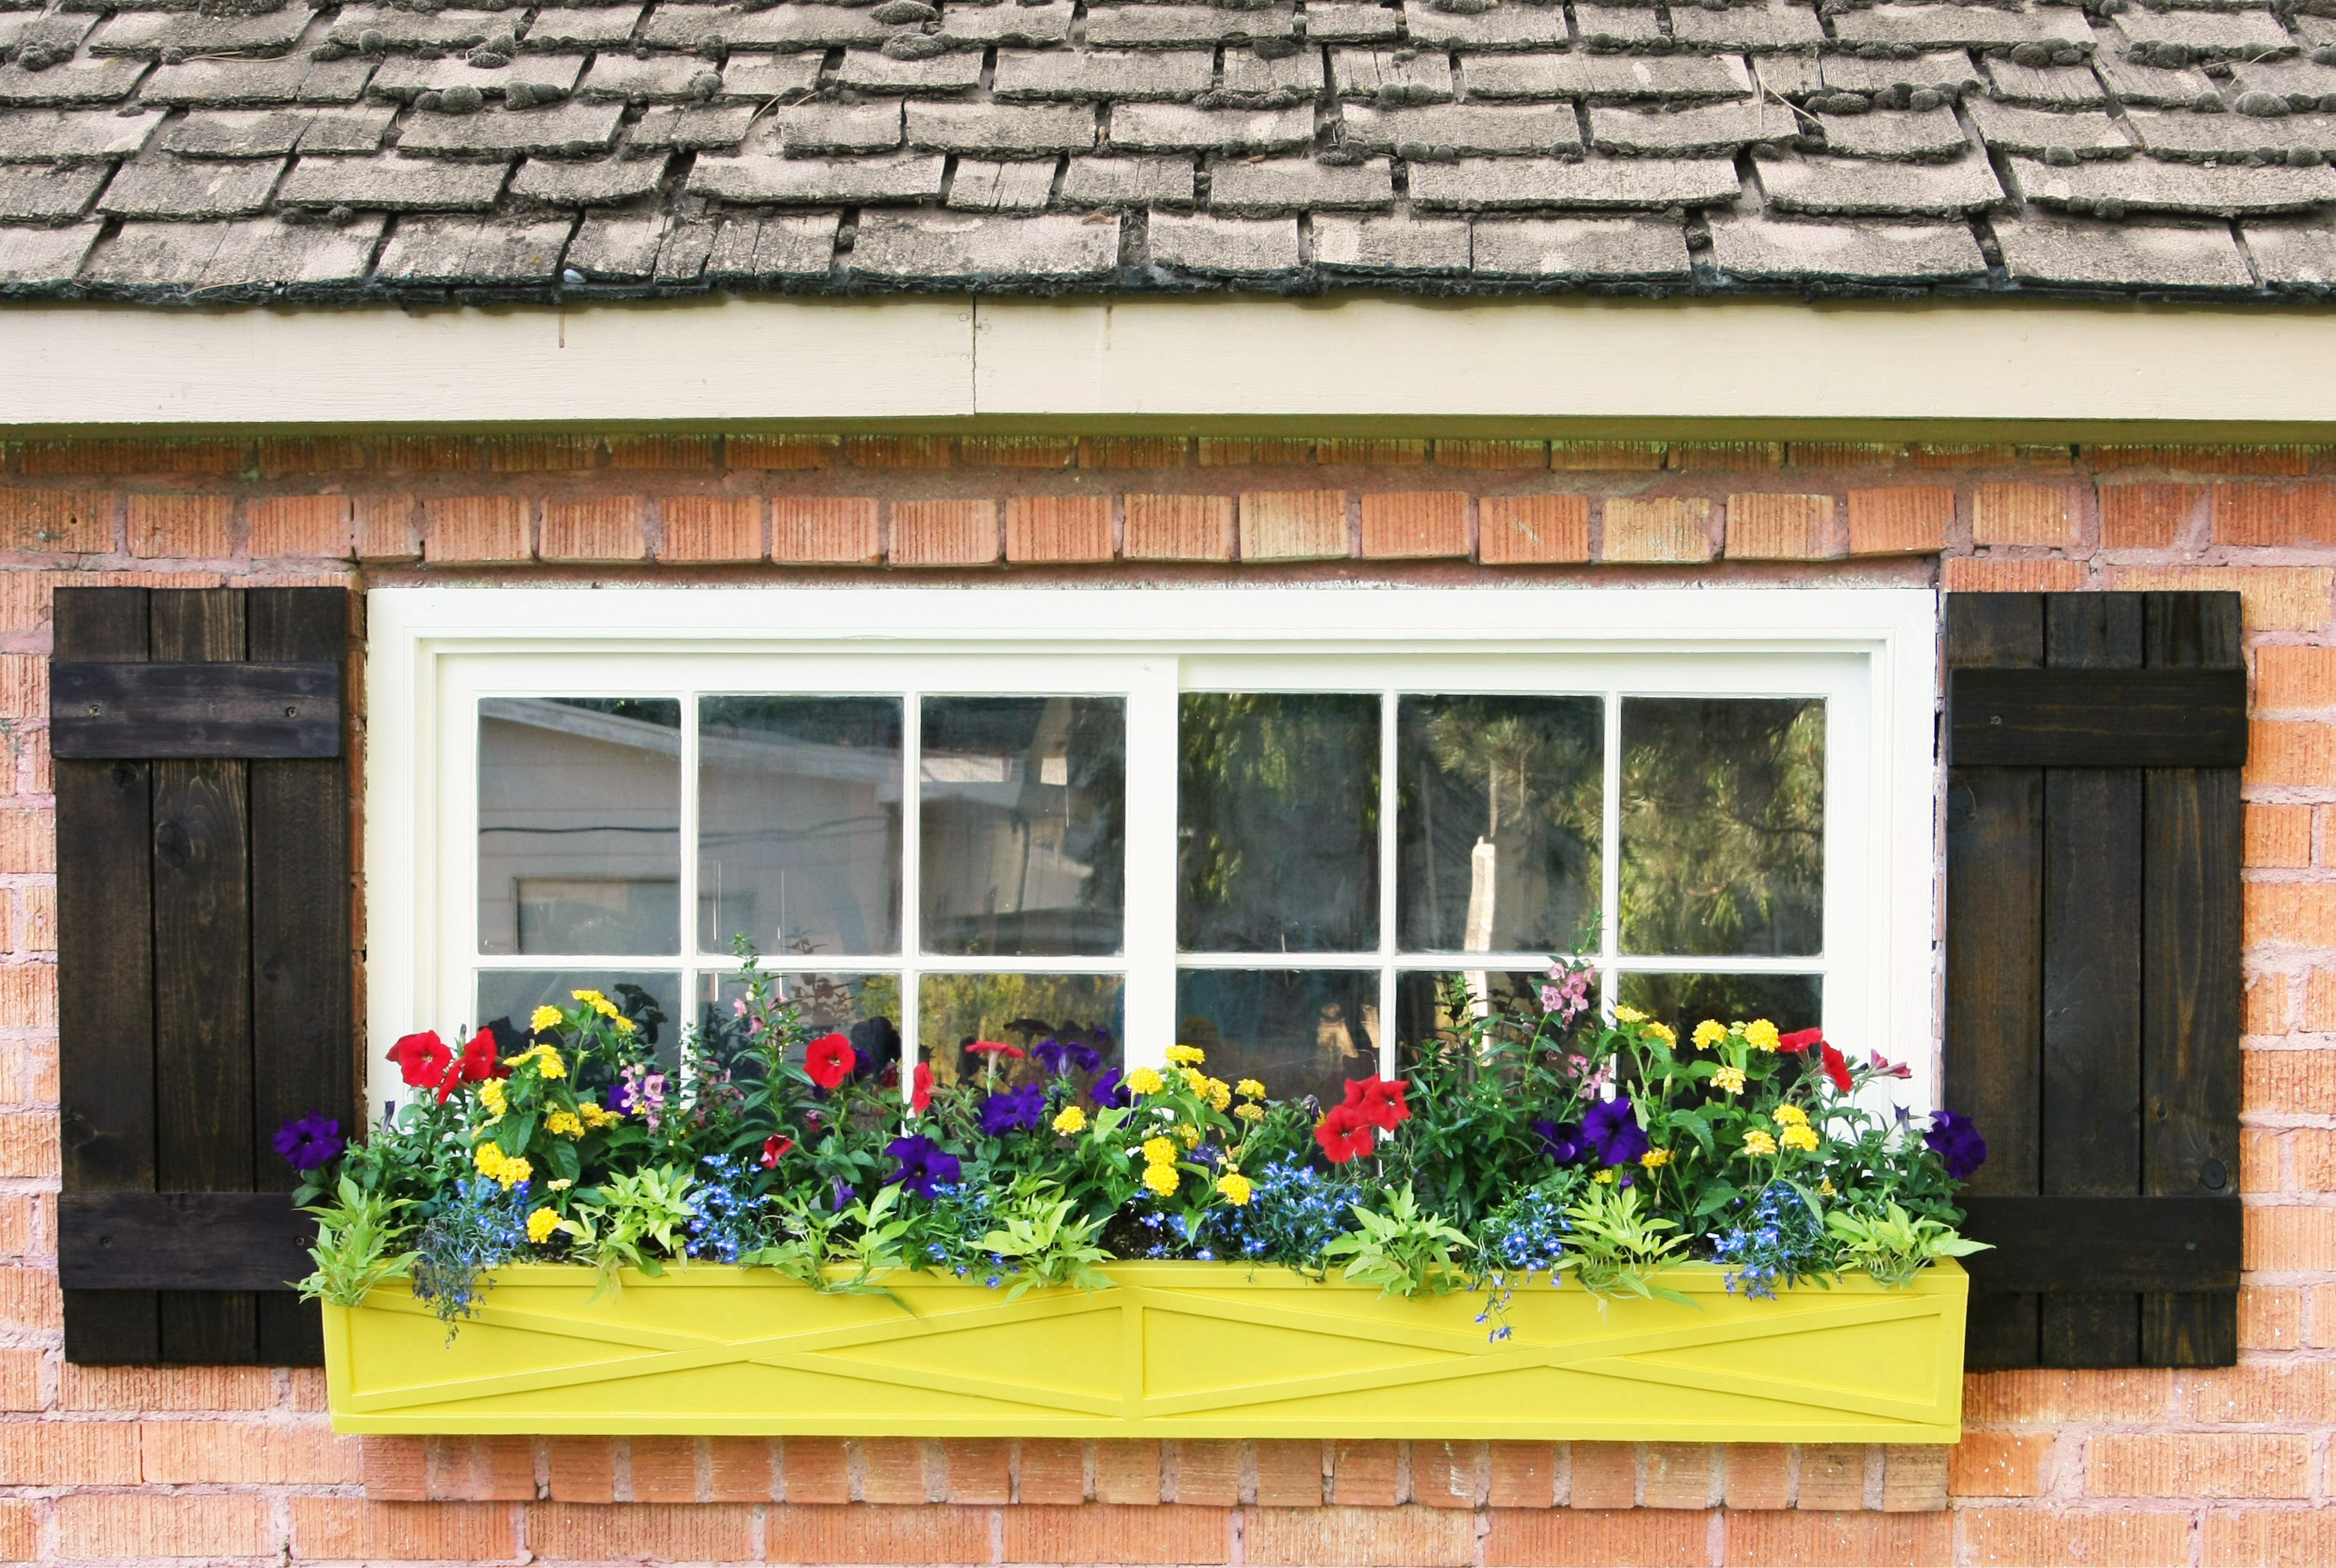
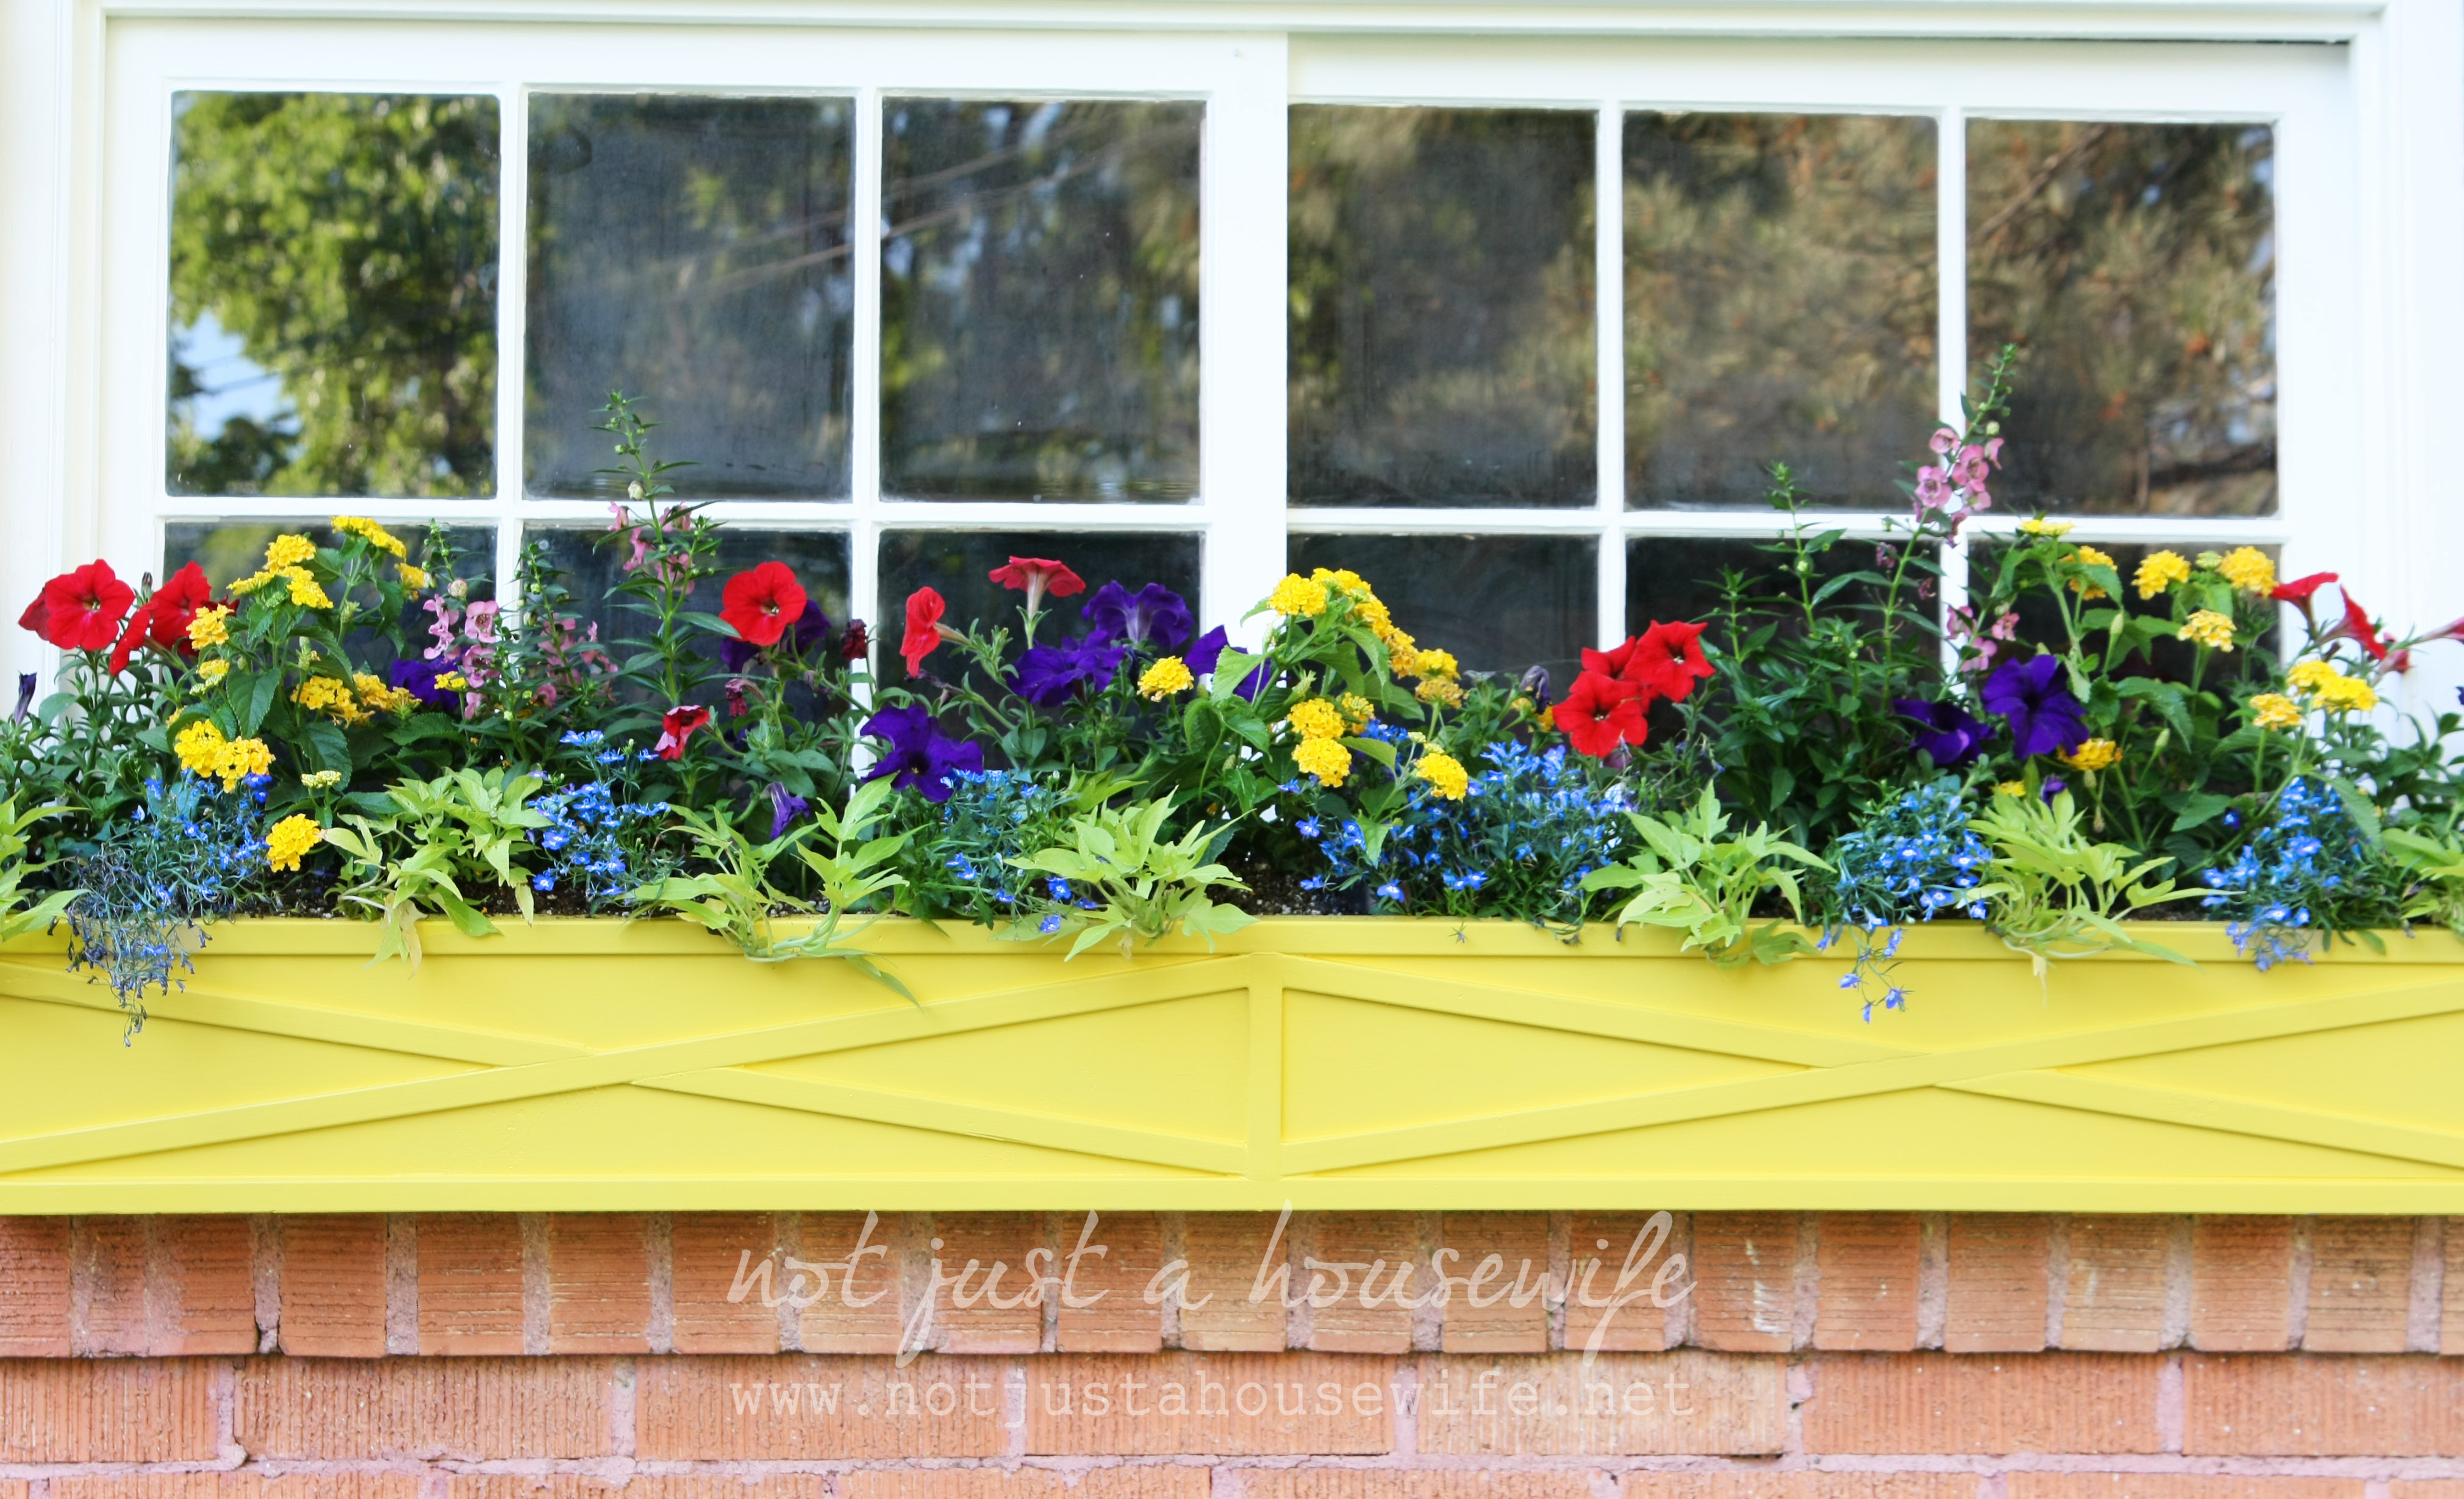
I built simple shutter and a custom window box to finish off the look. I didn't take a lot of pictures of the process since I had so many projects I was working on at the time. If you want me to throw a tutorial up let me know.
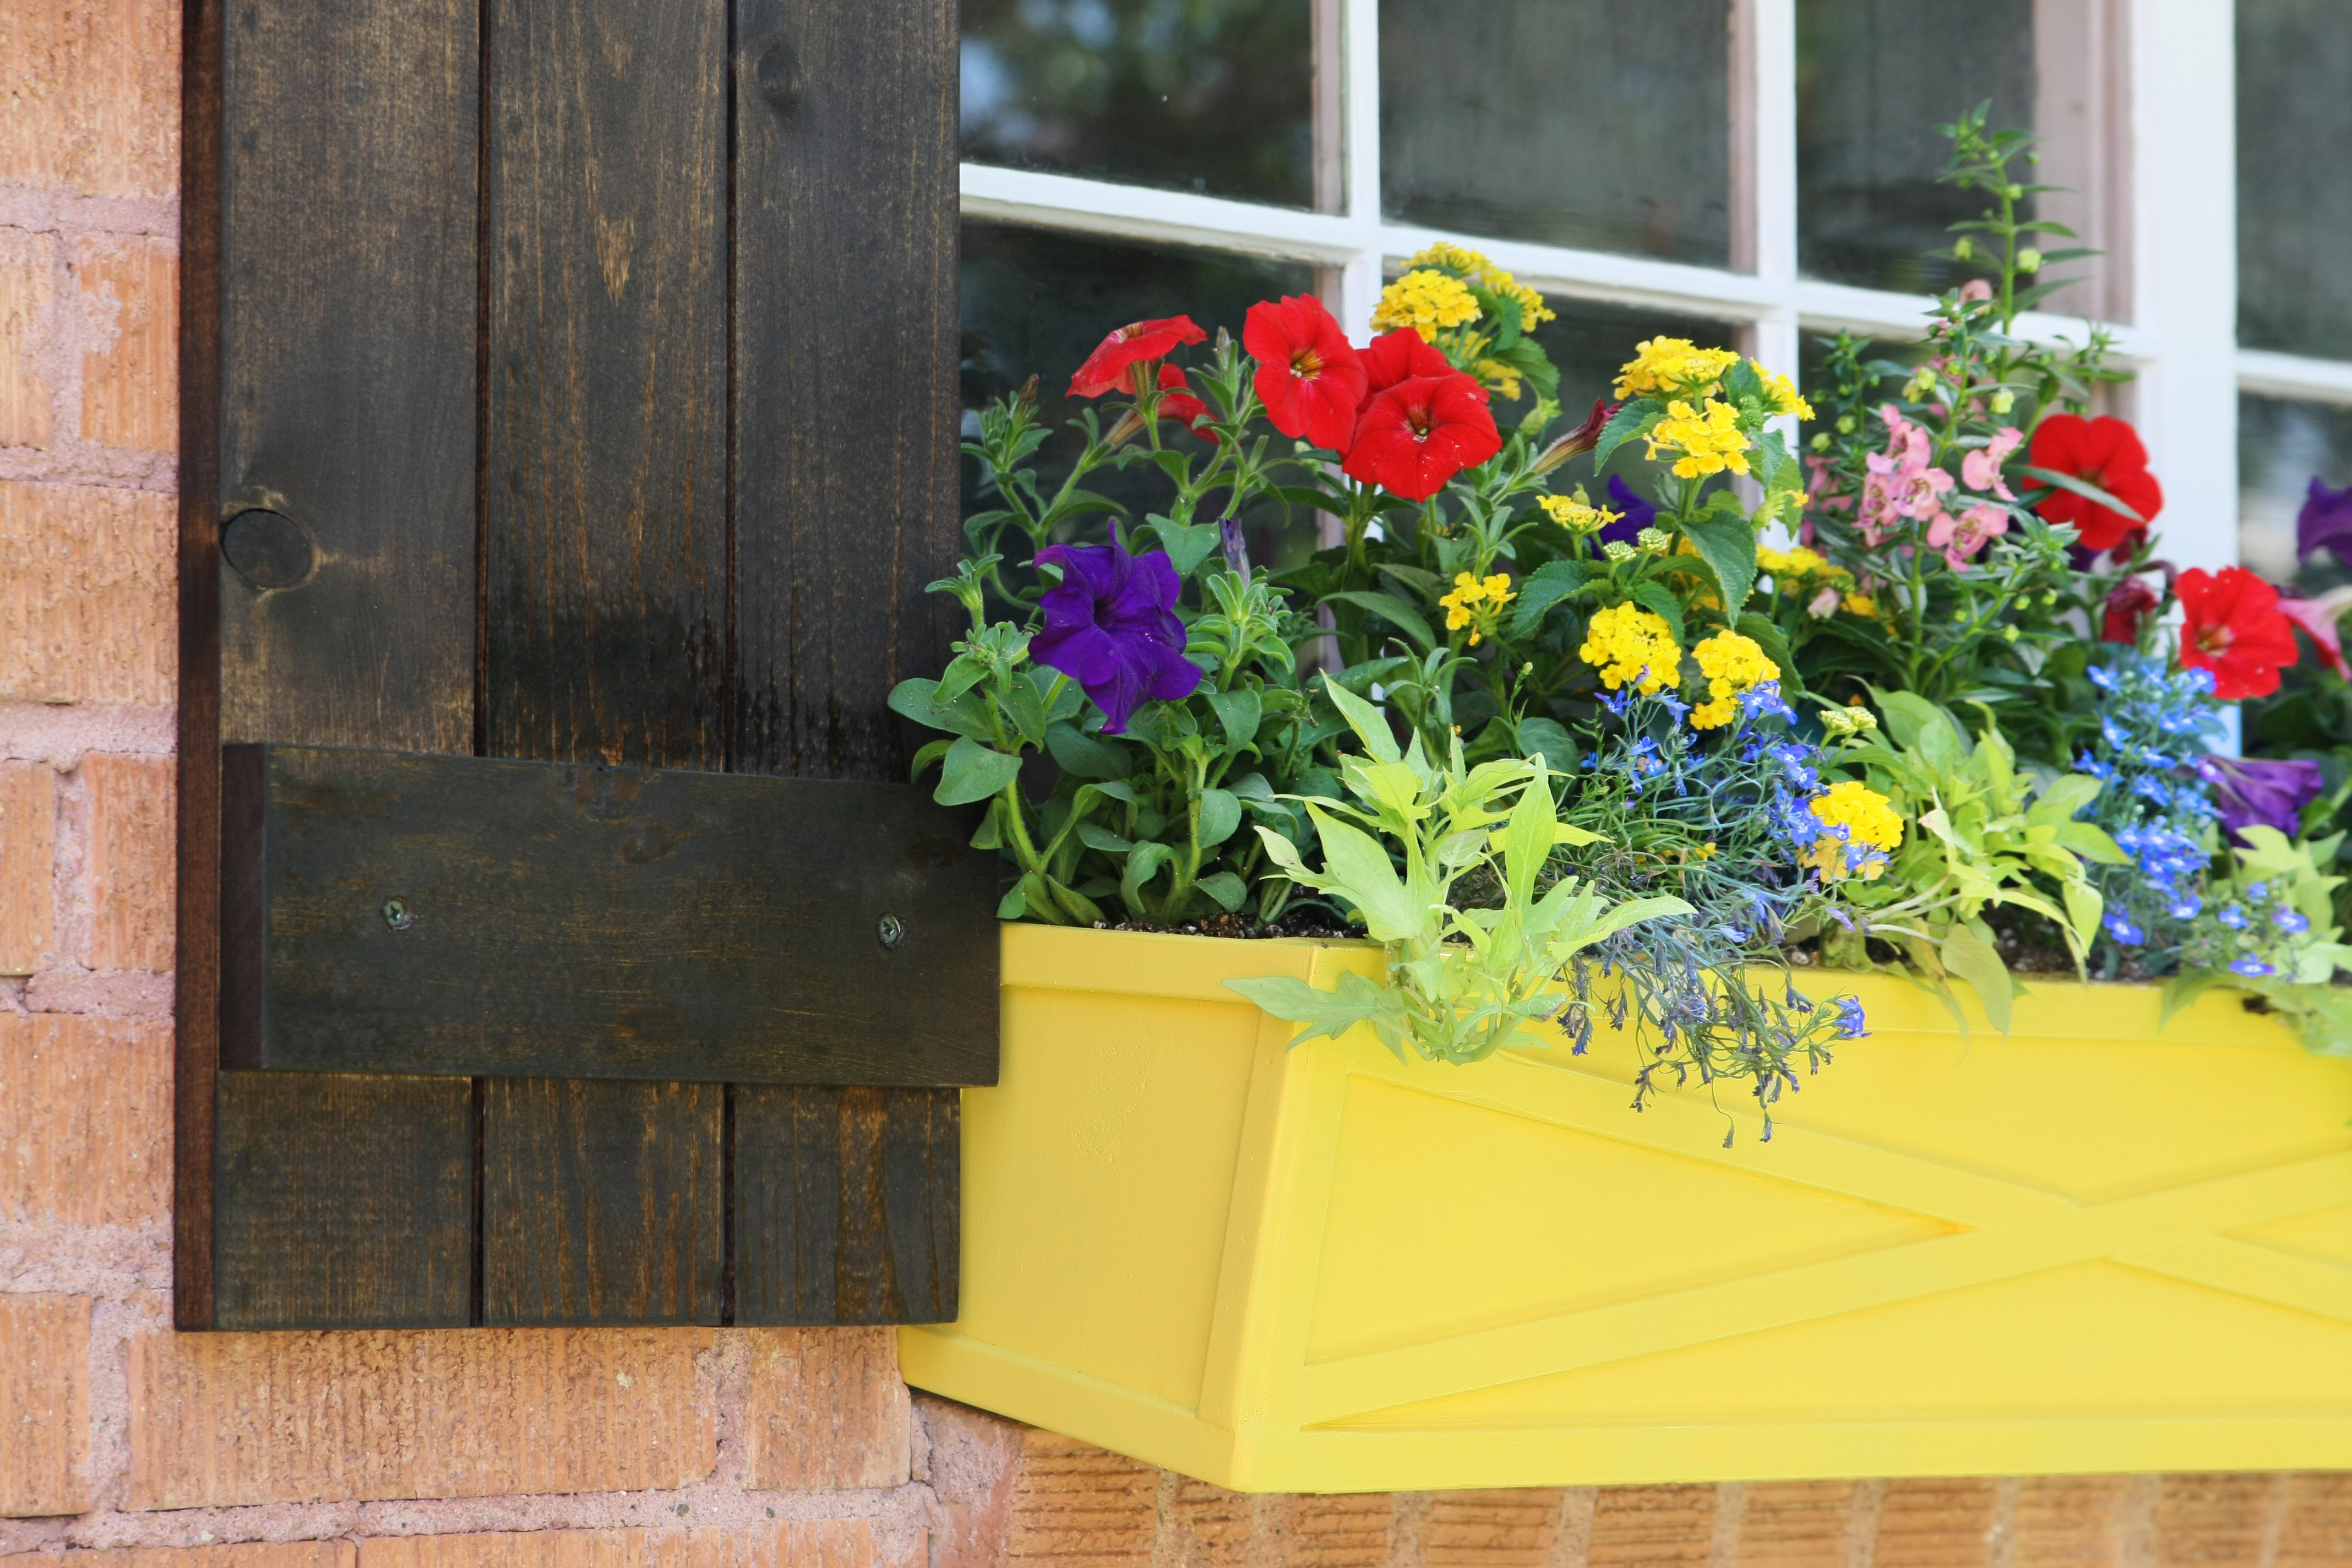
Because the window ledge is slanted I had to make the box a little different that a regular square box. I really love the x detail in the front!
A big thanks to 3MDIY.com for providing the products I needed for this project. Y'all know I do not share products unless I LOVE them, here on my blog. And I love theirs :)

This post is a collaboration with 3M DIY. To keep up-to-date on projects, products and sampling visit 3MDIY.com.
3M DIY Twitter Page
3M DIY Facebook Page
3M DIY YouTube Page
3M Pinterest


Thanks for sharing, Stacy! I guess I have no reason now to keep avoiding this task on MY checklist : )
I love love love the way your window turned out! I think the yellow planter and shutters are the perfect finishing touch. I bet seeing this makes you happy every time you go in your yard! :)
Looks great!! How did you hang the shutters?
We predrilled holes, added plastic anchors in the holes and then screwed the shutter directly into the brick. Outr house is so old that the mortar and brick are flush instead of there being a different in depth. Otherwise I would have tried those nifty brick clips or something like them.
LOVe this project!!! Nice work ❤
Love, love, love, LOVE the result!! Pinning!
WOW what a difference. It looks so pretty, and charming like it was always meant to be just this way! Nice job.
Great job! Your tutorial was perfect!!!
I love the "x" detail on the window boxes and the cheery yellow color! I am thinking of redoing two windows at our house. Thanks for the walk through!
Love the makeover and thanks for all the great tips! :)
stacy, you are amazing. i LOVE the finished window..the shutters and window box are perfect. i just adore how you can make something that looks dead..feel so alive again!:)
Love the new window!! The video was great, I an terriable at repainting things so this was perfect for me!!
Wow! The end result is so much more inviting. It looks like it was a lot of work - but worth it because it will last for years!
Stacy
the window looks great! I love the addition of the window box and shutters. I agree it's important to be safe and use caution. I often use my safety glasses and masks.
gail
I love the tutorial! I know how difficult it is to have your husband lose his job ( it happened to us twice during the first year of our marriage). I admire you for keeping your chin up and contributing to your household (blogging, tutorials, etc.). It is SO stressful and I know with your AC out you probably want to grab a one way ticket to Antarctica (my Mom's AC has been broken for months, we live in Florida). Y'all are in my prayers, just know that your readers notice your efforts to be positive and keep it movin! Go girl! ;)
The finished product is AMAZING Stacy! You are so great at breaking it down and made it seem like I could even do it myself. (ha!) I love 3M too.
Looks great Stacy! It made such a huge difference in how it looks! I love the shutters and window box, too! :)
What an amazing transformation!
I LOVE it. That flower box is amazing.
Oh my gosh you are a rockstar! I can't believe you did that whole project. You've really inspired me to tackle some big projects that I was too nervous to do, and had asked my husband to do for me! No more!! Thanks Stacy!
Wow! I wouldn't have known where to begin! Thank you so much for sharing! I'll be passing this along to my father in law as well!
This turned out GORGEOUS!! I LOVE that yellow you chose and the colors of the flowers are to die for!! So glad you made a video too...now it all makes sense :)
Thanks for the informative video! I love the final result. The shutters and window box are the perfect touch.
Wow, what a difference! Love the smaller projects like this, that wind up making a huge impact.
Love the yellow flower boxes...i'd love to see a tutorial on that!
Great tutorial! Thanks for sharing the video! :D
Thanks for the blog, I need to repair some wood, and the 3M Primer & Patch will work great! Going to the store now to pickup so I can start my project!
Oh wow, what a difference!! Love the white trim against the brick. It looks so crisp and sharp! You did awesome and gave me some ideas for when we rebuild our shed! Be proud, girl!
Thanks for this great tutorial. Your window looks great!
I absolutely love it!! And unemployment? I think I've missed a post! I hope everything is OK.
Bonnie
Awesome job and so so "perdy". :)
wonderful improvement! love tackling the small projects that make a HUGE difference overall! xo!
I LOVE what you did Stacy!! makes a huge difference!
Gorgeous redo Stacy! Love the added window box. So much work but oh so worth it!
Great job and super great tips! Pinning for reminders later!
I hope you have been able to get your a/c fixed. I live in Bountiful and work in SLC so I know the temperatures you're dealing with, and I had to replace mine 2 years ago so I know how expensive it is. I was just telling someone at work about your broken a/c and saying I can't imagine how miserable it must be. Yay for a drop into the 90s later this week!
Amazing transformation! The window box and shutters really make the window pop!
Okay, seriously. That window box is adorable! What a great transformation, and I think I might add this to our never ending list. :) We have a similar shaped window off of our garage and the area always looks gross. Your after looks so happy!
I love this transformation. I am not kidding when I say your "before" window looks a lot like the windows in the house and garage where I grew up (same gross green and everything).
I love how the "after" window looks so much longer thanks to the shutters and flower box, and how the side of your garage looks so crisp & cared for. I think it's wonderful that you took a little old house and garage and have made them your own in hundreds of beautiful ways.
Great tutorial & the video was so helpful. I need to fix/beautiful the windows on my home too. Love 3M!
Holy moly! What a difference!!! Wonderful work!! I LOOOVE that bright yellow flower box!!
It looks amazing! Love it with the window box and shutters!
Oh my word -- what a beautiful transformation! Home & Garden magazine perfect!
Jenn/Rook No. 17
Looks amazing. This was super helpful for a project I'm doing with an old window not on my home, just a window I bought!
It looks so good and you were totally prepared to work! Love the yellow, too!
Take care,
Trish
I love the way it turned out Stacey! Great video too, I'm inspired to work on my own wood windows now!
Stacy this is beautiful and so happy! Makes me wish I had an ugly window to do this too! hmmm wheels are churning!
Nice job Stacy! I love the video :) You have inspired me to add a window box to one of our shed windows! Happy 4th!
Love this transformation! Awesome job! And...such an inspiration for me to get on my project lists. Enjoy the rest of your week!
youngnasawife.blogspot.com
Oh my gosh Stacy. The new window looks AMAZING. What a transformation! xoxo
Absolutely beautiful job Stacy!!! i love it! ~Linda
Absolutely beautiful transformation!! Love your bun, too. Great video!!
Beautiful job! Love 3M stuff. The window is a showstopper now!
LOVE it!! That's a huge transformation!
Curb appeal on a garage - you did it! Love that window box - so fun and colorful!
Kelly
Gorgeous! Loving the brightness of the window box and the shutters set everything off perfectly! I didn't know about the paint thinner before the scraping part... great tip I will definitely use!
What a perfect post for me to read! I have a large flower box that was on the front of the house and I'm thinking of attaching it under the windws=s on my garage.
I would love a tutorial on the window box. Everything looks great!
Question. I have some old windows that I am trying to repaint. I have scraped and scraped, but there are still major sections where the paint is intact. (I would prefer not to use chemicals to strip the paint if I can avoid it.) I know that when I go to paint this, it won't look very good because you will be able to tell that I am painting over patches of paint in some areas while painting on bare wood in others. I don't mind so much on the windows on the far side of the house, but I would prefer not to have that patchy look on the window that is next to the door though which we enter the house. Do you have any suggestions?
I feel this is one of the most significant information for me.
And i'm happy studying your article. However wanna commentary on some basic issues, The website taste is ideal, the
articles is actually nice : D. Good job, cheers