• Skip to primary navigation
  • Skip to main content
  • Skip to primary sidebar
  • Skip to footer
Stacy Risenmay
  • Home
  • About me
  • PRESS
  • Contact Me
  • My Book
    • Facebook
    • Instagram
    • Pinterest
    • Twitter
menu icon
go to homepage
subscribe
search icon
Homepage link
  • Home
  • About me
  • Project Gallery
  • Our House
  • PRESS
  • Contact Me
  • Privacy Policy
    • Facebook
    • Instagram
    • Pinterest
    • Twitter
  • ×

    Custom Painted Curtains

    By Stacy 15 Comments

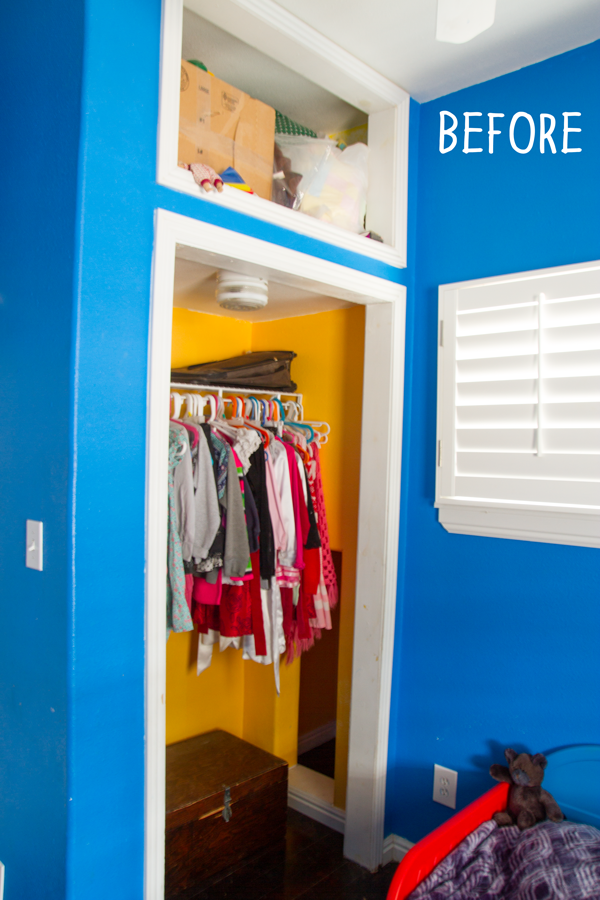
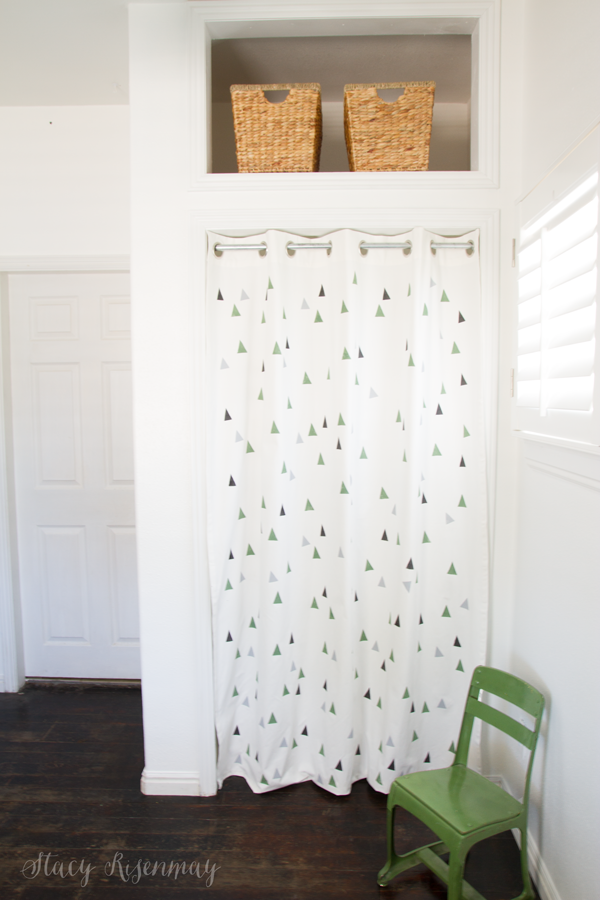
    I revealed a room I had made over for my neighbor's little boy last week and now I get to dive into all the tutorials from the space. First up is the curtain I added to the closet! I know you guys probably think I just paint all the fabric and rugs I can get my hands on after all the things you have seen me paint in the past, but I really did try to find the perfect fabric before resorting to painting this curtain. I swear. I spent a solid month searching for the fabric that I had inside my head. I even decided to scrap the picture in my head and just find something in the right color scheme. But in the end, I gave up and decided to make my own.


    bedroom-before


    I was going to sew the curtain and add the grommets myself but when I added up how much the thick fabric would be plus the big grommet kit, I decided it would be about the same to just buy one from IKEA. I really don't enjoy sewing so it wasn't a hard sell ;)


    kids-closet-idea


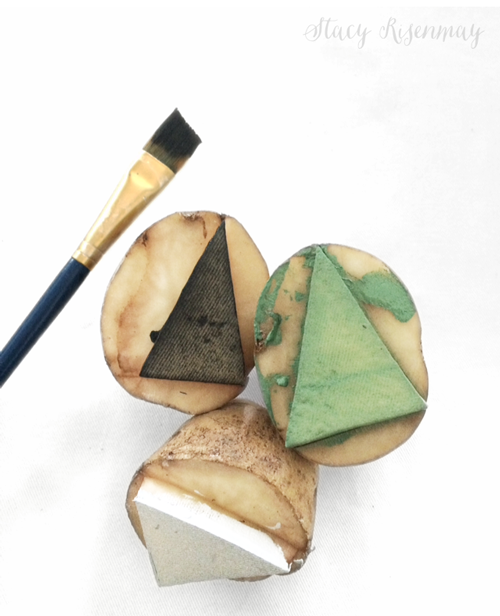
    I have not potato stamped since I was a kid and I made my own wrapping paper (yes, I was weird).  When I made the gold confetti curtains for the little girl room I did last month, I cut out circles from vinyl to use as a stencil. I got nice and evenly painted circles. But for this look, I wanted some to look a bit faded or worn so I went with the stamping idea. I also didn't want it to be perfectly lined up. I made it more random and didn't worry if some of them were crooked.

    It was so much fun! It went a lot faster than the stencil approach too. My best tip I could give you is to use a paint brush to apply the paint to the potato stamp instead of dipping the potato into the paint. That way, the paint won't squish out where you don't want it to go.


    potato-stamps


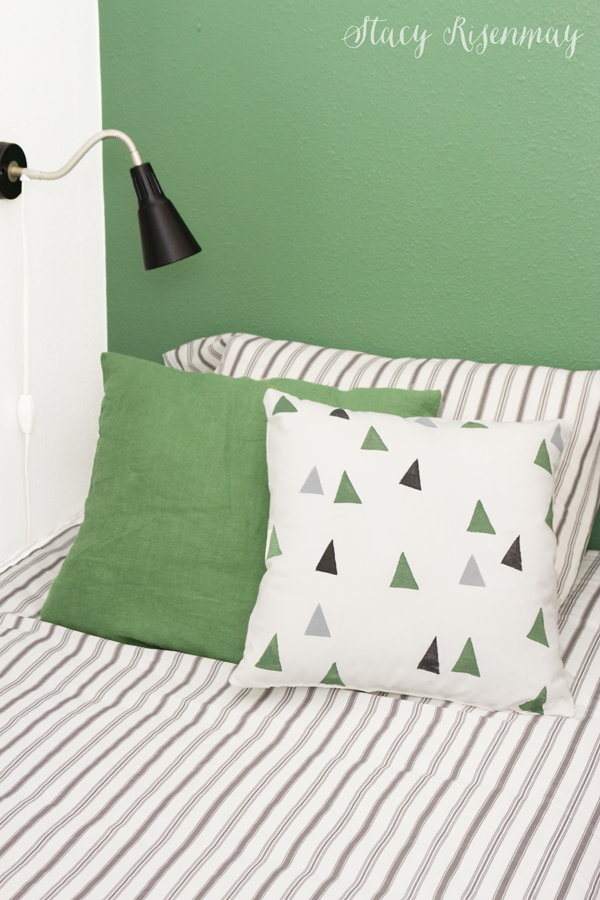
    I used this same technique on some white fabric to make a matching pillow.


    boy-bedding


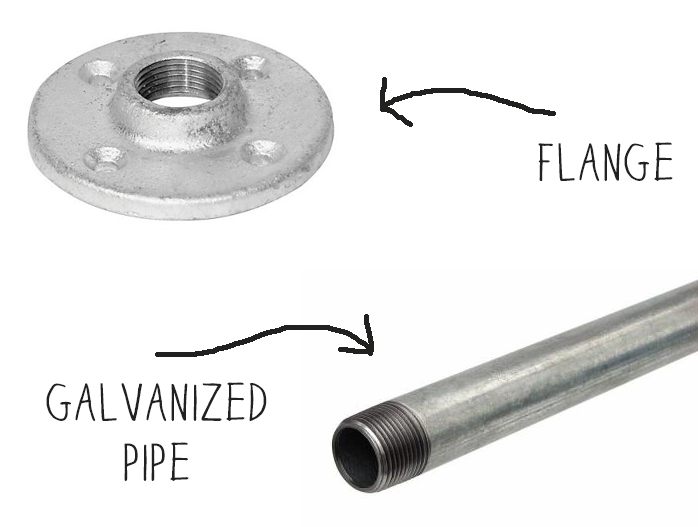
    Since this room belongs to a little boy and kids tend to be rough on things, I decided a tension rod was not going to hold up very well. I ended up using a flange and some galvanized pipe to make a curtain rod. I used a ¾ inch flange and ½ inch pipe so that in case the pipe was not cut exactly, there would be some play. Because of that, it didn't screw into the flange but instead rested inside.


    curtain-rod-out-of-metal-pipe


    I am really happy with how it turned out! It goes so well with the rest of the room. If you missed the reveal, you need to see the whole space!


    curtains-instead-of-closet-door


    Pin for later:

    potato-stamped-fabric-


    Have you ever potato stamped anything before?

    You will also like:

    • Vintage Green Boy Room Makeover!Vintage Green Boy Room Makeover!
    • Dresser MakeoverDresser Makeover
    • Modern Industrial Bed with StorageModern Industrial Bed with Storage
    • Easy DIY Terrarium LampEasy DIY Terrarium Lamp
    • 6 Hardware Options {Help Me Decide!}6 Hardware Options {Help Me Decide!}
    • DIY Woven Pillow, Watercoloring, and FREE Classes!DIY Woven Pillow, Watercoloring, and FREE Classes!
    • Painted Placemats {Picnic Table Makeover}Painted Placemats {Picnic Table Makeover}
    • Painted Rug TutorialPainted Rug Tutorial

    « Farmhouse Decor
    Painting Our Old Windows »

    Filed Under: DIY & Tutorials, Painted Fabric 15 Comments

    Subscribe

    for your weekly DIY fix.

    Reader Interactions

    Comments

    1. Christina in FL

      August 15, 2016 at 7:03 am

      Stacy, this is brilliant! I love triangles so I am cutting up some potatoes today. :) Thanks so much. Oh, I have painted on fabric but more stenciled than stamped. :)

      Reply
    2. Elisabeth

      August 15, 2016 at 7:30 am

      Hi Stacy,

      I love that curtain! How good is that! The colours are great, too. You've gotta be happy with that!

      I have a curtain dilemma, too, and, like you, have been looking for the fabric in my head, to no avail. I'm off to IKEA tomorrow. I'll try one more haberdashery, but if they don't have THE fabric, I'll just buy some Lenda curtains from IKEA, and maybe stencil something on them, and add inverted pleats. It's so tricky, isn't it, as curtains are pretty 'big' things in the scheme of a room, and they either WILL work..... or be an abysmal failure. Fingers crossed. Maybe I'll do a potato print!

      Love your curtain. Well done.
      Cheers, Liz. (Australia)

      Reply
    3. j

      August 15, 2016 at 9:03 am

      Love the curtain rod and curtain...it will be so easy to slide back and forth...a very nice remake. Love it!

      Reply
    4. Evon

      August 15, 2016 at 12:17 pm

      I really love what you did to the whole room. And I have to agree with everyone else, I love the curtain and the rod. They're so unique, and I believe the rod will really hold up!

      Reply
    5. Linda

      August 15, 2016 at 12:40 pm

      I have some drop cloth grommet curtains that I made and I think I'll try some different potato stamps on them - maybe I can make some musical notes and bars on the potatoes and come out with something close to what I have in mind. I want them faded and may try mixing some stenciling and sponge stamps too to make the music theme! Just hadn't thought of using potatoes lately!! Thanks for the idea.

      Reply
    6. Cynthia chilson finger

      September 01, 2016 at 9:43 am

      Oh my goodness! This post brought back so many happy memories doing potato stamping with my kids when they were young. The three colors you chose a perfect for a little boy. Lovely room. p.s. How cute would it be to have the child make some art for his room? :D

      Reply
    7. LO SAVARESE

      September 02, 2016 at 10:25 am

      I love this entire room and how bright and airy it feels. Love the curtain and that you used galvanized pipe for the curtain rod. Very clever!

      Reply
    8. Holly McCall {McCall Manor}

      September 04, 2016 at 12:44 pm

      I LOVE THIS! Your colors are perfection and I love the potato stamps. I would love if you would link up to Your Inspired Design over at McCall Manor. We would love to feature you!

      Reply
    9. Sam

      March 20, 2018 at 9:39 am

      Super nice! What kind of paint did you use please?

      Reply
    10. Christiane Lavoie

      March 22, 2018 at 5:16 am

      Love the idea. Did you use fabric paint or can you use Any paint?

      Reply

    Trackbacks

    1. Show and Tell, Link Party Time! - Sugar Bee Crafts says:
      September 5, 2016 at 6:00 pm

      […] Custom Painted Curtain via Stacy Risenmay […]

      Reply
    2. Show + Tell 233 - Tauni Everett says:
      September 5, 2016 at 6:00 pm

      […] Custom Painted Curtain via Stacy Risenmay […]

      Reply
    3. Wine'd Down Wednesday {155} - Our Three Peas says:
      September 6, 2016 at 5:01 pm

      […] 2. Custom Painted Curtains†//†Not Just A Housewife […]

      Reply
    4. Wine'd Down Wednesday 155 | Dizzy Busy and Hungry! says:
      September 6, 2016 at 5:02 pm

      […] 2. Custom Painted Curtains // Not Just A Housewife […]

      Reply
    5. 155th week of Wine’d Down Wednesday says:
      September 6, 2016 at 5:19 pm

      […] 2. Custom Painted Curtains//Not Just A Housewife […]

      Reply

    Comment Below! Cancel reply

    Your email address will not be published. Required fields are marked *

    This site uses Akismet to reduce spam. Learn how your comment data is processed.

    Primary Sidebar

    stacyHey! I'm Stacy and am a DIY addict. I love to get my hands dirty, whether it's sawdust, paint, or dirt. My goal is to help YOU learn to fix up your home and yard. No matter the style or size, I think everyone should love their home. And it doesn't takes a big budget to get there. Let's DIY together!

    Subscribe to My Blog!

    Search this site

    categories


    Subscribe

    Footer

    Welcome! I'm sharing our adventures as we fix up our 1938 cottage. Whether it is big or small, I think everyone should love their home and I don't think it takes a lot of money to make a space your own

    About Stacy

    • Facebook
    • Instagram
    • Pinterest
    • Twitter

    My Favorites

    copyright

    All images and content are copyrighted via Stacy Risenmay unless otherwise stated. If you'd like to share my work, please link back to this blog.
    Thank you for visiting!


    Footer

    ↑ back to top

    About

    • Meet Stacy
    • Privacy Policy
    • Contact

    Categories 

    • Home Decor
    • Outdoor Projects & Gardening
    • DIY & Tutorials
    • Kid Activities
    • Recipes
    • Travel
    • Cleaning
    • Houseplants
    • Staining
    • Painting
    • Power Tools
    • Holiday Ideas

    Newsletter

    • Sign Up! for emails and updates

    As an Amazon Associate I earn from qualifying purchases.

    Copyright © 2020 Brunch Pro on the Brunch Pro Theme


    Privacy Policy
    Welcome! Thanks for visiting.
    Hi! I'm Stacy and I want to help YOU become a DIY rockstar! Sign up for my email list so each project, tip, and trick will go directly to your inbox :)
    Your information will *never* be shared or sold to a 3rd party. Pinky promise :)
    Welcome!
    Hi! I'm Stacy and I blog about fixing up our 1938 cottage. Join the thousand of others who get my posts sent to their inbox for FREE!
    Your information will *never* be shared or sold to a 3rd party.