
I finally cleaned up my bedroom in the office well enough to photograph it! Before we added our bed to the mix, this room already was hard to keep tidy since it was multi-functional. It was our mudroom, storage room, and my home office. Now we can add bedroom to the mix..... at least temporarily.
Why?
I need to rewind a bit and explain why we moved our bedroom upstairs to the office space for those of you who may have missed it in a previous post. We used to have the boys all in one big bedroom. We decided that since the boys were getting older, we would have two kid bedrooms. The plan was to finish the unfinished part of the basement, turn it into a new bedroom for Shane and I, and then separate the boys. I got really excited about designing kid spaces and jumped the gun. I moved the kids into our old room before the basement was even started. So Shane and I were camping in the unfinished part of the basement.
Two things prompted the move to the office. A.) I hated it down there. There isn't a ceiling with insulation yet. We heard every single sound above us. There are also no windows so the only light was coming from the bathroom next door. I felt like a vampire. B.) I do not have a workshop so the basement has been my workshop during the winter. Our garage is tiny and is full of things in storage. We moved the bed upstairs so I could again work on things like my sister's kitchen cabinets.
Soooo.... I have come to the conclusion that we can't do the basement until I get a shed. Then I can move the stuff in the garage to the shed and use the garage as a workshop. Then that frees up the basement to be a bedroom. Whew! All that just to show you these photos of my clean (temporary) bedroom :)
My Bedroom in the Office!

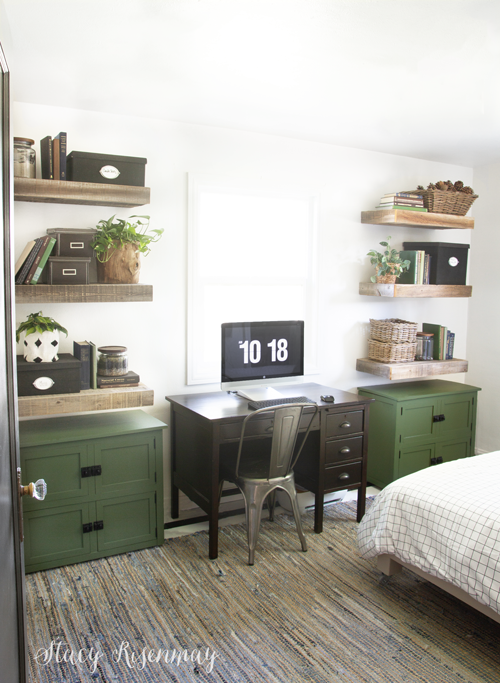
I've been crushing on moody shades of green like sage and olive green for a long time and knew I wanted to add more to my home. This was the perfect space to do that!

I knew it was going to feel weird having a large piece of furniture sticking out where nothing was previously so I wanted the bedding to be light and bright. Something dark would have been too heavy. This bedding was perfect! (affiliate link) The green pillow is from H&M Home and the gray pillows are from IKEA.

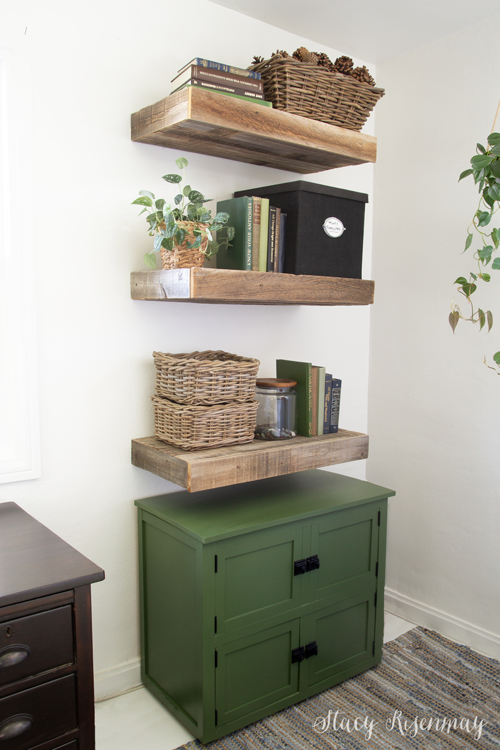
The cabinets are painted in Global Green by Behr.
I painted the previously white cabinet olive green and I LOVE it! Shane (as usual) was a little hesitant for the change. As soon as the room was all put together and styled, he said liked it better than before.
There is only a couple of feet of empty space on either side of the bed. A bit tight! So we added wheels to the bed so if we need more room on one side, we can easily slide it over.

I love the light in this space! It is west facing which means the morning light is soft and subtle and then by mid day it is sunny clear until sundown.
The shelves will forever be one of my favorite things I have built. Made from old fence pickets, they are also drawers! I store paperwork in them and photos that need to be filed or scrapbooked. It is fun to change up the decor too. This room has gone from turquoise, to more neutral, to green!

The rug in this space was not intended for this room. It was just an extra that I threw in here when we moved our bed up so that our feet would have something warm to touch when we woke up. I don't love it, but it works okay for now. When we install new flooring next month, I will get a new rug.

I almost didn't share this post because it isn't a finished room. I also hate having to give a long explanation of why we are sleeping in here. Shane and I feel a bit like we are living in an apartment all over again. But I thought that maybe those of you who have downsized, those of you renting, those of you who's living arrangements may have changed, or those of you who might want to add a guest bedroom to your office, might find value in this post. We lived with just a mattress on the floor for a month and I finally said "I know this is temporary, but I need this space to be cute and actually feel like a bedroom!" Just because a situation is temporary, doesn't mean you can't make it feel like "home". I still think it is worth putting forth effort to make it your own space. Shane and I may be in here for another 6 month or even longer. I wanted to love my room :)
P.S. The other wall of this room still looks the same as before. I need to paint some of the boxes or bins green and restyle them so they fit this new space better. I will share when I get it done!
So what do you think? Have you found yourself in a similar situation? I love to hear about it! Please share in the comments.


My favourite version of your office! This is beautiful and subtle. I love the green.
Love the green and a great solution.
Enjoy your day
Cindy
I LOVE your temporarily room! It's bright, cheery and the olive green looks awesome! I'm so happy you are NOT sleeping in an unfinished room! Enjoy your time as you adjust to change...something we all have to do. I'm thrilled you DID post this! Love and hugs!!!!
move the office to the unfinished basement and you are set!
I would but I spend a ton of time on the computer for work and the darkness would get to me after awhile. I am solar powered! :)
Every time you redo a room I think, "This is fabulous, you nailed it." Then you redo it, and again I think, "This is fabulous, you nailed it." Here we go again. Now I'm thinking, this is my favorite! Lovelovelove that green, especially with the wooden shelves. Your logic of wanting a temp situation to be emotionally uplifting makes so much sense. I hope you work out all the details of shifting spaces. You're always an inspiration for me to deal with my own room use issues.
I would really like to know where you purchased that super large frame holding all the family photos. Please don’t tell me you made it...
Thanks, Kathy
Haha! I did make it but it’s not really a frame and it is super simple. It’s a thin piece of plywood (you can buy 2x4 foot pieces at Home Depot and you don’t need to cut anything). I painted a black border around the edge. Then I used spray adhesive to attach the photos. Once they were all on, I used black washi tape to form the grid.
What paint did you use on the cabinet? I LOVE it! It looks so pretty with all the black & white & the wood tones in the baskets & shelving. Great job!
The paint is BEHR and the color is called global green. I love it too!
I love the room! Even if it's not done, it gives me such beachy vibes.
My 'office' is in my bedroom at the moment as well, so I can relate
The room is as cute as can be! Yes, I think you're right about making even a temporary space homey and nice. It will give you more energy to meet the day!
Love how you’re making the best out of your situation. Too many of us settle and live with “ugly” too long. It saps the joy of creating out of you and hinders motivation toward goals.
So much better than the basement! But I have to ask... where do you keep all your clothing?
They are in the closet in the basement. Such a pain, but luckily temporary!