• Skip to primary navigation
  • Skip to main content
  • Skip to primary sidebar
  • Skip to footer
Stacy Risenmay
  • Home
  • About me
  • PRESS
  • Contact Me
  • My Book
    • Facebook
    • Instagram
    • Pinterest
    • Twitter
menu icon
go to homepage
subscribe
search icon
Homepage link
  • Home
  • About me
  • Project Gallery
  • Our House
  • PRESS
  • Contact Me
  • Privacy Policy
    • Facebook
    • Instagram
    • Pinterest
    • Twitter
  • ×

    My version of a "Thankful Tree"

    By Stacy 28 Comments

    The idea of a thankful tree is not new and I have seen so many of them around. So I almost didn't share mine with you. But it is a little different so I will. The main difference is how it is used. I know this will sound incredibly silly, but it has always bugged me that you add leaves everyday instead of taking them off. It is Fall after all. The leaves fall off the tree ( ok, so I might be a little OCD or something. . . ) So at our house we make all our leaves together and write what we are thankful for on them. We put them all on the tree. Every person has their own color. Mine was red! Then at night when we are doing the whole scripture reading, prayer, bedtime thing, we each pick one of ours off and we talk about those things. You could do this at dinner time or when ever it is easiest for your schedule. Then the leaves are "falling" off the tree gradually just like in nature. Okay, here is how I made mine:

    I used some plaster of paris that I had hanging around,

    a bucket, (and yes, that is a 90% off sticker you see) and a little tree that died in our yard. You could also use a flower pot. Just make sure to cover the hole with tape so the plaster doesn't come out the bottom.

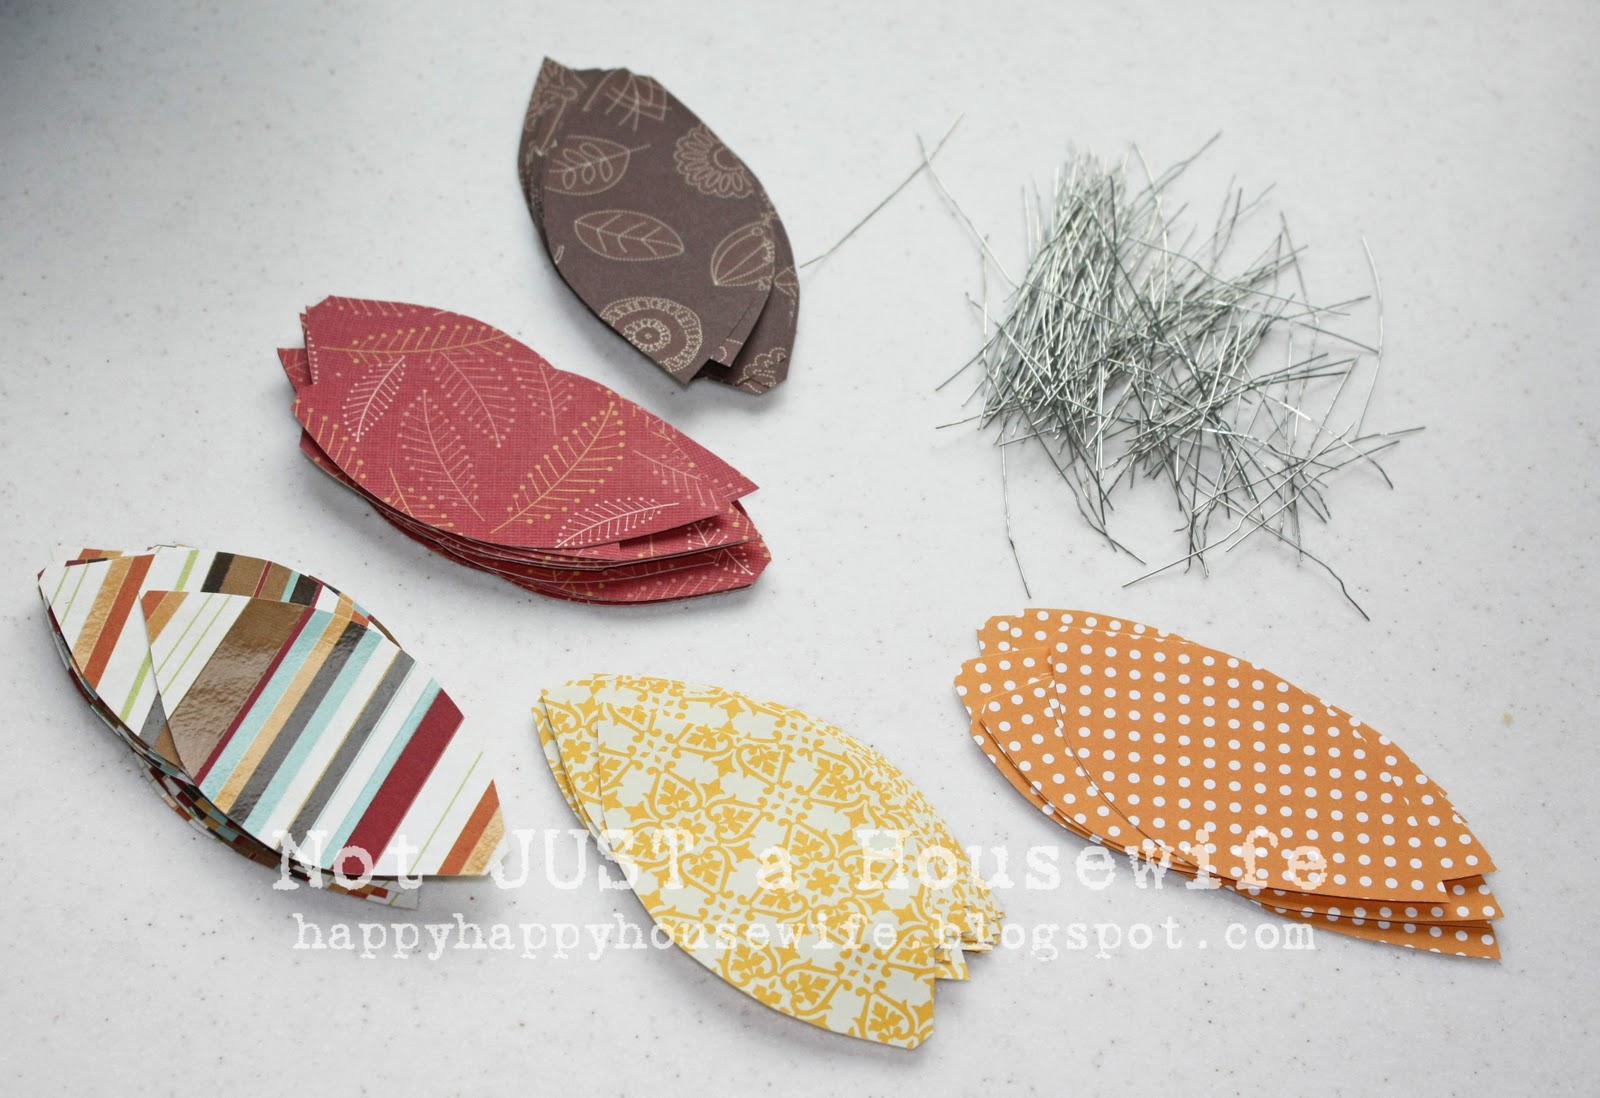
    I picked out some fall paper for the leaves too.

    I mixed up the plaster and stuck my tree in it. I let it sit for most of the day to make sure it was hard.

    I cut one leaf out and then used it as a pattern. I traced 24 leaves per piece of paper. Then I got craft wire and cut about 2 inch pieces.

    Instead of tape, I used my glue gun because I thought it would be more secure.( plus I really like my glue gun!) I want to re-use the leaves for next year.

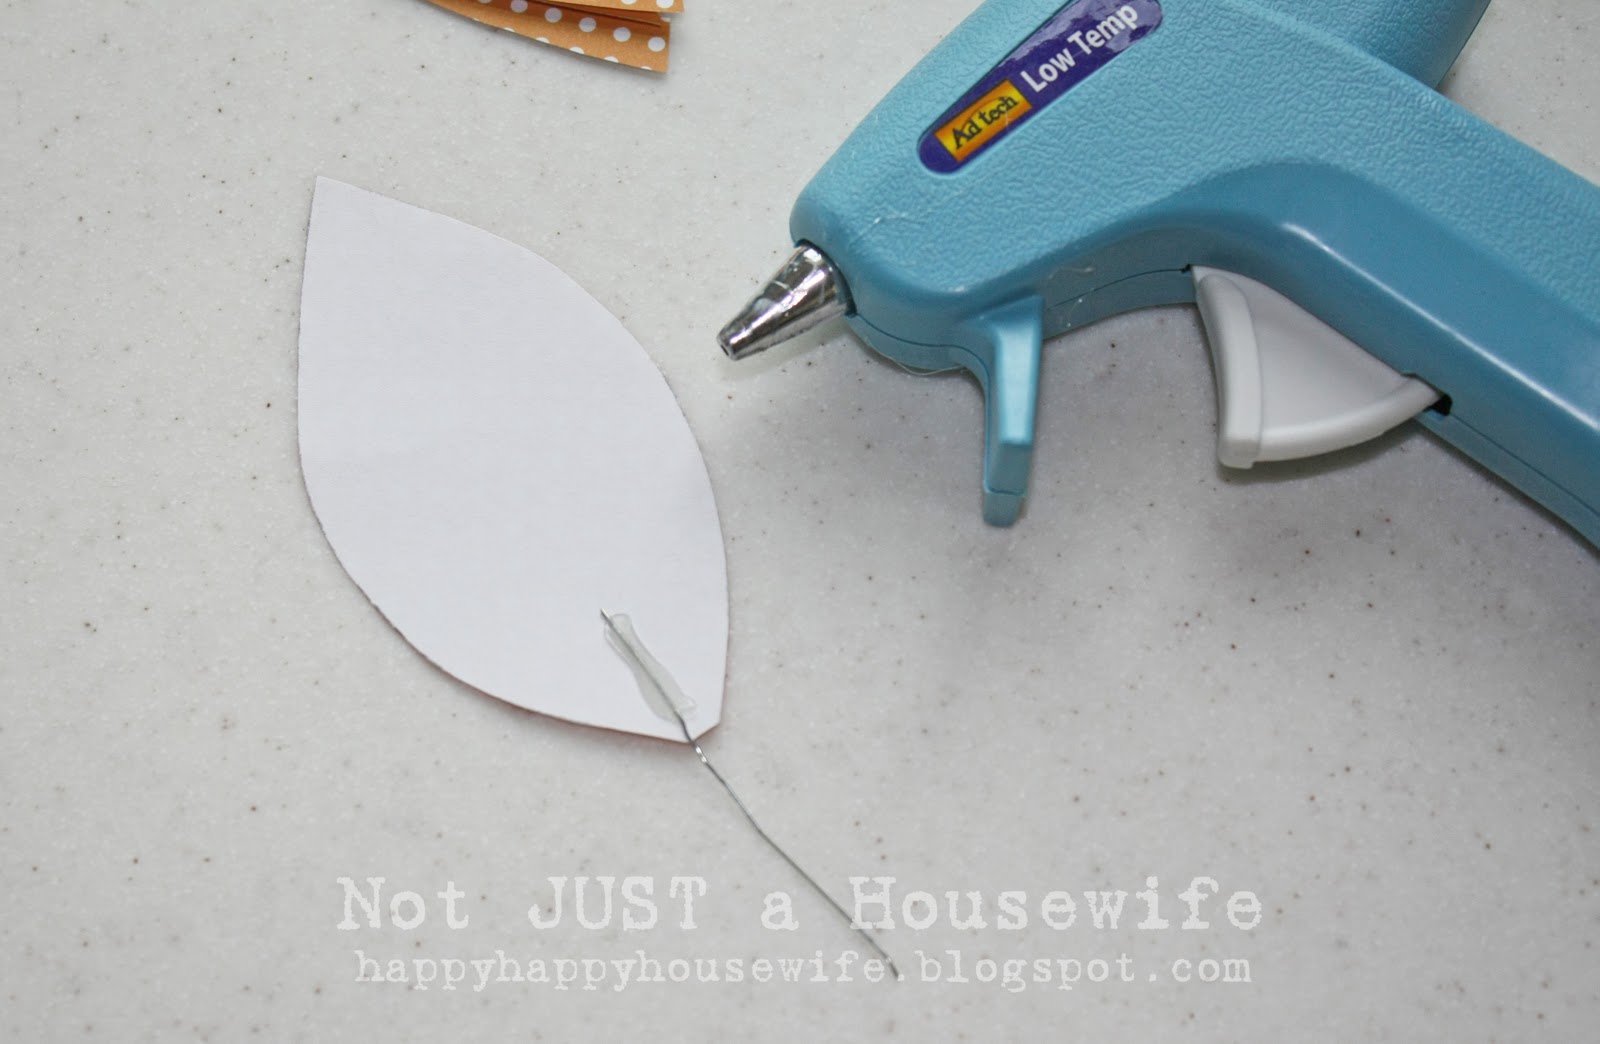
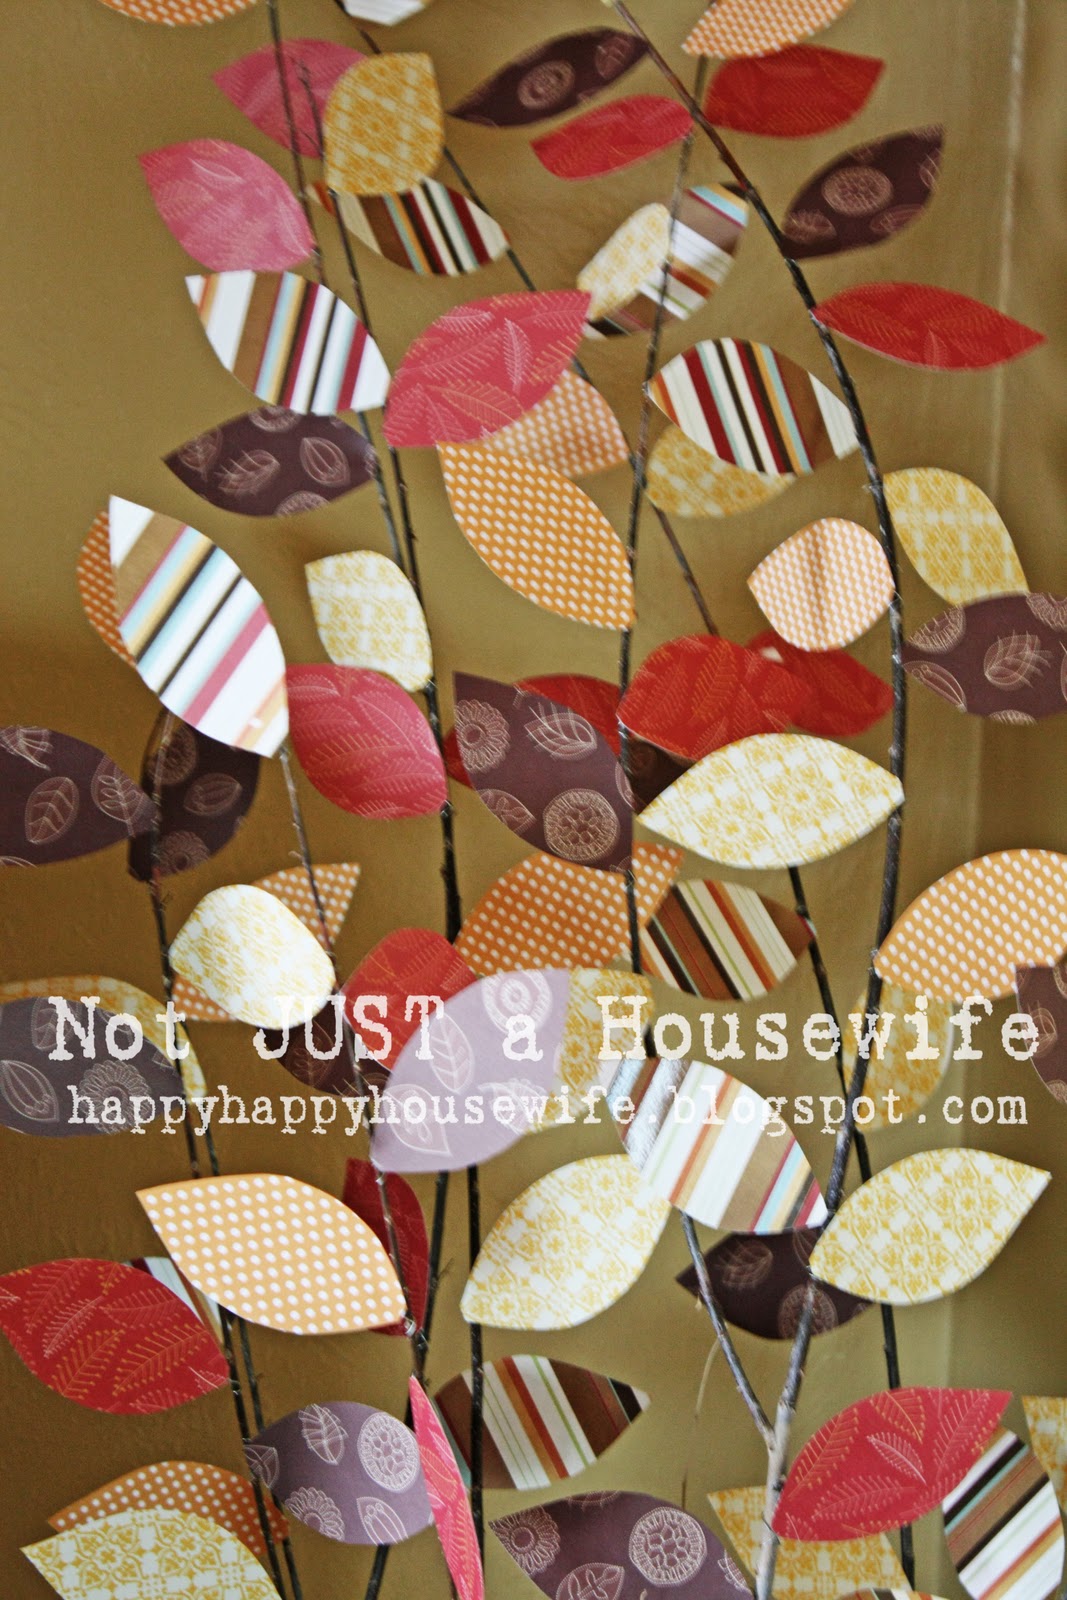
    Because I added the wire to the leaves instead of using say, string, I was able to wrap the wire around the branches and bend them where ever I wanted. I had control over where they faced and everything (I like having control!)
    And there you have it! My Thankful Tree!!!

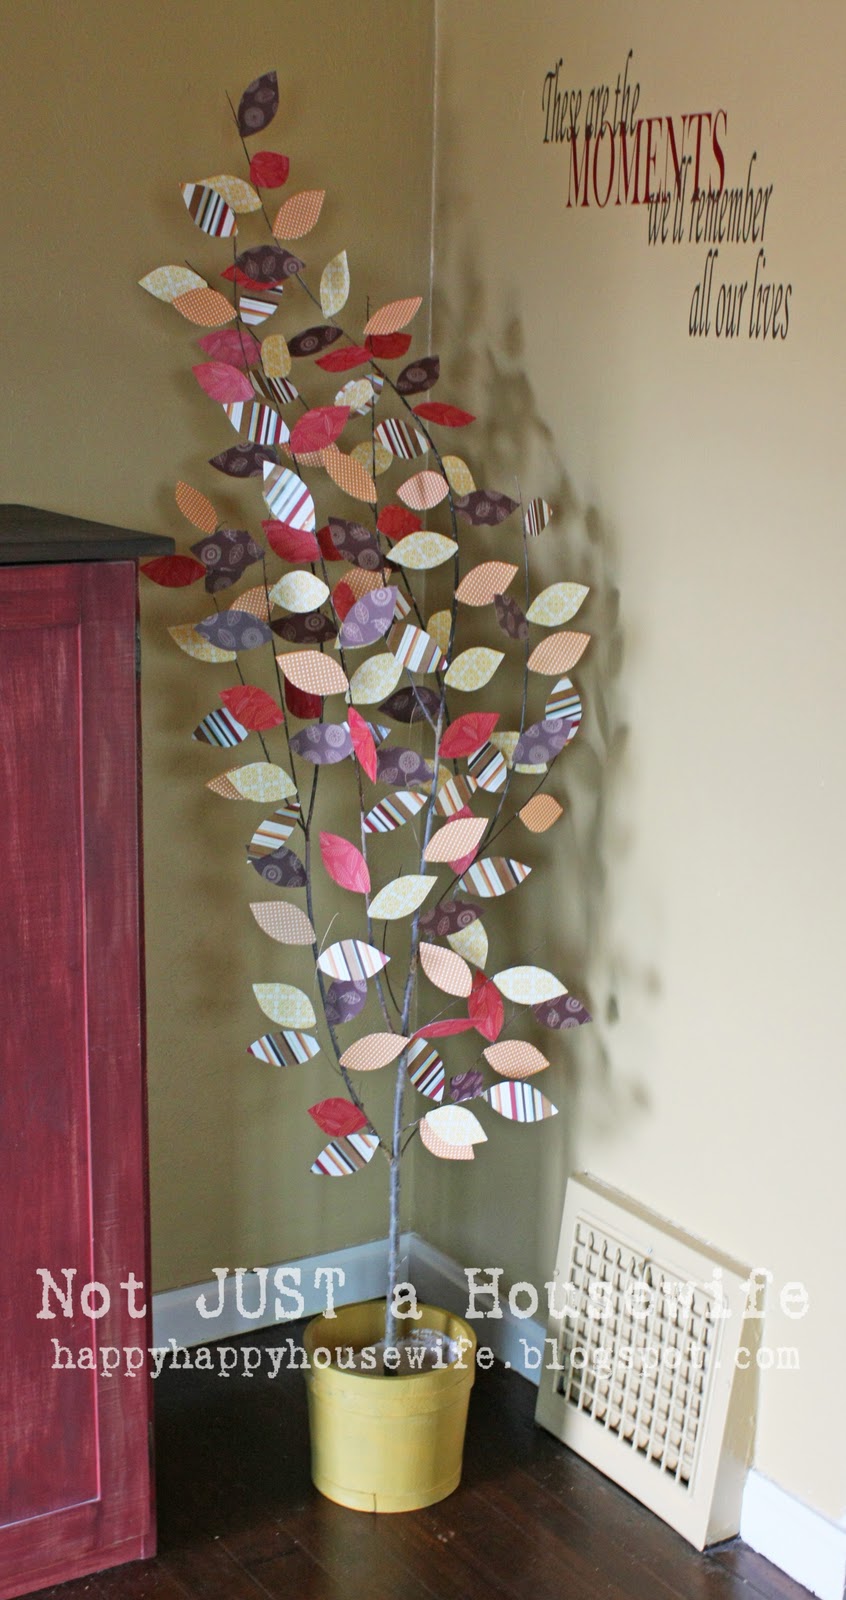
    We left some of them blank so we can add things next year. I figure most things we wrote this year we will still be thankful for next year too, like our home, food, family. . etc. It didn't take a ton of time, but I would like to get at least a couple years out of it!

    Oh, and I forgot to add something to the bucket to hide the plaster. I will probably throw some moss in there or something. Maybe. If I get around to it :)

    You will also like:

    • "Rescuing One To Rescue Another" {Celebration of Service}"Rescuing One To Rescue Another" {Celebration of Service}
    • Black Bean BurgersBlack Bean Burgers
    • Backyard Project Update!Backyard Project Update!
    • Crushing On: White BeddingCrushing On: White Bedding
    • DIY Leather OrnamentsDIY Leather Ornaments
    • Leaf Resin MagnetsLeaf Resin Magnets
    • Dated Oak Dresser Gets A Makeover!Dated Oak Dresser Gets A Makeover!
    • 1970's Ranch Rambler {Home Tour}1970's Ranch Rambler {Home Tour}

    « Felt Face Activity
    My 5 minute $1 Christmas Wreath »

    Filed Under: Holiday 28 Comments

    Subscribe

    for your weekly DIY fix.

    Reader Interactions

    Comments

    1. CourtneyKeb

      November 19, 2010 at 12:15 am

      I love it! So cute!

      Reply
    2. Tara @ Tara Being Tara

      November 19, 2010 at 2:44 am

      This is adorable!!!

      Reply
    3. Mrs.Grinder

      November 19, 2010 at 4:24 am

      um i adore this!!!

      Reply
    4. Liz

      November 19, 2010 at 4:30 am

      Its gorgeous!!

      Reply
    5. Lyndee

      November 19, 2010 at 4:54 am

      I love this tree. We can't paint our walls (stinking rent thing) so this a perfect project for me. I'm sure I can find a deal tree somewhere.

      Reply
    6. Jenglamgirl

      November 19, 2010 at 10:00 am

      Hi Stacy your post has been up since midnight last night. I emailed you last night and sent you mine, I haven't heard back from you. Love the thankful tree. Jen

      Reply
    7. Amanda

      November 19, 2010 at 12:55 pm

      Happy Friday! I love this! I featured you today on my blog toptwentthings.blogspot.com I would love for you to stop by and grab a button!

      Amanda

      Reply
    8. Kelli

      November 19, 2010 at 5:23 pm

      Very cute! YOu did a great job!

      xoxox
      Kelli @
      loveoursimplelife.blogspot.com

      Reply
    9. Kelli @ RTSM

      November 19, 2010 at 5:24 pm

      This is really cute! I love that you used wire so you could face all the leaves the right way! Such a smart idea!

      Reply
    10. Cassie

      November 19, 2010 at 6:01 pm

      I absolutely adore this project!!!
      I would love it if you linked to my party!!
      http://paperissues.blogspot.com/2010/11/save-thanksgiving.html
      =)

      Reply
    11. Sabr

      November 19, 2010 at 6:53 pm

      This is beautiful and such a good idea..will be filing away for future use!!!

      Reply
    12. Cassie

      November 20, 2010 at 4:59 pm

      Hi! Hi!
      I just wanted to let you know that we featured you today at Paper Issues!!!
      Thanks for linking up!
      You rock!!
      =)

      Reply
    13. TheSmithHotel

      November 20, 2010 at 5:25 pm

      Very cute idea! Love how it turned out!

      Jody

      Reply
    14. Jackie

      November 20, 2010 at 7:05 pm

      Great idea! Thanks for linking up to Paper Issues!

      Reply
    15. House Revivals

      November 20, 2010 at 7:50 pm

      This is such a creative idea!

      Reply
    16. Laurel @ Ducks in a Row

      November 20, 2010 at 7:53 pm

      I always love a Thankful Tree! Yours is cute!

      Reply
    17. Pam

      November 20, 2010 at 9:49 pm

      Your tree is so cool. What a love of work, patience and thankfulness. Thanks for sharing

      Reply
    18. Erin

      November 20, 2010 at 10:53 pm

      Very Awesome! and a great Idea I agree with the idea that the leaves should 'fall' off too

      Reply
    19. Creative Ambitions

      November 20, 2010 at 11:02 pm

      Stacy... great tree... very cute...good idea on using wire. Love the paper you used! And lovin' those frames in your earlier post!

      Kendra

      Reply
    20. Emily

      November 21, 2010 at 4:44 pm

      I really really LOVE this! I don't have time this year, but I've bookmarked it for next year! Thanks for sharing.

      Emily
      WhipperBerry

      Reply
    21. ale

      July 25, 2013 at 6:02 pm

      Is amazing i loveit

      Reply
    22. Nicole Stone

      September 13, 2013 at 9:19 am

      Love this, what a great idea!

      Reply
    23. Anna

      October 01, 2013 at 1:39 pm

      I LOVE this idea!!! Such a simple, yet beautiful way to show thanks :) I wonder if that could be used as a thank you for your donation tree?

      Reply
    24. Belinda

      October 24, 2013 at 4:45 pm

      This is the first time I have seen a thankful tree, gorgeous. Excuse me for being a little slow but do you glue the paper to the back of a piece of fabric?

      Reply
      • Belinda

        October 24, 2013 at 4:58 pm

        sorry, I read it again and realised it was printed paper :)
        Leaving now to my local arts store to start my very own Thankful Tree. Thank you

        Reply
    25. Ashley Pederson

      November 15, 2014 at 4:25 pm

      I recently read a great book titled, "Little Things Long Remembered: Making Your Children Feel Special Every Day" by Susan Newman, Ph.D that points out the importance of creating traditions/memories with your family in order to better bond with them. I am probably a little late, but do plan to make a thankful tree with them- love your thankful tree- I may have to make a large tree instead of a small one that I had originally planned to make- thanks for sharing!

      Reply
      • Joni

        November 19, 2014 at 11:34 am

        That is so important, Ashley, especially in today's high-tech driven environment. It seems these devices just take over our lives if we don't put a leash on them! It's love-hate thing :-). I will take a look at Susan's book - sounds perfect for today's family.

        Reply
        • Ashley Pederson

          November 24, 2014 at 1:36 pm

          You're welcome Joni! Enjoy!

          Reply

    Comment Below! Cancel reply

    Your email address will not be published. Required fields are marked *

    This site uses Akismet to reduce spam. Learn how your comment data is processed.

    Primary Sidebar

    stacyHey! I'm Stacy and am a DIY addict. I love to get my hands dirty, whether it's sawdust, paint, or dirt. My goal is to help YOU learn to fix up your home and yard. No matter the style or size, I think everyone should love their home. And it doesn't takes a big budget to get there. Let's DIY together!

    Subscribe to My Blog!

    Search this site

    categories


    Subscribe

    Footer

    Welcome! I'm sharing our adventures as we fix up our 1938 cottage. Whether it is big or small, I think everyone should love their home and I don't think it takes a lot of money to make a space your own

    About Stacy

    • Facebook
    • Instagram
    • Pinterest
    • Twitter

    My Favorites

    copyright

    All images and content are copyrighted via Stacy Risenmay unless otherwise stated. If you'd like to share my work, please link back to this blog.
    Thank you for visiting!


    Footer

    ↑ back to top

    About

    • Meet Stacy
    • Privacy Policy
    • Contact

    Categories 

    • Home Decor
    • Outdoor Projects & Gardening
    • DIY & Tutorials
    • Kid Activities
    • Recipes
    • Travel
    • Cleaning
    • Houseplants
    • Staining
    • Painting
    • Power Tools
    • Holiday Ideas

    Newsletter

    • Sign Up! for emails and updates

    As an Amazon Associate I earn from qualifying purchases.

    Copyright © 2020 Brunch Pro on the Brunch Pro Theme


    Privacy Policy
    Welcome! Thanks for visiting.
    Hi! I'm Stacy and I want to help YOU become a DIY rockstar! Sign up for my email list so each project, tip, and trick will go directly to your inbox :)
    Your information will *never* be shared or sold to a 3rd party. Pinky promise :)
    Welcome!
    Hi! I'm Stacy and I blog about fixing up our 1938 cottage. Join the thousand of others who get my posts sent to their inbox for FREE!
    Your information will *never* be shared or sold to a 3rd party.