
YEAH! My project that I have been so excited about is finally done!!! I have wanted a lamp in my family room for so long. There are only two lights in the ceiling since my house is so old. I really wanted an antique bridge lamp like I have in my bedroom but they have tiny bases and tip very easily. Not exactly kid friendly. So I decided to make one so I could control the size of the base and make it fit my style. And if I save (a ton) of money that would be great too!
**UPDATE** Here are a couple of pictures in the day light :) A little better.
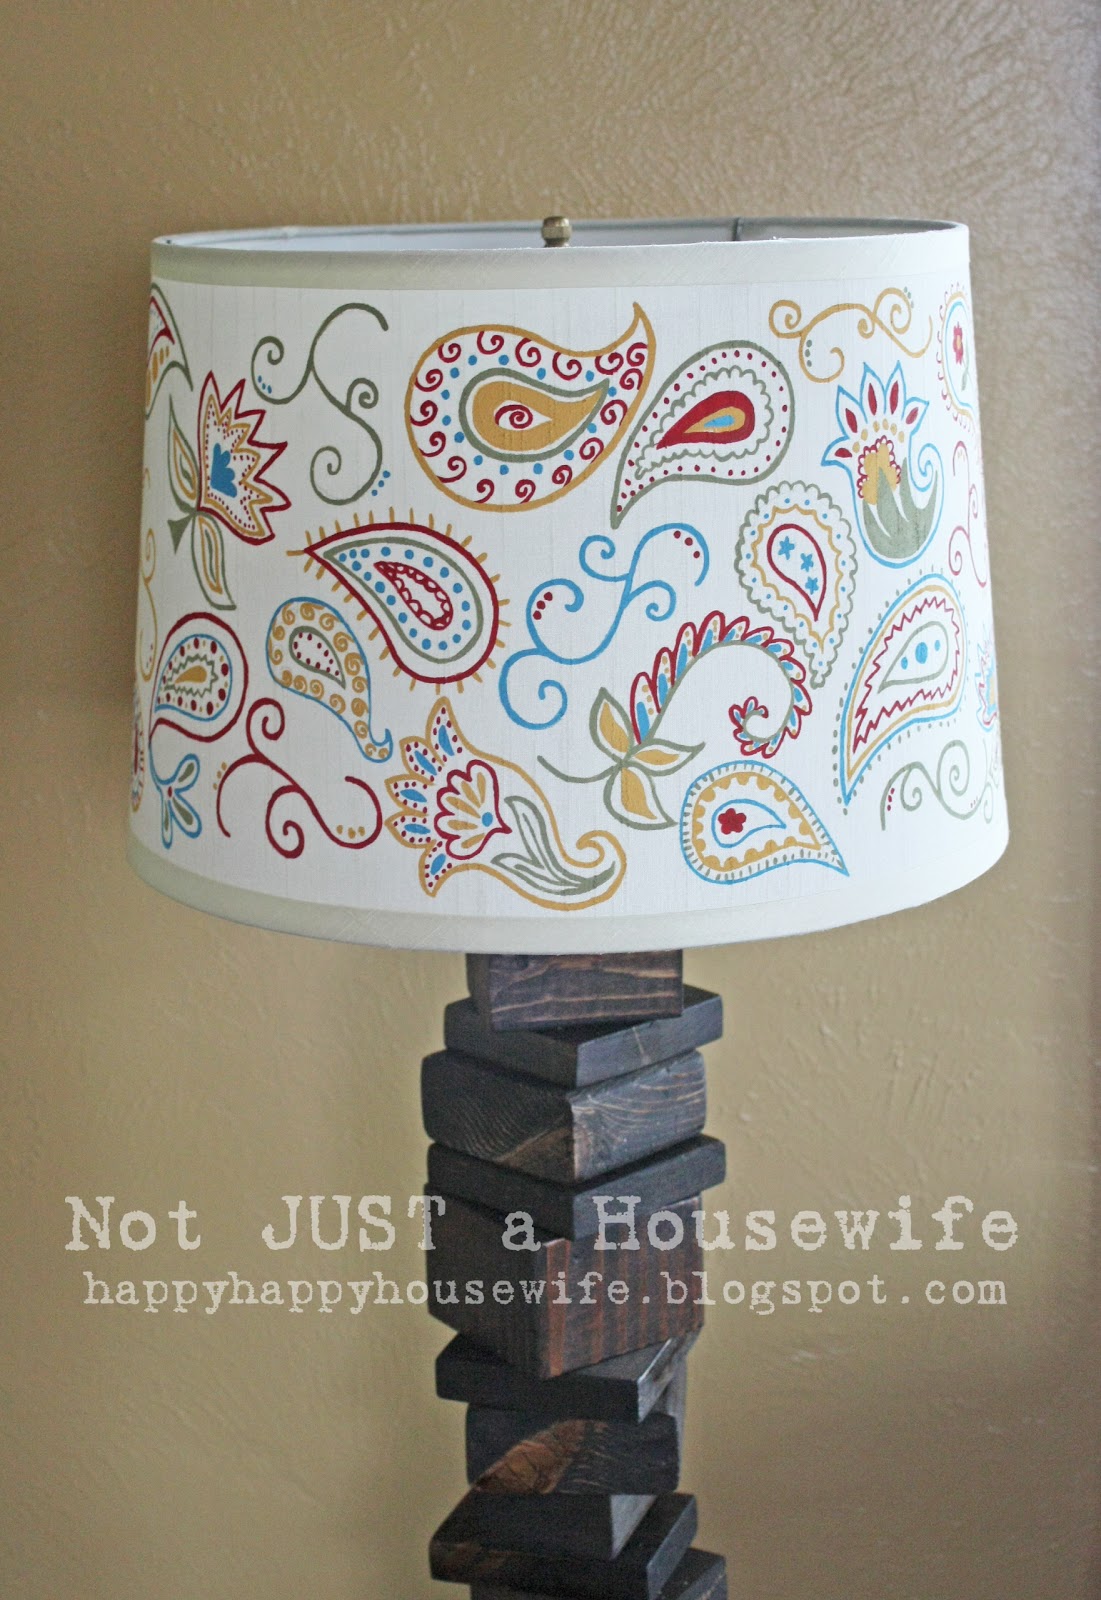

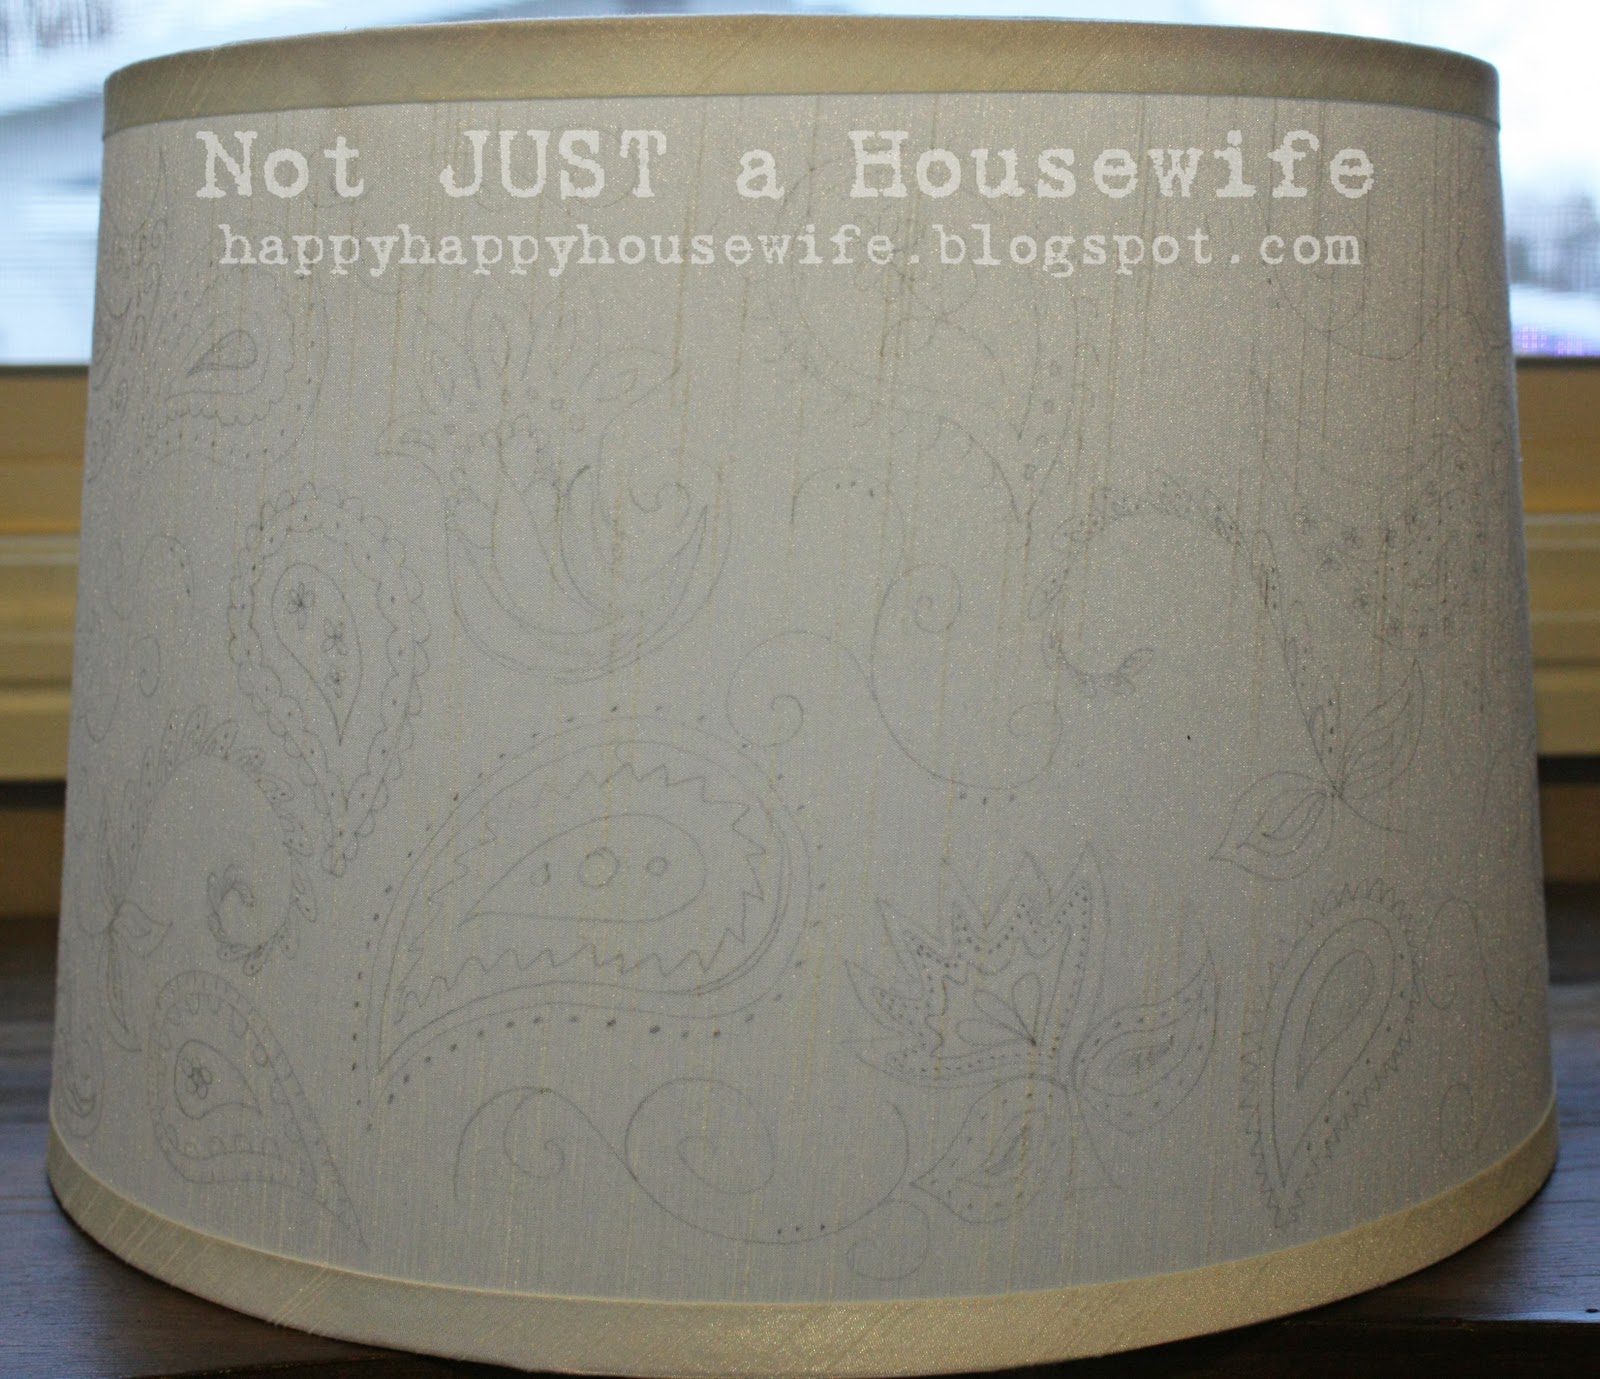
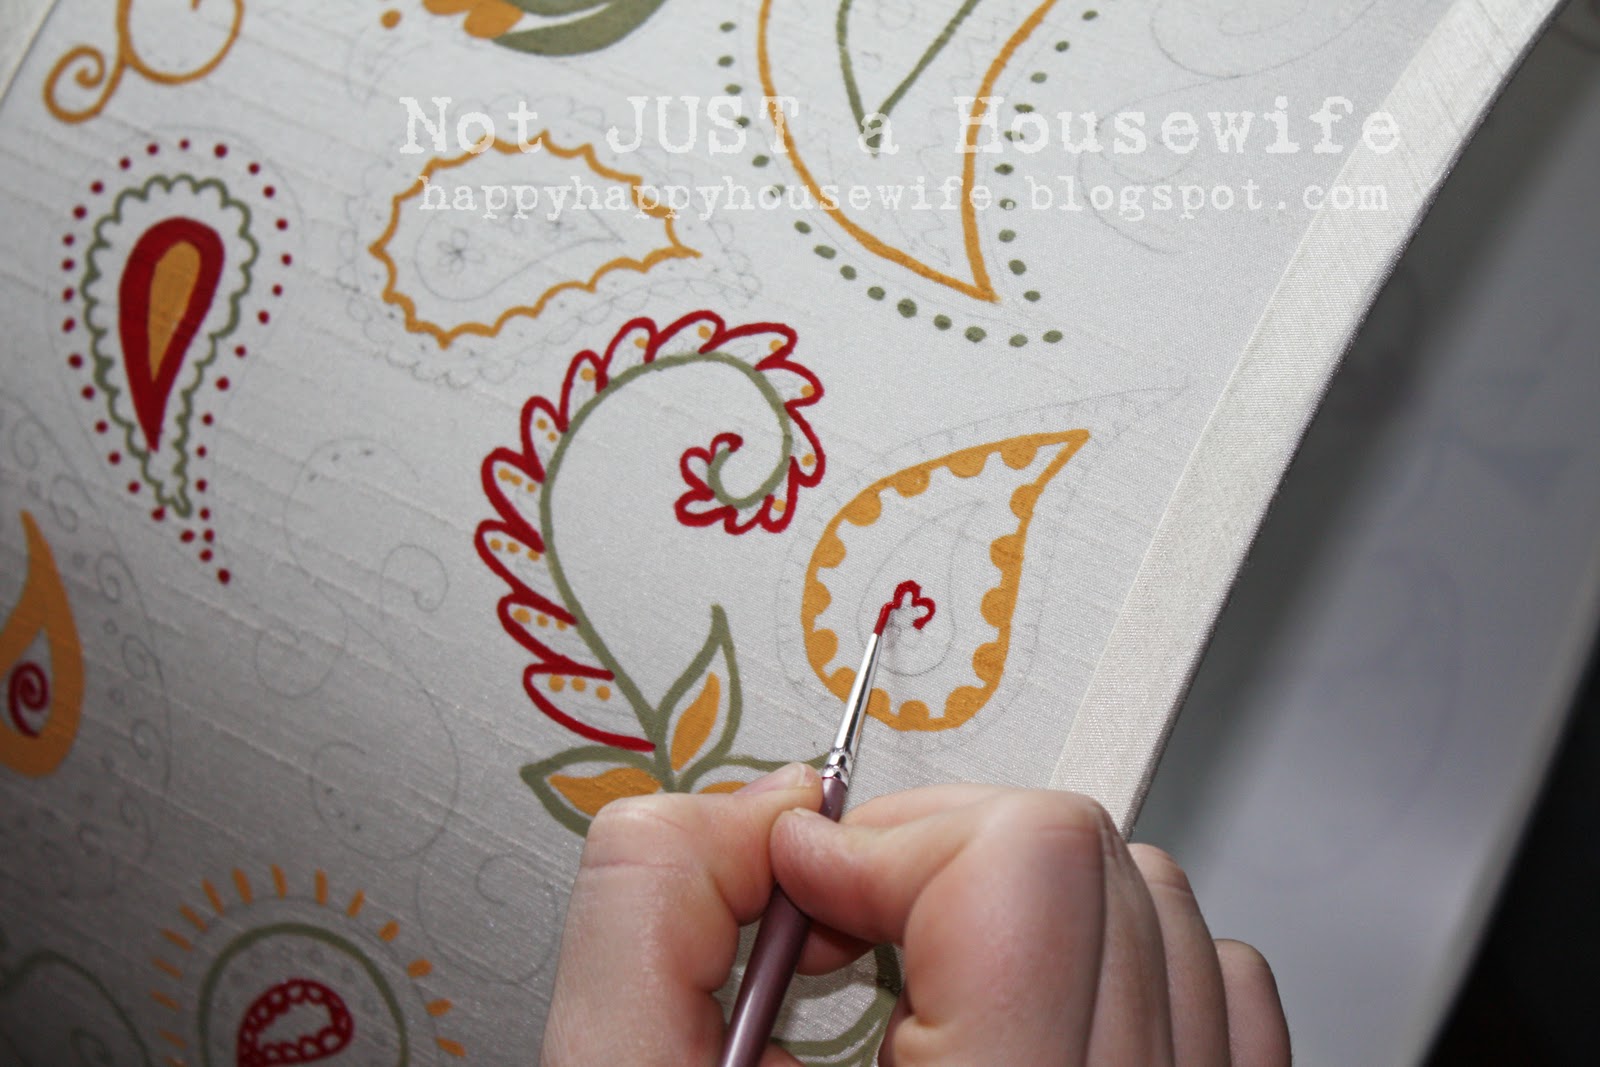
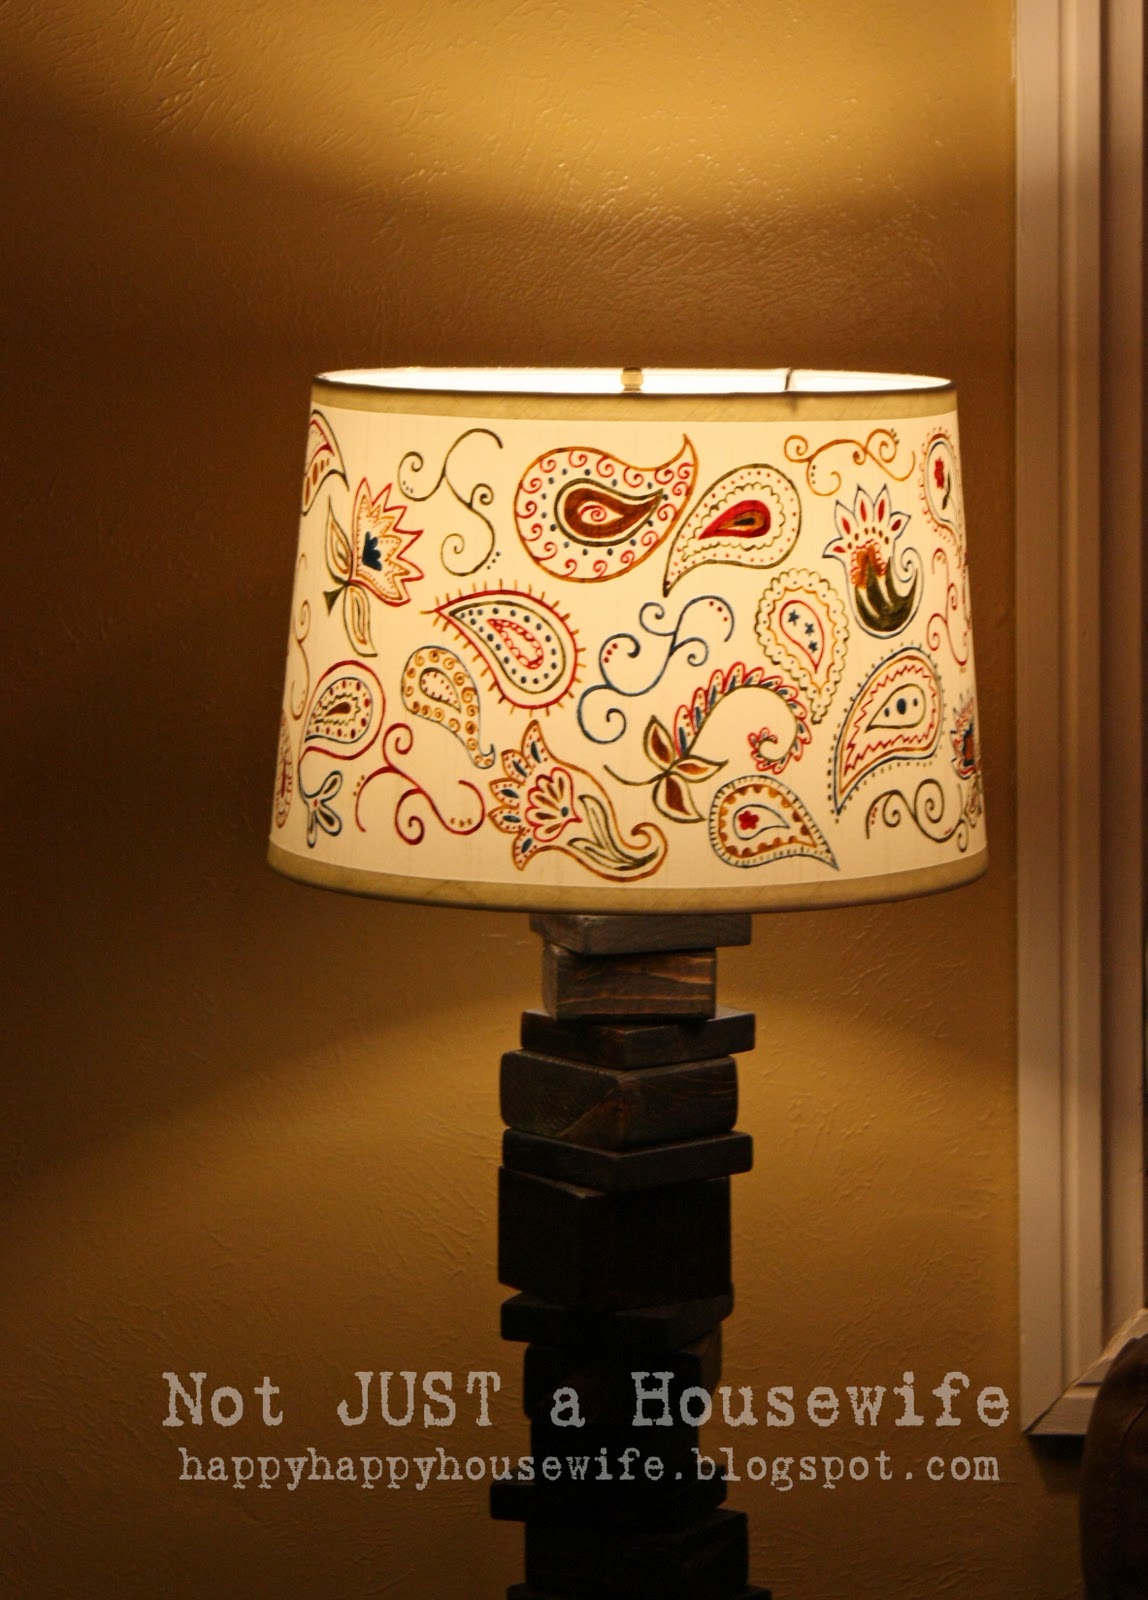
The first thing I did was lightly pencil a design onto the lamp shade. I am slightly obsessed with paisley so that is what I chose.
****Update**** I need to clarify something that until someone asked me for the pattern I used, I didn't realize that I hadn't explain very well. I didn't use a pattern. I made up the paisley design as I went. I erased if I didn't like it. Paisley is easy because anything goes. There is no wrong way. If it looks like a strange amoeba thing, you are good to go!
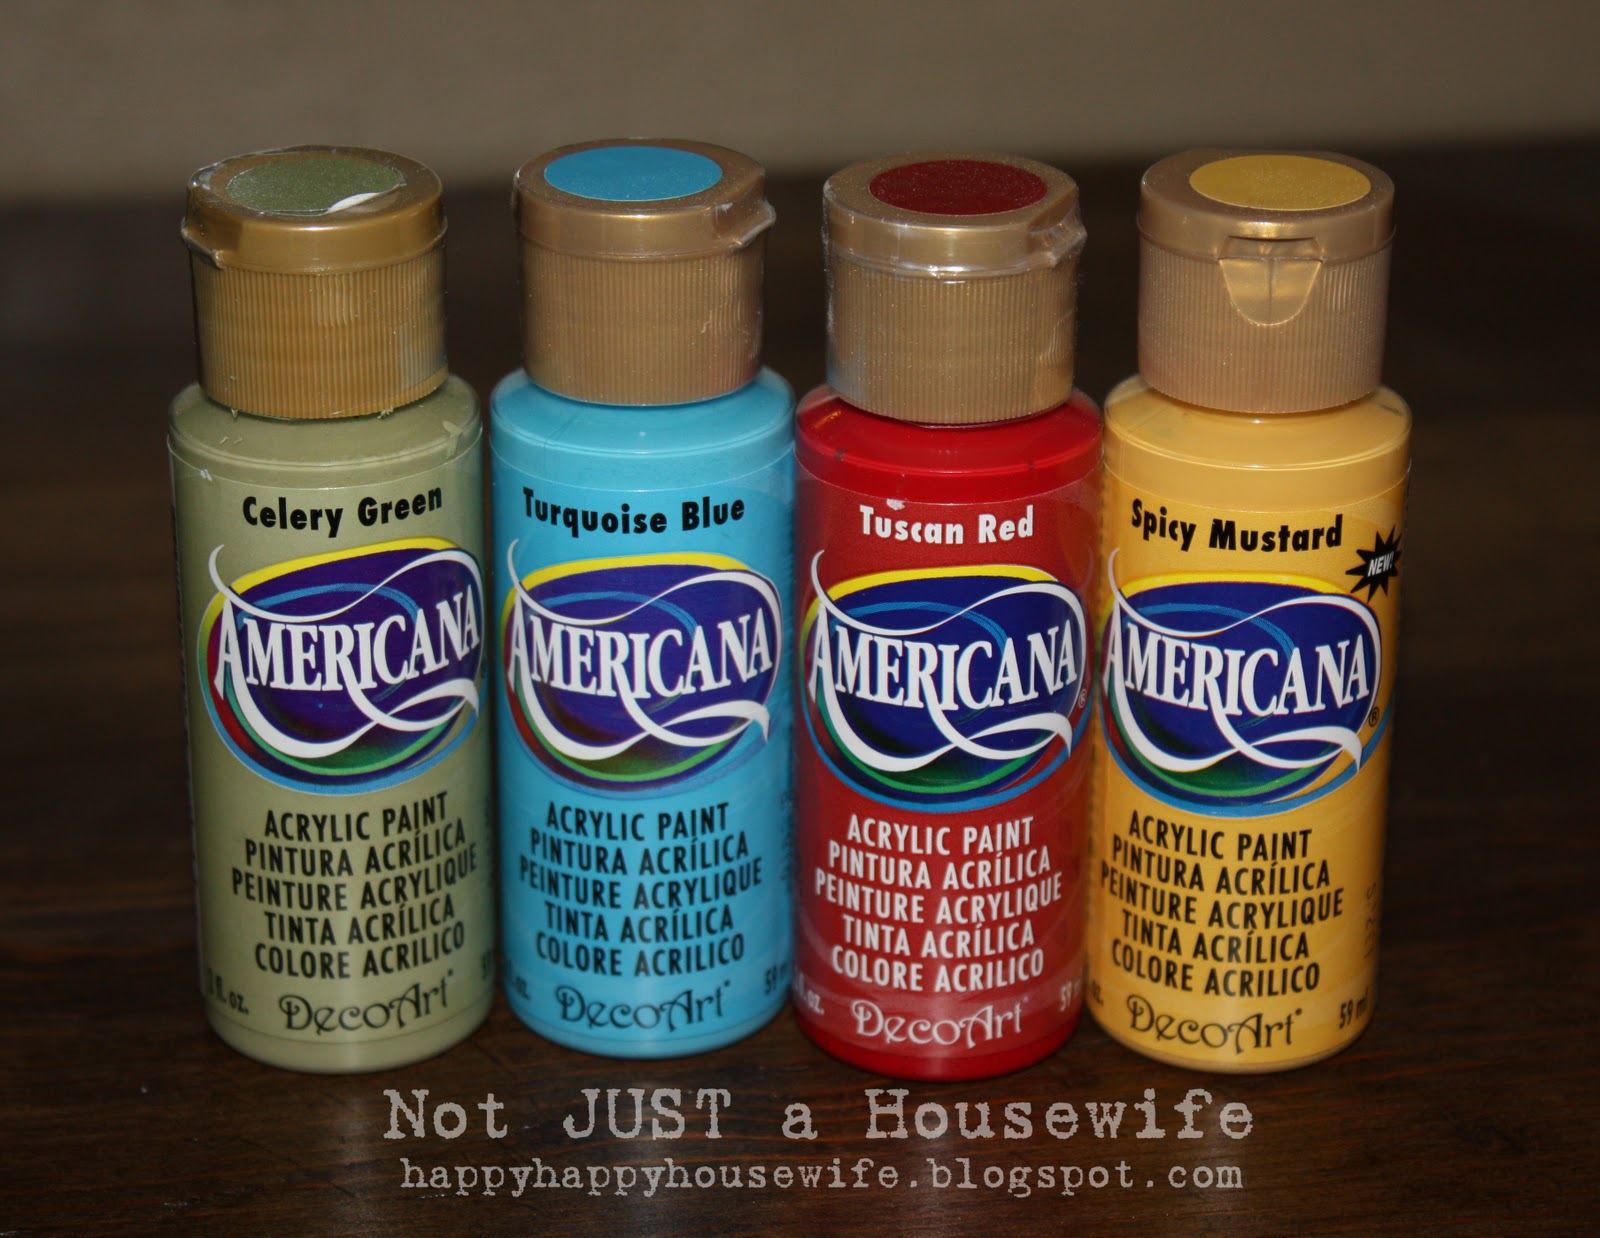
I used Deco Art paint to paint on the design. Usually when I paint on fabric I use a fabric paint medium. But since this won't be thrown in the washing machine, I skipped on the medium.
I used a small pointed brush. I can do this pretty quickly. I broke it up into 3 night so I wouldn't get sick of it. I watched a couple TV shows each night and painted. I enjoy it. If you don't want to hand paint your shade you can by all means cover your shade in fabric. A little spray adhesive or modpodge and your set.
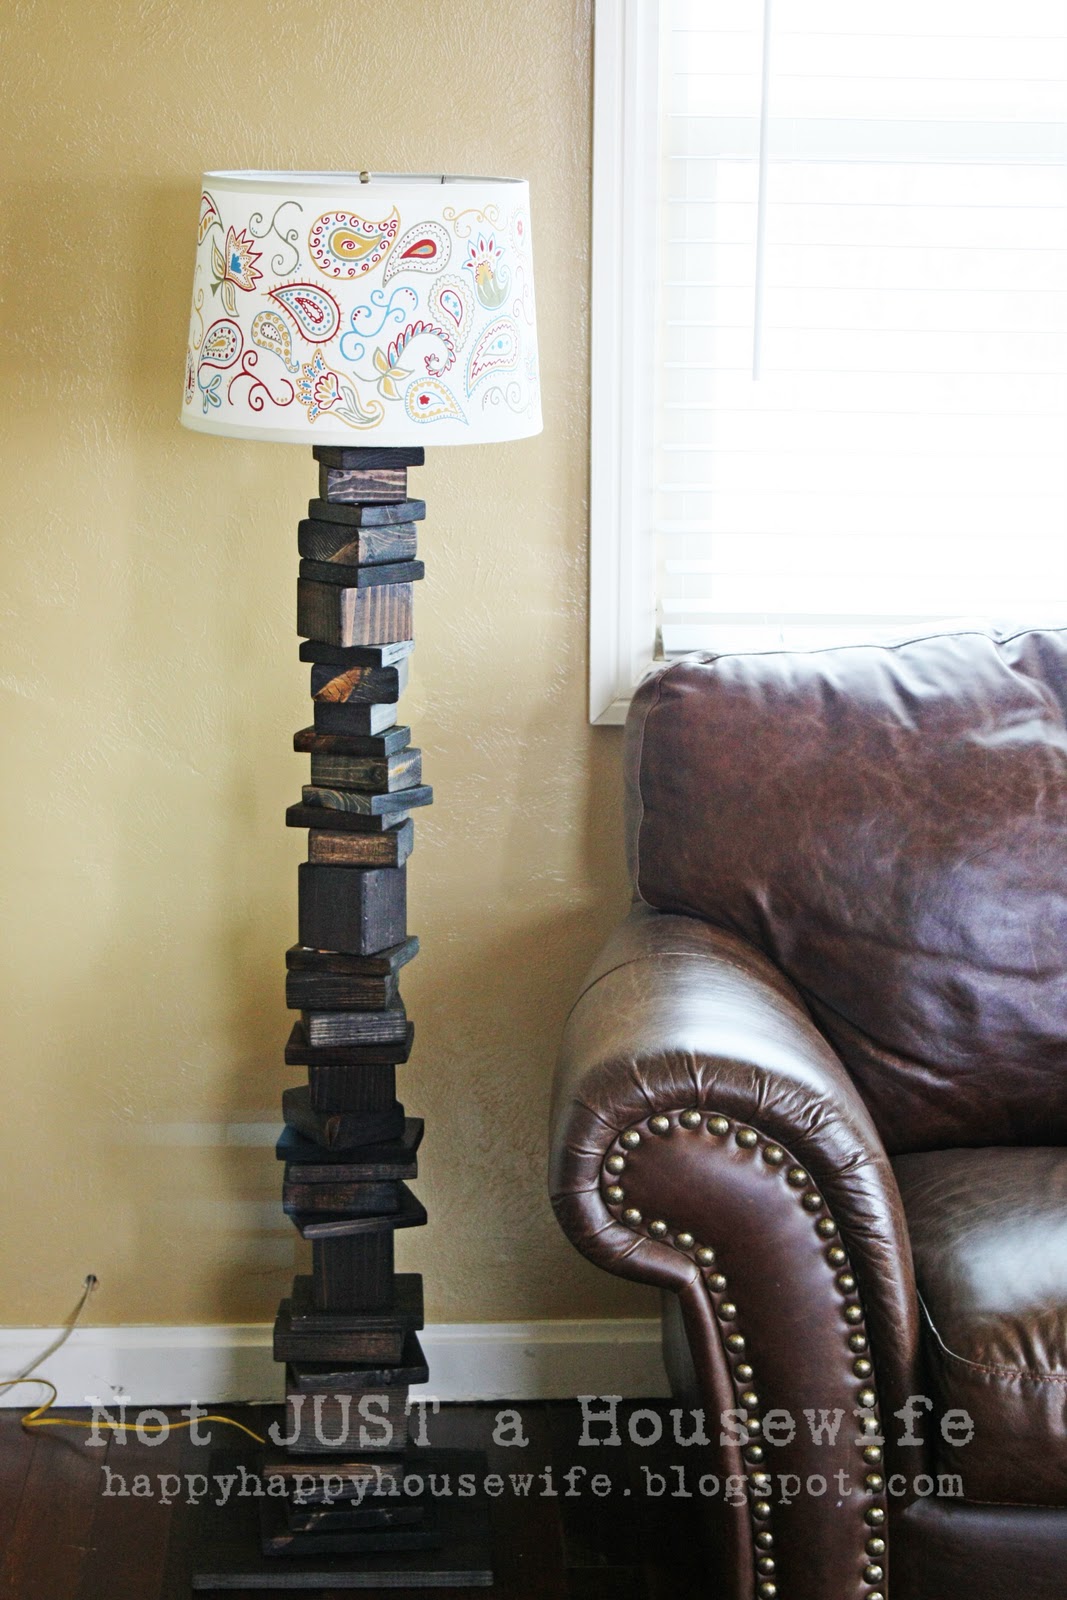
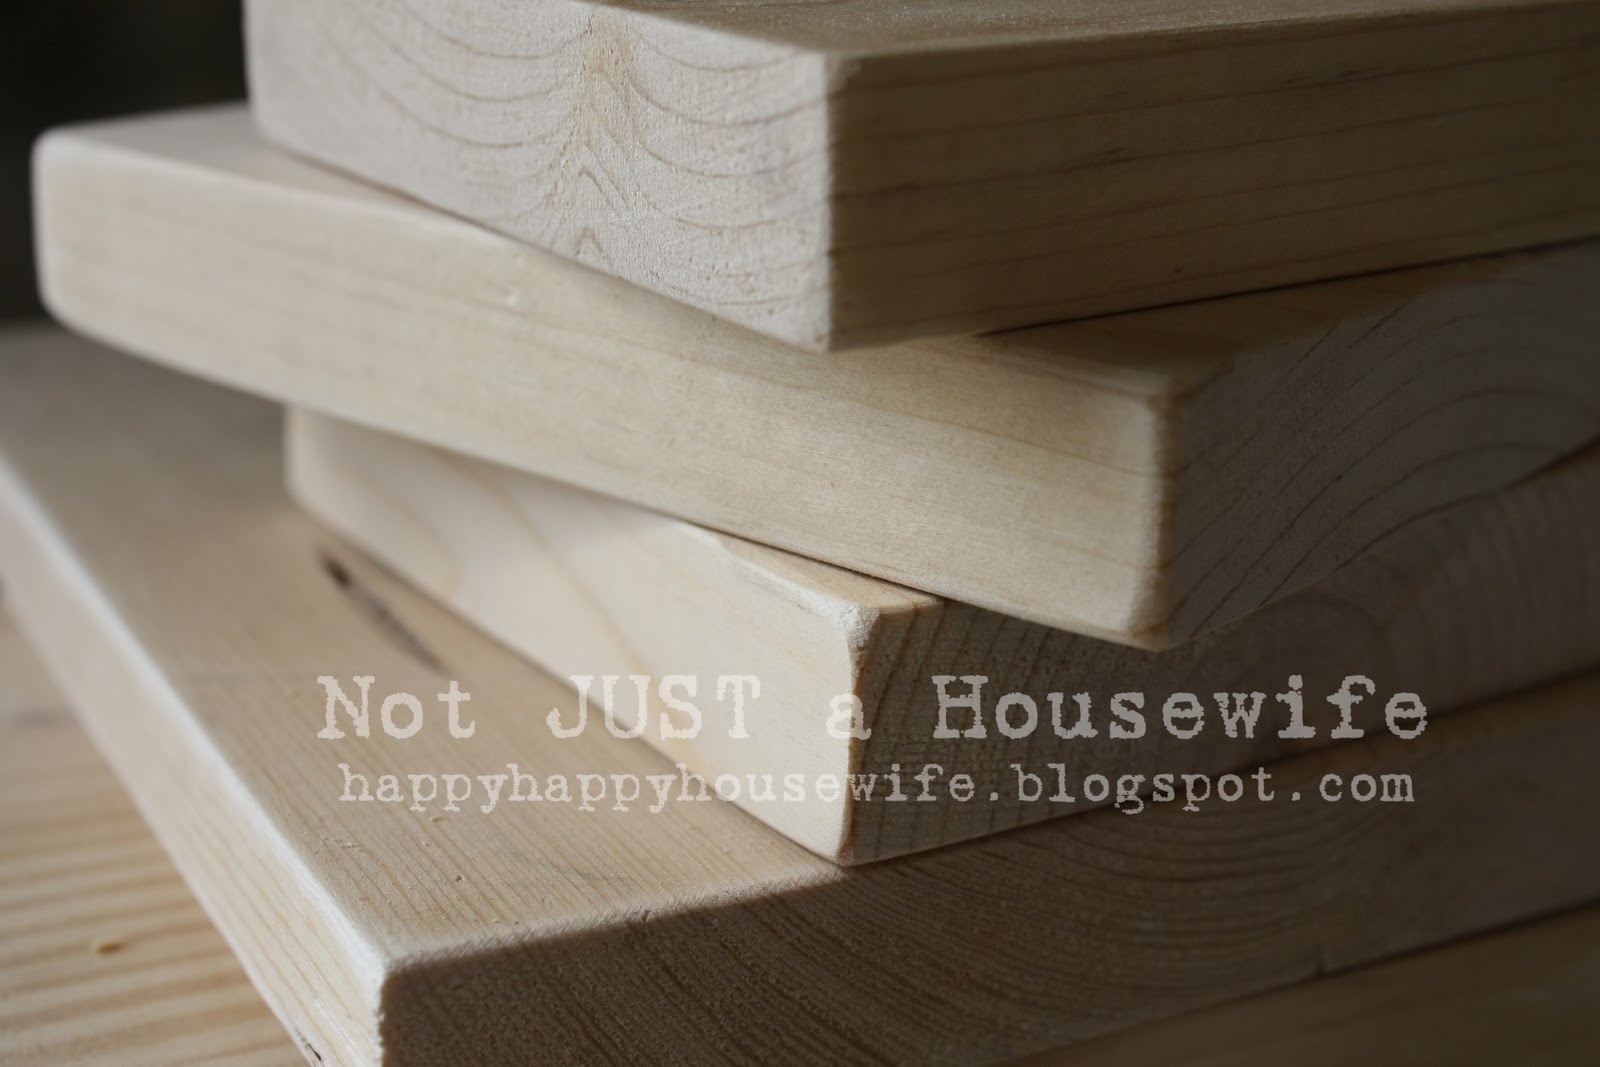
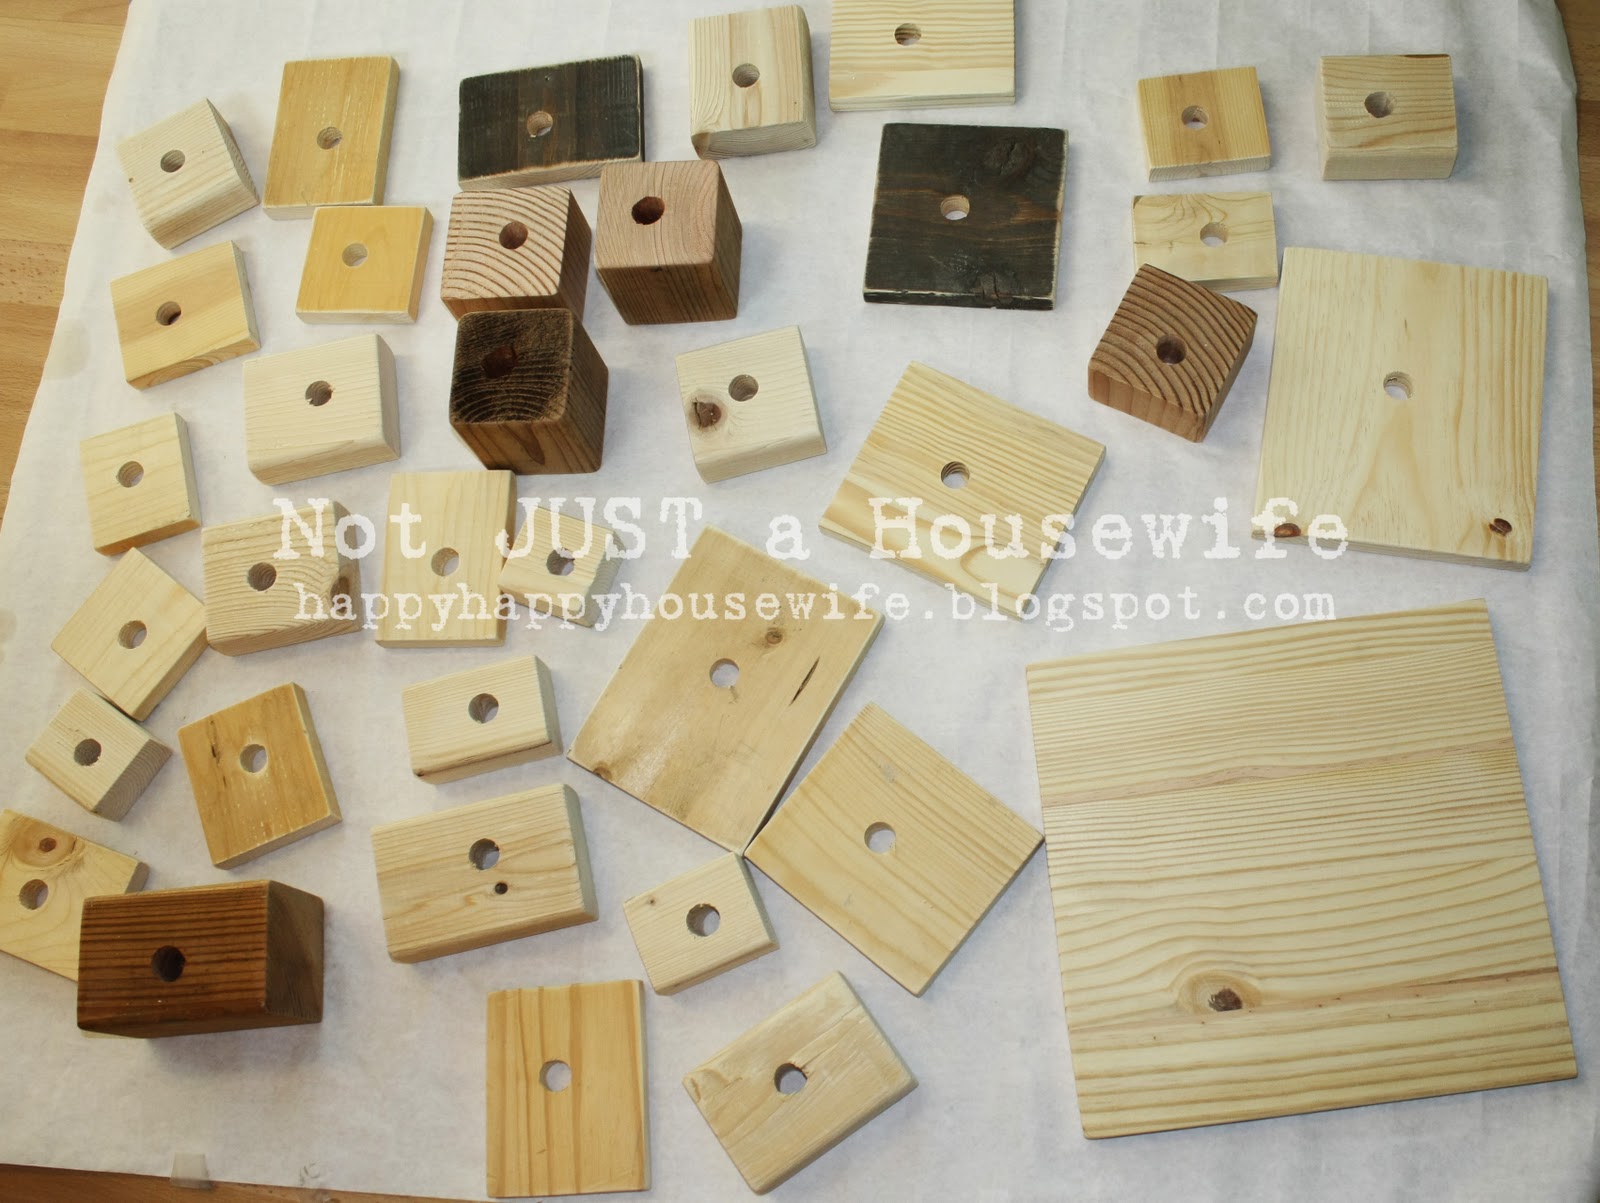
Now for the base. I had my husband gather up all my scrap pieces of wood from past projects and put them in the basement. My garage is freezing and I am a wuss. I covered everything in the unfinished part of our basement and turned it into my winter workshop. I cut all the wood with my miter saw. I didn't even measure. I just grabbed it and cut random sizes. I know, I know. You are totally diggin' my outfit. Sorry ladies. It is completely custom and takes years to make.

As I was cutting I stacked them up to make sure I was cutting enough to get the height I wanted.

When they were all cut, I sanded the heck out of them. I wanted all the edges and corners to be smooth. I have kids whose heads seem to be magnetically drawn to sharp edges.
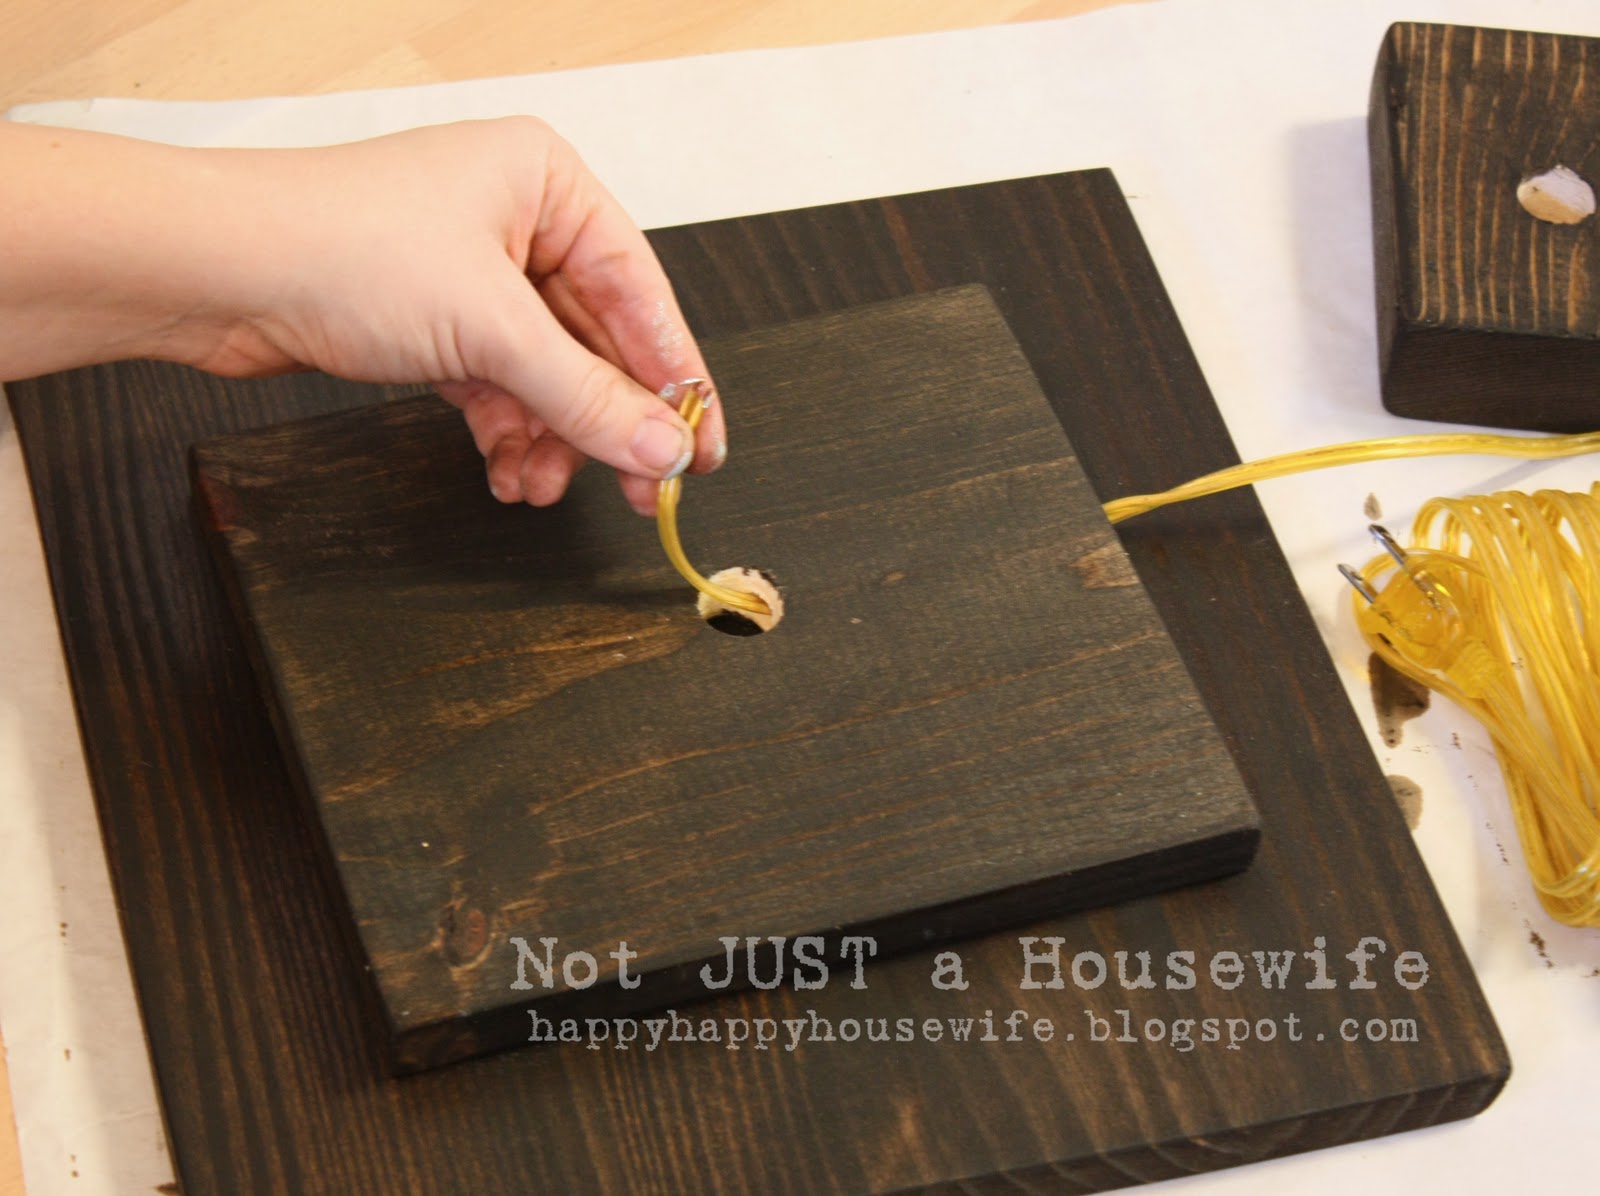
I used a bore bit (¾ inch) to make holes in the center of each one. Again, I did not measure. Great huh? That is probably why I like this project so much.I put the piece I was drilling on top of a piece that would not be used for the lamp.
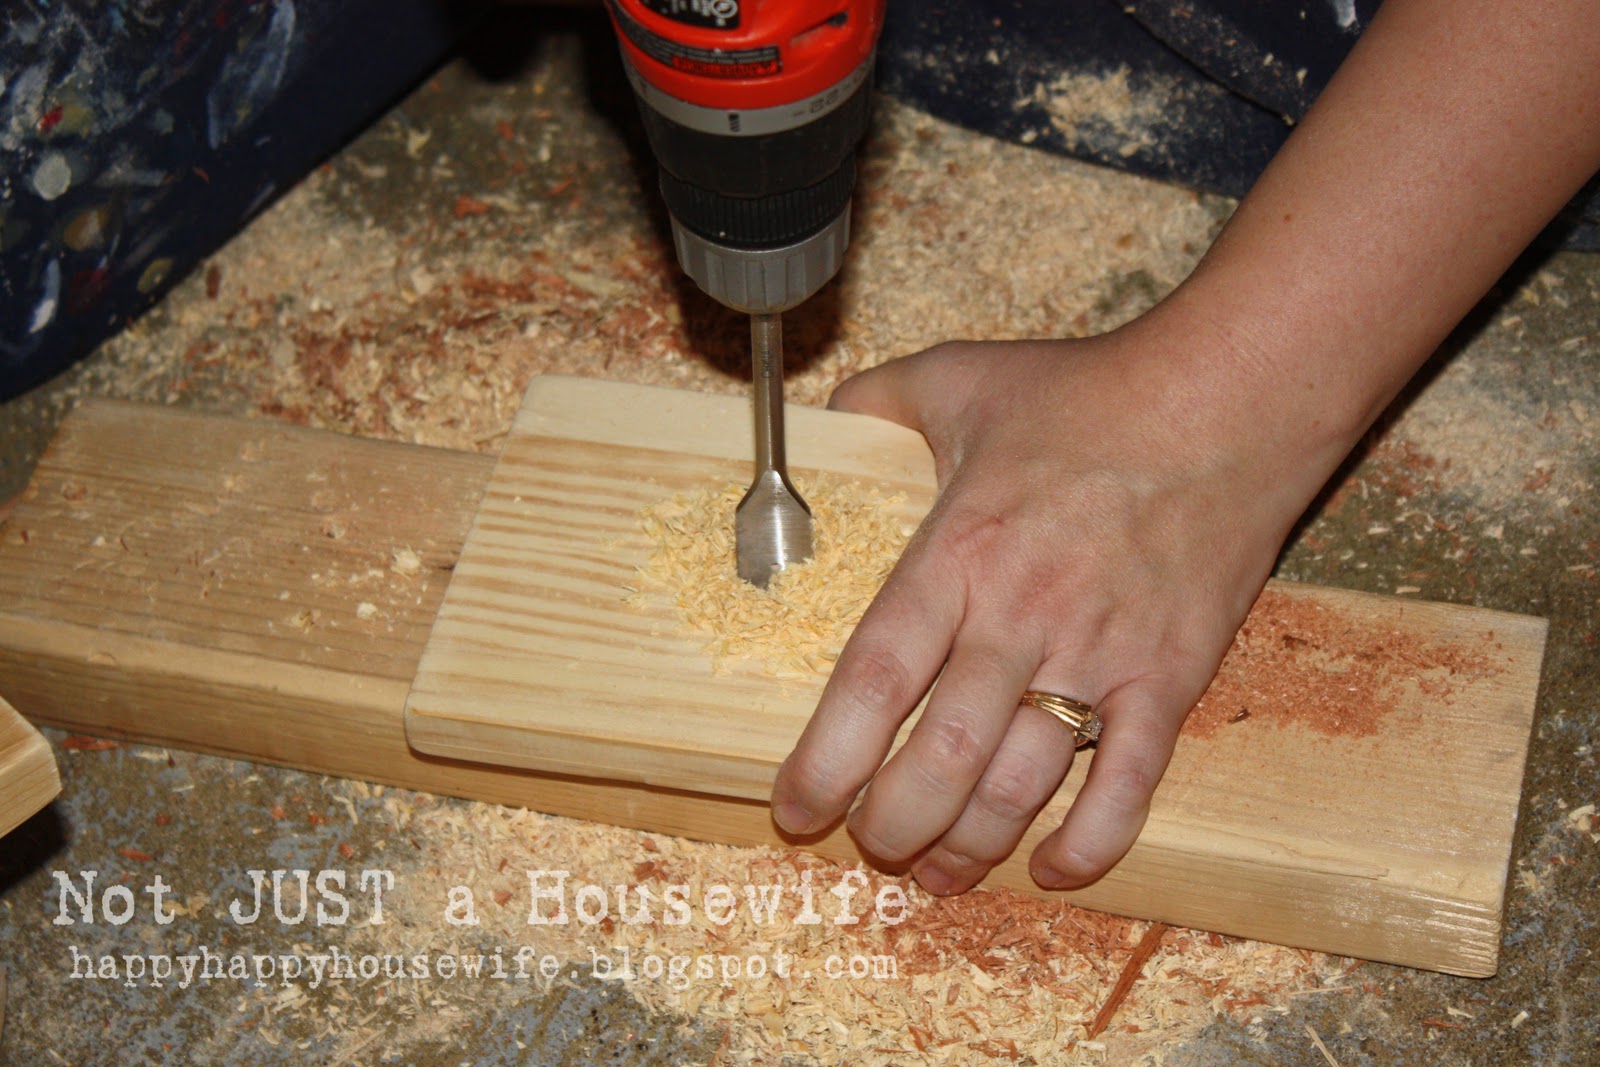
I did not want the cord coming out of a hole in the very bottom piece or else the lamp would wobble. So I did not drill a hole in the very bottom board. I took the second the last board and drilled a hole on the side that went all the way through until it met up with the center hole. You will get a better idea of what I am talking about when you see me put the cord through this hole a little later. All you need to understand now is that I am a genius for thinking that up.

Here are all the pieces to my lamp puzzle!
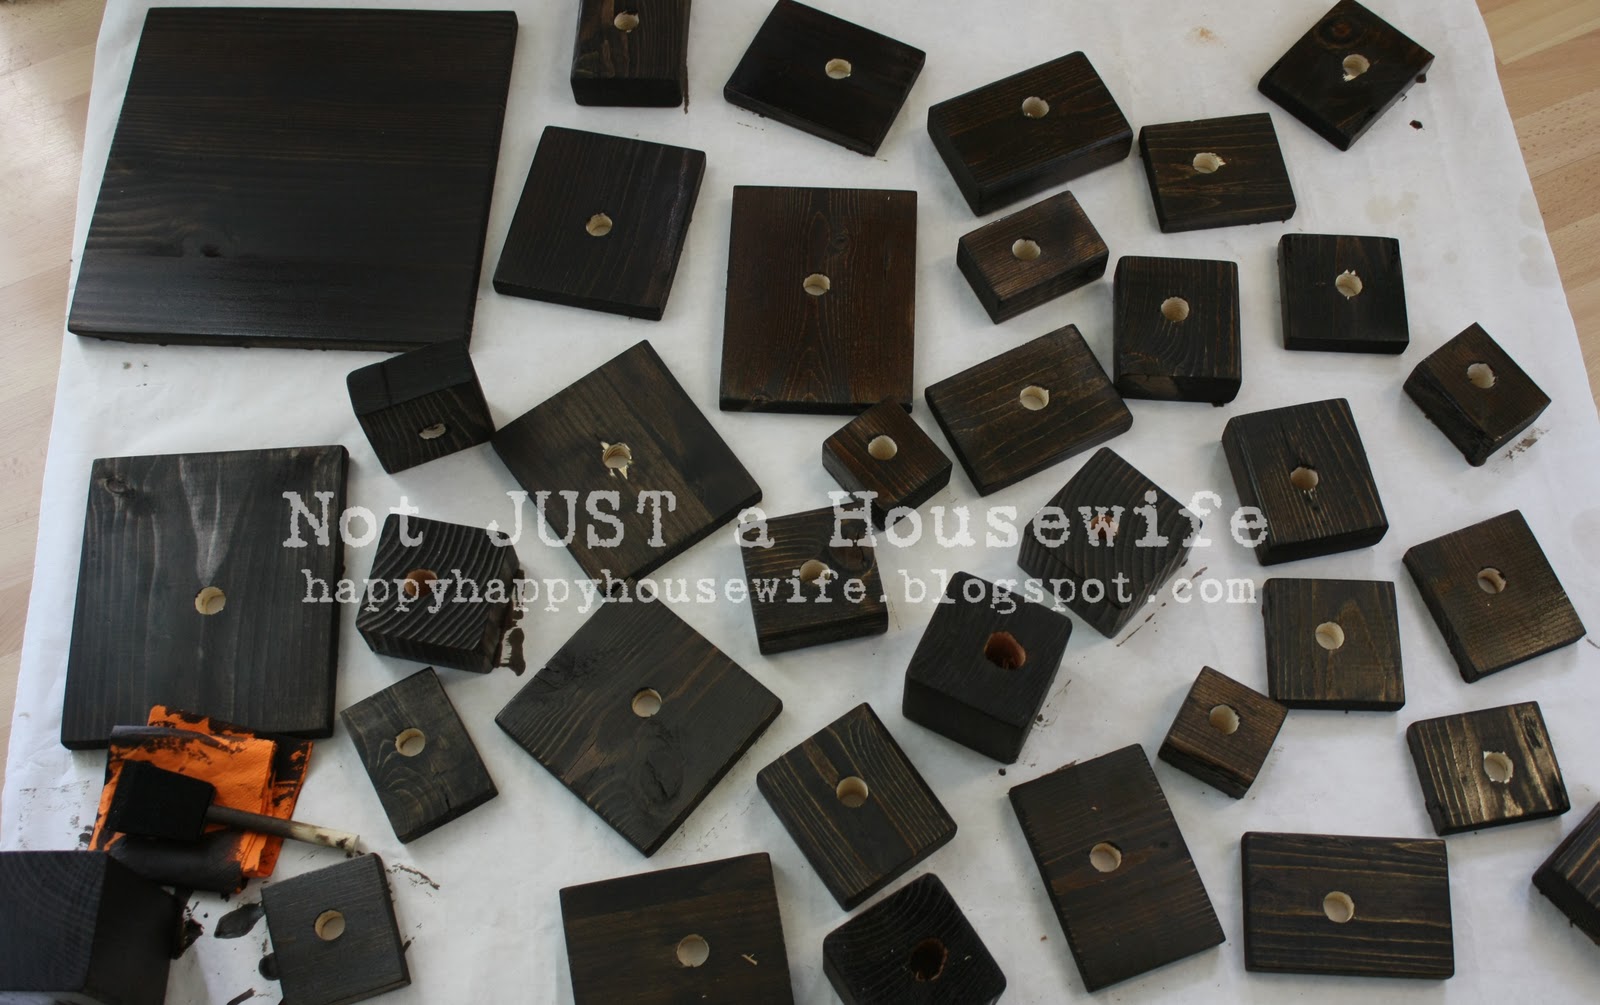
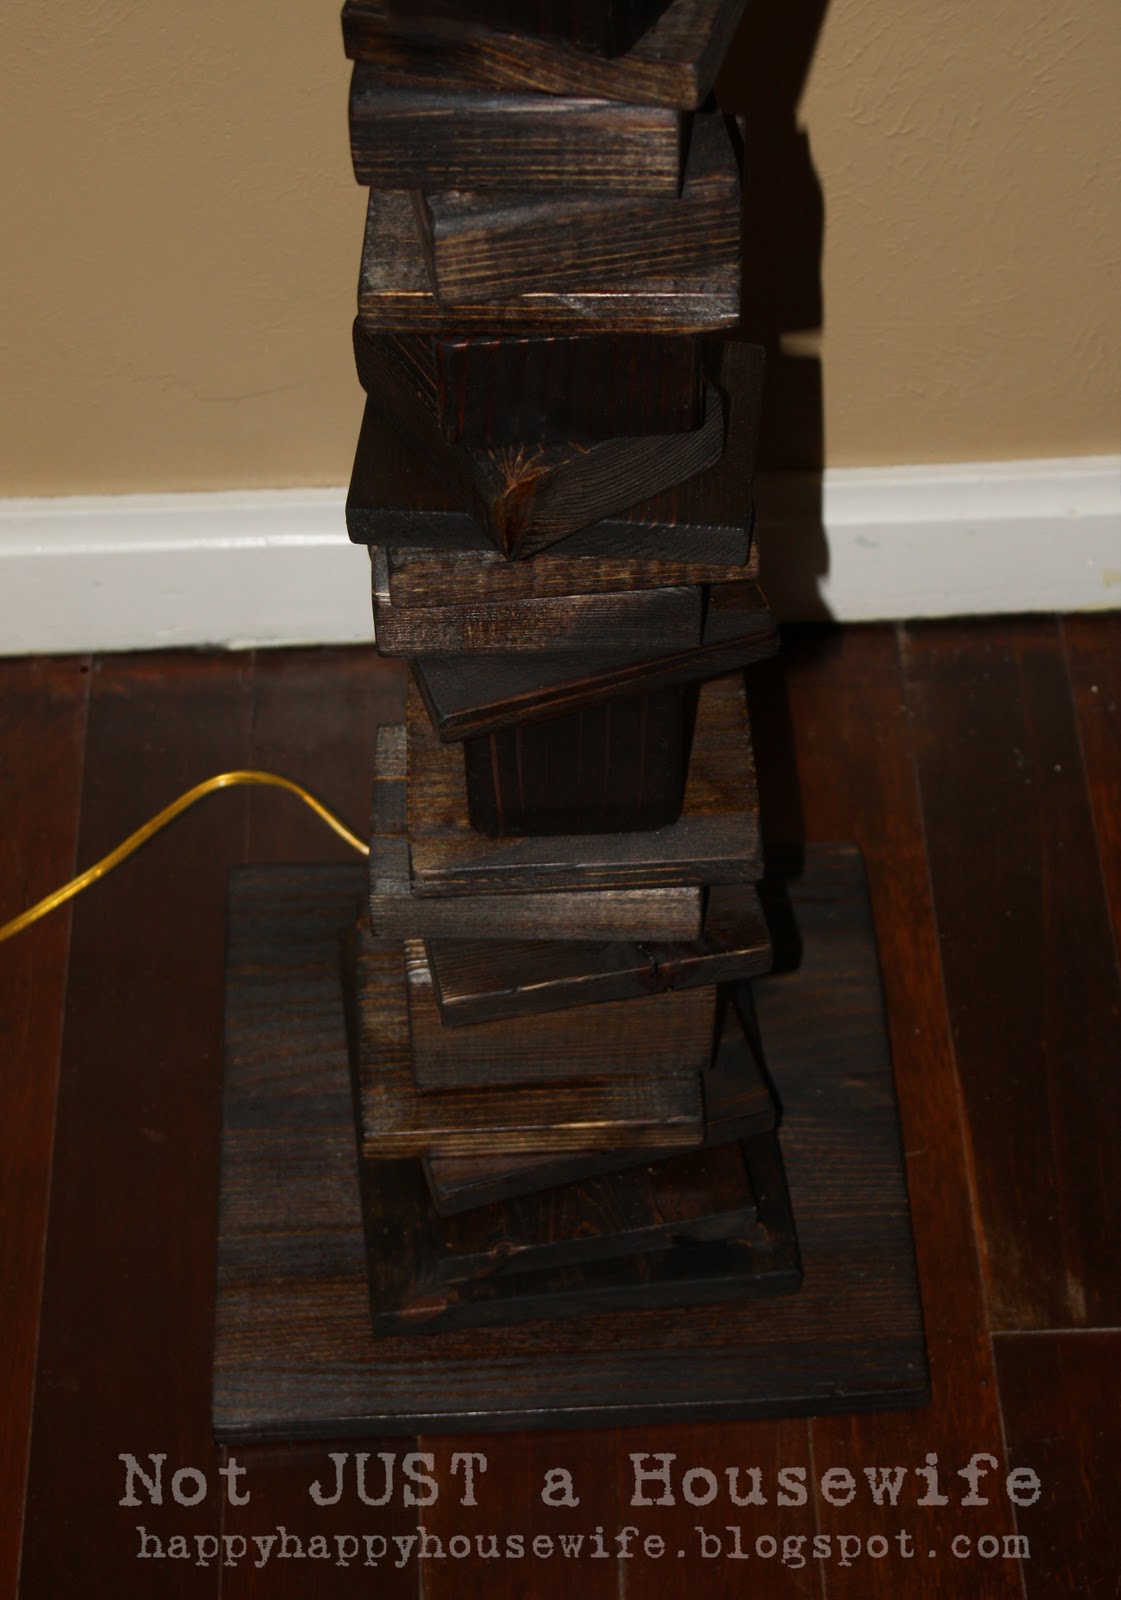
Then I stained them all a dark walnut. This is right after I stained them. The stain sinks into the wood slowly. It ended up being lighter than this. I like dark stain for many reasons and one of them is that it hides imperfections quite well. Since this was all scrap wood, there were definitely imperfections!
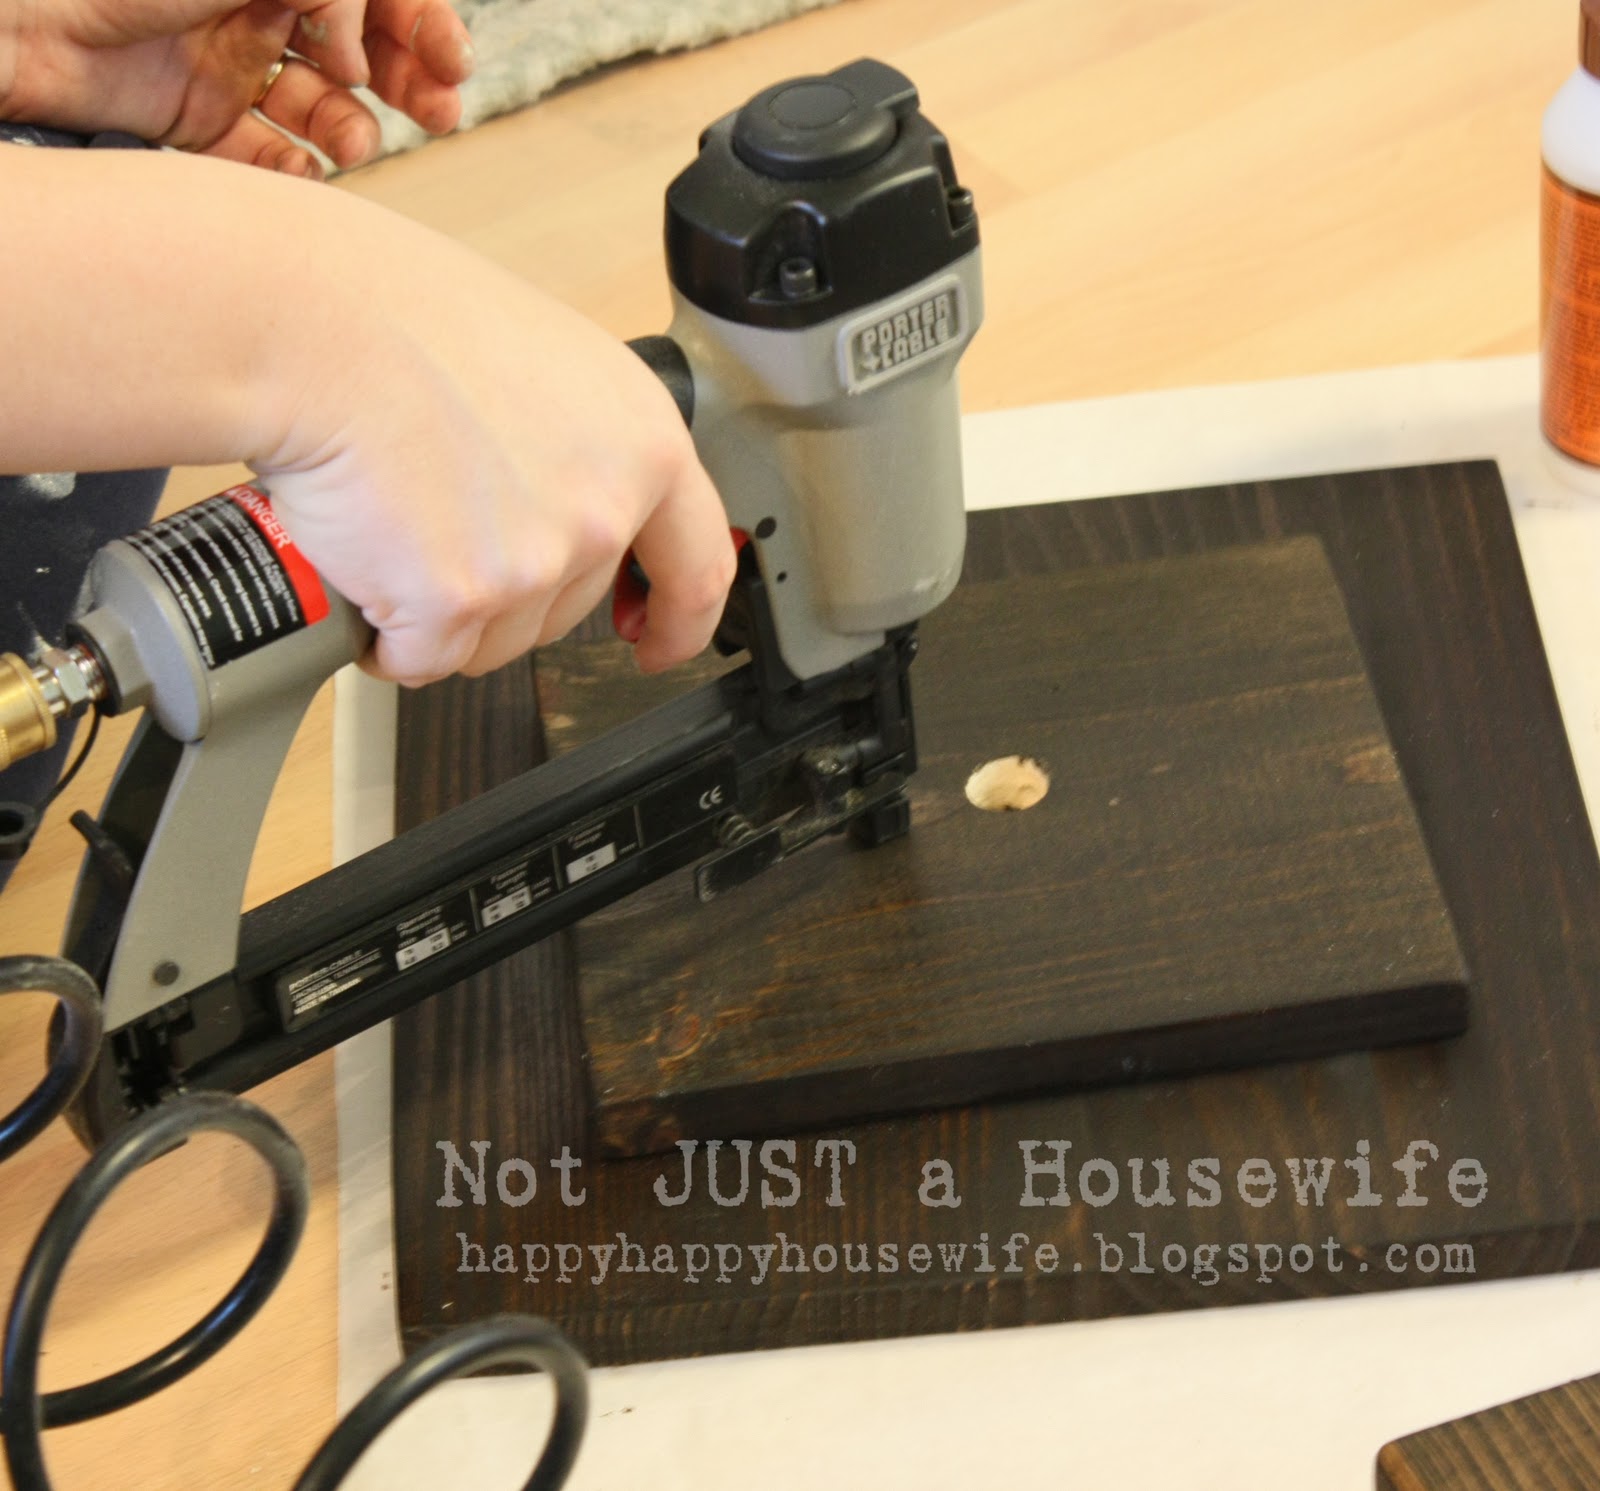
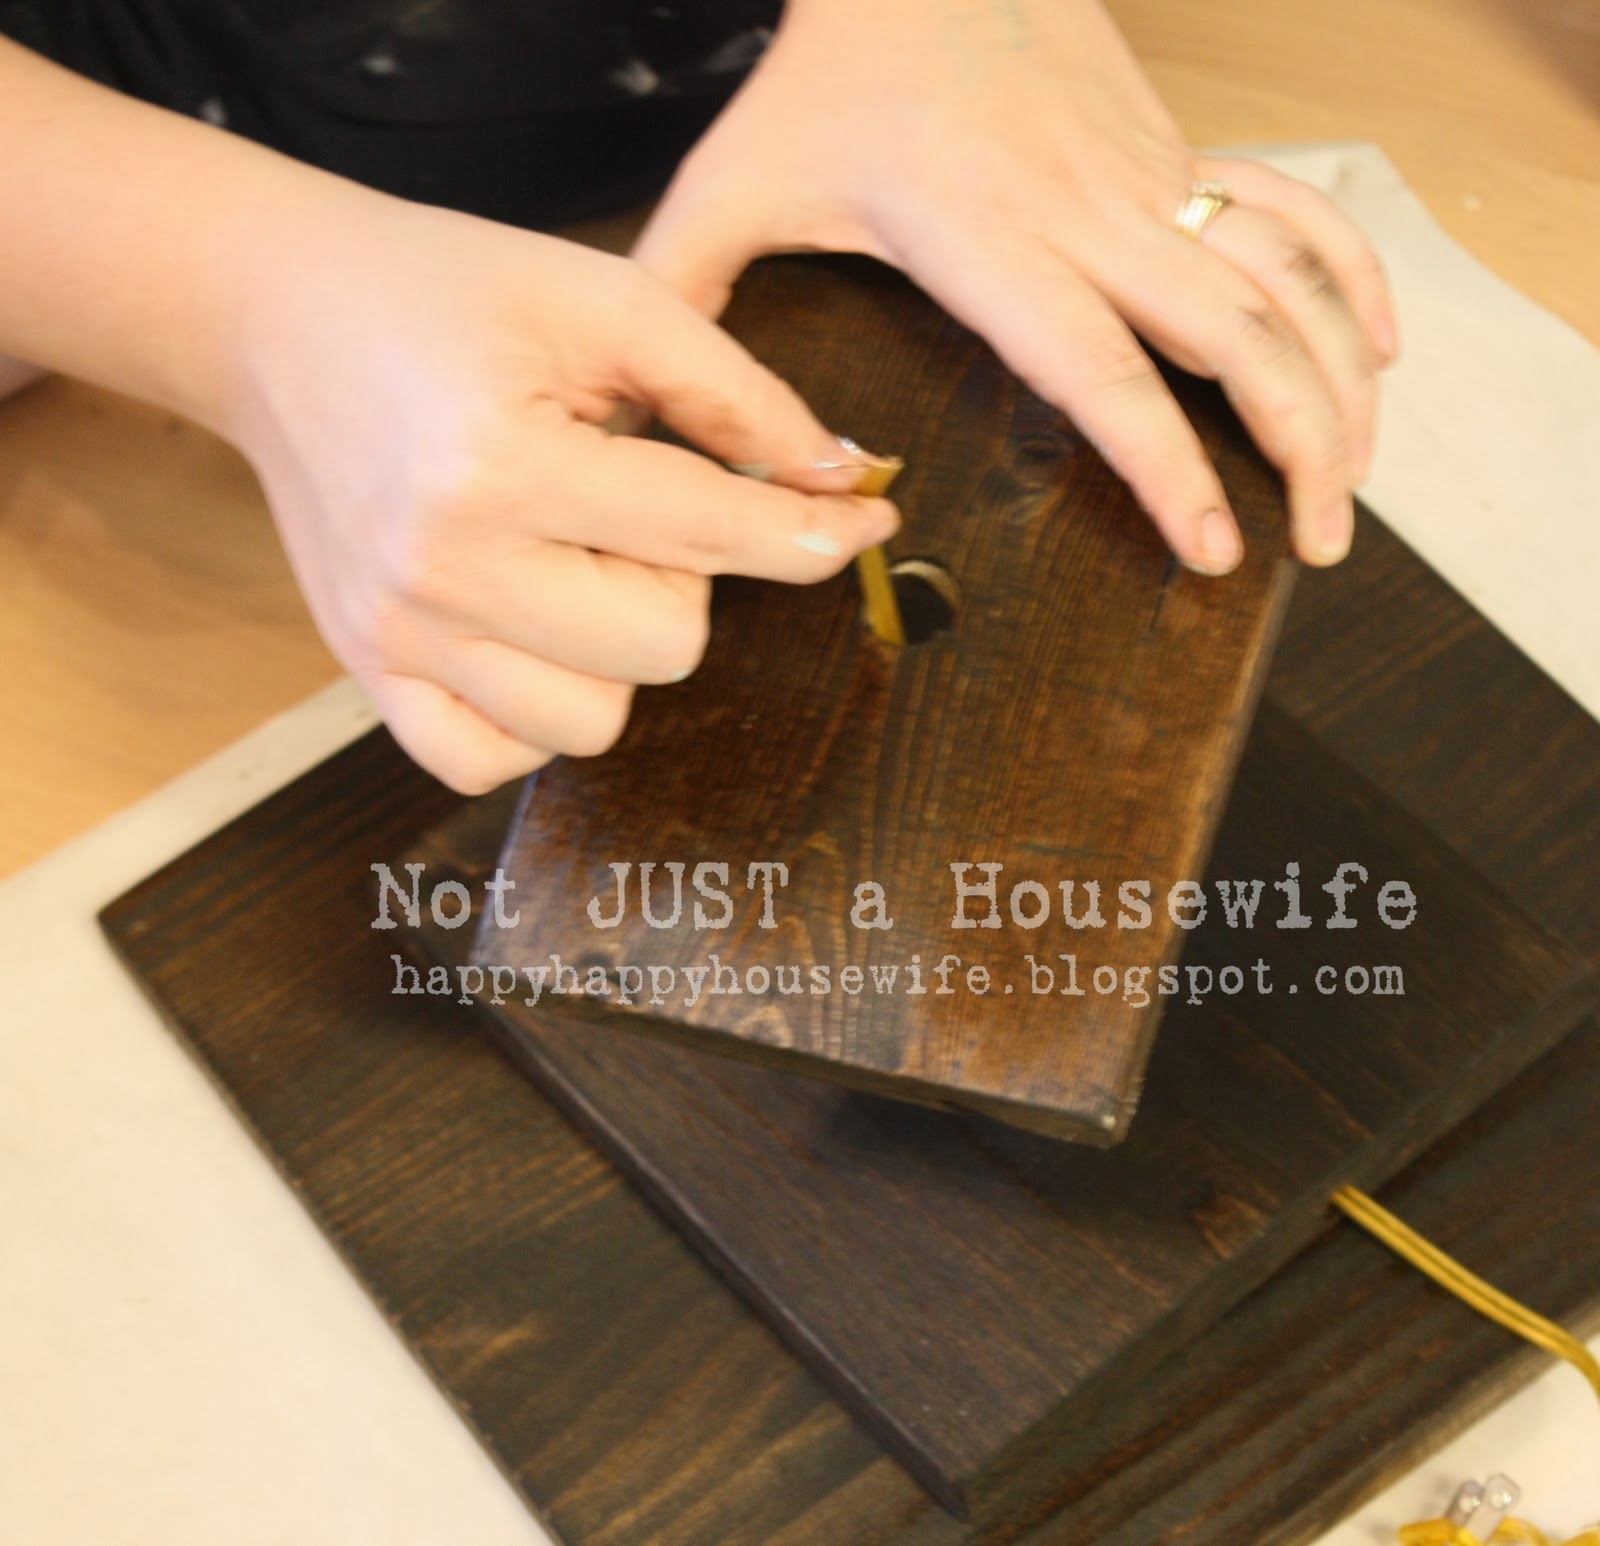
Time to assemble! I used Gorilla wood glue on the bottom of the board and then added it to the base.
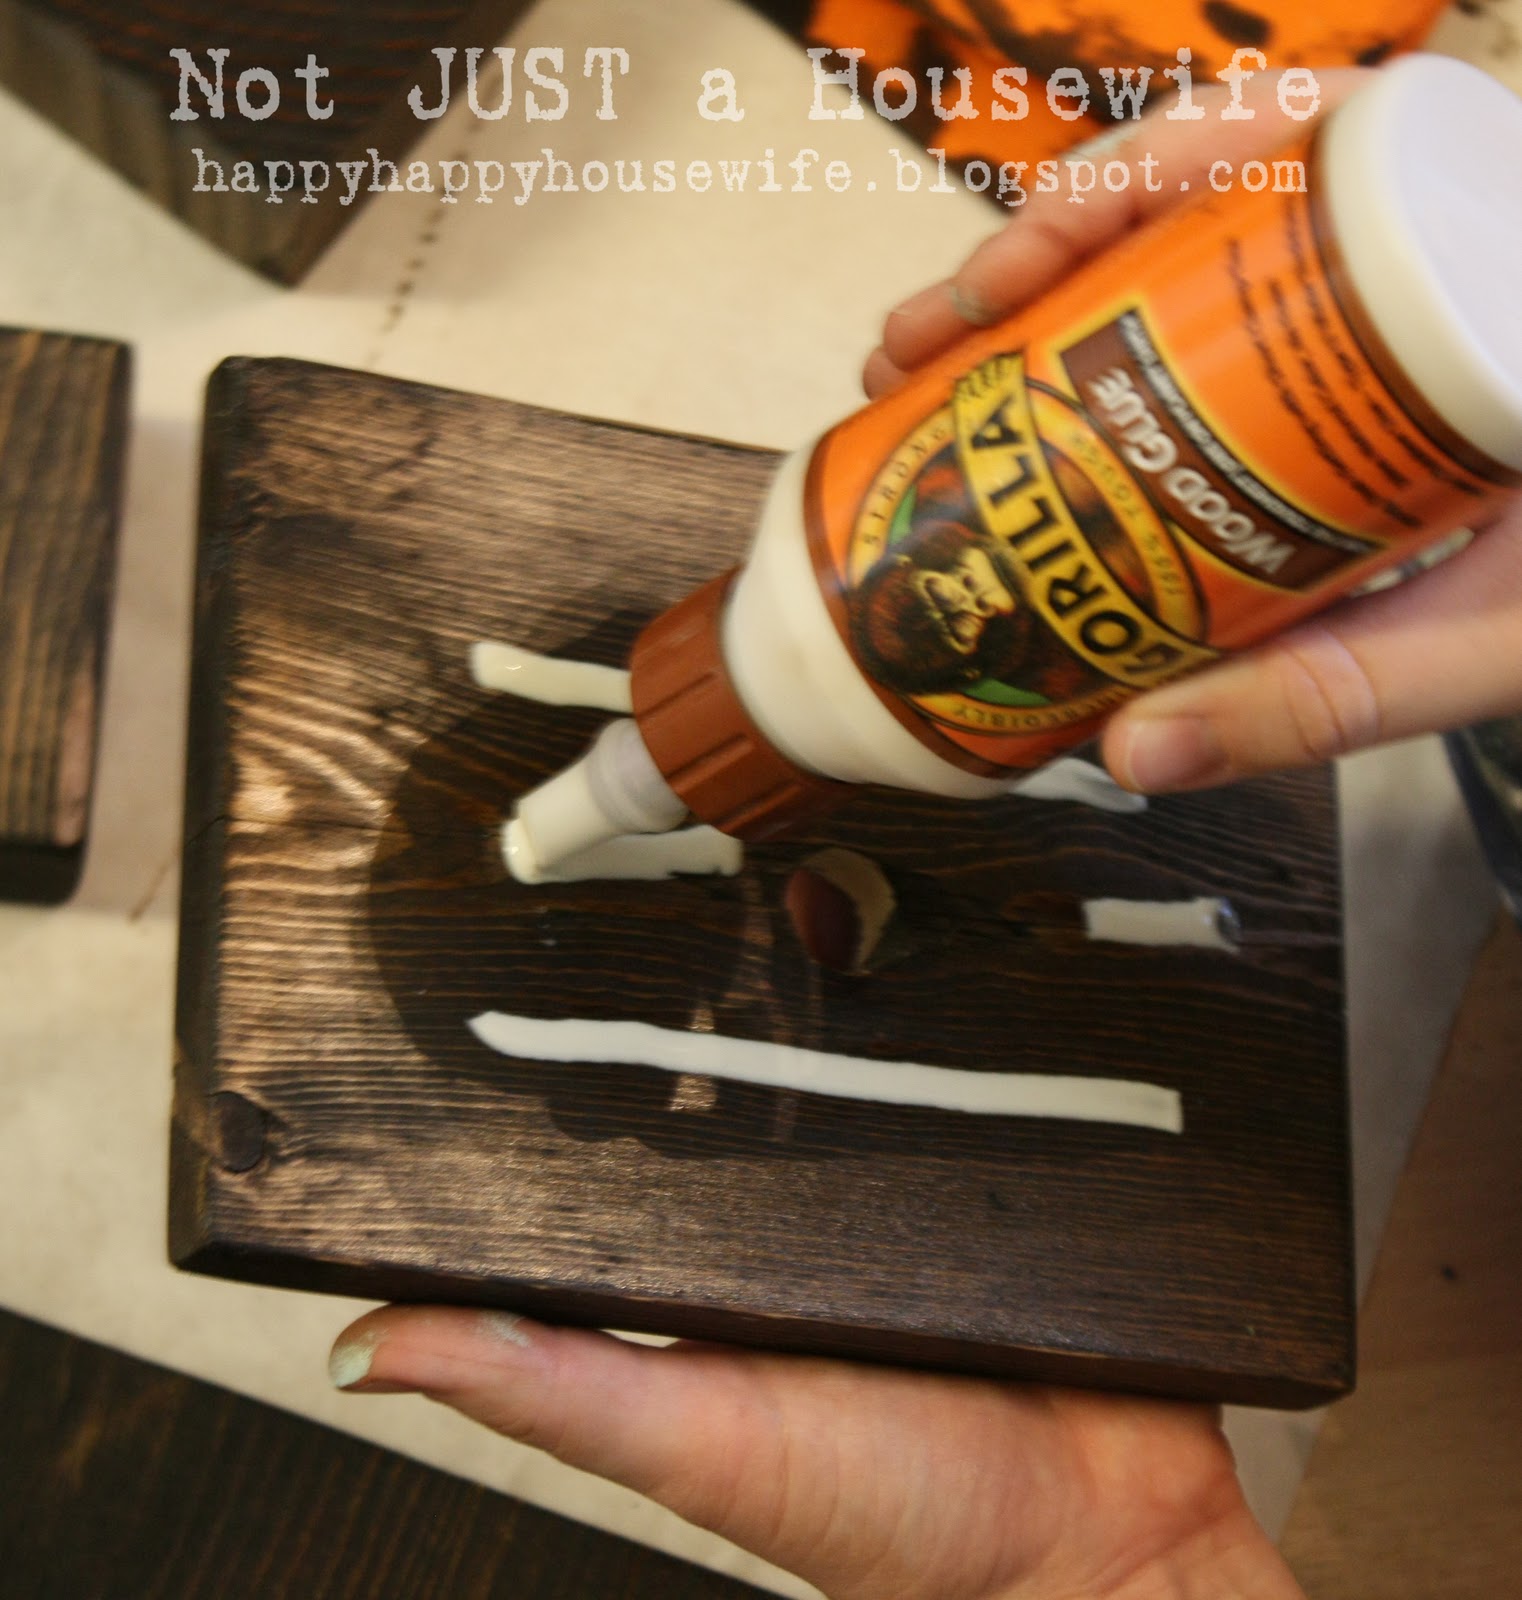
I nail gunned it so it would stay in place while the glue dried. Also, I just like any excuse to pull out my favorite tool :)
Then I strung the cord through.
After that it is pretty much like you are stringing giant beads onto a string. Glue, string it on, nail once or twice and repeat. Now, I need to point out that some of the chunks of wood were too thick to nail. But the glue when dry will be strong enough. I didn't worry about it. I figured that it was better to have most of them held in place than none of them. I literally just grabbed and stuck it on, then grabbed another. No rhyme or reason. I have found that if you want a truly random look that it is best to make it truly random. Because of that and not measuring anything, this was an EASY project.
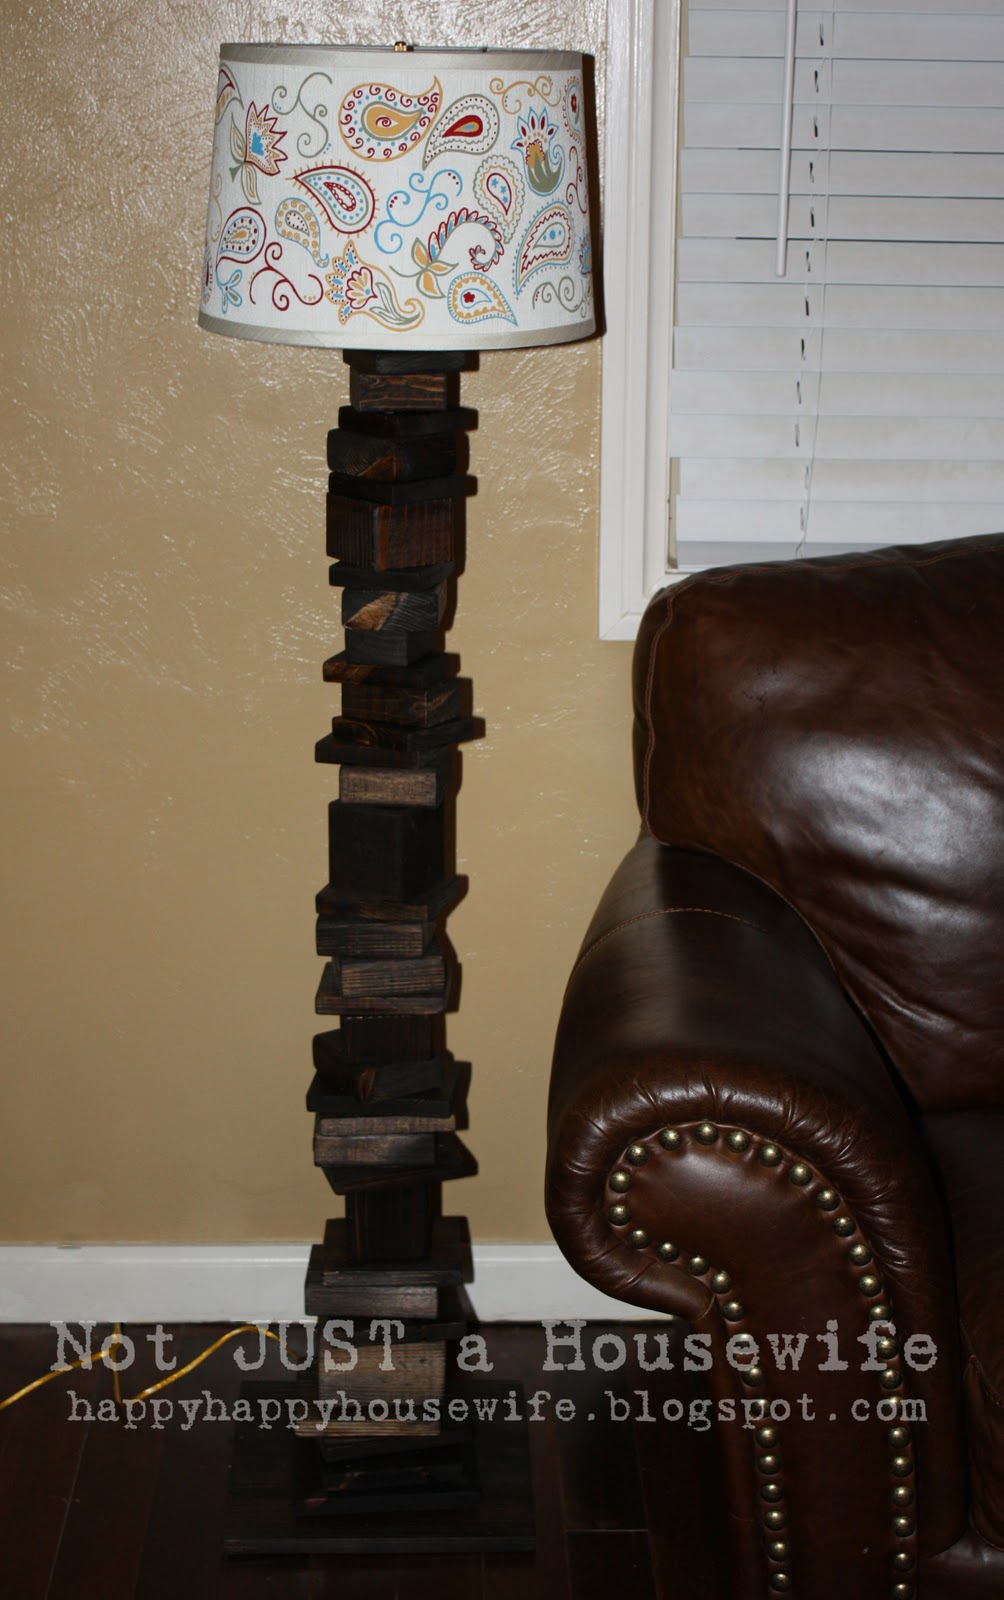
Sorry this is a little dark. But it is soooo much prettier in real life. I hope I get better pics in the morning.


Ummm, I am speechless... I love it so so so much! Seriously I want one! Wow! You know I wanted to meet you the other day, at Jen's cookie party, maybe next time :). I love being your first comment :)
WOW! you did a beautiful job on the shade! love the look of the entire lamp!
Sarah you are so sweet! Did you not go? I was late and thought maybe I missed you because of that. Definitely next time :)
That's a lot of painting...I hope you win. Great project.
Amazing!!!
Turned out AMAZING!! Love, love, love the shade, but then I've always like paisley too.
OMGOSH... truly one of the best DIY projects I've ever seen!!! I NEEEEED one! Can't wait to see if I can pull one off.
That is amazing! Good luck!
That is so cool, I love it!!!!
I'm super impressed with this lamp! What a fabulous idea! and you are remarkably GREAT at drawing and painting pasiley! Best of luck to you!
SO.VERY.COOL.
LOVE this! So creative.
So impressed! Love the chunky shape the wood creates. What a clever idea.
Wait!!! You hand drew that kick *ss paisley design? I'm amazed!!!! Very very cool!
Wow...just wow! Every detail is perfect!
Take care,
Lisa
The stacked scrap wood is such a good idea. As for tea staining; I have seen it come out fantastic but more times it's a flop. I find I want people to know I actually went to the trouble of tea staining so I put too much on. It's subtle and sometimes just looks like a cream shade after....
I love your idea, now all I need to do is wait till morning to try to convince my husband to let me make this, haha.
http://www.alwaysiwnonder.com
Having a little GIVEAWAY on my blog for a $20 Home Depot Gift Card if anyone is interested.
That looks amazing! I wish I had time and the patience to sit and paint details like that. Oh wait..I can't draw. Smile.
With ideas like this there should never be a scrap of wood in any landfill. Fabulous job! wonderful idea!
I am head over heels in love with this, totally and completely gorgeous! I personally (as much as I love tea stained things) would not stain that shade, it's too beautiful as it is. I entered several projects in that DIY party and thought I had a pretty good chance until I saw this! If you don't win I'll be shocked. GORGEOUS.
As a result, I have featured you on Craft Gossip this morning
http://homeandgarden.craftgossip.com/scrap-wood-lamp-with-hand-painted-shade/
If you would like a "featured by" button, you can grab one here!
http://homeandgarden.craftgossip.com/grab-a-craft-gossip-button/
I can tell that SO much time went into this, but the result is gorgeous!
Wow! I'm impressed. It's very unique! I love the lampshade and can't believe you hand painted it! I'm a little jealous of your steady hand! Great job!
LOVE IT, how flippin awesome, and I LOVE the paisley design you painted. Good job, and good luck, hope you win.
Bella :)
So beautiful! I adore your lamp shade! I painted my own lamp shade this summer!
Love this!!! You have inspired me to make my own lamp for my crafting area :) We have tons of scrap wood! Great job :)
So love the shade! Great job hand painting! Wow! The base is quite extraordinary! Love it! I'm hoping for a nail gun this Christmas. Cross your fingers! ;)
One word...FANTABULOUS!!! Yes, that's a word!
Oh my gosh.. this lamp totally rocks! You offered such a fabulous tutorial too. It's so original and looks so cool.
I've featured the lamp on SNS #61's sidebar this weekend. :)
Donna
http://funkyjunkinteriors.blogspot.com/
This is so awesome! I'm looking for handmade ideas to use for my baby's room and now I want to make one of these for him! :) Great job, thanks for sharing! :)
I am so in love with this lamp. I want one! Thanks for linking up to the DIY Club. I am a follower here now!
Holly
504 Main
DIY Club
What an amazing lamp! I'm seriously jealous (of the lamp and your mad skills in general!)
No way! I can't believe you made that yourself! I am in LOVE with your paisley painting! Flawless!
Fantastic! What a brain storm you had! Mmmm... now you have me thinking...I might have to whip one up. What FUN!
This is mind- blowing. WHOW will not do it any justice... You could sell them for some serious bucks, every house should have one of those lamps. Starting with mine.
Love it! This is a craft even my husband would like! Hope you'll come link up to Made with Love Monday :) The party will be open until Friday so feel free to link up multiple projects. Hope you have a very Merry Christmas! http://sewchatty.blogspot.com
I love this lamp! I can see it in so many spots in my house, Thanks for sharing!
Congrats on making the Top 10 at The DIY Club!
Amy
the lamp is sooooo cute..
You did an awesome job! YOu really did a great job painting the shade! Come link up to my Sew Crafty party...
http://wildflowersandwhimsy.blogspot.com/2010/12/startin-early-for-orphaned-no-more.html
All I can say is Awesome! This is great.
dramaqueenseams.blogspot.com
Utah State! Hey Aggies all the way! Go Aggies! go Aggies! hey Hey Hey!
I'm totally inpsired to make my own lamp now. I love this!
Wow! That is so beautiful, both the shade and the stand!! I'd love to have you submit it to the M&T Spotlight: http://www.makeandtakes.com/spotlight
This is GENIOUS!!! My mouth is open in amazement....
Uh, WOW! That is so incredibly clever and beautiful. I will be looking at my scrap wood with new eyes.....
this is AWESOME! I'm so impressed right now and I am featuring you next week at MMM :)
You are so clever! What a great idea. I totally think you should tea stain the shade. I've done it. Great results. Tea, sponge brush and you're good to go! Thanks for the great tutorial!
I've seen a picture of this throughout blog land but I hadn't realized that you painted the shade as well! As if the base wasn't awesome enough!! I love this lamp.
i am SO impressed with your painting! great job and awesome skills = )
For the flippin' love - that is so stinkin' cute!!! My daughter totally flipped for it too. We're gonna have a Mom/Daughte day and attempt to make something like it. Could we get you to post your paisley so we can copy them - PLEASE & THANK YOU!!! I can't draw a stick man with a ruler.
I just made it up as I went. I didn't use a pattern. I drew it on the shade lightly enough I didn't like a certain paisley I drew, I could erase it. If you want, you could practice on a paper first.
Wow, what an undertaking. It's beautiful!
It's linky party time again! I hope to have you come link up and enter my $50 american Express giveaway! Happy holidays!
-Dana, Saturday Mornings
http://danajeanward.blogspot.com/2010/12/50-american-express-giveaway-ends.html
You're a girl after my own heart! What a great lamp!! Fabulous!!
Wow - Anthropologie has nothing on you!
Love this! Thanks for linking! I;ll be featuring this on BCD on DEc. 28th!
So cool Stacey! You did a fantastic job! It's gorgeous!
Roeshel
Love the lamp & the shade!
The lamp base is so versatile! Each of the wood blocks could be painted different shades of a particular color to match a room. Cubes of wood would look great as well!
Very creative & very clever!
And I probably wouldn't tea stain the lamp shade...I don't think the colors of the paisley would pop as nicely on the tea-stained shade.
Great work!
LOVE the texture of the stacks of wood! Verynice!
Amazing work! Love the shade, love the wood!
Congratulations! You've been featured at this weeks Hookin Up with HoH #30!
Stop by and grab a button if you'd like! :)
~Allison @ House of Hepworths
I am going to feature you today at my site- itssoverycheri.com
Cheri
http://www.itssoverycheri
http://www.thediyclub.com
This is great! Very unique:)
Lindsay
I love this! The paisley matches my fabric from my window treatment I just made! I love it and love the colors too! Here is a photo before installation. http://www.facebook.com/photo.php?pid=31628303&l=bee2037ede&id=1540129617
At first glance I thought your shade was from Ikea. Amazing that you painted on all that gorgeous detail. Fantastic tutorial and uber creative project!
An amazing project. Definitely a winner! I'd pay big bucks for that fabulous shade!
That lampshade is simply amazing! You are one talented girl!!!
WOW just WOW!!!! LOVE IT!!!! I would buy that iin a store;) TOO COOL!!!!!
Nishi
Ditto what everyone else is saying, this is AWESOME!!
I can't get over how much I love this lamp! I'm featuring you tomorrow on CrazyDomestic.com! Feel free to grab an "I was featured" button!
http://www.crazydomestic.com/p/grab-button.html
I love this! Im heading into the garage right now to dig through the wood. Thanks!
Wow...I love to see a GIRL using power tools...see guys, like football it's not just for men! lol...but really, I have wantd to make a lamp out of some "extra" items I have, but scared of the wiring process...thanks for sharing this tutorial!
I absolutely LOVE this!!! Thanks for sharing!
I just found your blog, but I'm loving all the projects. House fix-ups, felt faces, scrap wood, and another mom who knows how to use a miter saw! What could be better? Oh, wait-- a USU sweatshirt. Go Aggies!!! I love it!
I love this lamp. I think I'll make one for my sister, too. She just bought a house, so this would make a good house warming gift.
Wow, I really love this lamp! Thanks for the great tutorial!
saw you on studio 5. Can not believe you hand painted that. AMAZING!
THis is soooo neat I can't wait to try it... but I don't have a nail gun I might have to use a bit more muscle driving nails.
I love this idea... How cute and wonderful.
love it, love it, love it. I have the same while boring lamp shape, and un-matching base, now I know what to do. thanks for the inspiration.
but I do have a question, how do you install the top part where connect with the light bulb? and the plug to the outlet? hehe... I can't wait to make my own.
Awesome! Another great lamp! big thumbs up over here ;o)
happy crafting!
Linda
Can I please just tell you how much I love this lamp?? It is already on my to do list! Cheap and easy, my 2 favorite things in a project. :)
Goodness I LOVE that lamp! And I think we have the same sofa. I just found your blog and i already love it. I am a new follower.
Holy moly! That is amazing! Really. Great job! Just found your blog via vintage revivals, love it!
That is so clever - well done that girl!!! BTW - I found you on Pinterest - someone pinned you!!!
http://pinterest.com/pin/24361314/
Thanks for sharing, Jas in Oz
Fantastic! I'm over from Vintage Revival too, but I laughed at the comment right above mine. I just pinned this before commenting. Super creative and beautiful! Way to go!
Your lamp is amazing! I have so many little pieces of scrap wood, I totally want to do this project! Thanks for the tutorial! -Chessa
Wow! This is so creative. I love it!
thanks for the tutorial. this is amazing. loved every minute of it and can't wait to make one. you are a crafty crafty lady.
OH-MY-MY!! I LOVE your lamp! You are so clever!!
LOVE IT~!~!~!
I am kinda stumped though... I may be asking silly question but how did you do the lamp part of this whole thing... I mean the wiring! I would have loved to see that part! I have never thought to wire my own lamp up and would love to replicate this in short and tall versions! How did you do it?!
I love this project! Great way to use your scrap pieces and the shade is awesome!!
I need a table saw. You are amazing!
Um, this is absolutely AMAZING!!! I've been gathering log pieces to do something similar, but am at a loss of how to actually get a lamp to work. What cord, "lamp guts" did you use and where did you purchase them? LOVE your blog!
Oh wow, this is beautiful! I just pinned it on pintrest, it's just too awesome!
LOVE LOVE LOVE this!!! I am your newest follower!!!
Really love this one! Thanks for sharing..
I know this is an old post...I just found you via Vintage Revivals, and I was JUST talking to my husband about how I could make my own chunky floor lamp and then HERE IS YOUR POST about how you did it! I love your blog! Thanks so much for this great post!
Hi Stacy! I just found your blog through apartment therapy this week and it's been so much fun reading about some of your projects! I loove this lamp idea, it has so many gorgeous elements - chunky wood, dark stain, casual elegance, and - wow - handpainting! :) I had one question I was hoping you could answer although I know this post is from awhile ago :| Where did you get a long enough lamp cord? Did you take apart an old lamp? Thanks in advance if you have a chance to answer this! :)
UberCOOL!! You are so talented!
LOVE IT! LOVE IT! LOVE IT!
I must make one now.... Thank you for the post (I stumbled across it while reading your post about comments.... So I thought I'd share what I'm thinking this instant! :)
its good keep it up. you have any another idea
Wow! What an amazing idea! I have piles upon piles of scrap wood that I just can't bring myself to part with. You have got the gears spinning in my head with all sorts of new ideas. Thanks for sharing this beautiful lamp!
I have the same question some others have... Coul you post or email me about how you did the wiring please! I would make this right now if I knew how to do the wiring. Please please post thanks :)) <3 this is so amazing
I don't have a tutorial on it but here is a video that shows it. There are two wires. One gets wrapped around one screw on the left and one gets wrapped around another screw on the right side. It is super easy.
http://www.youtube.com/watch?v=L2xXzIFeB78
Hi, Neat post. There's an issue with your website in internet explorer,
would check this? IE nonetheless is the marketplace chief and a huge section of folks will leave out your great writing due to this problem.
You gave me a great idea to use scrap wood.
Could you also please share the details on how you attached the lamp shade and the bulb to the stand.
What a great idea. We have lots of scrap wood but didn't know what to use it for. Now I know. Love your lamp and the idea. THANKS!
I know it's several years later, but I would like to know how thin you had to get the acrylic in order to maintain the color when the light is on. I am getting ready to paint a lampshade, and I need the colors to stay mostly true when the light is on.
Wow! That is so cool! Where did you get your inspiration from ??? :)