

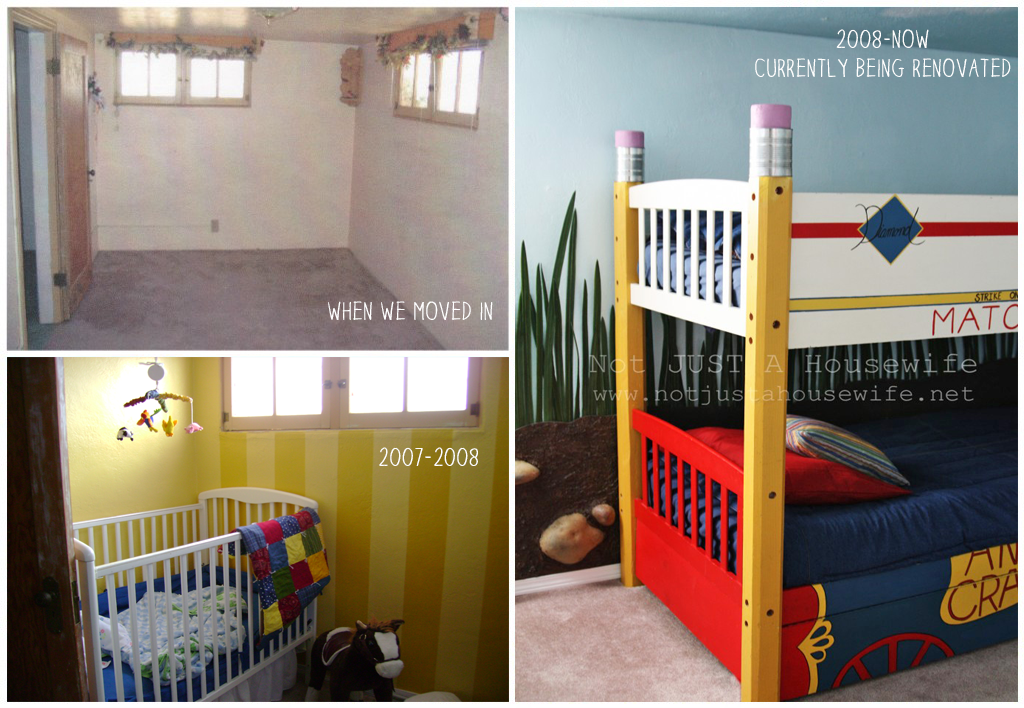
Right before we moved into this house we took a trip to Disneyland. It was our first time going to California Adventure. My boys fell in love with the Bugs Life part. Later after we had moved in we decided we would take inspiration from that to decorate their room. The boys wanted everything to be big so they felt like a bug. We were limited in how big we could go. The ceilings are only 8 feet after all! But it was fun coming up with ideas. We bought a basic bunk bed but only used some of the parts (head board/foot board, ladder). W bought 4 x 4 posts for the pencil and cut off the corners so they were the right shape. We were lucky to know someone with a drill press so we could drill the hole exactly where they needed to be. For the erasers I used a jigsaw to cut out lots of circles. I nailed two together then added another, and another until they were as tall as I needed them. I sanded them to be smooth. The metal parts are pumpkin pie filling cans. I drew free handed then painted the boards so the beds would look like they were made out of a match box and a cracker box. The bottom is actually two boards held together by a piano hinge. It lifts up so the trundle bed can come in and out.


Since the bedroom was suppose to look like they were outside I painted clouds on the ceiling with a sponge. The “grass” I bought at Micheal’s in their floral department. I am not sure what it is suppose to be, but it works great! For the dirt and rocks I used a jigsaw to cut the shapes I wanted out of thin hardboard. I used liquid nails to adhere the fake rocks (I bought them for $1 each from SUNROC) that are usually meant for the outside of buildings. Then I mixed up some cement and slathered it on the boards all around the rocks. That became the dirt. I should also mention that I had pre-drilled some holes so I could attach them to the walls later. Painting the cement was probably the hardest part but using a sponge brush helped. After I was done painting I put on a layer of polyurethane to seal it. The panels behind the bed do not have rocks and cement. For safety reasons I just painted them.


I built the closet! It was my first time framing a wall and I did need a little help from my hubby with lifting the sucker into place and carrying the sheet rock, but I was able to the rest my self. I was even able to match the plaster finish with the existing walls. It now has a second rod to hang clothes lower and more basket below that. In other words, it is crammed to capacity with little boy clothes :)

One of my favorite things at the Bugs Life part of the park were the benches made out of giant “used” popsicle sticks. I knew I wanted to do something with a popsicle stick but we didn’t need a bench. I made one big one and screwed it to the wall. We use it as a measuring stick to measure our kids!
In the past I have always had my babies have a nursery with their own theme. Each time I had a baby I would changed the theme. When we moved here we decided to have the boy all in one room because the room is so LONG! So my baby got his own theme (monkeys) but I tried to keep the colors the same as the other side of the room.
 I took these pictures right before I had my baby and it wasn't ALL the way finished. I don't have the rest of the bedding in the crib and it is missing some more monkeys. There are also 3 white basket on the top of the blue cabinet.

I free handed this monkey on the wall in pencil and then painted him. He sort of matches one of the stuffed animals (That didn't make it in the picture). If you don't want to freehand you could always use a projector and then trace the image on the wall.


The before and afters:


Comment Below!