• Skip to primary navigation
  • Skip to main content
  • Skip to primary sidebar
  • Skip to footer
Stacy Risenmay
  • Home
  • About me
  • PRESS
  • Contact Me
  • My Book
    • Facebook
    • Instagram
    • Pinterest
    • Twitter
menu icon
go to homepage
subscribe
search icon
Homepage link
  • Home
  • About me
  • Project Gallery
  • Our House
  • PRESS
  • Contact Me
  • Privacy Policy
    • Facebook
    • Instagram
    • Pinterest
    • Twitter
  • ×

    Growing and Storing Butternut Squash

    By Stacy 4 Comments

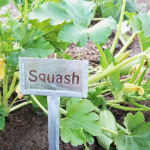
    Butternut Squash is one of our family's favorite things we grow in the garden. While most of the time we just cook it and eat it with butter and a little bit of brown sugar, there are a lot of other yummy recipes that we use it for too. It is easy to grow and will produce enough to last you through the winter and spring. In fact, if you store it properly, butternut squash can last 6+ months on your shelves! I'm going to share my tips on growing and storing butternut squash!

    Growing And Storing Butternut Squash


    butternut squash


    Growing Butternut Squash


    Butternut squash is a winter squash. It is the last thing we harvest from the garden. If we don't get a hard frost early in the year, I don't pick them until around November. Unlike summer squashes that you want to pick while the skin is soft, butternut squash skin will need to harden before picking. They go from light green to a beautiful tan.

    They love full sun and rich soil. They, like pumpkins, will vine and need more space to grow than some other vegetables, but they produce well. I average between 15-20 per plant (sometimes more). Last year I got 49 from 2 plants and this year I got 36 squashes. If you have limited space in your garden, you could always grow these on a trellis to save space.

    I like to create hills, or mounds of soils, to plants the seeds in as this is suppose to help keep them warm. I plant them as soon as all danger of frost is gone. They do not like the cold when they are first starting out. If you have poor soils, you will want to add compost around the plants. They are big eaters!

    When it is time to harvest, make sure to cut a least a 2" stem. If the stem breaks off, that is okay, those will just be the first one you will need to eat as they tend to not last as long.


    butternut squash


    Storing Butternut Squash


      • Wash them well! Get all the dirt off so they are squeaky clean and have less risk of rot.


      • Place them in the sun so they can harden and cure. I usually place them on a clean tarp on my driveway on sunny, warm days. If outside is not an option due to weather, a sunny counter by a window can work too. The harder the skin, the better. I try to get at least a week of curing in before storing them.


      • Store them in a dry, cool place. For me, that is my basement storage room. I store them on wire shelves with all my canned goods. I really would like to build a wood rack with drawers one day though! I try not to stack them but if I have a lot, sometimes I have to double up.


      • Check on them periodically. If one starts to get dark spots I eat that one right away. If one starts to get soft spots, I cut the soft parts off and feed to the the bunnies and chickens. That rarely happens though. Most of the time they do just fine and look like we just picked them! I have noticed that if kept longer than 5-6 months they are still edible, but they must lose their sugar content because they are no longer sweet. We actually kept one for a year once just to test things out. It looked just fine, was nice and firm, but had no flavor.

    PIN For Later:


    You will also like:

    • Garden Augers - FAST, Easy Planting!Garden Augers - FAST, Easy Planting!
    • Refresh Old Garden GatesRefresh Old Garden Gates
    • Raised Garden Beds {The Secret Garden Makeover!}Raised Garden Beds {The Secret Garden Makeover!}
    • Outdoor Garden Tools (Review & Giveaway!)Outdoor Garden Tools (Review & Giveaway!)
    • Garden Planning and Crop RotationGarden Planning and Crop Rotation
    • 15 Must Have Gardening Tools15 Must Have Gardening Tools
    • Rainbow GardenRainbow Garden
    • Controling Weeds In Your GardenControling Weeds In Your Garden

    « DIY Wood Burned Chargers {Personalize Your Thanksgiving Table!}
    How to Refresh A Weathered Wood Door »

    Filed Under: Outdoor Projects & Gardening 4 Comments

    Subscribe

    for your weekly DIY fix.

    Reader Interactions

    Comments

    1. Jamie

      November 10, 2020 at 4:05 pm

      Can you explain how you cook them? I grew them for the first time this year and I am not really sure what to do with them.

      Reply
      • Stacy Risenmay

        November 11, 2020 at 9:44 am

        I usually cut them in half, scrape out the seeds and stuff with a spoon, then add them to a baking dish with a bit of water. I cover it in tin foil and bake until soft. It will vary depending on the size.
        Now that I have my instant pot, I’ve been cutting them into smaller chunks and cooking them in there.
        When cooked, you scrape the squash out of the hard skin.
        Some people peel the skin off before cooking but it is hard to do.

        Reply
    2. beverly e

      November 11, 2020 at 4:52 pm

      This is such a helpful post. I didn't realize that you had mountains practically in your back yard... What a beautiful view!

      Reply
      • Stacy Risenmay

        November 11, 2020 at 8:12 pm

        Yes! We are surrounded on all sides. It’s only a couple minute drive to the entrance to the canyon. That’s why we spend so much time there :)

        Reply

    Comment Below! Cancel reply

    Your email address will not be published. Required fields are marked *

    This site uses Akismet to reduce spam. Learn how your comment data is processed.

    Primary Sidebar

    stacyHey! I'm Stacy and am a DIY addict. I love to get my hands dirty, whether it's sawdust, paint, or dirt. My goal is to help YOU learn to fix up your home and yard. No matter the style or size, I think everyone should love their home. And it doesn't takes a big budget to get there. Let's DIY together!

    Subscribe to My Blog!

    Search this site

    categories


    Subscribe

    Footer

    Welcome! I'm sharing our adventures as we fix up our 1938 cottage. Whether it is big or small, I think everyone should love their home and I don't think it takes a lot of money to make a space your own

    About Stacy

    • Facebook
    • Instagram
    • Pinterest
    • Twitter

    My Favorites

    copyright

    All images and content are copyrighted via Stacy Risenmay unless otherwise stated. If you'd like to share my work, please link back to this blog.
    Thank you for visiting!


    Footer

    ↑ back to top

    About

    • Meet Stacy
    • Privacy Policy
    • Contact

    Categories 

    • Home Decor
    • Outdoor Projects & Gardening
    • DIY & Tutorials
    • Kid Activities
    • Recipes
    • Travel
    • Cleaning
    • Houseplants
    • Staining
    • Painting
    • Power Tools
    • Holiday Ideas

    Newsletter

    • Sign Up! for emails and updates

    As an Amazon Associate I earn from qualifying purchases.

    Copyright © 2020 Brunch Pro on the Brunch Pro Theme


    Privacy Policy
    Welcome! Thanks for visiting.
    Hi! I'm Stacy and I want to help YOU become a DIY rockstar! Sign up for my email list so each project, tip, and trick will go directly to your inbox :)
    Your information will *never* be shared or sold to a 3rd party. Pinky promise :)
    Welcome!
    Hi! I'm Stacy and I blog about fixing up our 1938 cottage. Join the thousand of others who get my posts sent to their inbox for FREE!
    Your information will *never* be shared or sold to a 3rd party.