• Skip to primary navigation
  • Skip to main content
  • Skip to primary sidebar
  • Skip to footer
Stacy Risenmay
  • Home
  • About me
  • PRESS
  • Contact Me
  • My Book
    • Facebook
    • Instagram
    • Pinterest
    • Twitter
menu icon
go to homepage
subscribe
search icon
Homepage link
  • Home
  • About me
  • Project Gallery
  • Our House
  • PRESS
  • Contact Me
  • Privacy Policy
    • Facebook
    • Instagram
    • Pinterest
    • Twitter
  • ×

    DIY Wood Table Top Easel

    By Stacy 4 Comments

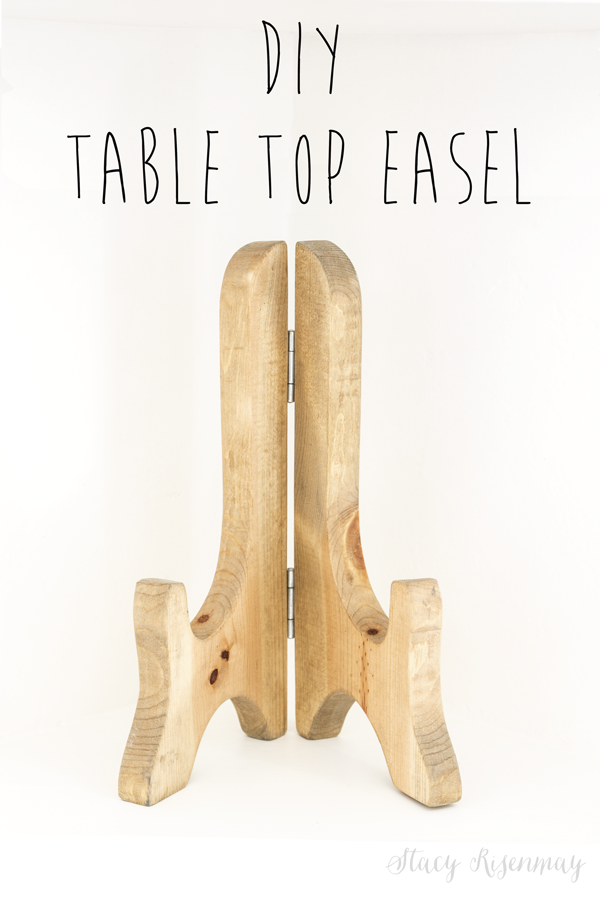
    When I went to find a home for the Nucleus intercom in my kitchen, I wanted to be able to hide the cord and plug. It sat on my counter and the outlet was higher so it still showed. I needed to prop the Nucleus up higher but didn't want it to look awkward. I decided to quickly make a wood easel for it to sit on. After I published that post, I had some questions about where I got the cute easel, so I decided to do a tutorial.

    diy-easel


    DIY Wood Table Top Easel


    Supplies:

    1x6 board

    paper

    pencil

    scissors

    jigsaw

    sandpaper

    stain

    paper towels

    2 small hinges

    screwdriver or drill


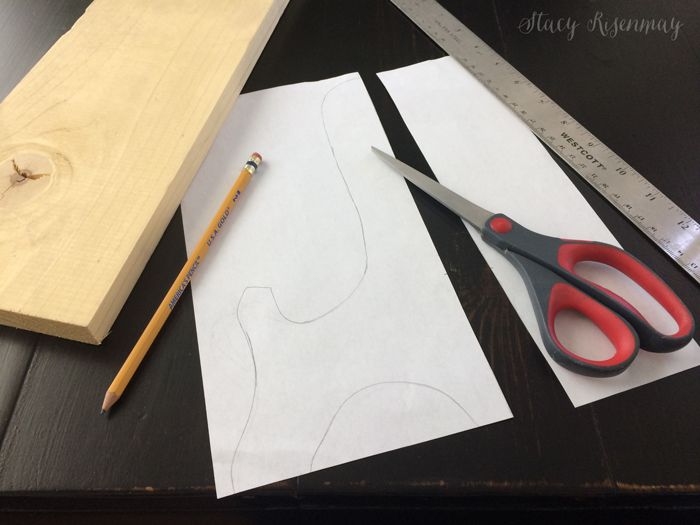
    I grabbed a 1x6 scrap board that I knew would be wide enough. I drew the shape I wanted it to be on the printer paper and then cut it out.


    DIY-wood-easel


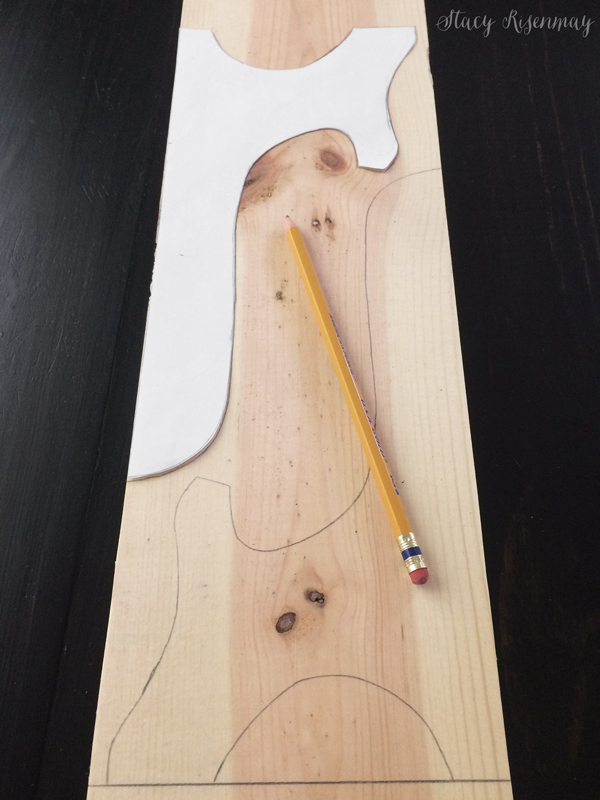
    I traced the shape onto the wood two times and then cut out the shapes using a jig saw.

    Sand them smooth and stain them the color of your choice. I used the same weather looking stain that I used for my office closet.


    DIY-wood-table-easel


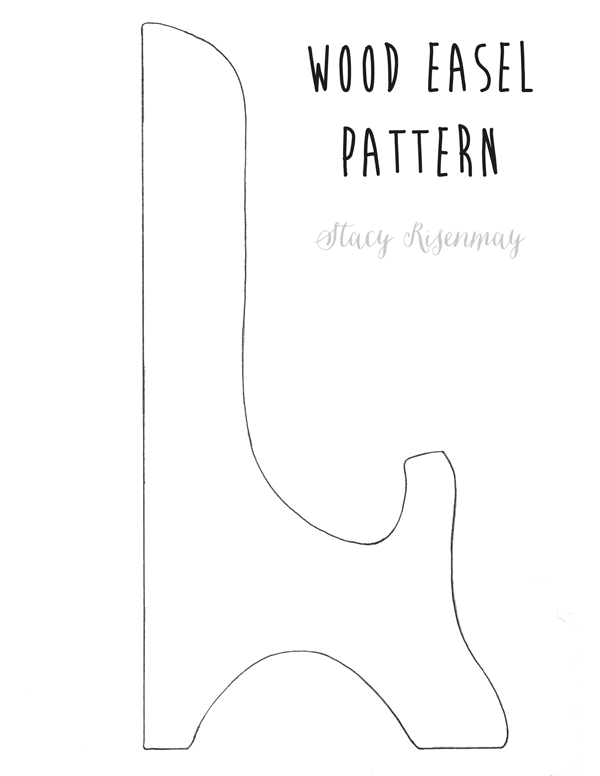
    Here is a printable pattern if you would like to make one like mine. Print it as an 8x10 and it will hold a 5x7 photo frame.


    easel-pattern


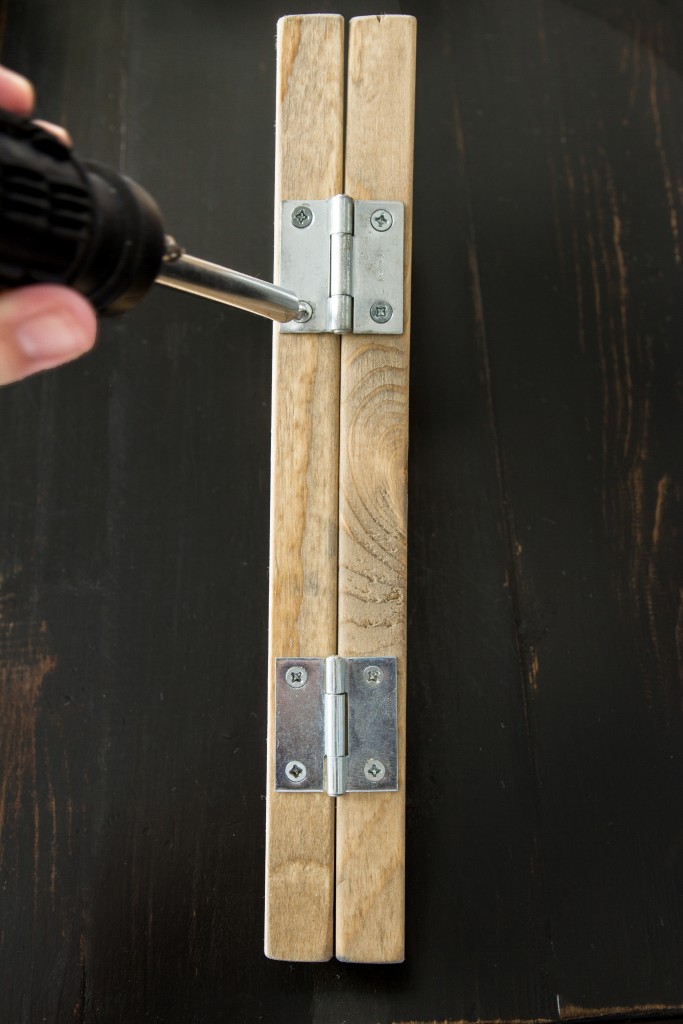
    Once the stain has dried, add two small hinges to the back sides.


    screw the two together


    It really is that easy!


    Pin For Later:


    DIY-Table-Top-Easel


    I think now that I have one for my Nucleus, I am going to make a few more for around the house. Wouldn't it look pretty on a mantel?


    .

    You will also like:

    • Using Paper to Decorate a FrameUsing Paper to Decorate a Frame
    • How to build a simple side tableHow to build a simple side table
    • Crate Planter TutorialCrate Planter Tutorial
    • Easy DIY BenchEasy DIY Bench
    • IKEA Hack Using Reclaimed WoodIKEA Hack Using Reclaimed Wood
    • Reclaimed Wood DeskReclaimed Wood Desk
    • Wood Bead PlanterWood Bead Planter
    • A Bigger Top For Our TableA Bigger Top For Our Table

    « Our Backyard Plans
    Crushing On: Green »

    Filed Under: DIY & Tutorials 4 Comments

    Subscribe

    for your weekly DIY fix.

    Reader Interactions

    Comments

    1. Barb macaskill

      May 24, 2017 at 7:12 am

      Great idea for tablets too! Hoping that I have to make one of these because I win the Nucleus Intercom system! Fingers crossed!????

      Reply
    2. Elizabeth H

      May 24, 2017 at 11:13 am

      I think you could build anything. Thanks for sharing with us. It totally would look great on a mantle with a sweet oil painting.

      Reply
    3. Jeanne

      May 24, 2017 at 1:17 pm

      Simple and gets the job done...wow!

      Reply
    4. Marie

      June 01, 2017 at 6:41 am

      I can't believe how easy this is! What a great way to up your decor game. I know what the grandparents are getting for Christmas now. Thanks for sharing your tutorial with us at Merry Monday this week!

      Reply

    Comment Below! Cancel reply

    Your email address will not be published. Required fields are marked *

    This site uses Akismet to reduce spam. Learn how your comment data is processed.

    Primary Sidebar

    stacyHey! I'm Stacy and am a DIY addict. I love to get my hands dirty, whether it's sawdust, paint, or dirt. My goal is to help YOU learn to fix up your home and yard. No matter the style or size, I think everyone should love their home. And it doesn't takes a big budget to get there. Let's DIY together!

    Subscribe to My Blog!

    Search this site

    categories


    Subscribe

    Footer

    Welcome! I'm sharing our adventures as we fix up our 1938 cottage. Whether it is big or small, I think everyone should love their home and I don't think it takes a lot of money to make a space your own

    About Stacy

    • Facebook
    • Instagram
    • Pinterest
    • Twitter

    My Favorites

    copyright

    All images and content are copyrighted via Stacy Risenmay unless otherwise stated. If you'd like to share my work, please link back to this blog.
    Thank you for visiting!


    Footer

    ↑ back to top

    About

    • Meet Stacy
    • Privacy Policy
    • Contact

    Categories 

    • Home Decor
    • Outdoor Projects & Gardening
    • DIY & Tutorials
    • Kid Activities
    • Recipes
    • Travel
    • Cleaning
    • Houseplants
    • Staining
    • Painting
    • Power Tools
    • Holiday Ideas

    Newsletter

    • Sign Up! for emails and updates

    As an Amazon Associate I earn from qualifying purchases.

    Copyright © 2020 Brunch Pro on the Brunch Pro Theme


    Privacy Policy
    Welcome! Thanks for visiting.
    Hi! I'm Stacy and I want to help YOU become a DIY rockstar! Sign up for my email list so each project, tip, and trick will go directly to your inbox :)
    Your information will *never* be shared or sold to a 3rd party. Pinky promise :)
    Welcome!
    Hi! I'm Stacy and I blog about fixing up our 1938 cottage. Join the thousand of others who get my posts sent to their inbox for FREE!
    Your information will *never* be shared or sold to a 3rd party.