• Skip to primary navigation
  • Skip to main content
  • Skip to primary sidebar
  • Skip to footer
Stacy Risenmay
  • Home
  • About me
  • PRESS
  • Contact Me
  • My Book
    • Facebook
    • Instagram
    • Pinterest
    • Twitter
menu icon
go to homepage
subscribe
search icon
Homepage link
  • Home
  • About me
  • Project Gallery
  • Our House
  • PRESS
  • Contact Me
  • Privacy Policy
    • Facebook
    • Instagram
    • Pinterest
    • Twitter
  • ×

    Refinished Desk Tutorial

    By Stacy 36 Comments

     I love building and refinishing furniture! It all started when I was a newly wed and received a ton of hand-me-down furniture from family and friends. Most people probably would have left it "as is" until they could afford new things. But not me. I wanted them to look nice and match right then ( I don't have a whole lot of patience). So I figured out how to fix them up. I still have almost all of that furniture and some are my favorite pieces even though I have lots of new things too.

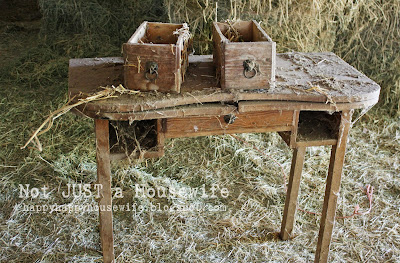
    Today I am going to show you how I refinished an old desk that has been collecting dust in my mom's barn for years! The first picture is the before before.

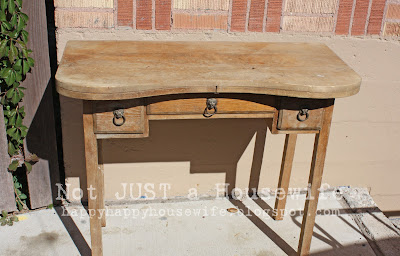
    And here it is all cleaned up. The before picture :)
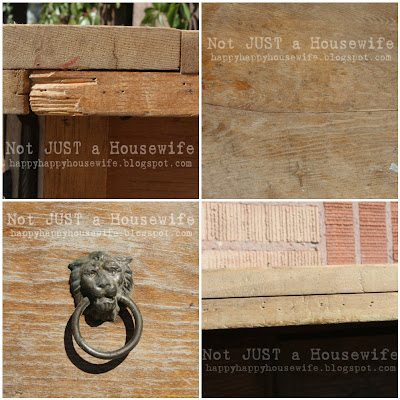
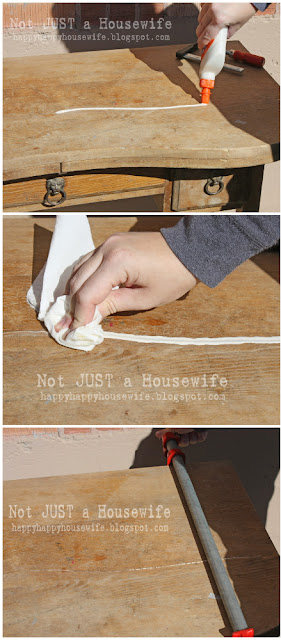
     It needed a lot of TLC. It had a minor crack on the top, thumb tack holes along the front, and chunks missing. It also had a broken leg. I first addressed any repairs that needed to be made. I used Elmers stainable, paintable and sandable wood glue. I put glue along the crack and let it sink in. Then I wiped it off with a damp paper towel.
    Putting the large clamp on caused some of the glue to squeeze out so I wiped it again. I glued and clamped the broken leg too. I used a small C clamp.
    The desk wasn't the best ever made. The drawers were held together with only 2 nails on each side. Needless to say, they weren't very strong. I re-enforced them with my brad nail gun. I looked around the desk and found some other spots to re-enforce as well. Really I just like to find reasons to use it. It is my favorite tool!
     I let the glue dry for a day before I took the clamps off and sanded it. I was lucky because it was pretty much all flat. I did most of the sanding with my hand sander. There were only a few spots I did by hand. You need to remove the old finish so the wood will accept the new stain. If you have something that you want to refinish and it would be hard to sand, you can use gel stain. I have used that several times with very good results. I use Minwax's gel stain. You can apply it over existing finishes. It is thick and sticky. It would be best to practice on something else first to get the hang of it. For an example, see my bathroom HERE.

    It is all naked and ready for a new look! I almost forgot to mention that I used putty to fill in any small cracks or nail holes. Putty, let dry, and then sand. I use Elmers stainable, paintable, sandable wood putty. I used the natural color because it was outside and so was I. I should have used the darker colored putty (it was ALL the way inside ). This putty is stainable, but to a point. That is why they have a darker color. I added more stain to the puttied parts and it worked out fine, but in retrospect I should have got off my big behind and got the darker putty!
    In a situation like this, I use oil based stains. This wood was old and dried out. The oil in the stain helps the wood. Plus it dries slower than waterbased stains and gives you more time to work at getting an even finish. Waterbased stains sink in fast, especially with dry or porous (soft) wood. You can also use a wood conditioner before applying the stain. It is sold in cans just like the stain and is milky white. I always use foam brushes too. There aren't any brush marks and it makes for easy clean up. Just toss them in the garbage!

     I let the stain dry for a day and a half. It needs to be completely dry and not sticky at all.

    Then you can add the polyurethane. I love the smell of polyurethane! I know, I know, in the state of California it is known to cause cancer yadda yadda. . . But I love it. In a well ventilated area of course. It brings the wood to life and protects it. I use Minwax's Fast Drying Clear Satin finsih.
    And drum roll please. . . . . .

    Taaadaaaa! Isn't she a beaut??? All I did for the drawer pulls was scrub them in some soapy water. I love the patina on them. I think this will make a welcome addition to my office.

    You will also like:

    • How To Clean And Sanitize Reclaimed WoodHow To Clean And Sanitize Reclaimed Wood
    • Valentine's Day Decor that Transitions to SpringValentine's Day Decor that Transitions to Spring
    • Crushing On: PurpleCrushing On: Purple
    • What I'm Crushing On: Cobalt BlueWhat I'm Crushing On: Cobalt Blue
    • Easiest Way To Paint WallsEasiest Way To Paint Walls
    • Giant S'More CakeGiant S'More Cake
    • Abstract Plastic BowlAbstract Plastic Bowl
    • How To Build A Wood Serving TrayHow To Build A Wood Serving Tray

    « Making mini bread
    EASY No Sew Pumpkin »

    Filed Under: Furniture, Power Tools, Staining 36 Comments

    Subscribe

    for your weekly DIY fix.

    Reader Interactions

    Comments

    1. Stefanie

      October 24, 2010 at 3:24 pm

      It looks fabulous. Thanks for sharing!

      Reply
    2. Janiece

      October 25, 2010 at 3:23 am

      BEAUTIFUL!

      Reply
    3. xinex

      October 25, 2010 at 5:42 am

      Wow! Amazing!...Christine

      Reply
    4. Between Blue and Yellow

      October 25, 2010 at 2:14 pm

      Sooooo cute! I love what you did with it, probably what it looked like when they first made it.

      Reply
    5. Sami

      October 25, 2010 at 5:39 pm

      Such a pretty desk!

      Reply
    6. Grannie K

      October 26, 2010 at 9:56 pm

      You are amazing. I look forward to seeing more of your ideas. I'm trying the ones I can and saving the ones I can't right now.

      Reply
    7. Christa @ Stories of a House

      October 29, 2010 at 11:55 am

      Oh my gosh, I can't believe it's the same desk! It looks amazing.

      Reply
    8. Sarah @ Cozy.Cottage.Cute.

      October 29, 2010 at 7:18 pm

      I agree. Beautiful! I love the shape of it, too. :)

      Reply
    9. Kim @ Second Time Furniture

      October 30, 2010 at 7:32 am

      The before picture is great! Most people would have walked right past it! Great job!

      Reply
    10. Kathy@DandelionsandDustBunnies

      November 19, 2010 at 7:28 pm

      Amazing redo. Can't believe it was just sitting in a barn. Wow. Great job. Visiting from Craft-o-maniac.

      Reply
    11. Heather

      February 11, 2011 at 6:21 pm

      That is incredibly beautiful. How can I get so lucky to find that in an attic somewhere? LOL.

      Reply
    12. Penny of This-N-That

      February 20, 2011 at 1:49 am

      Beautiful just like the others have said this is such a great job.

      Penny

      Reply
    13. Dale

      March 13, 2011 at 9:41 pm

      Such a cool post. Great project and it looks great after you got it all finished.
      -Dale
      Love your blog
      -Dale
      http://www.savvyspice.blogspot.com

      Reply
    14. Anna

      April 29, 2011 at 11:44 pm

      Hey there, this desk is perfect! I'm new at this DIY furniture stuff and still need a bit of help. I'm learning today, first hand, why everyone paints instead of restaining. :) I'm working on my second restaining project today and if you wouldn't mind, could you please share the color/type of stain you used - I love the finished look of it! Thanks! :)

      Reply
    15. Amber

      April 30, 2011 at 5:51 pm

      Oh my, this is totally beautiful.

      Reply
    16. Katie @ Wildwood Creek

      July 27, 2011 at 9:18 am

      What a beauty! Love the lines, the finish and the hardware. Great job.

      Reply
    17. Karen G @ It's Still Life

      July 27, 2011 at 2:25 pm

      Wow, simply amazing. You saved a wonderful piece.

      Reply
    18. west furniture revival

      July 31, 2011 at 7:51 pm

      LOVE YOUR LITTLE DESK REDO AND ID LOVE TO FEATURE IT ON MY REVIVAL MONDAY. PLEASE LET ME KNOW IF THIS WOULD BE OK WITH YOU.

      Reply
    19. Helena

      August 11, 2011 at 9:53 am

      I have a question about the hand sander. I have begun working on larger projects, such as bookshelves, that require sanding. I have been doing it all by hand *shudders* and really want to get a handsander. But I have joint problems (so you can only imagine how hard it is to sand by hand) and my husband thinks a machine will hurt even worse. Any advice?

      Reply
    20. katie s

      October 01, 2011 at 2:20 pm

      LOVE the table!! I need to find someone with an old barn and lots of old furniture they no longer want :) And then I need to go by a few more power tools :)

      Reply
    21. Titia

      November 03, 2011 at 5:45 pm

      I love this. I have one almost identical. Stripped it down and did the same thing you did. Lived with it for a year and painted it on the weekend. I'm even more in love with it now. :)
      Good job!

      Reply
    22. Latoya @The Scotts Crib

      November 19, 2011 at 8:38 pm

      Your desk looks amazing. It makes me wish I had taken the time to refinish one I found from an antique store. I brought it and the chair for $25.00 and it was solid wood. I got frustrated with the desk after half a year and had my husband curb it. I won't do that again...I'll come to your tutorial for assistance:)

      Reply
    23. The Mountain Treasure Chest

      January 21, 2012 at 8:47 am

      What a wonderful new life you gave this old desk, I love it!

      Reply
    24. Lori

      January 21, 2012 at 8:23 pm

      Would you mind sharing the color of the stain?

      Reply
    25. terry stewart

      July 21, 2012 at 1:26 pm

      Awesome refinishing job...but the purist in me has to mention that, though it works beautifully as a desk, it's design suggests that it was originally meant to be a skirted dressing table. Back in the late 1930s through the1950s, many brothers, husbands, and fathers made these curved-top dressing tables for the ladies in their families. Those two strange oar-shaped pieces you see sitting on top of the desk in the "stained' picture were actually meant to hold two sides of the dressing table skirt. They sit just under the top of the table, and you would swing them out from the center so you could sit at the table and/or access the drawers. So, when you get tired of using it as a desk, you can make a pair of pocketed panels for it, add a glass top to put lace or photos under, and use it as a dressing table!

      Reply
      • Lane

        February 09, 2017 at 7:05 am

        Thank you for the history lesson. Good information.

        Reply
    26. Casey

      June 15, 2013 at 3:18 pm

      Wow! You have really inspired me to do some home projects I've been meaning to tackle. This turned out beautifully!

      Reply
    27. Shannen

      July 17, 2014 at 3:08 pm

      I just stumbled onto this site while looking for instructions on refinishing a desk. Thank you!!! My dad and I are going to turn it into a father/daughter project!

      Reply
    28. Donn Andersen

      April 03, 2015 at 9:26 am

      I just bought an old beautiful oak desk for only $40.00. I am going to refinish it and am scared to death! I have NEVER refinished anything....

      Yours came out beautiful!

      Any advice for a newbie?

      Reply
    29. Flash

      July 22, 2016 at 10:33 am

      looks great.. I really want to refinish furniture but never seem to find the time.

      Reply
    30. Janice Greene

      November 21, 2016 at 12:54 pm

      Hi: I wish I had the wear-with-all to do this to my old desk...but I live in a small condo with no room to do these refinishing things. Plus the fact that I'm old and don't have the patience. The reason I'm writing you is perhaps you know of someone in my area who does what you do and wants a once beautiful mahogany desk to restore. It has been sitting on my porch. I covered it with a plastic tarp. I hate to just drag it down to the dumpster outside my building ( i live on the second floor). My desk is by no means as bad as the one you started with. I live in Las Vegas. Maybe there are some people who read your blog who would be interested. I DON'T TRUST CRAIG'S LIST so I don't want to put an ad there. The desk is over 60 years old. It had been in my mom's house and after she passed away, I moved it to a back bedroom. Unfortunately sitting in bright morning sun. Over the years the draws starting falling apart, but not so bad that they can't be repaired easily. I would love to see this beautiful old desk go to someone who could restore it to its original beauty.

      Reply
    31. Samantha Rogers

      December 12, 2016 at 8:06 pm

      My grandmother recently passed away and I was lucky enough to lay claim to an old wooden desk she got as a wedding present. It does have quite a few cracks, so I appreciated your tip to use wood glue to fill in the holes. I think after it is stained, the glue won't be noticeable at all.

      Reply
    32. Lane

      February 09, 2017 at 7:02 am

      Beautiful! I could tell even in it's original state that it would finish up nicely.

      Reply
    33. John

      September 12, 2017 at 12:13 pm

      Stacy.thanks for sharing your table.
      I have a old writers desk .it has a pull down, not roll up. It is a dark color looks like many coats of varnish shellac or paint.
      I don't know if I should sand it down to th bare wood or use some type of refurbish fluid and rub it down. I think I would like the darker color but black as it nearly appears now,
      Is it any way I can send pictures

      Thanks

      Reply

    Trackbacks

    1. REVIVAL MONDAY FEATURES #23 | Fashion Trendy says:
      June 25, 2012 at 2:37 am

      [...] FINISHES AND CHECK OUT HER WONDERFUL PIECES… #3 DUSTY DESK THIS FEATURE IS FROM STACY @ NOT JUST A HOUSEWIFE HERE IS HER BEFORE… DONT MIND THE HAY AND DUST!!! THIS PIECE WAS STORED AWAY IN A BARN [...]

      Reply
    2. Decanter Blog says:
      June 24, 2016 at 3:29 pm

      The Beautiful Whole Refinished

      [...] about the hand sander. I have begun working on larger projects, such as bookshe [...]

      Reply

    Comment Below! Cancel reply

    Your email address will not be published. Required fields are marked *

    This site uses Akismet to reduce spam. Learn how your comment data is processed.

    Primary Sidebar

    stacyHey! I'm Stacy and am a DIY addict. I love to get my hands dirty, whether it's sawdust, paint, or dirt. My goal is to help YOU learn to fix up your home and yard. No matter the style or size, I think everyone should love their home. And it doesn't takes a big budget to get there. Let's DIY together!

    Subscribe to My Blog!

    Search this site

    categories


    Subscribe

    Footer

    Welcome! I'm sharing our adventures as we fix up our 1938 cottage. Whether it is big or small, I think everyone should love their home and I don't think it takes a lot of money to make a space your own

    About Stacy

    • Facebook
    • Instagram
    • Pinterest
    • Twitter

    My Favorites

    copyright

    All images and content are copyrighted via Stacy Risenmay unless otherwise stated. If you'd like to share my work, please link back to this blog.
    Thank you for visiting!


    Footer

    ↑ back to top

    About

    • Meet Stacy
    • Privacy Policy
    • Contact

    Categories 

    • Home Decor
    • Outdoor Projects & Gardening
    • DIY & Tutorials
    • Kid Activities
    • Recipes
    • Travel
    • Cleaning
    • Houseplants
    • Staining
    • Painting
    • Power Tools
    • Holiday Ideas

    Newsletter

    • Sign Up! for emails and updates

    As an Amazon Associate I earn from qualifying purchases.

    Copyright © 2020 Brunch Pro on the Brunch Pro Theme


    Privacy Policy
    Welcome! Thanks for visiting.
    Hi! I'm Stacy and I want to help YOU become a DIY rockstar! Sign up for my email list so each project, tip, and trick will go directly to your inbox :)
    Your information will *never* be shared or sold to a 3rd party. Pinky promise :)
    Welcome!
    Hi! I'm Stacy and I blog about fixing up our 1938 cottage. Join the thousand of others who get my posts sent to their inbox for FREE!
    Your information will *never* be shared or sold to a 3rd party.