
Having access to fresh herbs all season is amazing. If you have never cooked with fresh herbs, you need to start! There is such a huge difference from store bought dried herbs. I love being able to walk out into my yard and cut fresh herbs anytime I want. It is easy to grow herbs! You can grow them in your vegetable garden, raised beds, flowerbeds, and even in containers. A lot of herbs are perennial too which mean they will come back every year. Growing herbs from seed saves money and is easy to do. Here is your guide on how to grow herbs from seed!

Growing Herbs From Seed
The first thing you need to determine is if the herb is an annual or a perennial. Perennial herbs will need to be started indoors and earlier than you start the annual herbs since they generally take longer to reach maturity. I live in zone 6 and like to start my perennial herbs anywhere from early February to mid March. My annual herbs get started anywhere from mid March to mid April. I like the herbs to be fairly big before transplanting outside. You can sow seeds of annual herbs outside in early spring, you will just have wait a bit longer before being able to harvest off of mature plants. Starting herbs indoors gives you a head start to the growing season.
You can use things like egg cartons and clear plastic salad containers or you can buy seed trays. You can even use individual pots. I start almost everything I grow each year from seed indoors, so having lots of seed cell trays on hand makes sense for me. I have been using the ones I currently have for 5 years now.

Planting Herb Seeds
Fill your containers or trays with a quality seed starting soil. Don't pack it in too firmly. Seed starting mixes are great because they are free of large pieces of bark. Seedling like fluffy soil so their little root can easily grow. It is a good idea to add some water to the soil so it is moist before planting.

Once you have your containers filled with soil, read the planting directions for each type of seed. Generally speaking, the larger the seed, the deeper it will get planted. But it is best to read the instructions on the back of the seed packet. I like to use a toothpick to create holes in the soil for the seeds. If the seed only needs to be lightly covered, I add the seeds to the top of the soil and then add a dusting of soil after.

Watering Herb Seeds
The reason I like to use seed cell trays, is that they come with a bottom tray. It is easy to add water to the bottom tray and then the water is absorbed slowly through the drainage holes. Bottom watering is best for seedlings. If you used another type of container, be very careful when watering from the top so you don't disrupt the seeds and tiny seedlings.
Herb Seed Germination
It is important that the soil doesn't dry out during the germination process. The trays I use also come with a clear plastic cover to keep the humidity high while germinating. Once the seeds germinate, I remove the covers. If you don't have clear plastic covers, you could use plastic wrap, a clear plastic bag, or some other type of plastic covering.
To help the germination process, I place my trays on heat mats. While one could argue that they aren't necessary, I have found they not only sped up the germination process, they also increase my germination rate. Once the seeds have germinated and I have removed the covers, I also remove the heat mat.

Lighting Needs For Herb Seedlings
Let's talk about light. While you can get away with not buying cell trays with covers and heat mats, the one thing I think is a must are grow lights. They are inexpensive and easily found in stores and online. If you try to grow seedling by placing them in a sunny windowsill, chances are, they will get leggy. They will be reaching and reaching to get more light. Especially in the winter when there is less sunlight. Hanging a grow light directly above the seedlings allows them to grow nice and strong without them reaching to find enough light. You will get strong, bushy plants instead of tall spindly ones.
Adjust the grow light so it hangs 3-4 inches above the seedlings. Raise them as the seedlings grow. I like to use S hooks and chain so I can easily adjust them. I have also used zip ties and string. Seedlings like 16 hours of light a day. You can buy power strips that have a built in timer so the lights will turn on and off on their own.

The Importance Of Air Circulation For Herb Seedlings
I like to place a fan in front of the shelves my seedling are on. The fan blowing on them recreates outside conditions and will help strengthen them. When wind blows on the stems, it stimulates a hormone call auxin which strengthens the cells in the stems. Wind also prevents fungus and mold from growing on the soil surface which causes damping off (a fungal disease where the base of the plant rots and dies). So blast that fan for healthy seedlings!
Thinning Your Herb Seedlings
Once your seedlings are about 1 inch, it is time to thin them down to one seedling per cell, or pot. I try to only plant one seed per cell, but sometimes when they are teeny tiny seeds, it is hard to tell how many I dropped in the hole. As hard as it is to do, you will need to remove the extra seedlings. The main seedling you keep, will grow bigger and strong without other around it competing for space, water, and nutrients. I use tiny scissors. Don't pull them out! This will disrupt the roots of the seedling you want to keep.


Fertilizer For Herb Seedlings
Once the seedlings have true leaves and are about 2-3 inches tall, you will need to start fertilizing. Use a water soluble fertilizer that is balanced, meaning the npk (nitrogen, phosphate, potash) numbers are all the same (like a 3-3-3 fertilizer).
Once the plant has outgrown the cells, if it isn't time to plant them outside, I plant them in a larger container. If it is warm enough outside, you can simply plant them there.


Hardening Off Your Herbs Plants
Because your herbs have been growing in a pretty controlled environment, if you planted them outside without getting them use to it, they would more than likely die. Take them outside and put them in light shade for a couple hours a day. Gradually increase the amount of time they are out and how much sun exposure they get. Do this for at least a week and a half to two weeks. It greatly reduces the risk of transplant shock. This is the scariest part for me! I'm always afraid I am going to forget them outside and all my hard work will go down the drain. Set a time on your phone. That has really helped me!

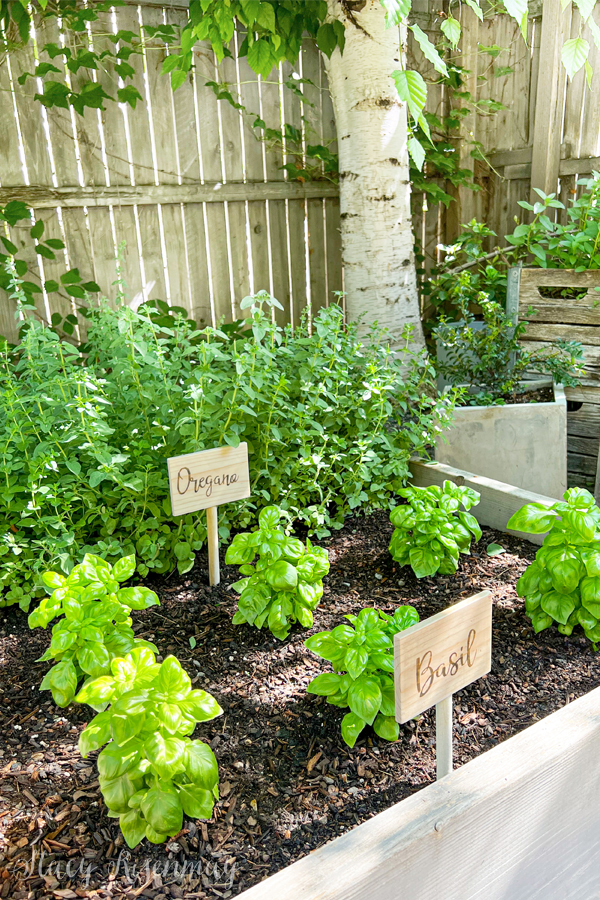
Once the danger of frost is gone in your area, you can finally transplant your herb plants outside! Make sure to plant your herbs in a spot that gets enough sun for that type of herb. Basil likes full sun while some herbs like lemon balm plants do better in partial shade. Figure out which herbs need direct sunlight and which can handle some shade before you plant. They will also need well-drained soil. I have a whole post on growing herbs complete with the difference between annual vs perennial and how to use the herbs in your cooking! You can check it out HERE. By early summer you will be enjoying your fresh herbs!

Whether you have a full blown kitchen garden with garden beds full of culinary herbs, or you grow them in larger containers on your porch, growing different herbs is a great idea. It is the best way to add flavor to meals. There is such a variety of herbs out there, there's bound to be some you enjoy. Aside from their culinary uses, there are many medicinal herbs. Either way, herbs are healthy for you.
If the herb forms flower buds, the leaves will start to loose flavor because all the energy is going to the flower. I like to deadhead the herbs so they stay flavorful. If you allow your herbs to flower, you can collect them and save your own herb seeds to plant next year. I have a whole post on how to collect and save seeds!
The best part of growing your herbs from seeds is being able to garden during the winter. It is so fun to watch for the little seedlings to emerge and to watch them grow daily. I get so excited everytime there is new growth. I hope this guide helped you feel confident in trying to grow herbs from seed. If you have any questions, please don't hesitate to comment below or email me. Happy growing!


This is such a clear guide to the steps of raising herbs!