
My toxic trait is that I always think I can get a project done faster than I really can. Call me optimistic, but I really thought I could get this garden fence done in a week. It turns out it was way more technical than I thought it would be. The perfectionist in me reared its ugly head and slowed things down a bit too. Maybe it is because this project challenged me, but I am so PROUD of how it turned out and it is one of my favorite recent projects. This DIY vegetable garden fence took 3 weeks to complete but was worth every (extra) minute!
This post is sponsored by Wagner but all ideas and opinions are 100% my own.

My Fence Is Hiding A Secret!
Not only is this wood fence pretty, it has a fun secret! Truth be told, I didn't really need a fence for the garden. I don't need to keep animals out and my kids are old enough to be careful when stepping in the garden to get a stray ball. But I WANTED a cute, decorative fence. I wanted a way to define the space like you would with a rug in a room.
The MAIN reason I wanted a fence though, was to hide the sprinklers. The way we water our large garden is with sprinklers on 3 foot long stems. The sprinklers along the front of the garden are just poking out for all to see. They have always bugged me. I came up with an idea and how to execute it and luckily Shane was willing to help me see if it would actually work.

Fence Posts
This fence is made up of 2 different types of wooden posts. We had 8 solid 4x4 posts and 5 "sprinkler hiding" posts.
I didn't want to cement the posts into place for several reasons. In my research I came across a type of fence post where you pound it into the ground and then screw the 4x4 post into the base. We have such heavy clay soil that I knew these would be very secure.

For the sprinkler fence posts, I needed a hollow 4x4. I am sure there are a bunch of ways to go about this, but given the tools we had available, this is what I came up with.
We cut a 2x4 down a bit so instead of being 1.5" thick, it was 1" thick. Using the table saw, we scored lines on the side so it would be easier to chisel out.

We then cut another 2x4 in half lengthwise to create sides. We cut them to be thinner at the top. This way there would be a bigger space for the sprinkler head at the top, and the rest of the post opening would be narrow for the stem. We needed the walls to be thicker at the bottom so we could screw the fence panels into them later.

Once assembled, I coated the bottoms with liquid rubber. This will hopefully slow down the rotting process. It seemed like the best option since we were not using cement. And as an added bonus, it will help these posts match the solid posts that have the black metal base! Win, win.

X Fence Panels
I love anything with an X detail! I have several fences pinned that have this fun pattern. There are multiple ways to create an X for a fence panel but I like the look of one specific way the best. And of course it is the hardest one to execute! Instead of having one board go behind the other, I decided to notch out the boards so they fit inside each other. For the fencing material we went with 2x4s since they are strong and inexpensive.

I hate math so I let Shane take the lead on this part. He figure out the angle for the blade on the table saw and then cut two lines in the center of each 2x4 (cross board). Then I used a cutting tool to finish cutting out the piece. I had tested out a couple other ways but this cutting tool was a great way to get the job done fast. Or at least faster...


I cut the sides, top, and bottom of each panel out of 2x4s. When all the pieces were cut, I sanded each and every one with my sander. I knew that this wooden fence would get touched a lot and probably climbed on and I didn't want anyone getting slivers. It was very time consuming, but worth it.
I screwed them together to create a rectangle box. Then I added the cross pieces in the center to form the X. I had to use a rubber mallet to fit most of the cross pieces together where the notches were. It was a nice snug fit!


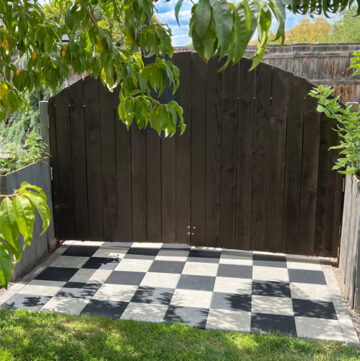
The the Xs got screwed into the frames. They were nice and solid without being too heavy. I made 12 panels total. They were each 76.5 inches long and 31 tall. I wanted a 5 inch gap at the bottom of the fence which made the total height of the fence 36 inches.
Assembling The DIY Vegetable Garden Fence
Once the solid 4x4 posts were set, we dug down 18" and placed the hollow posts in the hole. We unscrewed the short side and placed the sprinkler inside. Our garden sprinklers are on a flex line so it was easy to move them into place. We packed the dirt down around the line and then screwed the short side back on.


With all of the posts now set, the next step was to hang the fence panels! We simply screwed the side of the panel directly into the side of the post. For the hollow pickets, we had to put the first screw farther down to where the wall was thicker. We also used screws that were slightly shorter than the ones we used on the solid posts.

Staining The Fence
Our privacy fences are stained a light gray. I have loved the look of the greenery from the yard against the gray so I chose to also stain this vegetable garden fence the same color. Or so I thought.... When I started spraying the stain I realized it was a lot darker than the stain I had used in the past. One look at the label on the can verified that it was indeed a darker gray. So I quickly grabbed some paper towels and wiped off as much as would come off. I actually really liked the look once I did that so I kept up the routine. Spray, spray, wipe, wipe.

I used my Wagner Flexio 3500 with the detail nozzle. The staining was my absolute favorite part of this whole process! Probably because it was the easiest and fastest part of the project. Can you imagine how long it would have taken to stain this 80 foot fence with a brush?! It got in the little nooks of the Xs so nicely too. I put down a plastic tarp but luckily there isn't a lot of overspray with this sprayer.

It is SO HARD to try and photograph an 80 foot fence! The photos don't really do the whole thing justice, but I am so in love with this fence. It completes my garden area.

And not only are the sprinklers perfectly hidden, they pop up and work beautifully!


This seemingly simple fence gave me a run for my money but will hopefully last years and years. It's not perfect, but I am glad I took the extra time to make sure it was as straight as possible and that everything fit well.

Q&A
Why Don't You Have A Gate?
For now we do not have a garden gate on this fence since it doesn't run the full length of the garden space. We kept both ends open because of the shape and how both ends curve. We can access the garden from both ends and walk around in the garden. If we decide we want a gate opening in the future, all we have to do is take down one panel and convert it into a two little gates.

What If I Need To Keep Animals Out?
This fence would still be super cute with chicken wire, hardware cloth, wire mesh, or some other type of wire fencing attached to the backside with a staple gun. This would allow you to still have the X design and have your garden or garden beds be animal proof. It would keep out even small animals. You could even dig down and have some of the wire fencing buried in the ground to prevent animals from digging.


What other vegetable garden fence ideas do you have? What styles do you like? In your opinion, what would make good fences? Are you team white picket fence? Or would you rather a wire fence? I'd love to hear what you think in the comments below :)


What you created was ingenious! I just have four metal things that edge at the corners of our raised beds. When I need to keep critters out, we wrap chicken wire around the posts.
If I had my way, I'd white picket fence the whole 5 raised beds and have and arched gate to get in. But hubby says he wouldn't be able to mow such a tight area. I think it's just an excuse. But then again, he's the one with a green thumb, so I will be happy with chicken wire and all the food we harvest! ;-)
The most important thing is the harvest! So as long as your garden is thriving, that is amazing :)
Wow, it is beautiful and such a smart design! I don’t usually comment and I have no need for anything like it but I had to say how impressive it is ♥️.
Thank you! I appreciate you taking the time to comment. It made my day!
Hey Stacy I love this fence! We will be using your fence as inspo four ours. Can you share the angle you cut the 2x4s for the x? Thank you!
22.5 was the angle for the ends of the 2x4s that got connected to the corners of the frame.