• Skip to primary navigation
  • Skip to main content
  • Skip to primary sidebar
  • Skip to footer
Stacy Risenmay
  • Home
  • About me
  • PRESS
  • Contact Me
  • My Book
    • Facebook
    • Instagram
    • Pinterest
    • Twitter
menu icon
go to homepage
subscribe
search icon
Homepage link
  • Home
  • About me
  • Project Gallery
  • Our House
  • PRESS
  • Contact Me
  • Privacy Policy
    • Facebook
    • Instagram
    • Pinterest
    • Twitter
  • ×

    DIY Bench {Knock off Challenge}

    By Stacy 17 Comments

    Hello! I have not been as active blogging this month as I was hoping. I had a huge list of posts to work on and projects but two birthdays, school concerts, and sickness took over. But I did get one fun project crossed off my to-do list thanks to a knock off challenge hosted by my talented friend Katie from Addicted 2 DIY. I built a DIY modern bench. These were my inspiration.

    I found the ottoman first (a mere $350) and was going to make a knock off of it but I really had my heart set on making a bench so I found one very similar.


    mid century modern bench and ottoman


    I am not very experienced in the whole "knock off project" thing. I have only ever done one (the Pottery Barn Star) and I made it exactly like the inspiration image. This time, I wanted to use a different fabric other than gray and I wanted the wood base to be a bit thicker. So I hope that even though I made a few small changes, that this is still considered a knock off :)


    black and white bench under coat rack

    Supplies

    *Some links are affiliate

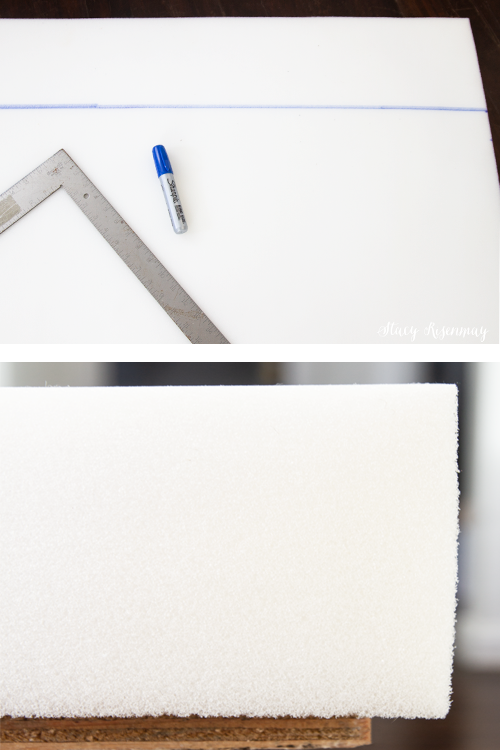
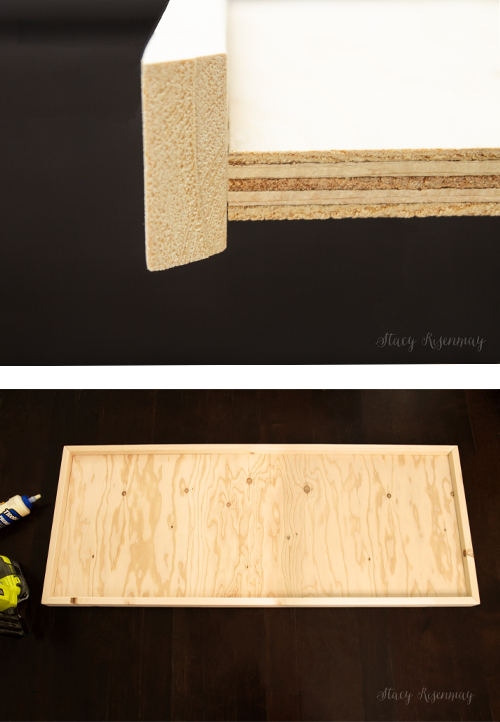
    (2) pieces of ¾" plywood cut   17" x 44" or your own desired size

    High density foam cut to 18" x 45"

    1x3 boards

    (4) Tapered wood legs

    (4) Leg plates

    Fabric of choice


    supplies for diy bench


    How to make a DIY Modern Bench

    Step 1

    I used a kitchen knife to cut the foam. I cut it slightly bigger than the board so it would overhang slightly on all sides. I did that so that the fabric would be snug and not loose.


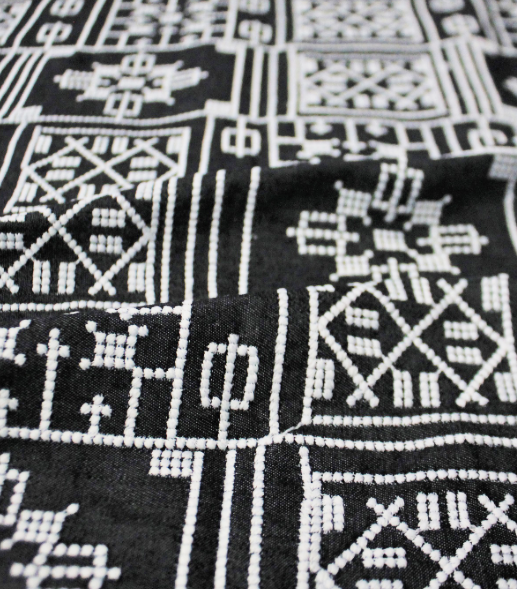
    I bought this fun black and white geometric fabric from Joann's. I got it for 70% off!


    Step 2

    I don't have any photos of me sewing the cover because well, I hate sewing and it stresses me out. I didn't even think about photos. I was just trying to survive. I cut a piece for the top, pieces for the side, and pieces for the ends. I sewed them all together sort of creating a fabric "box" than would easily slip over the foam. The key to having everything lay fat and look nice is to iron the seams flat.


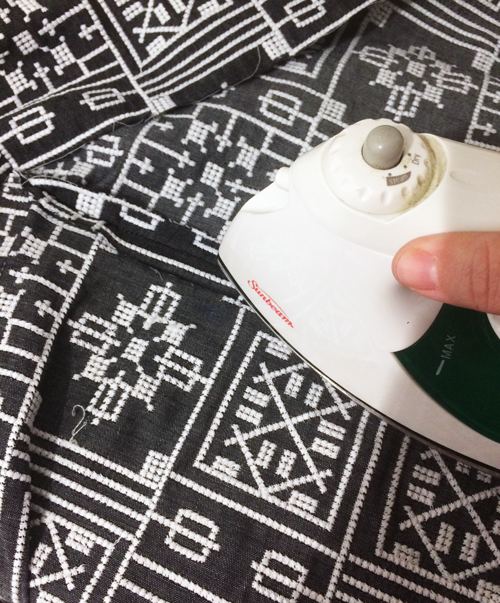
    You can see how by sewing it you get clean lines versus just folding and tucking the fabric. It was worth sewing, even though I don't like it ;)


    upclose of corner of bench


    Step 3

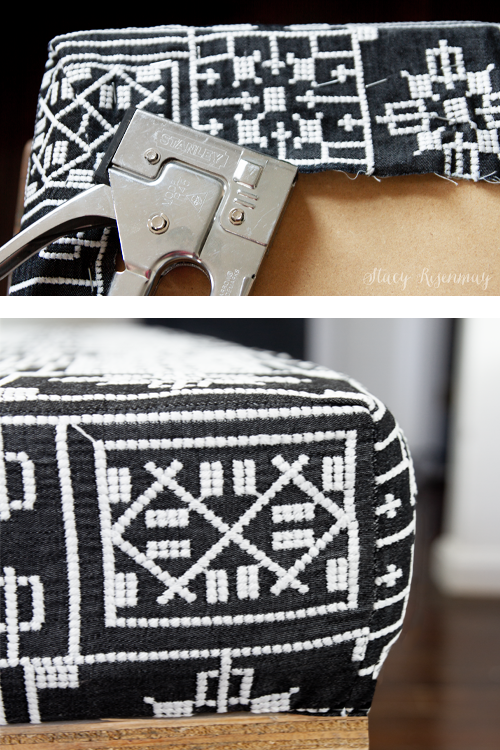
    I actually used MDF for the bottom of my foam since that is what I had on hand. MDF or plywood would both work. I gently pulled the fabric around the edge and stapled it to the bottom.

    You can see in the bottom photo that the foam part is bigger than the MDF and the plywood for the base. This is perfect because you will add the 1x3 boards as trim on the plywood base.


    Step 4

    I decided that the 1x3 boards were a bit too thick so we rip cut them down to 2". When I glued and nailed them to the side of the plywood, I made it so it hung down a bit so it would hide the leg plates.

    After the trim was added , it looked like a really big serving tray.


    Step 5

    I stained the legs and base a nice medium brown. My trick to make sure the color is not too orange is to add a coat of gray stain first followed by a brown stain like Provincial, Early American, or Walnut.

    Once the stain was dry I added a few coats of poly, making sure to sand in between coats.
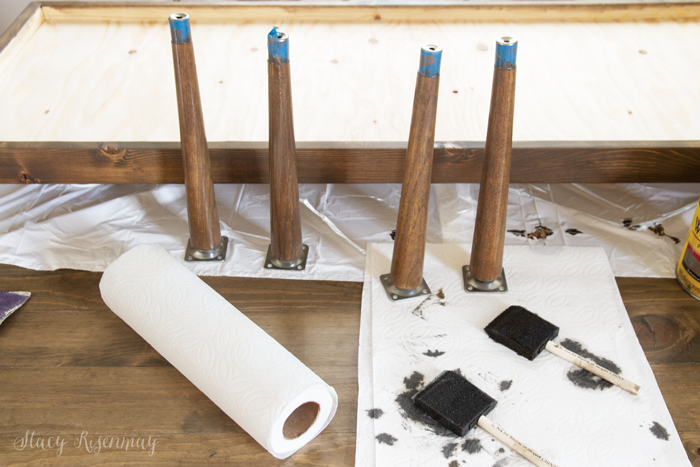
     

    Step 6

    Wne  the poly was dry, I flipped over the base and screwed on the leg plates and then screwed in the legs to the plates. I flipped it back over and inserted the cushion.


    I couldn't be happier with the results! I can't decide if it will go in the living room, the office, or my son's room.


    black and white bench under coat rack


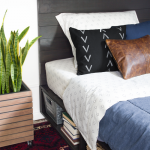
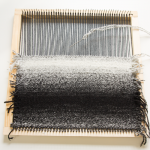
    The living room is hard to shoot in the morning will all the sun coming in the front window. I kind of  like it with the leather pillow and the pillow I weaved.


    bench by window


    But I think it makes the most sense to have this DIY modern bench in the office under the coat rack. The shoes are stored in crates to the left and the kids can have a place to sit to take off and put on their shoes. Plus the black and white striped floors go well with the geometric design in the fabric.


    bench by coat rack


    Have you ever recreated something you saw that was too pricey? I'd love to hear about your knock off projects in the comment below and if it was a success!


    Here are the other people participating in this knock of challenge. Stop by and see their projects!


    Addicted 2 DIY

    RemodelaCasa

    Woodshop Diaries

    The Inspired Workshop

    The Awesome Orange

    DIY Huntress

    Reality Daydream

    You will also like:

    • Dining Room Table Makeover {Refinishing A Wood Veneer Table}Dining Room Table Makeover {Refinishing A Wood Veneer Table}
    • Easy To Build Toy Box CrateEasy To Build Toy Box Crate
    • DIY Floating Bathroom ShelvesDIY Floating Bathroom Shelves
    • Top Projects of 2018Top Projects of 2018
    • DIY Modern Beds {Teen & Tween Room}DIY Modern Beds {Teen & Tween Room}
    • Easy DIY Terrarium LampEasy DIY Terrarium Lamp
    • DIY Woven Pillow, Watercoloring, and FREE Classes!DIY Woven Pillow, Watercoloring, and FREE Classes!
    • Dated Oak Dresser Gets A Makeover! {Giveaway}Dated Oak Dresser Gets A Makeover! {Giveaway}

    « Tips for Painting Kitchen Cabinets
    Meet The Blogger {Sincerely Sara D} »

    Filed Under: DIY & Tutorials, Furniture, Home Decor, Power Tools, Staining 17 Comments

    Subscribe

    for your weekly DIY fix.

    Reader Interactions

    Comments

    1. cmt

      February 25, 2019 at 1:24 pm

      Love it. Thanks for the how to.

      Reply
      • Stacy

        February 25, 2019 at 2:12 pm

        Thank you!

        Reply
    2. Cara Troell

      February 25, 2019 at 2:55 pm

      This is beautiful Stacy!! I love the modern look... and that fabric gives me all the heart eyes!

      Reply
    3. Katie

      February 25, 2019 at 3:26 pm

      It turned out soooo pretty, Stacy! I love that fabric you chose! And you're right. As much as I hate sewing, you just can't beat the clean lines that you get.

      Reply
      • Stacy

        February 26, 2019 at 12:30 pm

        Thank you! Yep, sewing is the way to go for clean lines!

        Reply
    4. Danita

      February 25, 2019 at 4:12 pm

      Can't believe how easy you made that look! I love how your sewing turned out, the seems are spot on! You can sure rock that sewing machine when you need to! :-)

      Reply
      • Stacy

        February 25, 2019 at 4:42 pm

        That's a big compliment coming from you! Thanks!

        Reply
    5. Cristina

      February 25, 2019 at 7:40 pm

      Oh, I just love this entire area! The bench's sleek look is awesome and that so it's that fabric you picked for it!

      Reply
    6. Dorothy

      March 15, 2019 at 3:50 pm

      Love the bench but am intrigued by the collage above it. Did you create it?

      Reply
    7. Lily ardor

      April 15, 2019 at 10:49 pm

      WOW! This turned out amazing!! I love it! Your photos amazing too. ???

      Reply
    8. Amber

      June 26, 2019 at 7:14 am

      Beautiful bench! How much fabric did you use??

      Reply
    9. Michelle

      February 08, 2020 at 4:48 pm

      How much did this cost you, all total?

      Reply
    10. Karis

      February 28, 2020 at 9:30 am

      How many yards of fabric did you need?

      Reply
      • Stacy

        March 04, 2020 at 6:24 pm

        I used 2 and a half yards

        Reply
    11. Pamela

      September 15, 2020 at 7:55 am

      This is so gorgeous. I love the look.

      Reply
    12. Creatively Beth

      September 16, 2020 at 2:35 pm

      Awesome project, you nailed it and that fabric is EVERYTHING!!
      Have a great week!
      Creatively, Beth

      Reply
    13. Sarah @ The DIY Mommy

      September 24, 2020 at 9:04 pm

      Stunning bench! Love the fabric, it really makes it something special. Great work!

      Reply

    Comment Below! Cancel reply

    Your email address will not be published. Required fields are marked *

    This site uses Akismet to reduce spam. Learn how your comment data is processed.

    Primary Sidebar

    stacyHey! I'm Stacy and am a DIY addict. I love to get my hands dirty, whether it's sawdust, paint, or dirt. My goal is to help YOU learn to fix up your home and yard. No matter the style or size, I think everyone should love their home. And it doesn't takes a big budget to get there. Let's DIY together!

    Subscribe to My Blog!

    Search this site

    categories


    Subscribe

    Footer

    Welcome! I'm sharing our adventures as we fix up our 1938 cottage. Whether it is big or small, I think everyone should love their home and I don't think it takes a lot of money to make a space your own

    About Stacy

    • Facebook
    • Instagram
    • Pinterest
    • Twitter

    My Favorites

    copyright

    All images and content are copyrighted via Stacy Risenmay unless otherwise stated. If you'd like to share my work, please link back to this blog.
    Thank you for visiting!


    Footer

    ↑ back to top

    About

    • Meet Stacy
    • Privacy Policy
    • Contact

    Categories 

    • Home Decor
    • Outdoor Projects & Gardening
    • DIY & Tutorials
    • Kid Activities
    • Recipes
    • Travel
    • Cleaning
    • Houseplants
    • Staining
    • Painting
    • Power Tools
    • Holiday Ideas

    Newsletter

    • Sign Up! for emails and updates

    As an Amazon Associate I earn from qualifying purchases.

    Copyright © 2020 Brunch Pro on the Brunch Pro Theme


    Privacy Policy
    Welcome! Thanks for visiting.
    Hi! I'm Stacy and I want to help YOU become a DIY rockstar! Sign up for my email list so each project, tip, and trick will go directly to your inbox :)
    Your information will *never* be shared or sold to a 3rd party. Pinky promise :)
    Welcome!
    Hi! I'm Stacy and I blog about fixing up our 1938 cottage. Join the thousand of others who get my posts sent to their inbox for FREE!
    Your information will *never* be shared or sold to a 3rd party.