
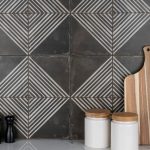
I think out of everything in my office the two things that have made the biggest difference as far as how my office ( and home) function are the shelves and this bench. We had a shoe storage problem. We have tried the basket approach, but that has major flaws. I was constantly digging through the whole thing to find my shoe's mate, they got scratched up and dirty, and I never had a great place to put the basket. It always seemed like we were tripping over it, too. We had tried drawers, closets, and the things that hang on the back of the door with pockets. I have never been happy with those options. We are a "take your shoes off when you come in" kind of family. Plus our bedrooms are downstairs so hauling them to our closets was a pain. So far this bench has been amazing. The office door is directly across from the door that we use to go in and out of the house. The boys come home, take off their shoes, and go put them away. We have not had any lost shoes! I have not tripped over any shoes either. It is a small miracle.

 Because of the depth of the bench it can hold two rows deep of most shoes. I counted and it can hold almost 30 pairs of our families shoes!

I hope this tutorial makes sense. I do not use drawn up plans when I build furniture. I picture it in my head how I want it and then sketch it out on paper. I just make it up. I am very visual and love seeing actual pictures of the steps. I know I should probably learn to use sketch up or something, but this works for me and I hope you will understand, too :)
I bought all the lumber for this project at Home Depot. I think I made a few dozen trips there while doing my office :)
I was trying to do this as cheap as possible with out sacrificing quality. The top and sides are pine boards and the shelf, back, and bottom are sanded plywood. The trim is also pine. Be very picky when buying lumber. Spend the extra time looking through all the pieces and make sure they are flat, smooth, and not at all warped. The shape of your wood can make or break a project.
I used a jigsaw, a miter saw, a level, a brad nail gun (air compressor) and a little wood glue to build my furniture.
 Lets talk structure. This picture is of the bench standing up on its side. I hope the labels of " top" and " bottom" help. If I would have put the side piece over top of the top and bottom it would have been seamless when looking at it from the side. The side piece would have covered up the top and bottom piece, but structurally it would have been weak. By sandwiching it in between the top and bottom it is stronger. When you sit on it, the side piece is held in there. If I had nailed it the other way there would have been nothing under the top piece to hold the weight.
![]() I am sure you noticed the 1" by 1" pieces in the corners. They add strength as well and help make sure the corners are square. I nailed the side piece to the top of the bench first then nailed the 1x1 in the corners before adding the bottom board on.
I am sure you noticed the 1" by 1" pieces in the corners. They add strength as well and help make sure the corners are square. I nailed the side piece to the top of the bench first then nailed the 1x1 in the corners before adding the bottom board on.
 To add a shelf, you need something for it to rest on, something to support the weight. I used 1x2. I measured where the halfway point was and drew a line. I nailed the 1x2 with the top of the 1x2 on the line. My "half way line" is actually one inch lower than halfway. I did that because the shelf itself is one inch thick. When you lay the shelf on the 1x2 supports, then the top of the shelf will be at the true halfway point.
 Here is the basic "shell" of the bench

So the basic shell is not all that attractive. Here comes the trim! I used 1x2. Again, look for the best wood. You can buy rough cut (not sanded down) or the nice and perfectly smooth 1x2. It is worth the extra $ to get the nicer 1x2.
So I have now added 1x2 to the front of the bench to hide all the seams and the 1x1 in the corners. Now for the sides.....
 I didn't want to use 1x2 here because it would have stuck out too far and created a deep ledge. So I bought what is called lattice trim. It is about ⅛ of an inch by 1 ½ inches. I framed out the sides to hide all the seams. It gives it such a finished look!

For added support I put two pieces of wood down the center of the inside of the bench. I could have done one piece down the center and then 2 shelves on either side of it, but this worked as well. I decided to do it this way based on the board sizes I had on hand.
 This is a blurry picture, but what I wanted to show here was a little trick I learned. When you need to nail along the top or side of something, instead of guessing where to nail and hope that you don't have a few strays that go through in the wrong spot, draw a line.
 The center pieces got covered with 1x2 as well. The 1x2 that got nailed to the center piece is what the hinges got screwed to for the doors.
I added the back to finish of the actual bench and then moved on to the doors. I apologize for not having any pictures. It was at this point that I had a "my kitchen has been covered in saw dust for weeks and I need to just get this done" melt down. I was in gitter done mode and not tutorial mode.
But they were easy. I waited until the shell was made before I even took measurements. I figured out how big they had to be and cut them. I wanted to use the same hinges as my kitchen cabinets and for that I needed a circle cut out of the inside. I do not have a drill press which would have been ideal so I used a bore bit. The down side was that the pointed part went all the way through the board. I was okay with this because I knew I would be adding trim that would hide it. Using Spade Drill Bit (affiliate), drill down just deep enough for the hinge to set down in. Don't drill all the way through.

I added the same lattice trim to the doors as I did to the sides in the same framed-out way.
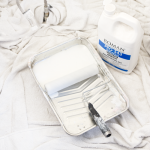
After building something I always use sandable, paintable, stainable putty to fill in the nail holes or any small gaps. I wait for it to dry and then sand the whole thing smooth. Then wipe it with a damp rag to get the dust off before staining or painting. I wanted the bench to have a dark espresso finish like I did on my desk so I used Minwax Gel Stain in WALNUT.
I do not brush it on and them wipe it off like it suggests on the can. I brush a thin coat on with a FOAM BRUSH and let it dry the required time and then brush on another layer. This bench has 3 coats of stain. Then I sealed it with Minwax Wipe-On Poly. I LOVE that stuff. It is so easy to apply and it doesn't smell nearly as strong as regular polyurethane. It also dries incredibly fast. I used the satin finish.
*Please feel free to email if you have any questions. It always seems I leave out something in a tutorial. I blame the late hours :)


thats amazing that you did that!!!! im in love with it- now's my turn to attempt building one of my own
Holy moly that is impressive! Someday I hope to have the right tools and be able to make something like this.
This is such an awesome project! I've never done anything with wood work, but this would be a worthwhile project to get started on. We've got way too many shoes and no good way of storing them. Thank you for sharing the tutorial!
Wow you did a really great job! It's so chic! I wish I had the time/resources to do somethingl ike this!!!
Ok, can I be you when I grow up? I love this!!
kisses
heather
Looks great. I wish I had room near my entry for something like that. Thanks for the tips on how you achieved your finish. I want that color for a table I'm working on, so now I don't have to ponder the choices. :)
You are AMAZING! Truly! So...how much would it cost to have you make one for me? ;)
I am not a power tool girl.... but I would LOVE to be! Here are a couple of my questions.
What does the bottom look like? Are there feet or does it sit directly on the ground?
Also, how much would you say this cost overall, for the materials etc? Thanks!
Stac, this is such an amazing project! I love how you covered all of the seams up with the trim, it looks SUPER expesive. You are my hero.
love your guts
mandi
what an AWESOME idea for shoes!!! would it be possible to build in a silent ventilation fan lol? stinky shoes are the WORST :)
You are too too much! That came out great.
Hi Stacy, I am amazed with your creativity. I would love to know or have a list of items required for this project, like the size and no. of plywood, etc. This piece would be great for my entryway. Great job. I will be checking your blog often.
I love this! I'll have to ask my brother in law to make this for me!
I'd love for you to link up and share:
http://tutusandteaparties.blogspot.com/2011/11/pinteresting-linky-party-week-fifteen.html
You are so beautiful. Thanks for being real.
Great job, Stacy! I didn't even know I needed or wanted one of these til I read your tutorial. Now - I'm figuring out where I want one and how it could best be used.......
You're such an amazing inspiration!!
Hugs ~~ Suz
absolutely gorgeous and so useful too! we have a shoe problem as well. i get itching to build something whenever I see one of your projects! :)
This is fantastically awesome Stacy!! Wish I could just come over to your house and watch you make stuff. You are amazing girl!
What you've done with this is amazing - and so useful! I've been in that shoe situation! I will keep this in mind for when our living situation changes and we'll need a shoe solution. Thanks so much for sharing.
This is great! Thanks for sharing. I am your newest follower.
Love this bench!! Just pinned it to my pintrest boards. But the main reason I'm hear is because I just wanted to personally thank you for your guest post on Sumo's Sweet Stuff. (which I also pinned) That is probably the COOLEST tradition I have ever heard of!! I'm not that great with clay so I'm not really sure how to make a fireplace. Maybe wood?? Real rocks? oh, this is going to be so fun. Thank you so much for this wonderful idea.
Gorgeous! If only power tools didn't frighten me so!
DO you have the measurements? Id like to try this one on for myself. try I say...lol
Was wondering if you could give measurements? What did you use the jigsaw for? What was your final cost in this? Thanks and hopefully I can give this an attempt :)
Hey Stacey, I too would love the measurements. Am thinking of doing some like a storage sofa bench for a tiny house I'm building, and I love a design where I can store shoes! : ) Thanks!
Could you please provide the dimensions for this bench?
Hi,
It's a fabulous work.You took great interest in minutest details and provide tailor made in depths to replicate it. Simply superb Thanks.
I absolutely love this DIY! I cannot wait to try this myself. Could you please send me the plans/measurements/cuts? Mahalo!
I'm impressed. I have been looking for a bench seat tutorial that was simple and effective.and I am so glad I found your site. Did you also mke the doors. You didn't really say much about that step. I am going to make one with a back rest. Thank you.
Hi
I'm impressed looking forward to try this very soon...
Many Thx
It might be used like a multi-purpose appliance that can blend numerous
foods. If you want to create an egg omelet,
you can simply crack the eggs inside a bowl, mix it
by using a hand blender before cooking. If the product
carries a cord, as the Hamilton Beach handheld blender does, you have to consider if the cord is going to be long enough
to your use.
Love the bench. I also love your wall color too! What is it?
Thanks for sharing!
I love what you made. I'm trying to figure out how you put on the doors???
Looks amazing. I want to make one to use for seating too. But I think it will need some wood support inside. Trying to figure that out.
Dear Stacy,
Could you share how you made the doors? Thanks!
I LOVE THIS! And my husband and I enjoy building things together, so I think we'll do this. Do you know, roughly, how much it cost to make this?
I am amazed with your creativity. I would love to know or have a list of items required for this project, like the size and no. of plywood, etc.
Love it! Around how much did this project cost to do?
This project was done at the beginning of my blogging experience and I didn't keep track of the exact cost. I can't estimate it now since Home Depot no longer carries the laminated pine. If I were to build this today, I would use a good quality plywood and then use edging tape.
I'm sorry I couldn't be more help.